


This is a guide to allow ping in windows firewall. But first, a few things to know.
By design, ICMP Echo Requests otherwise known as Pings are blocked by the Windows Firewall with Advanced Security. This article will be demonstrating how to use the Windows Firewall with Advanced Security UI or the Command Prompt to allow ICMP Echo requests via your Windows Firewall.
Network managers often regard the Internet Control Message Protocol to be a security issue, and as a result, believe that ICMP should always be disabled at the firewall as a precaution.
This may be the right way to go, but even while ICMP is widely acknowledged to have significant security vulnerabilities, there’s no need to restrict every single ICMP traffic!
Apart from Type 3 and Type 4 ICMP traffic, which are the only types you do not have to block on Windows 10/11 firewall, every other traffic is optional or must be restricted. Note that you must allow type 0 IN and type 8 OUT to make ping requests.
How to Allow Ping in Windows Firewall With Advanced Security
Before going into this, you must note that the easier way to allow ping in Windows is using the command prompt. I will discuss this later in the article, but you can skip this method if all you need is the fastest fix.
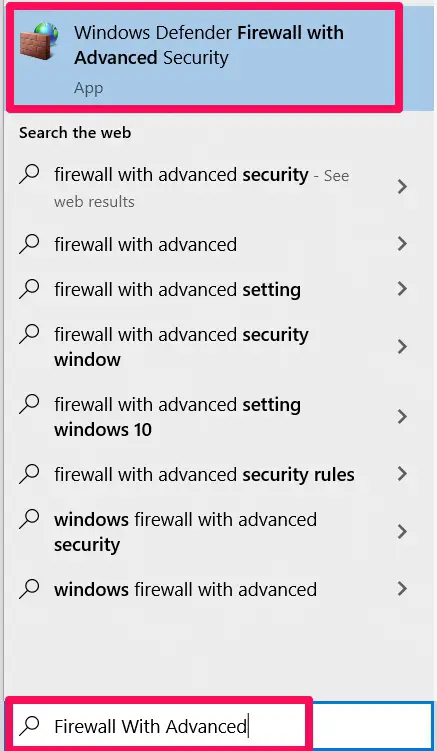
To allow ping in Windows firewall with advanced security, go to Start and type in “Firewall With Advanced”, then select the option for Windows Defender Firewall with Advanced Security.
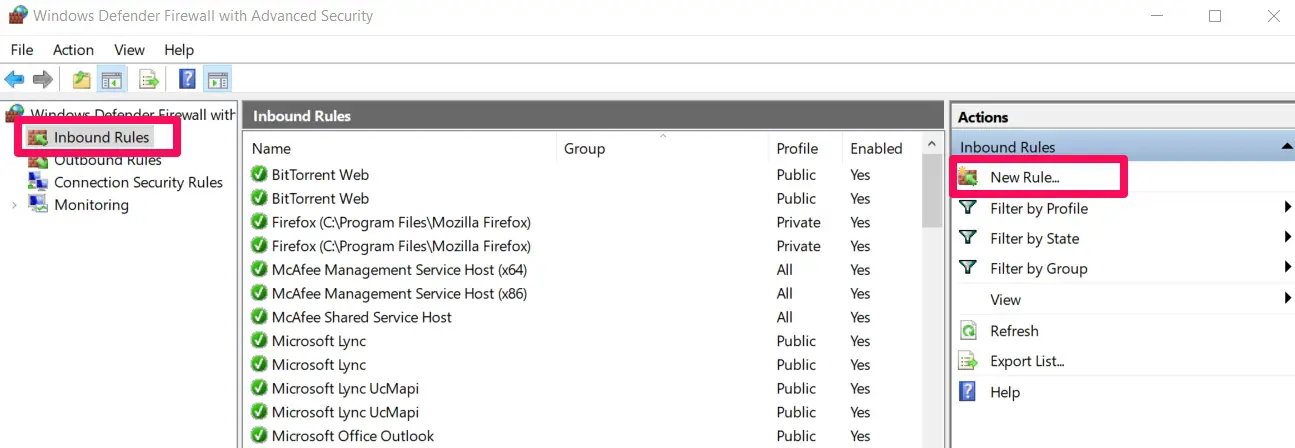
Here you will have to create two new rules. The first will be to allow ICMPv4 requests and the second will be to allow ICMPv6 requests. To do this, click on “Inbound Rules” in the left pane, then select “New Rule” from the right pane.
From the “New Inbound Rule Wizard” that appears, select the “Custom” option and click “Next.”
![How To Allow Ping in Windows Firewall [Step-By-Step]](https://technicalustad.com/wp-content/uploads/2022/02/custom.jpg)
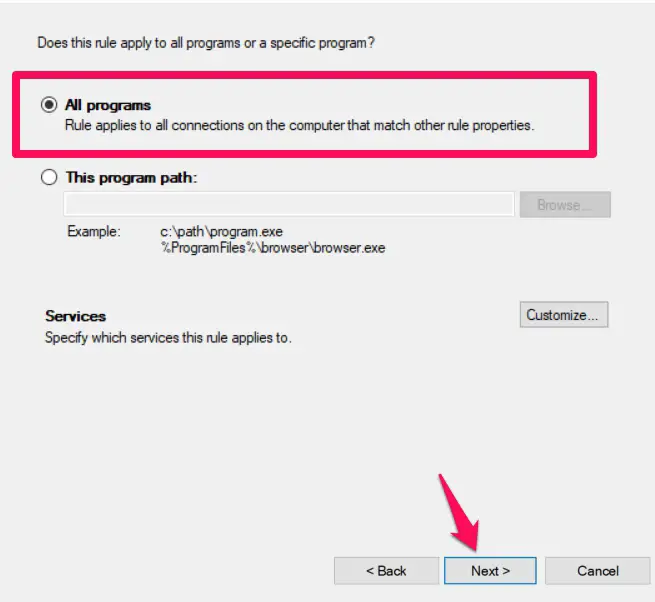
From the next page, ensure that the “All programs” option is selected, then click on “Next.”
On the protocol and ports page, select the “ICMPv4” option from the “Protocol type” dropdown list, then select the option to “customize”.
![How To Allow Ping in Windows Firewall [Step-By-Step]](https://technicalustad.com/wp-content/uploads/2022/03/customize.jpg)
This pops up the “Customize ICMP Settings” window, where you should select from the list of “Specific ICMP types”. Here, check “Echo Request” and click the “OK” button. This will return you to the “New Inbound Rule Wizard” interface. Click “Next.”
![How To Allow Ping in Windows Firewall [Step-By-Step]](https://technicalustad.com/wp-content/uploads/2022/03/ok.jpg)
I will recommend that on the next page you select the option for “Any IP address” for remote and local IP addresses. This is the easier way to go about it.
At this stage, it is possible to use the customize button to customize the specific IP addresses you want your computer to ping. If you select this option, you should note that other ping requests will be rejected.
There is also the option of configuring separate ping lists for remote and local IPs. Once you are done setting this up, click next.
![How To Allow Ping in Windows Firewall [Step-By-Step]](https://technicalustad.com/wp-content/uploads/2022/03/ping-next.jpg)
On this page, make sure the option for “Allow the connection” is enabled, then click “Next.”
![How To Allow Ping in Windows Firewall [Step-By-Step]](https://technicalustad.com/wp-content/uploads/2022/03/allow.jpg)
On this next page, you will have some flexibility with configurations for when the rule is active. My tip will be to leave all default options and click “Next” if you need rules to apply regardless of the network.
However in cases where your computer doesn’t connect to a domain or is not part of a business, or if you prefer not to respond to any ping request when on a public network, you can disable these options and click next.
![How To Allow Ping in Windows Firewall [Step-By-Step]](https://technicalustad.com/wp-content/uploads/2022/03/domian.jpg)
At this point, your rule must be named and given an optional description. My tip is to include “ICMPv4” in the naming because you would have a different rule for “ICMPv6” requests, and it will be nice to differentiate the two. Once you are done naming, click the finish button.
![How To Allow Ping in Windows Firewall [Step-By-Step]](https://technicalustad.com/wp-content/uploads/2022/03/ICMPv4-rule.jpg)
Sadly it is not yet over. It is the best practice to create a second rule for ICMPv6 requests. This may not be the most used rule, but it is better to have it and not need it than to need it and not have it. Especially since some networking applications use IPV6 pings by default.
Here is the good news – The process is almost the same as with the ICMPv4 rule. The only difference will be when you are at the ports and protocols page, select the “ICMPv6” option rather than ICMPv4.
And also make sure on the naming page you use a name containing ICMPv6 just to differentiate it from the first rule created.
![How To Allow Ping in Windows Firewall [Step-By-Step]](https://technicalustad.com/wp-content/uploads/2022/03/v6.jpg)
Now you have your two rules set up, close the Windows firewall app. At this point, your PC should immediately be able to respond to pings.
In case you need to disable this process, you may have to return to delete the two rules just created, or rather you right-click on the rules and select “disable.” The second option makes it easier to re-enable them when needed quicker without a need to recreate them.
How to Allow Ping Requests in Command Prompt
You can skip the first process if you are looking for the quickest way to create ping request exceptions. For this, all you need is to open your command prompt with administrative privileges.
To enable requests for pings, just like we did in the previous step, you will need to create two exceptions allowing traffic via the firewall. You will need one for ICMPv4 and another for ICMPv6.
We will start with the exception for ICMPv4 exception. You just need to type or copy the command below and paste in your command prompt then hit the enter key:
netsh advfirewall firewall add rule name="ICMPv4 echo request" protocol=icmpv4:8,any dir=in action=allow
Note that the name part of this code should be any name you want to associate with your request.
![How To Allow Ping in Windows Firewall [Step-By-Step]](https://technicalustad.com/wp-content/uploads/2022/03/terminal-1.jpg)
For ICMPv6 exceptions, here is the command you will need:
netsh advfirewall firewall add rule name="ICMPv6 echo request" protocol=icmpv6:8,any dir=in action=allow
Once this is done, there is no need for a computer reboot, the changes should take effect instantly. Pinging from your computer to any remote device should yield a result now.
Note that the name part of this code should be any name you want to associate with your request.
![How To Allow Ping in Windows Firewall [Step-By-Step]](https://technicalustad.com/wp-content/uploads/2022/03/google-ping.jpg)
Disable Ping Requests with Command Prompt
After creating the ping request, the process to disable it is very simple. You will need different codes for ICMPv4 and ICMPv6 requests.
For ICMPV4 type or copy and paste the code below:
netsh advfirewall firewall add rule name="ICMPv4 echo request" protocol=icmpv4:8,any dir=in action=block
Remember that this will only work if the name part of this code matches the name of an existing rule on your computer.
For ICMPV6 type or copy and paste the code below:
netsh advfirewall firewall add rule name="ICMPv6 echo request" protocol=icmpv6:8,any dir=in action=block
Remember that this will only work if the name part of this code matches the name of an existing rule on your computer.
Once the rules are blocked, you can expect that every ping request will be met with a timeout message.
When attempting to disable a rule, there are chances you may not remember the rule name. In these cases here is a script to display the names of existing rules on your computer.
netsh advfirewall firewall show rule name=all
Using this script will show a lot of rules. the most recent ones should be located at the top of the list.
Of course, using the command prompt is the more straightforward method but then you can always go back to allow ping in Windows Firewall.
Final Thoughts on How to Allow Ping in Windows Firewall
The process to allow ping in windows firewall is a complicated long one and not everyone will have a need for it. But if you are interested in networking, then I advise you do not skip it, as pinging will become one of your most valuable tools.
As soon as you have it set up, it becomes really easy to turn it on or off. Most people would however prefer the second method using the command prompt. It really does not matter what your poison is as long as it gets the job done.
If you loved this article, you may enjoy learning all about Windows Firewall

