


In this guide, we’ll help you create some simple Arduino projects for beginners. These basic items will help you understand how to set up Arduino software and then connect the components to perform certain actions.
If you are new to Arduino, make sure you download our free eBook below. Designed for absolute beginners, this guide will help you to understand Arduino boards and their components.
Arduino is an open-source electronics prototyping platform based on flexible, easy-to-use hardware and software. It’s intended for artists, designers, hobbyists, and anyone interested in creating interactive objects or environments.

Programming with Arduino UNO?

We just needed an Arduino UNO R3 board and the required USB cable to transfer the program from the computer to the board. On the circuit board to the left of the Arduino logo, there is an LED, short for light-emitting diode, a small light next to the letter L.
We want to turn it on and off and let it flicker for 2 seconds at a time.
When you insert the USB cable into the Arduino and your computer for the first time, you may notice that the light is blinking. do not worry! This is the default program stored on the chip. We will cover this.
USB cable powers the device. Arduinos can be run independently from the power supply on the lower left of the board. Once you have finished programming and do not require it to be constantly connected to your machine, you can choose a separate power supply. It all depends on the use cases and situations where you want to use the device.
Hardware Needed
Download Arduino IDE
So here we should download the official software of Arduino IDE from the official website of Arduino You can find the latest version of this software on the Arduino IDE download page.
Arduino IDE
Once the software is installed on your computer, continue and open it. This is the Arduino IDE, where all programming will happen.
Take some time to look around and make it comfortable.
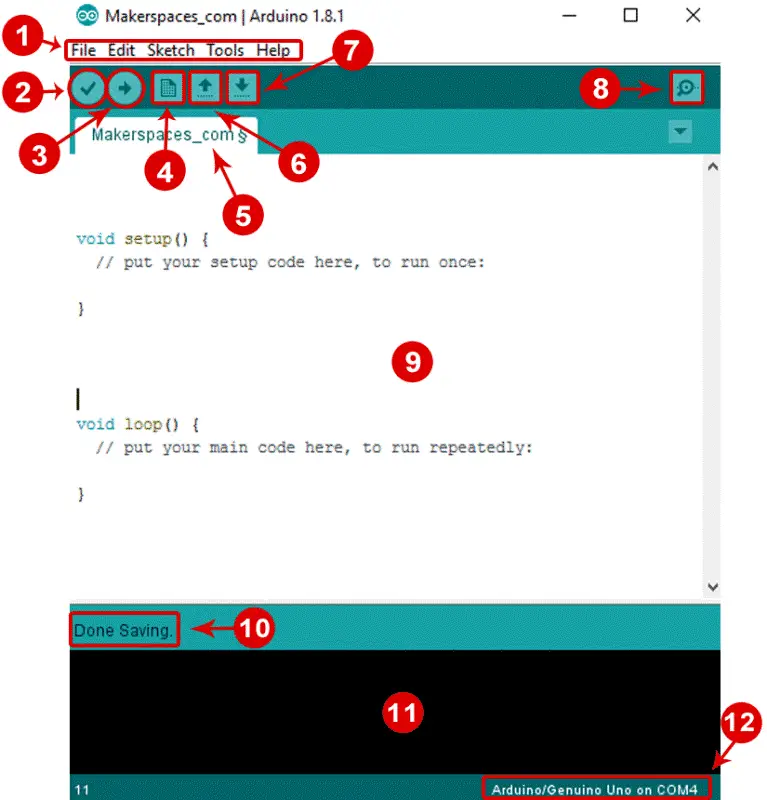
Menu Bar: Lets you access the tools you need to create and save Arduino sketches.
Verify button: Compile your code and check spelling or grammar errors.
Upload button: In this case, the code is sent to the connected circuit board, eg Arduino Uno. When uploading, the light on the board blinks quickly.
Create a new sketch: Open a new window with a blank sketch.
Sketch Name: The name of the sketch appears here when saving the sketch.
Open an existing sketch: Lets you open a sketch in a saved sketch or stored example.
Save Sketch: Save the currently open sketch.
Serial Monitor: When the board is connected, this will show serial information about your Arduino
Code Area: This area is where you write sketches to tell the board what to do.
Information area: This area tells you to save the state, code compilation, error and so on.
Text Console: Displays the details of the error message, the size of the compiled program, and other information.
Boards and Serial Ports: Tell you which circuit board you are using and which serial port to connect to.
Let’s do a simple test Connect your Arduino UNO
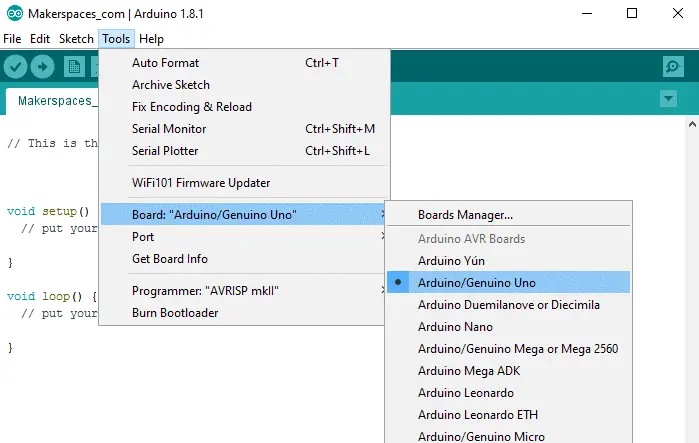
So here we need to connect the Arduino uno to our computer, plug it in the USB port. Once the board is connected, you will need to go to Tools then Board then finally select Arduino Uno.
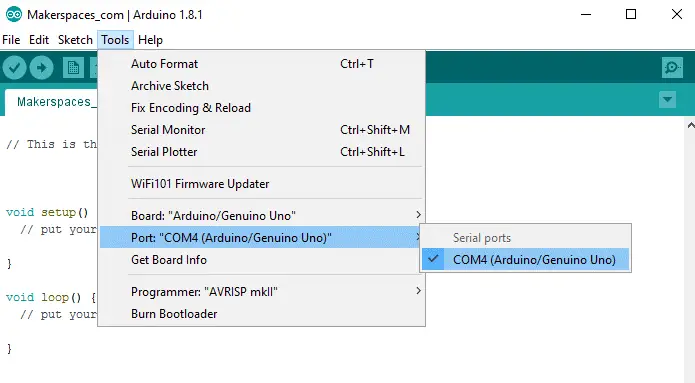
Next, you have to tell the Arduino which port you are using on your computer.
To select the port, go to Tools then Port then select the port that saysArduino.
Its finally you set up all thing with Arduino uno time to do your first Arduino project. In this example, we are going to make your Arduino board blink an LED.

Connect the parts as I mention in the above picture
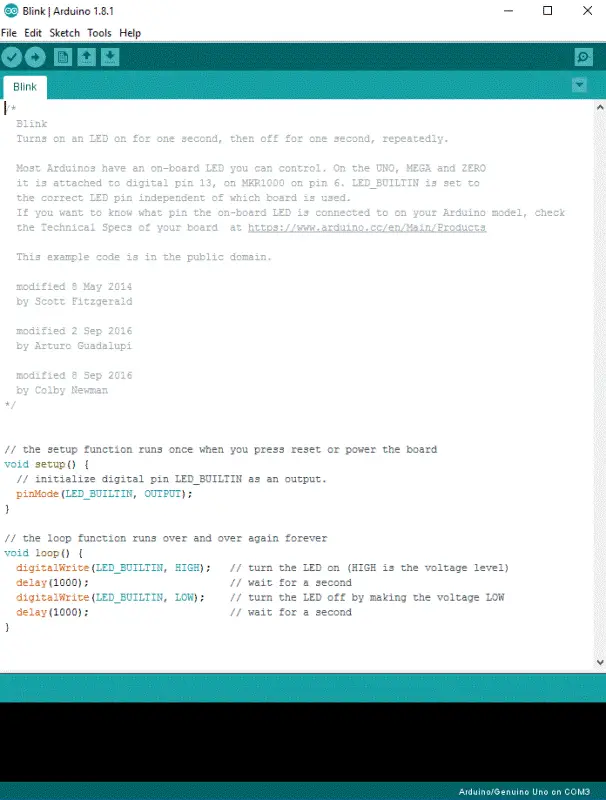
And upload the blink sketch to Arduino UNO
To open the blink sketch, you will need to go to File > Examples > Basics > Blink

Then this page will open along with C++ Sketch
The built-in LEDs on the Arduino board will flash rapidly for a few seconds and then the program will execute. If everything went correctly, the LED on the breadboard should turn on for a second and then off for a second and continue in a loop.
So this is how it will look Check the video below!

I will recommend you to read these Books for more learning
1.Arduino For Dummies
2.Exploring Arduino
![]()
![]() You may also like to read these articles
You may also like to read these articles
HOW TO BUILD USB DONGLE COMPUTER WITH RASPBERRY PI ZERO A 5$ COMPUTER
How to Build Alexa Based Home Automation Switch with ESP8266 and Relay
How to setup Torrent in Raspberry Pi/Build Torrent Box
Hope my article “Beginners guide for Arduino UNO” helps you to understand Arduino UNO. Stay connected we are bringing lots of articles on this topic.


