


Raspberry Pi is a credit card size computer. The RPi3 used here includes four USB ports as well as Wi-Fi and Bluetooth connectivity. HDMI video output requires an HDMI cable and a suitable monitor that supports HDMI. USB keyboard and USB mouse are also necessary.
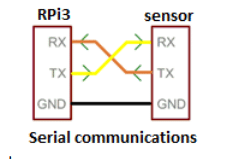
In this article, the RPi3 is connected to the COZIR CO2 sensor via the onboard UART. K-30 sensor code as follows. RPi3 provides a UART TXD-RXD connection for serial communications.
The Raspian Linux operating system is installed using the NOOBS installer. To continue, you need Raspian to set up your RPi3.
Install an operating system on your RasPi Using Noobs
Where raspberry pi co2 sensor Used?

- Products are used at every stage of the poultry industry 100961 In almost every stage of a chicken’s life cycle, it is necessary to manage carbon dioxide levels.
- Start with egg hatching. The use of carbon dioxide as a gas over the eggs helps to regulate the overall temperature, thereby reducing “early voyeurism.” Many of our customers use our 1% carbon dioxide transmitter/controller to monitor and control carbon dioxide levels in the NEMA enclosure.
- Eggs for vaccine production, which are inserted into eggs, hatched, harvested, and inactivated. This process requires a carbon dioxide concentration in the 5-11% range, which can be achieved with our 30% CO 2 controller in a NEMA 4 housing.
- After hatching, thousands of chickens are transported from hatcheries to truck growers. Since even a dead chicken may be an indication of a large-scale problem, the level of carbon dioxide in the truck is used for insured purposes, using the head unit like our remote CO 2 logger in the cab and the transmitter in the truck’s Trailer carefully recorded.
[the_ad id=”6015″]
- Chickens metabolize food more slowly at high CO2 levels. By regulating carbon dioxide, growers can further reduce the time it takes to convert chicks into broilers or laying hens. Many of our customers use 1% CO2 IAQ transmitters/controllers to maximize the balance between production and energy efficiency.

Let’s get Started
Buy Hardware
Note: Please Buy Hardware from this link, and yes I will get very little percentage of commission.
Thank you So much for your support
- Raspberry Pi 3 (or other models) (Buy Amazon)
- Raspberry Pi 7 official touchscreen (Buy Amazon)
- USB power supply (Buy Amazon)
- USB to micro USB cables (Buy Amazon)
- MicroSD card with Raspberry Pi compatible operating system (Buy Amazon)
- Connect the Raspberry Pi to the keyboard, mouse, monitor and 5VDC power supply.
- Power the RPi3 and LCD monitor. In order to access additional python files, you will need an internet connection. RPi3 provides a built-in Wi-Fi device. On your monitor, find the terminal’s icon. Select the icon, select your Wi-Fi network, and enter your network password.
- Verify that you are connected via Wi-Fi. On your monitor, select the globe icon to open the internet browser. Verify your internet connection by visiting Google.com.
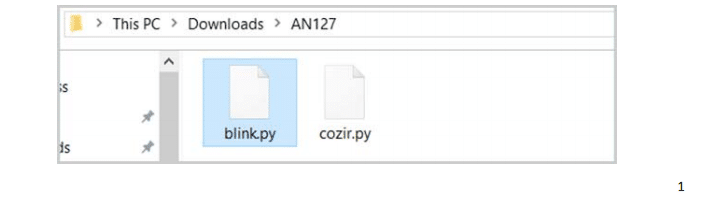
- Search AN-127 in the application notes tab at https://www.co2meter.com. Download the zip file to your Raspian download directory. Extract this directory to access python files.
Run the blinking example
We recommend that you run the Blink sample before connecting the CO2 sensor to verify that your hardware and software are up and running. Included in the downloaded folder is the blink.py python code. You can open it using the Raspian code editor Geany.
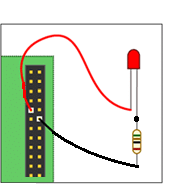
- Connect LED and Resistor to RPi Pin The connector connects to GPIO pins 9 and 12. The long lead of the LED is positive and connected to pin 12 through a 270 ohm, 4-watt resistor. The other LED pin is connected to lead Pin 9 is GND (ground).
- Choose Menu> Programming> Geany.
- Choose File> Open> pi> AN127> Blink. You should see the screen below.
- Choose Build> Build.
- Choose Build> Execute. If everything is set correctly, the LED will flash 12 times. Otherwise, go back and follow your steps before continuing.

Connect the COZIR sensor
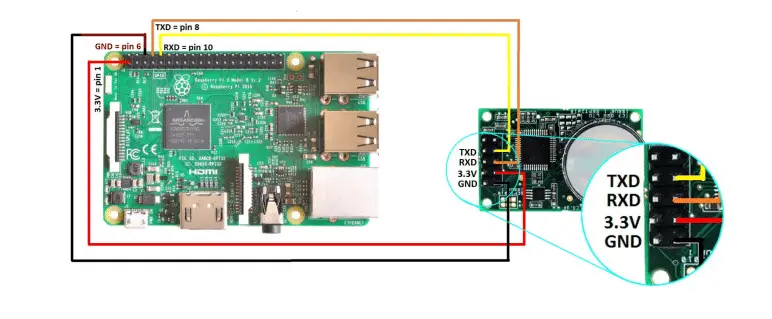
Connect the RPi3 to the COZIR CO2 sensor as shown. Use the 3.3VDC (recommended) pin on the RPi 3 board to power the sensor. If you decide to use an external power supply, you must provide 3.3 to 5 VDC. If the power drops below 3.3VDC, the sensor will not work properly.
Create your RPi3-COZIR project
- Choose Menu> Programming> Geany
- Choose File> Open> pi> AN127> cozir
- Observe the following screen:
Note: On line 6, the UART connection is ttyS0 come. Your tty connection may be different.
- Choose Build> Build.
- Choose Build> Execute.
- The output is as follows:
COZIR Python code
#Python Programming COZIR CO2 sensor
Serial port
Import time
Multiplier = 10 # The 20% sensor requires a multiplier
ser = serial.Serial (“/ dev / ttyS0”)
Print “Python program running Cozir sensor \ n”
ser.write (“M 4 \ r \ n”) # Set the display mode to display only CO2
ser.write (“K 2 \ r \ n”) # Set the operating mode
#K set mode, 2 sets of instantaneous CO2 output flow
# \ R \ n is CR and LF
ser.flushInput ()
time.sleep (1)
And really:
Ser.write (“Z \ r \ n”)
Resp = ser.read (10)
Resp = resp [: 8]
FltCo2 = float (resp [2:])
Print “CO2 PPM =”, fltCo2 * multiplier
Time.sleep (1)
COZIR serial command
The following python directive sets the display mode and operating mode.
ser.write (“M 4 \ r \ n”) # Set the display mode to display only CO2
ser.write (“K 2 \ r \ n”) # Set the operating mode
Please refer to the following instruction manual:
Special Thanks to https://www.co2meters.com
That is it For now if you face any problem with this sensor then please do let me know down below in the comments,


