


The hard drive is a vital component of your system so when it begins to exhibit strange behavior and adversely affect your system, the CHKDSK (Check Disk) fix is usually the answer.
Errors originating from hard disks can make your system very slow or even unresponsive so the CHKDSK utility is a lifesaver in such situations.
I will be explaining all about the CHKDSK fix and the processes of using the fix will be explained in easy to follow steps below.
Note: I will be explaining all the processes using the Windows 10 template. If you’re using an older version, don’t be too worried. The overall steps are closely related across most Windows Operating Systems.
What Is CHKDSK?

Check Disk is the original term for it but because the command you will run is CHKDSK, this became the normal term you use when referring to the Check Disk utility.
What Does It Do?
Quite literally, it goes through your hard drive searching for errors and when the utility finds the errors, it fixes them.
It is one of the most important fixes for faulty hard drives and you can use it occasionally just to maintain a healthy drive before any complications occur.
In tech terms, it performs these basic functions.
- Scanning The Integrity Of Your Hard Drive’s File System
- Fixing Errors Like Corrupt Entries In a volume’s MFT (Master File Table)
- Scans Every Sector On Your Disk’s Volume To Ensure There Are No Bad Sectors
- Helps Fix Physically Damaged Sectors (Hard Bad Sectors) By Making Sure The Sectors Are Not Used To Save Data
- Helps Fix Internally Damaged Sectors (Soft Bad Sectors)
- Recovering Bad Sector Data
The main idea I am trying to show is that the CHKDSK utility does a lot behind the curtains that we might not usually see and it does not get enough credit mainly because when running CHKDSK utility, it is a boring and long process with a lot of waiting involved.
But this utility fix is not something to be sniffed at. If you use it regularly, you will be able to combat hard drive errors usually even before they manifest.
When Should I Run CHKDSK Utility?
Like I explained above, running it occasionally might be best. But always run immediately when you notice strange symptoms like your system being slow or crashing.
Basically any time Windows shuts down abnormally or when applications you use normally start misbehaving and getting slow.
Windows will a few times automatically scan and repair your system using the CHKDSK Utility but you cannot rely on that because it happens too infrequently to count.
How You Can Run CHKDSK Utility in Windows 10
Now that I’ve explained the basic information you need to know about the utility, I’ll now dive into the processes.
Where, when, and how to use the CHKDSK utility to fix your system’s errors.
The first up is a simple running from Windows.
Running The CHKDSK Utility From Windows
This is probably the easiest of the processes that I will be describing to you.
This method will require the use of your File Explorer.
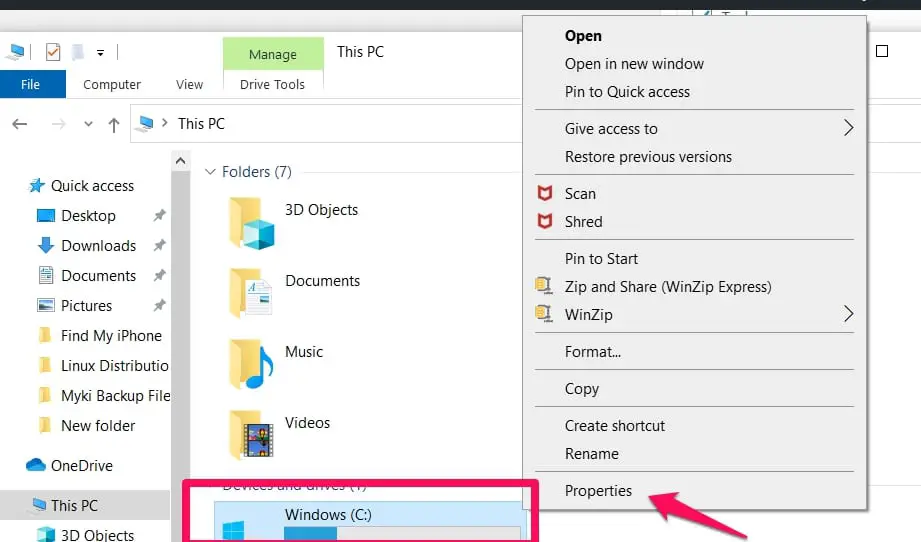
So the first step is to launch your File Explorer and navigate to the drive you’re having issues with or maybe you just want to randomly check for errors.
When you locate the drive, right-click on the drive to open up a list of options.
Select Properties from this list of options.
When the Properties menu opens up, navigate to the tabs at the top of the menu, and select the Tools tab.
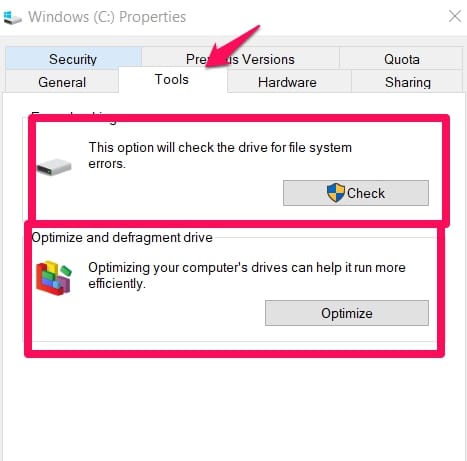
You will see two options in the Tools tab
- Error Checking
- Optimize And Defragment Drive.
What you’re concerned with is the Error Checking option. Under that option, click on Check. it will prompt you the option to “Scan drive” click on it.
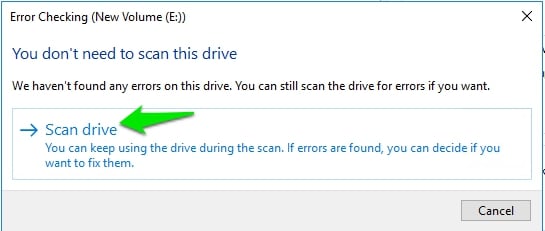
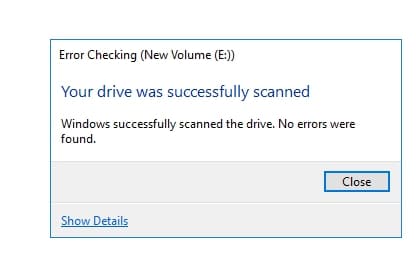
Your computer might prompt you that there are no errors on your system, don’t give up that easily.
Continuing The Process
You should then click on the Scan Drive option that will come with the prompt.
What you’re basically doing is now quickly scanning for errors but the process won’t be fixing the errors if it finds any.
If it does find errors, you will also be promoted again. This time the scanning process will include finding and fixing the errors.
Note: You can use your drive while the quick scan is going on. But you cannot use your drive when errors are being fixed by the CHKDSK process.
Of course, if you want to just go straight to the point and avoid the first quick scan, there are ways you could do that but I will explain those ways below so there’s no need to jump the gun just yet.
I will suggest this method for users who don’t want to spend hours on the normal scan and still want to quickly check the integrity of their drive. It is not safe enough in the long-term but this quick fix should do for short-term purposes.
Using CHKDSK Utility Command From Your Command Prompt
Now things are getting interesting because of the introduction of the command prompt which allows users the access to make changes that affect the internal processes of your system.
The command prompt is used if you’re in the following situations.
- You want to run an in-depth scan
- You’re forced to use the command prompt because your Windows won’t even start correctly
Using the command prompt to run the CHKDSK command ensures you get the utility scanning for and fixing bad sectors.
It will also automatically fix the errors it finds, unlike the former method when the first quick scan only promises to check if there are errors on your drives.
How To Open The Command Prompt (Admin)
You can’t use the CHKDSK utility function if you can’t even open a command prompt so here’s a guide on how to open one.
The first step is using the shortcut keys (Windows + X) and in the options that appear, select Command Prompt (Admin).
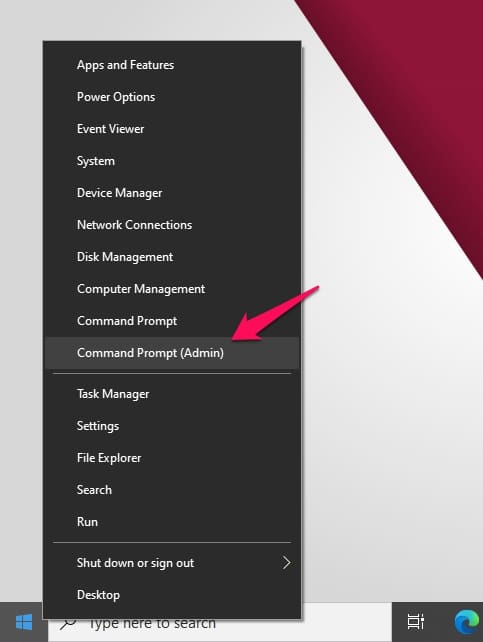
Remember to choose the Command Prompt option with ADMIN access so that you will be able to make changes to internal system settings.
When you do that, the command prompt will open.
Now you can start running the different variations of chkdsk commands or a simple chkdsk command.
I will be explaining what the simple chkdsk command and two major variations of the chkdsk command does and how the commands are run below.
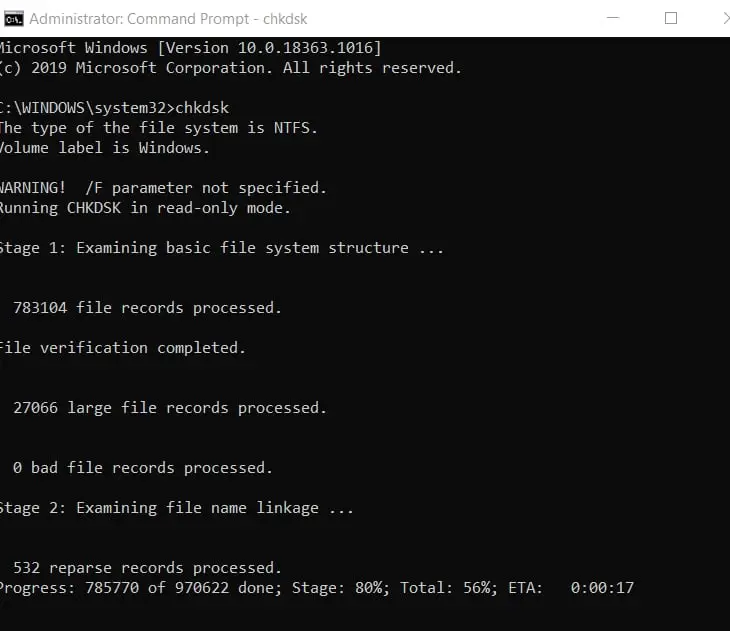
The Simple CHKDSK Command
This simple command can be compared to the one I explained above. The scan that only looks for errors without fixing them.
It is basically a scan that is done in a read-only mode, it will scan for errors and locate them if errors exist but it won’t fix them.
Although there will be a report that shows users the errors that exist.
You can easily use the method from Windows instead of opening a command prompt just to run a simple scan.
But it is important you know how it’s done just in case. To use this simple scan, enter this command
chkdsk
How To Run A CHKDSK “/ f” Command
When you open the command prompt with admin access (see process above), input this command chkdsk and select enter to run the command.
chkdsk /f
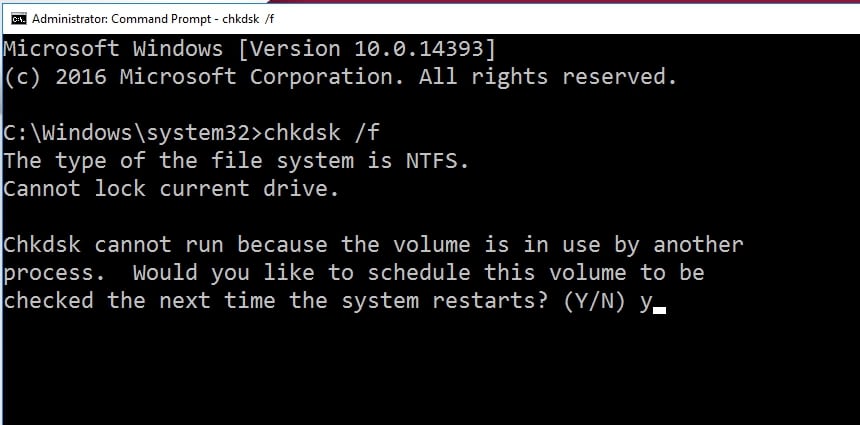
This is where the actual utility work begins. This command is basically scanning for and fixing logical file system errors so it won’t be fixing your bad sectors too.
That is for the next variation of the command. The “/ f” variation is run by opening the command prompt (admin) as explained above and entering this command.
If you want to scan your PC in the next reboot, just enter “Y” so it will run the CHKDSK utility on the next reboot.
chkdsk /f C:
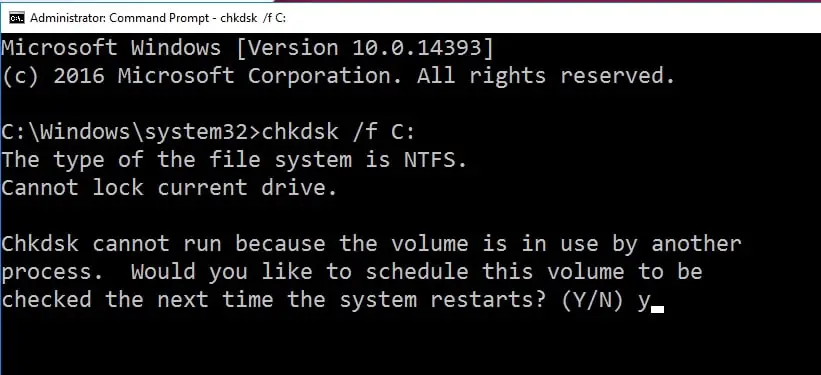
The “c:” indicates the drive you’re scanning.
You can usually change the indication of the drive depending on the drive you want to work on.
The CHKDSK / r Command
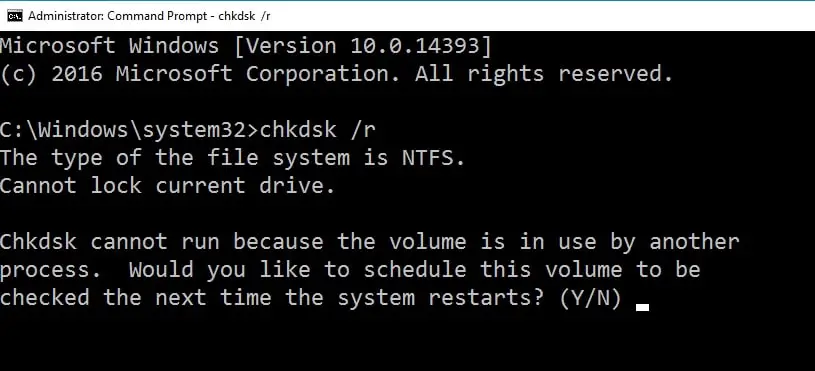
This is probably the most important variation of the different CHKDSK commands.
What you get when you run this command is scanning and fixing both bad sectors and logical file system errors.
You can combine both of the commands but it is basically as effective as running the “/ r” command alone.
This scan takes time and whenever you want to run it, make sure your system is plugged in to ensure your system does not go off during a scan because that may lead to serious data losses.
Use this scan occasionally to really get an in-depth scanning and fixing of the errors in your system.
The Problem Of Scheduled Scans
Whenever you run a chkdsk / f scan on a drive and that drive has processes in use, you will be automatically promoted to schedule a scan for the next reboot so you should take notice.
It is also noteworthy to mention that more often than not, an active drive will have files in use almost every time.
So, this means if you want to run this command and the drive you’re scanning has processes in use, you need to reboot after scheduling a scan for it to work.
Finding Out If You Have A Scheduled Scan And Canceling The Scan (If You Change Your Mind)
Like I explained above, sometimes you can schedule scans when the drive you’re attempting to scan has some files in use.
These scheduled scans can be really time-wasting if for instance you’ve forgotten about them and you just restart hoping to use your system really fast.
It is important you learn how to find out if you have a scan scheduled and how to disable the scan to prevent a massive waste of time.
Whenever you want to restart your system and you suspect you already have a scan scheduled, use the command prompt to confirm your suspicions and then follow the steps below to cancel that planned scan.
Finding And Getting Rid Of System Errors
Here’s how to go about it.
The first step is using the shortcut keys (Windows + X) and in the options that appear, select Command Prompt (Admin).
Remember to choose the Command Prompt option with ADMIN access so that you will be able to make changes to internal system settings.
When you do that, the command prompt will open.
Then you can continue the process by typing this command into the command prompt
chkntfs c:
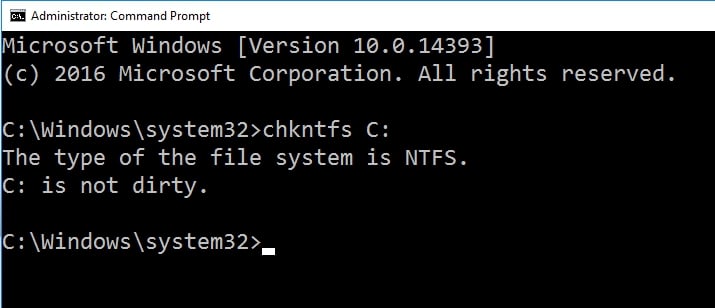
The “c:” part of the command represents the drive you were checking to see if it had a scheduled scan.
You can always change it to other representations of the drives you want to scan. There are three things that can occur after you run the command above.
- Presence Of A Manual Scan
- Presence Of An Automatic Windows Scan
- Absence Of A Scheduled Scan
These are the situations you can be confronted with. I will then explain what you can do in each situation according to your end goal.
Presence Of A Manual Scan
When there’s a scheduled manual scan on your system, you will get a prompt that says something along the lines of “Chkdsk has been scheduled manually to run on next reboot on volume C:”
When you get this prompt, you have two options. You can either just let the scheduled scan happen or you can cancel it.
Here’s how to cancel the scheduled scan. Open the command prompt and input this command.
chkntfs /x c:
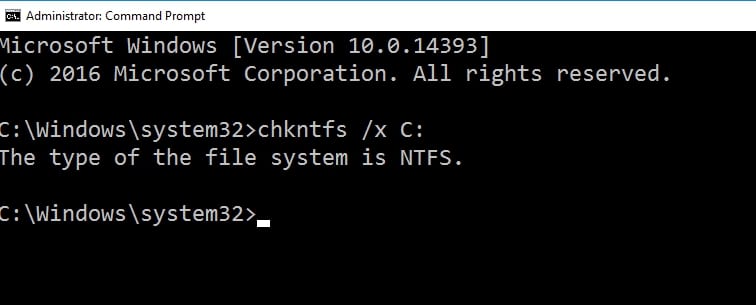
This exact command cancels the scheduled scan on your local disk.
You can always change “c:” to whatever drive manually scheduled a scan for.
Presence Of An Automatic Windows Scan
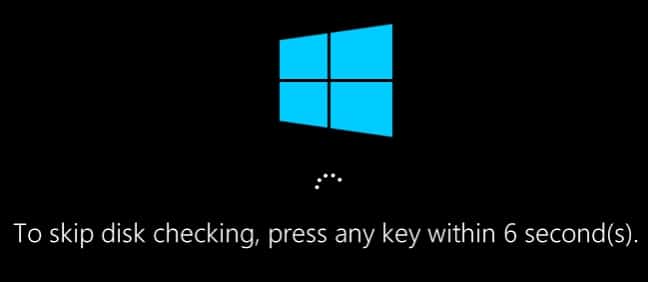
Sometimes when Windows flags potential issues with drives, it automatically schedules scans on these drives and when the next reboot happens, it scans your drives and fixes the error.
The good part about this scan is that you can either cancel it by using the same process as above or just before the scan happens when you reboot.
The latter option is possible because Windows allows a timed (10 seconds) option to cancel the scan.
So you can either just cancel by opening the command prompt and inputting this command.
chkntfs / x c:
Please note that this exact command cancels the scheduled scan on your local disk.
You can always change “c:” to whatever drive manually scheduled a scan for.
Note: There will be no feedback when you cancel scheduled scans, you will just have to trust that if you follow the right process, it will be removed.
Absence Of A Scheduled Scan
When there’s no scan scheduled, you will usually just get a prompt that tells you that the volume or drives aren’t dirty.
You might as well just leave them alone for now. There are other variations of the CHKDSK utility that aren’t really important to the average users but might appeal to tech buffs.
Learning more about the variations might be worth the effort. But for users who just want a tool to fix errors and repair sectors, these variations of the CHKDSK command is good enough for you.
Conclusion
Running a CHKDSK Utility is really important to keeping our drives free from various errors that mess them up.
You can stay ahead of the errors by planning periodic scans of all drives and fixing them before the damage affects your system as a whole.
Remember that to make sure your internal system settings are affected, always run the command prompt with admin access.
Have you tried the utility feature above? Please use the comment section to tell us about your experience using the CHKDSK utility.


