


This is the ultimate guide to Google Chrome Settings which will help You to understand the chrome settings like a pro along with we added some awesome tips and tricks in this post that will make to feel like your knowledge on chrome is like Ninja. 🐱🚀
Without any further delay, let’s explore this awesome topic. 🔎🔎
Early browsers were very basic, but they did suffice at the time, at least they were able to meet user needs and requirements. Needs have grown in leaps and bounds ever since and the basic browser of the late 90s will no longer suffice.
Browsers today do a whole lot more than rendering websites and pages. These make them more complex, but more comprehensive. Understanding their full capabilities is quite the task and a mastery of the chrome settings is definitely a handful.
As a serious internet consumer, I have had to use a lot of browsers. Many of which I still use, a few more frequent than others. In my internet use over the years, Google Chrome has remained a constant and an everyday choice.
In this article, I will bring in detail the functionality embedded in Google Chrome settings, but before then, here are some points to note about Google Chrome.
Google Chrome: History and Overview
First released in 2008 for Microsoft Windows, Google Chrome was developed by Google as a cross-platform web browser. The browser was later ported for macOS, iOS Linux, and Android. On Chrome OS, it is the platform for web apps and also its main component.
Even though Chrome is licensed as proprietary freeware, a major part of its source code is from Google’s open-source Chromium project.
It has grown to be about the most successful browser and according to Browser Market Share Worldwide, in November 2019 it has 64.3% of the market share. The growth has made Google extend its brand to Chromecast, Chrome OS, Chromebit, Chromebox, Chromebook, and Chromebase.
Chances are that because of the sheer size of Chrome, you are most likely reading this guide on a Chrome browser, or at least have the application installed on your computer. It is my aim to take you from a power user to an advanced user in this A to Z Chrome Settings tutorial.
Chrome Settings: The Definitive Guide
Users have very specific browsing needs. Using settings means that your Chrome use could be customized just for you. This personalization from settings improves productivity and efficiency.
Playing around with settings is the best way to know what works best for you, but it is always important to know how to undo settings. This way you can be sure to revert to what you are comfortable with if you enable a setting that you do not really like.
Hence I will start by showing you how to restore Chrome to its default settings. Please note that these steps will work on most browsers but are tested on Windows 10.
1. Restoring Chrome Settings to Default
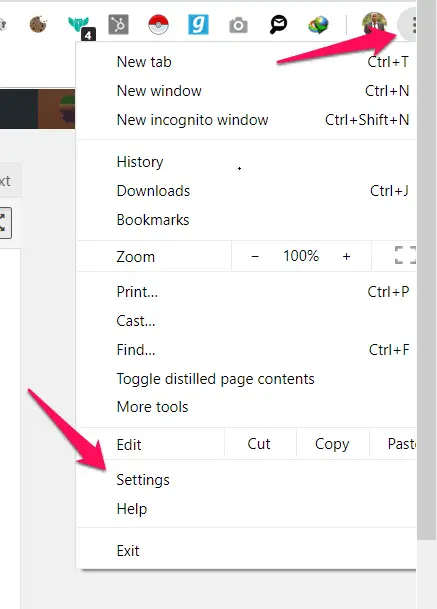
1. Click on the menu icon (the 3 dots at the top left corner of your Chrome browser)
2. Select the “settings” option from the list that pops out.
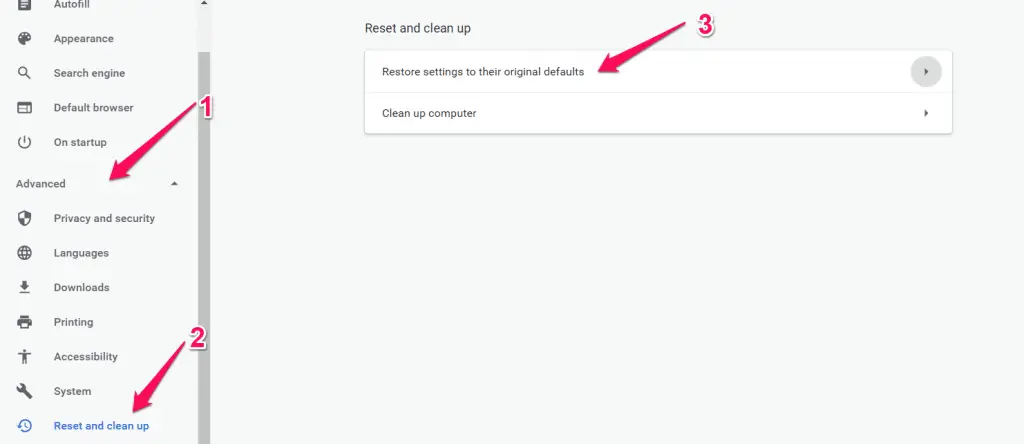
3. In the new window that displays, by the left pane, select the “Advanced settings” option.
Now select the “Reset and Clean up” option
Doing this brings out a few options on the right plane, select “Restore settings to their original defaults”.
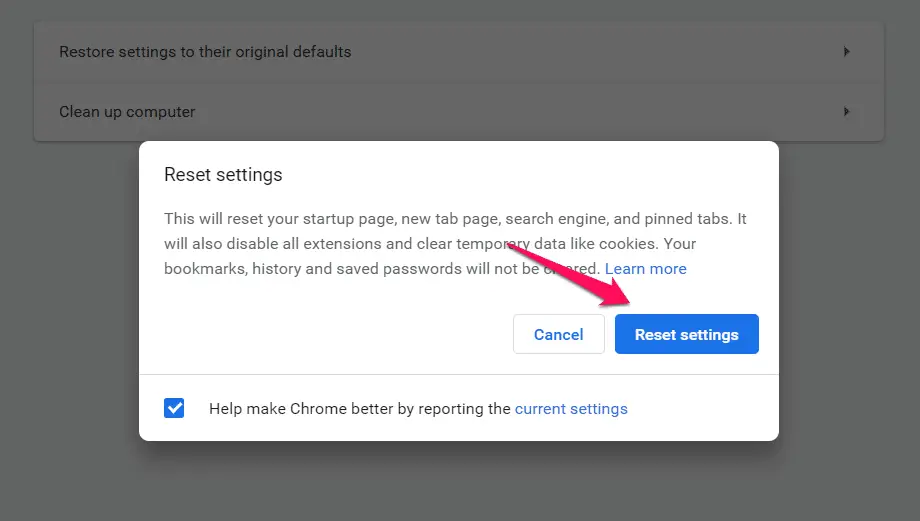
4. On the pop-up, click “restore settings“.
2. Locating Chrome Settings
To use your chrome settings, on your address bar, copy and paste “chrome://settings/” without the quotes. Alternatively, you can click on the Settings icon; the 3 dots at the right upper side of your browser and select the settings option.
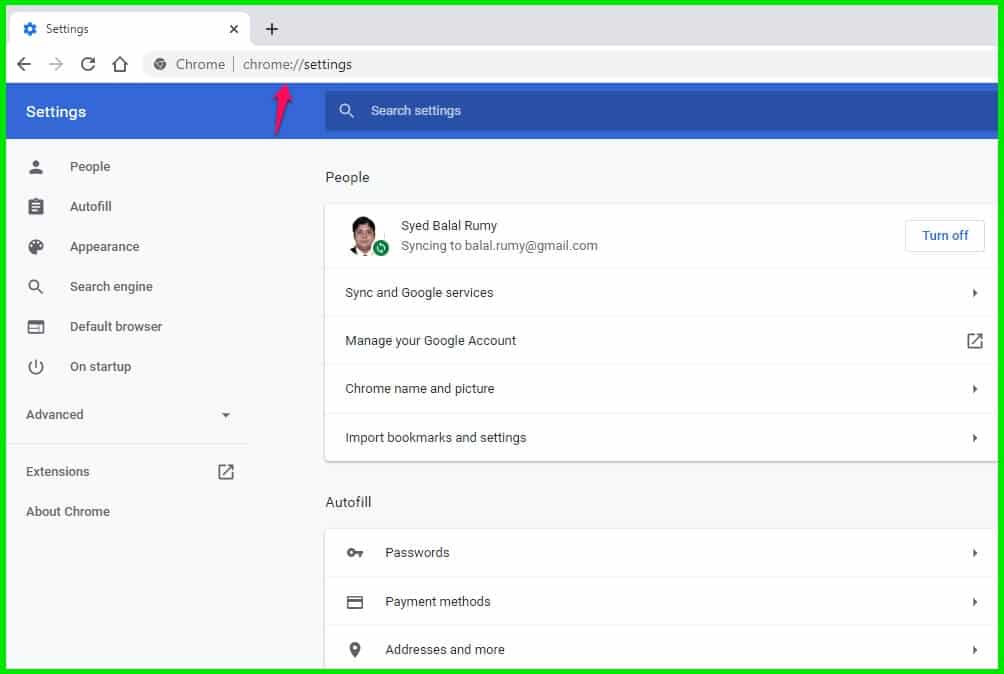
The settings screen by default will display on the left pane, a number of basic settings an option for the Advanced settings, extensions and an About Chrome tab.
3. Basic Google Chrome Settings
There are 5 basic settings:-
- People
- Autofill
- Appearance
- Search Engine
- Default Browser
- On Startup
3.1. People in the Chrome Settings
This setting manages user profiles on your google chrome browser. It permits a user to administer to their existing profiles, remove profiles, add new profiles, and import bookmarks and settings.
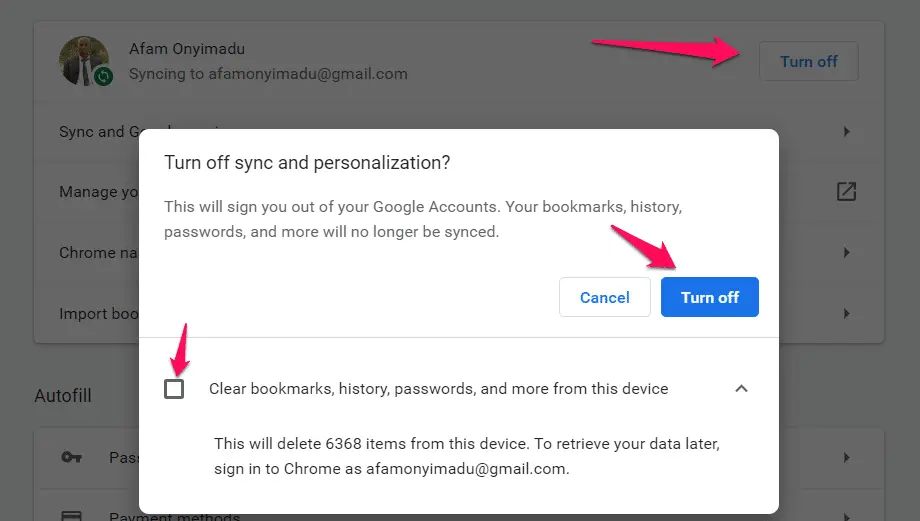
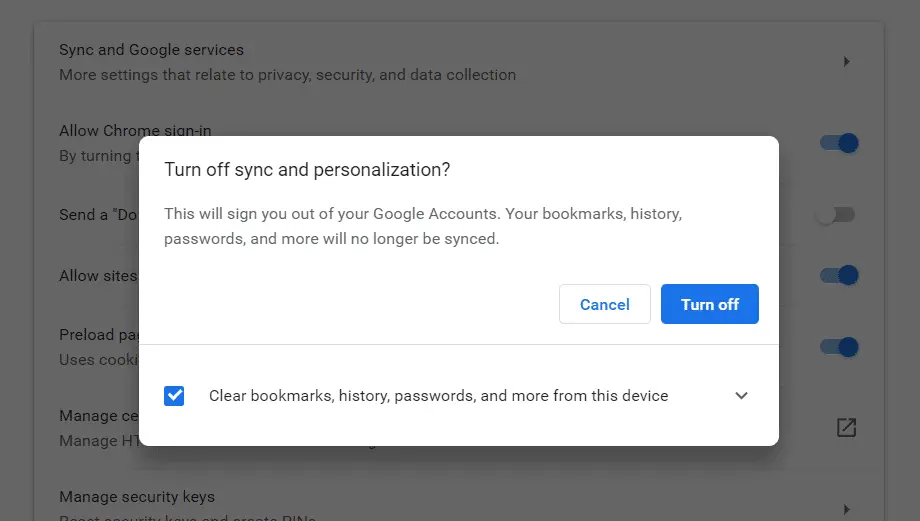
Turning on/off sync under people settings
Click on the Sync button on the right. Doing this pops out a new window.
On this pop up you have the warning “This will sign you out of your Google Accounts. Your bookmarks, history, passwords, and more will no longer be synced.”
If you are sure you want to un-synch from the browser, go ahead and click the “Turn Off” button. There is also an option to “clear bookmarks, history, passwords, and more from device”. Clicking this checkbox ensures all these are cleared upon turning off synch.
Please note that you will go through these steps to sync your browser with an existing user profile.
Sync and Google services
You can manage sync using this option of the “People” settings.
Click on the manage “sync and google services” tab. This brings up a number of options.
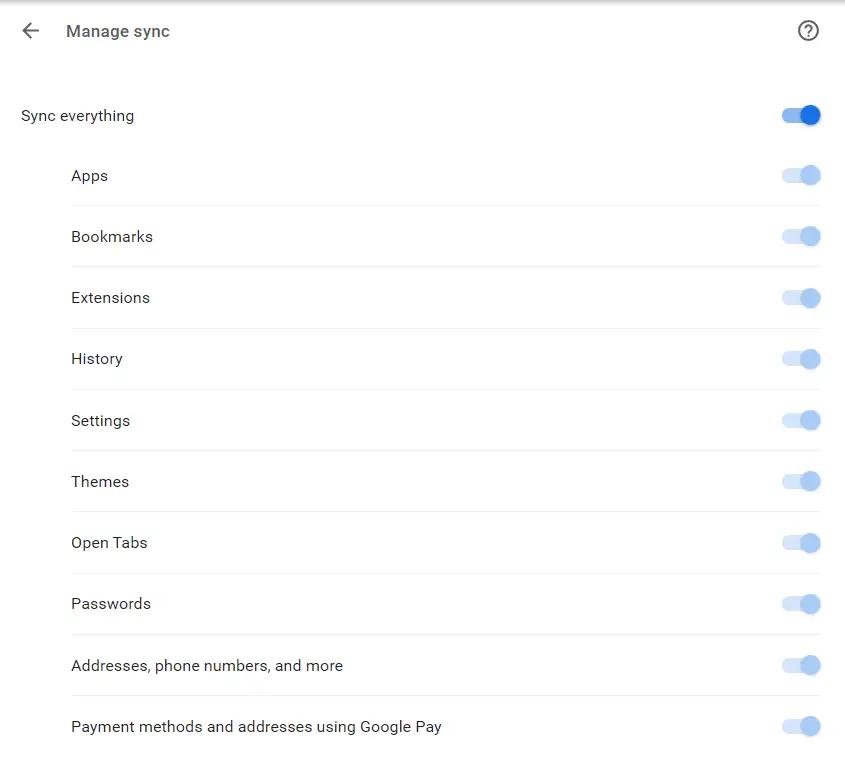
“Manage sync” option
Clicking this will give users the flexibility on what can or can not be synched. The options include:
Sync Everything, Apps, Bookmarks, Extensions, History, Settings, Themes, Open Tabs, Passwords, Addresses/phone numbers/more, Payment methods and addresses using Google pay.
Each of these options has a switch in front of them. Using this switch, you could turn on or off the Sync. Using the first switch, you could turn on or off sync for all items at once.
3.2. Control how your browsing history is used to personalize search, ads, and more options
Data is saved in your account. This data can give a user more personalized experiences across all Google services. By clicking this option, you are taken to the “Activity controls” page.
Here, you are capable of choosing which settings will save data in your Google Account. Another way of visiting this page is by visiting https://myaccount.google.com/activitycontrols/search.
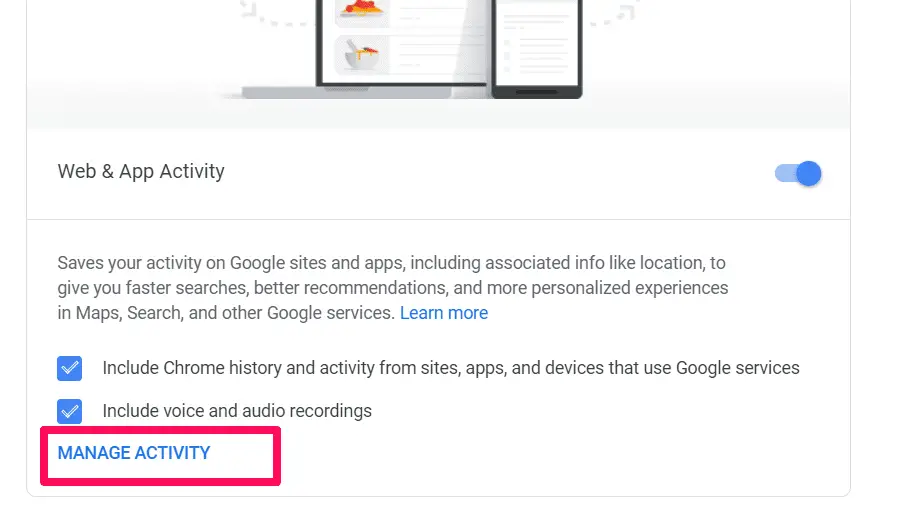
When you turn on the “Web & App Activity” switch, your activities on google sites and apps will be saved. This will include your associated information like location.
This is very essential to give you better recommendations, and more personalized experiences in Maps, Search, and other Google services.
Depending on your preferences, you could choose to check either of the checkboxes on the activity controls page, the “Include Chrome history and activity from sites, apps, and devices that use Google services” or “Include voice and audio recordings” checkbox.
3.3 Manage Activity
This is exactly below the “Include Chrome history and activity from sites, apps, and devices that use Google services” and “Include voice and audio recordings” checkboxes.
Clicking on this option takes you to the google activities account. This is where you could view and manage centrally activities like searches made, websites visited videos watched, etc.
This is how it operates: After using a few google services like youtube, search or even chrome, your activities can be saved on your account as data. With the saved activity, your experience on google becomes faster and more useful.
The activities logged into your activity account will normally depend on the Google products that you use and what activity controls you have turned on.
You can control most of the information that is displayed in your activity. You can stop an activity, delete activity, or find activity.
Show all Activity Controls
Below the Manage Activity, link is a show all activity controls link.
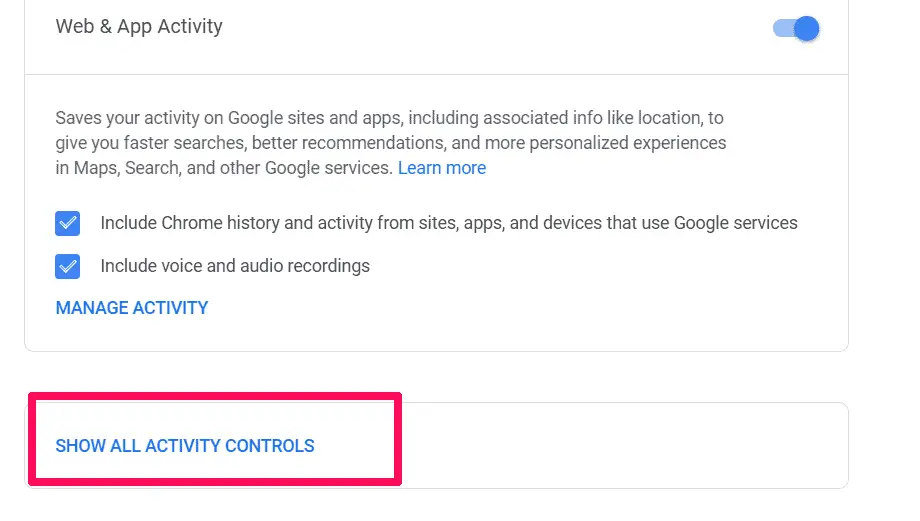
Clicking it reveals a lot of new activities features. You will have options for YouTube History and Ad personalization.
Depending on your personal preferences, you could check or uncheck either of “Include the YouTube videos you watch” or “Include your searches on YouTube“.
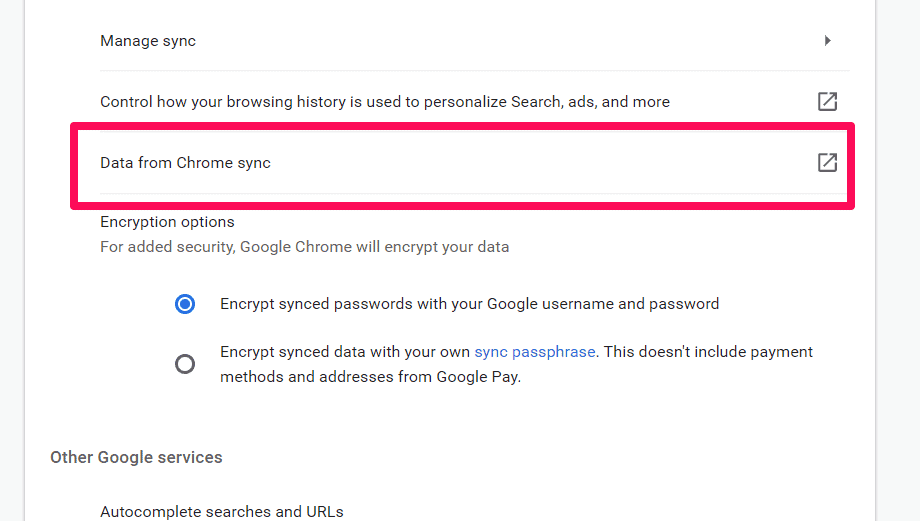
3.4. Data from Chrome sync
Going back to “Sync and Google services” on your settings page, you have the “Data from Chrome sync” just below the “Control how your browsing history is used to personalize search, ads, and more” option.
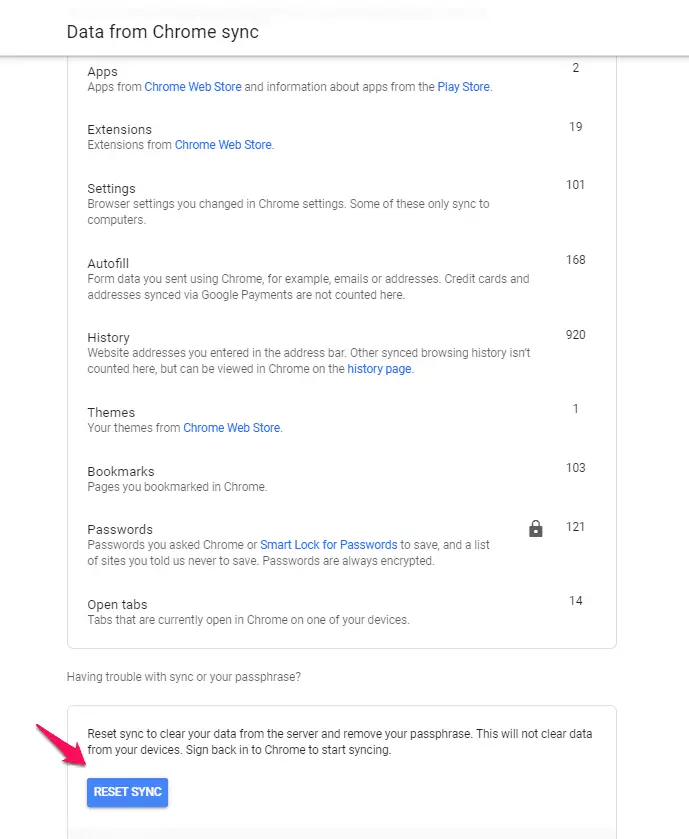
Chrome sync saves your bookmarks, your passwords your browser history, and a few other settings. They are saved securely to your Google Account. Here you can have access to them from any device running chrome.
Clicking this option opens a new window with a number of counts for what has been saved. Below these counts is a reset button that reverts all the counts to zero.
Encryption options
The final settings for Sync and Google services are the “Encryption option”. This option is a security option for all the data you may have stored using a chrome service.
It allows between two encryption options – “Encrypt synced passwords with your Google username and password” or “Encrypt synced data with your own sync passphrase. This doesn’t include payment methods and addresses from Google Pay.”
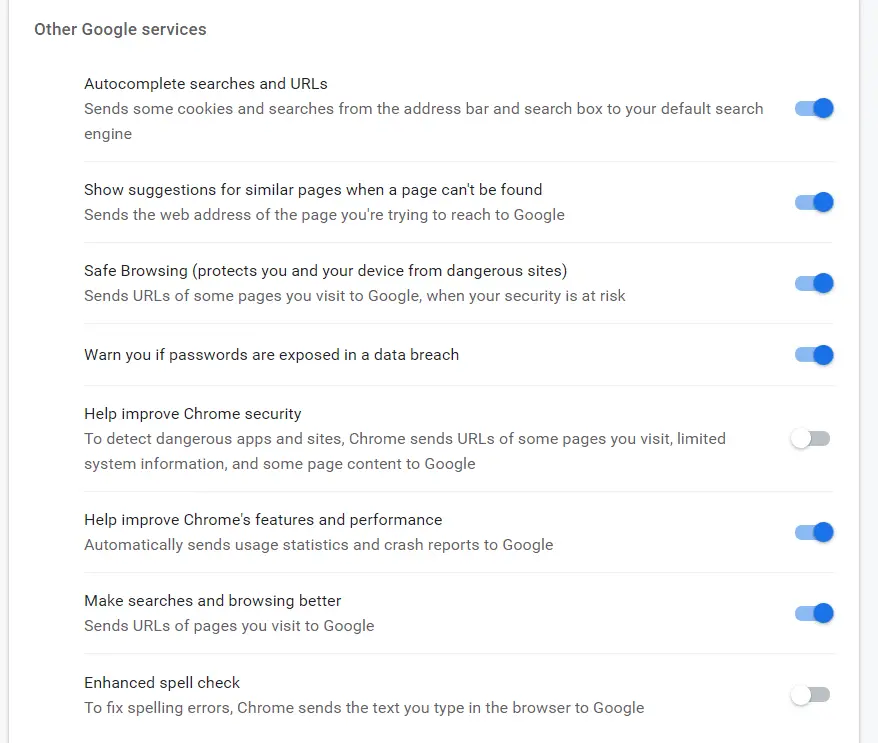
Below these checkboxes are a few complementary options with switches to turn on or off ads shown in the image below.
4. Manage your Google Account
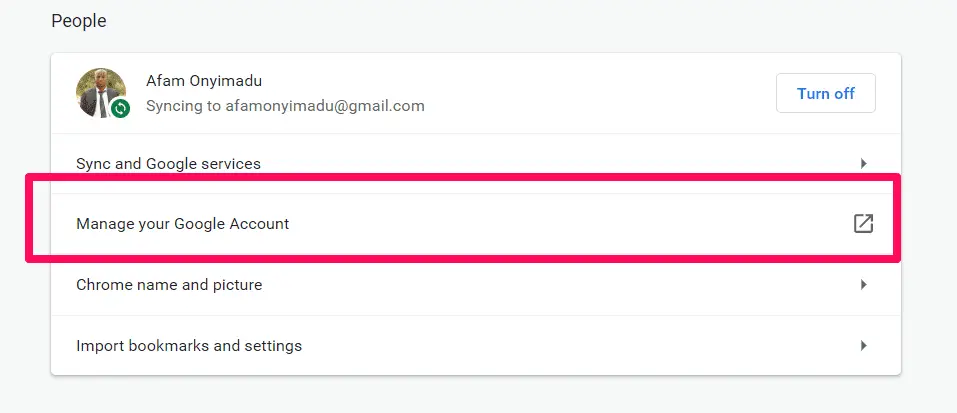
Clicking on this option takes you to your account page for google. The Google accounts page is divided into a left and a right pane. In the left pane, there are a few tab options including the options for:
Home – Where you have the options to manage your personal information. These usually include options for privacy and security.
Personal info – Here you have the options for your most basic information like your name and your photo, gender, phone number and other personal info associated with your Google services.
Data & personalization – This tab gives options for your data, activity, and a number of your preferences. These settings are generally used to make Google services more useful to you.
Security – Here you will find a few settings and recommendations to help make your account more secure. These options will include the option to enable 2-factor authentication or to use your phone to sign in.
People & sharing – Privacy is a huge concern for today’s internet users. This option gives some control over user privacy. It gives you control over what information is displayed to the people you interact with and to Google services that you use.
Payments & subscriptions – As you may have guessed, this option controls your payment information, your transactions, your recurring payments, and your reservations. In addition, you will be able to manage purchases and subscriptions.
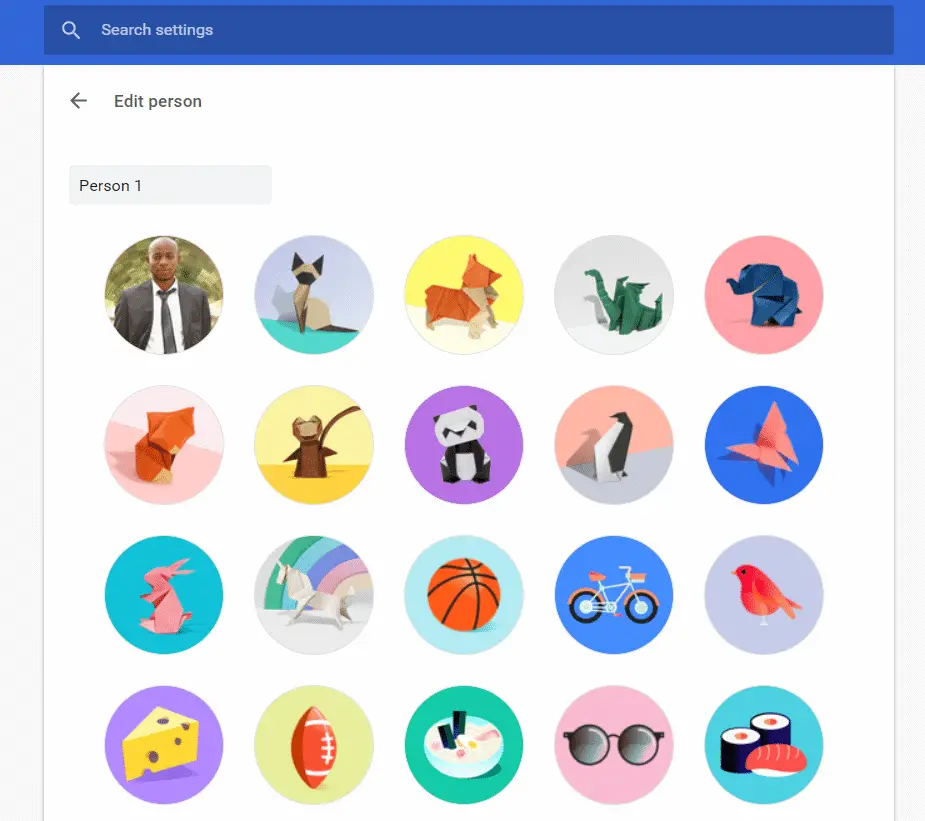
Chrome name and pictures
This is a very basic feature that allows you to choose what picture or gravatar to use for your Google services. Clicking it opens a new window with a lot of picture options to choose from.
If you have a picture already being used as your google image, it will be displayed amongst these other images.
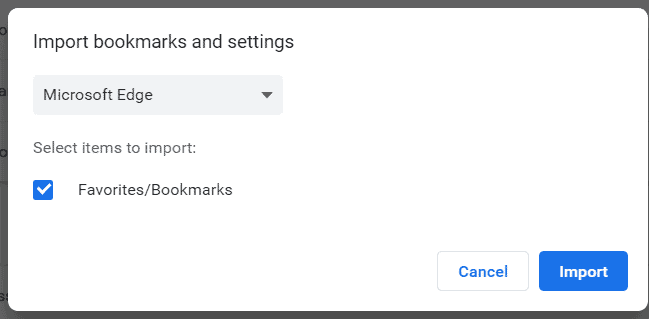
Import bookmarks and settings
This is the last option under the Peoples tab. It is used to import settings and bookmarks from other browsers.
Clicking it displays a new pop-up. This pop-up has a drop-down option to select the browser you wish to make an import from. From this drop-down menu, you can choose to make an import from Microsoft Edge, Internet Explorer, or a Bookmarks HTML file.
Once you have made a selection clicking the import button starts the importation of the bookmarks and settings.
4. Autofill in Chrome settings
This tab has three options “Passwords“, “Payment methods“, and “Addresses and more“. The autofill tab controls all the data you want to be automatically entered in forms during your Chrome experience. This option is focused on increasing the user experience and making your time on Chrome more valuable.
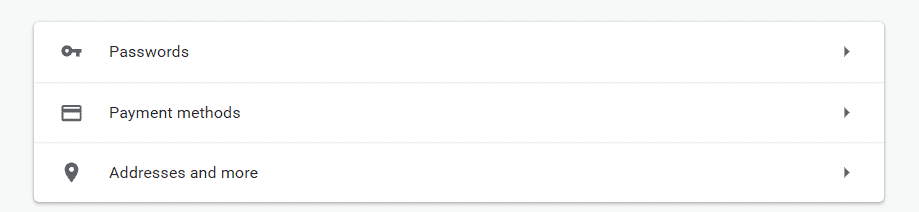
Passwords
This setting comes with three very important options at the top.
1. An option to save passwords. Turning the switch on will mean anytime you log into a website or service for the first time, Chrome will remind you to save the credentials to that service. You could accept, decline or postpone this.
2. An option for 3rd party password managers. If you have any already installed and enabled, Chrome gives an option to disable it.
3. An auto sign-in option. When you have your passwords saved on Chrome, you can automatically sign in to the website whenever you visit or manually have to choose to be signed in.
You should not that passwords can also be managed in google accounts.
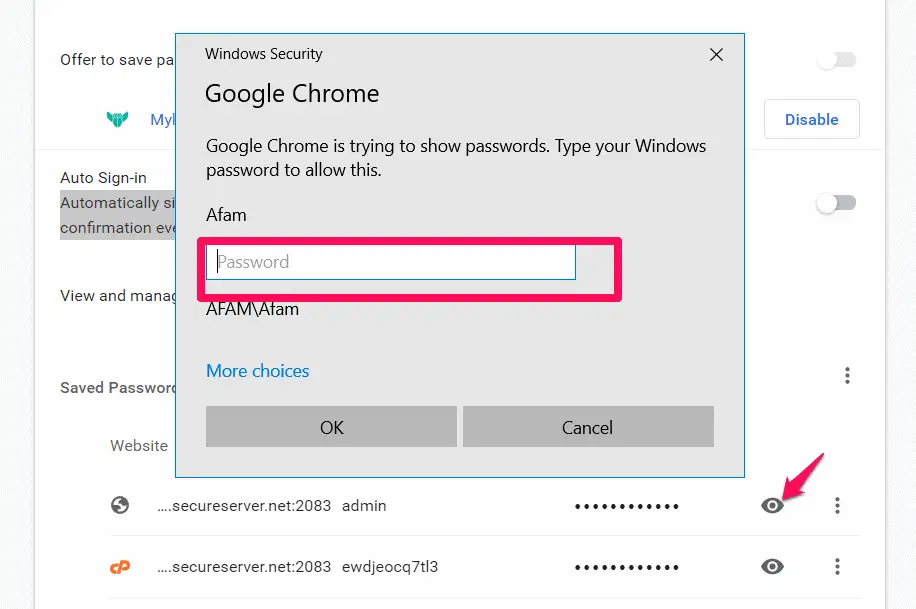
A list of saved passwords is also displayed under this setting. To view a password, click on the view icon (Icon that looks like an eye) in front of the website.
A prompt for your login password will appear. After inputing the login password, the password for the service you need will be displayed.

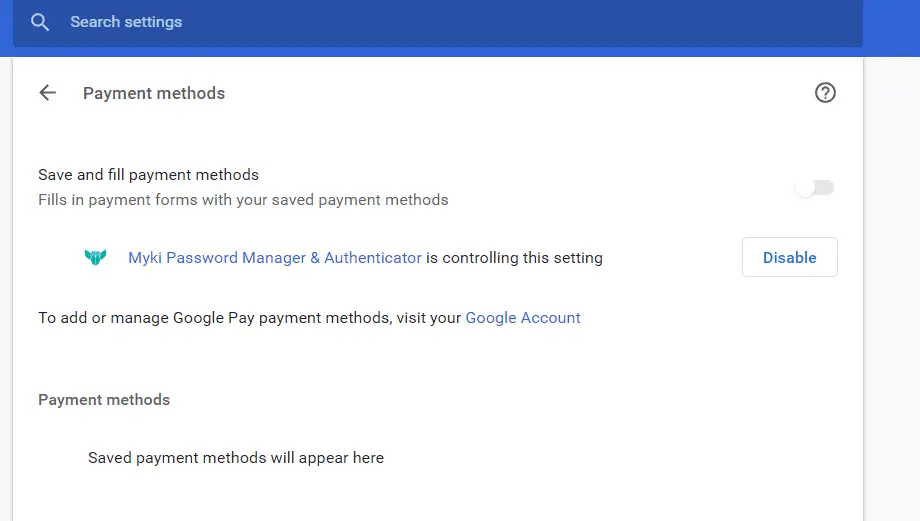
Payment Methods
Please note that if you are using a 3rd party password manager, you usually will be able to save payment credentials. If this is the case, this third-party service can be enabled or disabled in this “payment method” tab.
If there is no third-party service, or if it is disabled, turning on the switch in front of “Save and fill payment methods” makes chrome to automatically save payment credentials.
Your saved payment options will appear below every other option on the payment methods window.
Addresses and More
This option functions just like the above-explained Payment Methods settings. The only difference is that rather than saving payment options, it logs and saves addresses entered on forms using Chrome.
Once again, a third-party service can handle this and will need to be disabled for your Chrome browser to handle the function.
5. Appearance
The third setting on the left plane of your Chrome settings page is the appearance settings.
This setting handles 5 main functions including; Themes, Show home button, Show bookmarks bar, Font size, Customize fonts, and Page zoom.
Themes
To improve user experience, Google Chrome publishes a number of themes in the web store. These themes do not affect chrome function, but the look and feel of the browser.
On the webstore, there are a number of themes to choose from including, Dark & Black Themes, Space Exploration, Minimalist Themes, Enchanting Places, Superhero Sketches, A Splash of Color, Into the Forest, Pretty Patterns teams and a host of others.
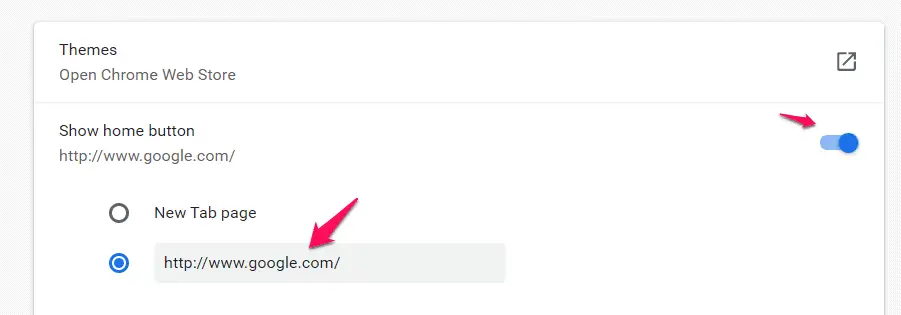
This option allows you the flexibility of choosing what home screen appears when you start up the browser. By default, this is set to https://www.google.com/.
You can change this value by inputting a new value in place of the google search home. Or you could altogether disable this function by switching off the switch in front of the “show home button” option.
Show bookmark bar
Bookmarks are very important to internet users. They allow you to easily find and revisit previously used websites and pages. The ease to which bookmarks are found is a telling factor in user-friendliness.
The bookmark bar exists just below the address bar. This bar can either be shown or hidden. The show bookmark bar feature controls this. If this feature is enabled the bar appears and vice versa.
Font Size
If you have ever used any word processing application, then you must already be conversant with font sizes. They are simply a scale of how big or small texts will appear.
On the browser, you can choose what values this should be. With chrome browser, there are 4 options: Very small, Small, Medium (Recommended), Large, Very large.
Selecting one or the other of these options will affect how texts will be displayed on your browser. It is advisable to leave this setting on a medium which is the recommended setting from Google Chrome.
Customize fonts:-
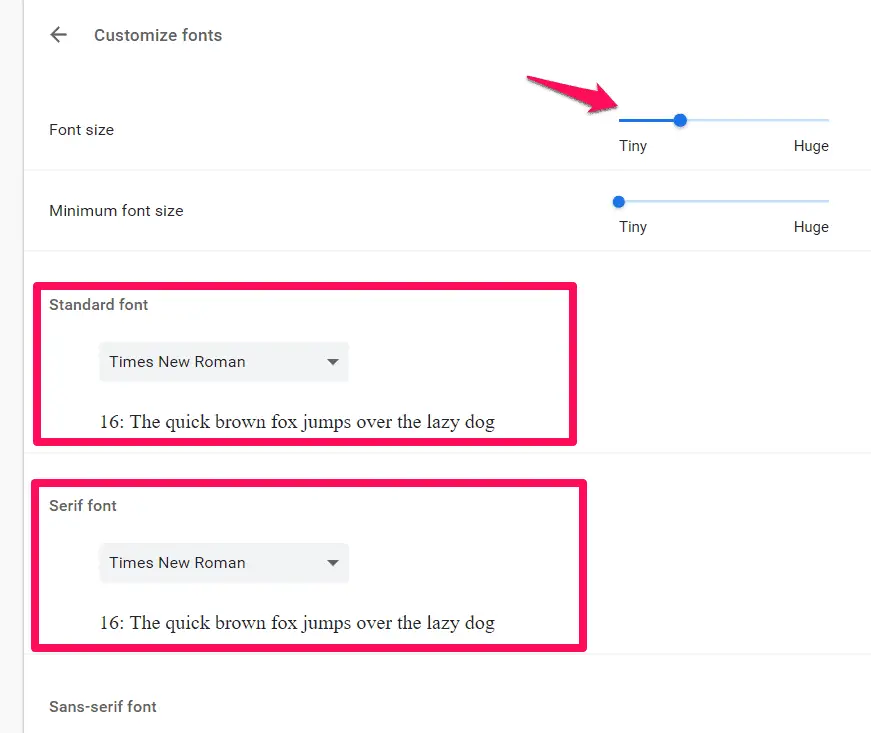
This setting affects the browser aesthetics and its appeal to a user. Just like you can select the size of the font you want, you can also choose the type of font to be used.
There are 4 font categories to choose from. Standard font, Serif font, Sans-serif font, Fixed-width font. For any font style chosen an example is given below the dropbox.
There is also an option to customize the font size by dragging the scale left or right in this setting.
Page zoom:-
This is the final appearance feature. For many computers, making an outward movement with two fingers on the touchpad will zoom in on a page.
The defaults for zoom size, however, are set in the page zoom option. By default, this is set at 100%. A user can choose to increase or reduce this. Increasing will make texts, images and anything displayed on your browser to grow in size while reducing this percentage diminishes the size.
6. Search Engine
A web or Internet search engine is a software system designed for the purpose of carrying out web searches. This implies that they search the World Wide Web (WWW) systematically for particular pieces of information.
There are a few search engines. On google chrome, you could choose which of them will be used by default to carry out searches when querries are inputted. By default the value for this is Google, but a user has the option of changing it to Duckduckgo, Yahoo or Bing. This will affect the search engine used in the address bar.
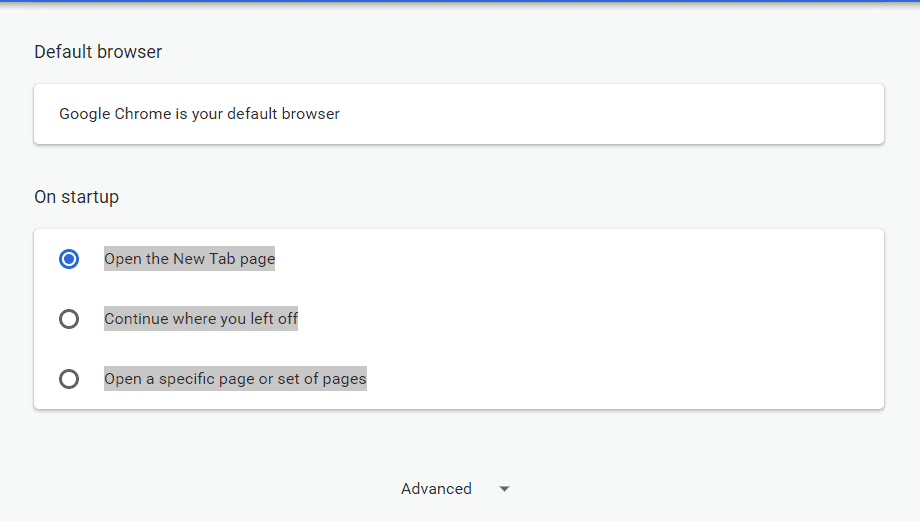
7. Default Browser
The default browser varies on the computer manufacturer. This value can always be changed, however.
For many makes, the default browser can only be changed from the computer settings and not from the browser setting. On the Default Browser setting of Google chrome, you are shown what browser is the default and given a choice for what the browser start-up should be.
8. On Startup
This is the last of the non-advanced Chrome features. It dictates what happens or how Google Chrome will behave when launched.
The “On startup” options include: Open the New Tab page, Continue where you left off, and Open a specific page or set of pages.
Open the New Tab page makes a new blank tab open when Chrome is launched.
Continue where you left off makes you have the same tabs you last used when you restart Chrome.
Open a specific page or set of pages allows the user to choose what page or pages open up when Chrome is launched.
Advanced Google Chrome Settings
The advanced features of Google Chrome can be accessed by going to your Chrome settings and clicking the downward-facing triangle in front of Advanced. Note: Advanced is found on the left pane of the Chrome settings page.
The advanced features include:-
- Privacy and security
- Languages
- Downloads
- Printing
- Accessibility
- System
- Reset and clean up
1. Privacy and security
Privacy and security are very touchy topics in recent years. Many users are skeptical about giving out information and when they do, they sometimes prefer keeping the information to the barest minimum.
Sync and Google services:=
This advanced setting takes you to the earlier discussed “sync and Google services” settings. Hence it is repeated as a basic and an advanced feature.
With this service, there is not much to add than was already discussed under basic settings.
Allow Chrome sign-in:-
When this is turned off, you will be able to sign in to any of your Google sites and services without signing into Chrome.
Clicking on this option brings up a pop-up window. Here you can turn on or turn off sync personalization. In the case of turning off, you are given a warning: “This will sign you out of your Google Accounts. Your bookmarks, history, passwords, and more will no longer be synced.”
On the pop-up, there is a checkbox. When checked, you will as well be deleting all browser history, bookmarks, and passwords from your device.
Send a Do Not Track request with your browser traffic
When we browse the internet, our browsing behaviors are sometimes monitored by the website. This many times is inconsequential but it may be an issue for some users.
Enabling the “Do Not Track” switch implies that a request will be included with your browsing traffic. You should note that despite the inclusion of this request, compliance solely rests on the website and how it interprets your request.

This may mean that some websites will show you ads that are not based on other websites you’ve visited. The majority of the websites that receive this request will still collect and use your browsing data. This they often collect for the purpose of improving security, providing content or services, and ads.
Allow sites to check if you have payment methods saved
If you have payment methods, having to input them every single time that you need them may diminish your user experience. When this feature is enabled, websites will be able to know if you already have payment info saved.
Preload pages for faster browsing and searching
Browsing and search behavior can be used to predict your future search behavior. This feature boosts your browsing speed. The principle is that cookies are used to remember your preferences even when you do not visit those pages. Because these pages are preloaded, this function becomes especially more useful when you have a slower internet connection.
Manage certificates
There are a few internal web resources or networks that will require that a user authenticates themselves using a digital certificate. With client certificates, users on Chrome are able to access these networks and resources. This additional security layer is put in place by organizations to secure their internal resources.
With the manage certificate settings, a user can import, export and manage whatever certificates they need. Clicking the manage certificate option opens a pop-up window for the certificate management.
Manage security keys
Yet another security feature of Google Chrome. According to the Chromium Library;
“Security Keys are able to present an attestation certificate when registering with websites. These attestation certificates are intended to provide assurance to the site about the level of protection provided by the Security Key. However, they are also a privacy concern if the certificate is unique to a small number of Security Keys.”
If you already have a security key, then with this setting, you will be able to create a PIN, Manage sign-in data, and Reset your security key.
Resetting your security key will delete every data associated with your security key, including its PIN.
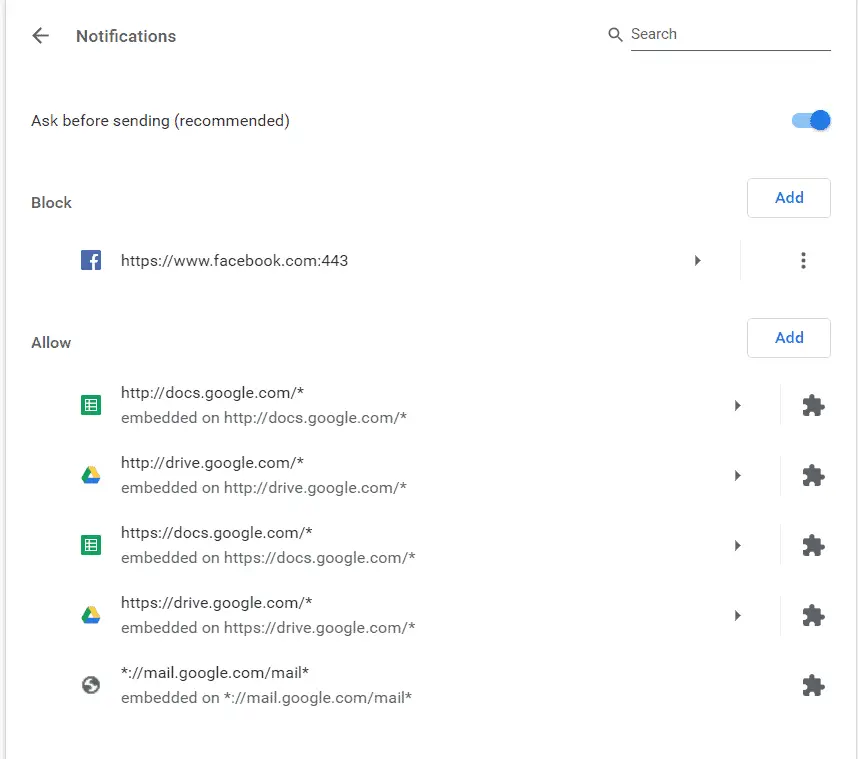
Site Settings
This gives a good measure of what information websites can use and also what content they can show you. There are a number of permissions associated with the site settings a few include: Cookies and site data, location, camera, microphone, motion sensors, notifications, and a few others.
For each permission, a user can choose to enable or disable. clicking the permission displays more options.
If you click on a notification, for example, there is the “ask before sending” option. Below this, there is a list of allowed and blocked websites and an option to add to these lists.
Clear browser data
History, cookies, and cache are closely associated with browsing data. There are a number of reasons you may want to get them cleared.
To do this click on the clear browser history tab. This brings out a window with basic and advanced tabs.
On the basic tab, there are options for browsing history, cookies and other site data, and Cached images and files.
On the advanced tab, there are in addition to the basic tab options, download history, password, and other sign-in data, autofill form data, site settings, and hosted app data.
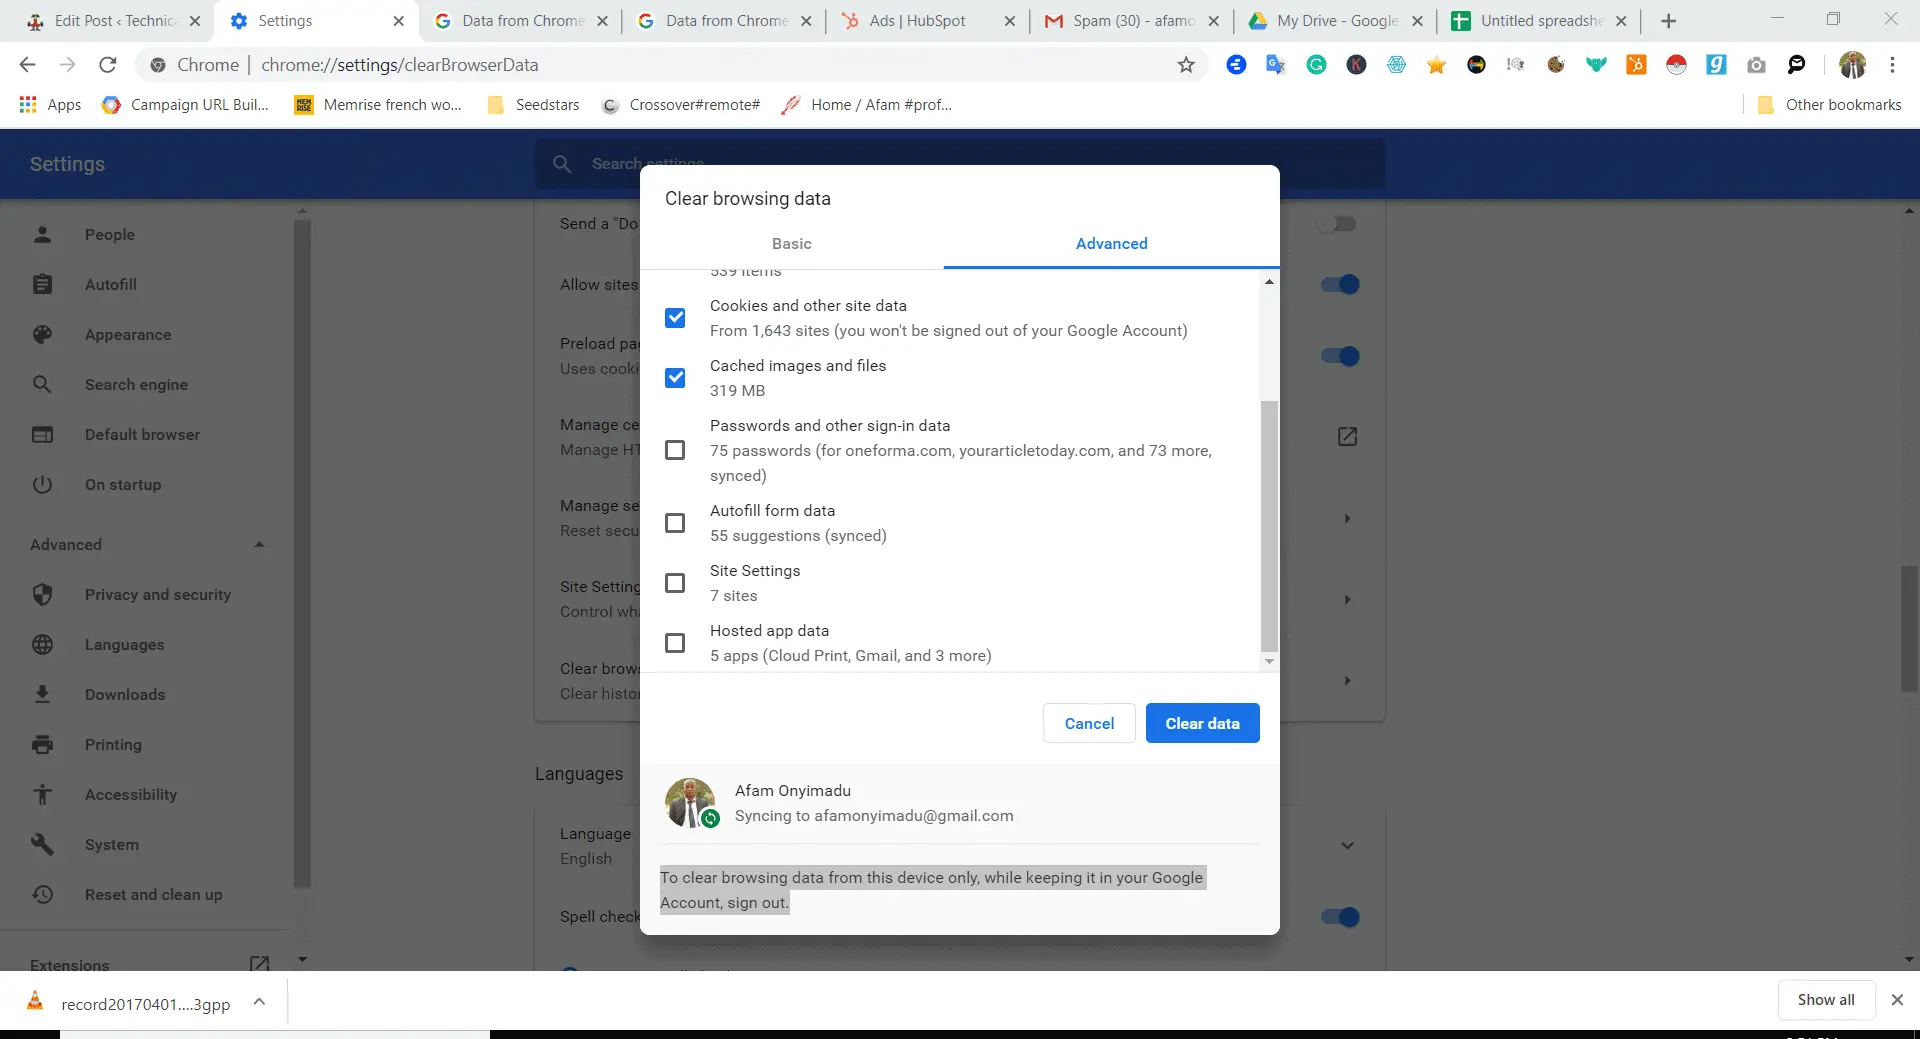
Please note that if you need to clear browser data on a device while keeping it on other devices, all you need to do is sign out of chrome on that particular device.
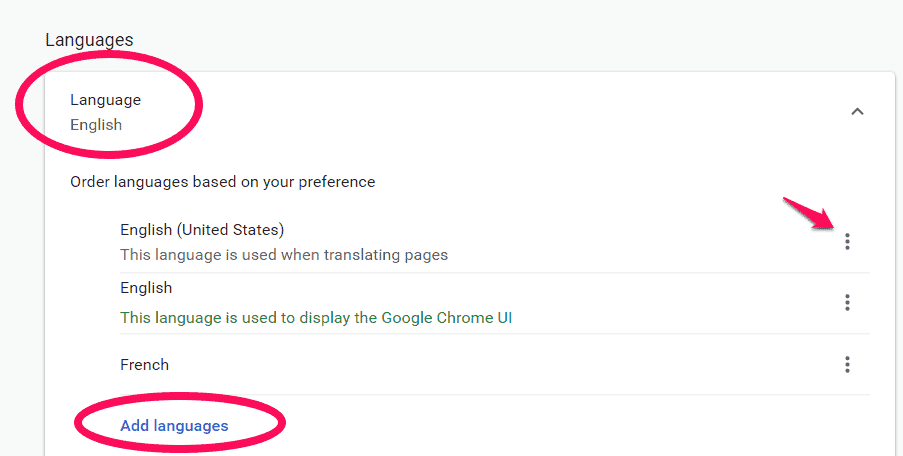
2. Languages
On the language option, you can choose what language your browser displays in. You have the option of adding a number of languages. But the top-most language will be your browser default language.
By clicking the three dots in front of the selected languages, you can move languages up or down the pecking order.
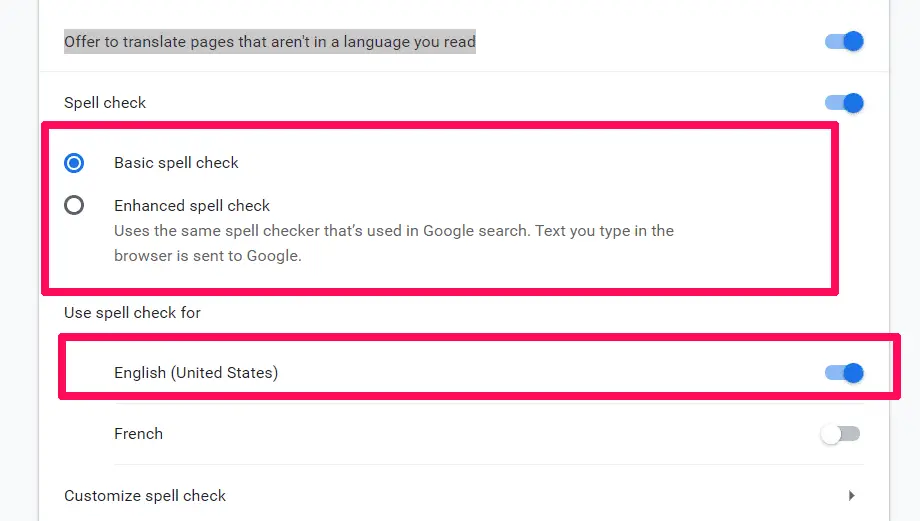
There is also an “Offer to translate pages that aren’t in a language you read” option. This option makes a google translate option appear anytime you browse a website that is not in your default language.
The spell check option makes you type without spelling errors on your browser. There is a basic spell check option and the enhanced spellcheck option which uses the same spell checker used in google searches.
You could also specify what languages you need to use the spell check for.
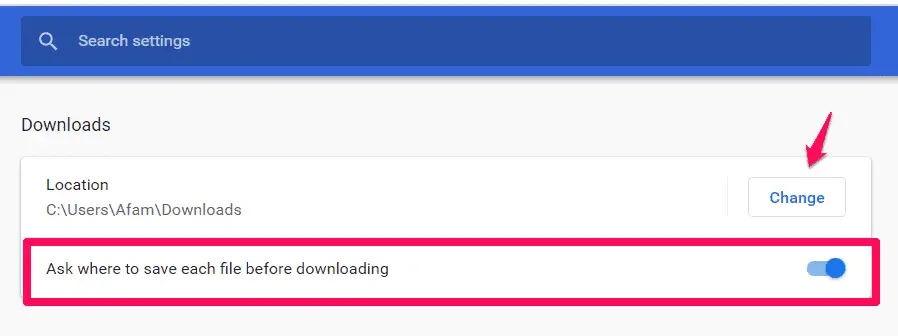
3. Download
Downloads can be saved on set apart locations. For this to happen click on downloads and under the location, click change and specify the location you want to save all your downloads.
Another option is to decide each time there is a download where it will be saved. To enable this, turn on the switch in front of “Ask where to save each file before downloading”.
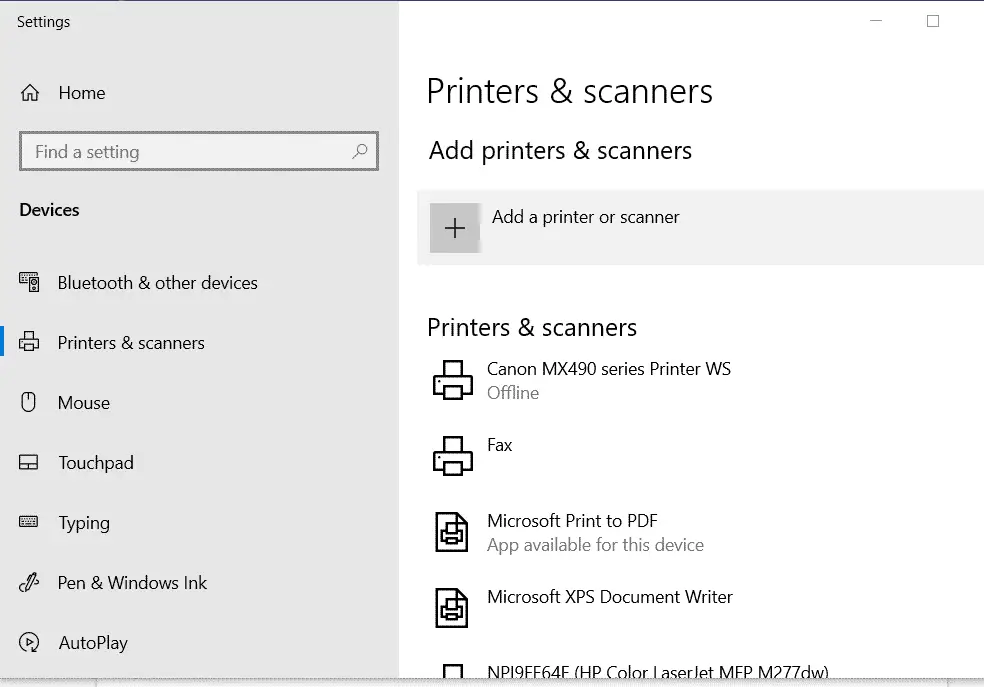
4. Printing
Printing is a task performed regularly while we browse. It could be PDFs images or text files. Using Chrome printing settings, you could specify how to print.
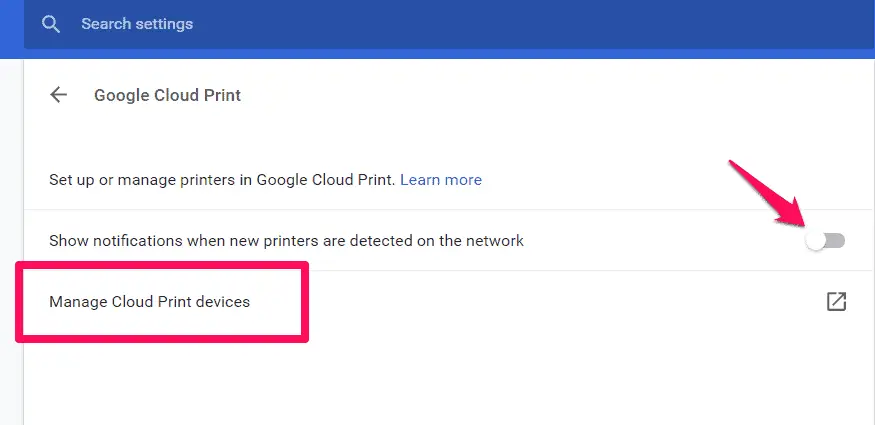
There are 2 printing options; Printing and Google cloud print.
Printing – Using the printing option, you will be taking to the computer printing settings. Here you can select a printer to use as default, or add a new printer.
Google cloud print – With this service, you are allowed to print from any web-connected device by routing print jobs between your computer, smartphone or tablet and sends them to an internet-connected printer.
You could enable the option to show notifications when new printers are available. You can also use the manage option to manage Google cloud print.
5. Accessibility
Accessibility helps to improve the user experience by customizing display features according to a user’s preference.
There are two accessibility options:
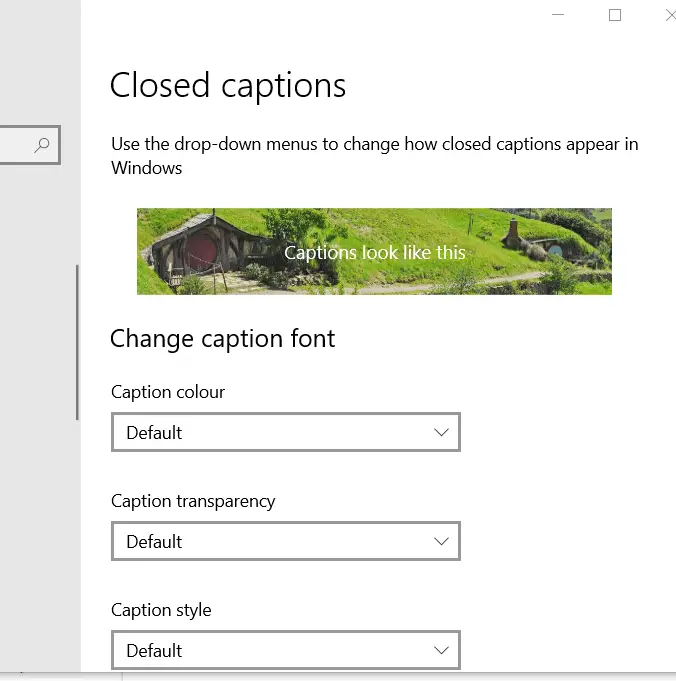
Captions – Selecting this option takes the user to the computer’s settings for closed captions. Here the user can change caption fonts, color, transparency. style etc.
Add accessibility features – When you click on this option, it will take you to the google webstore for chrome accessibility products. Here there are a number of extensions to add that will improve the user experience.
6. System
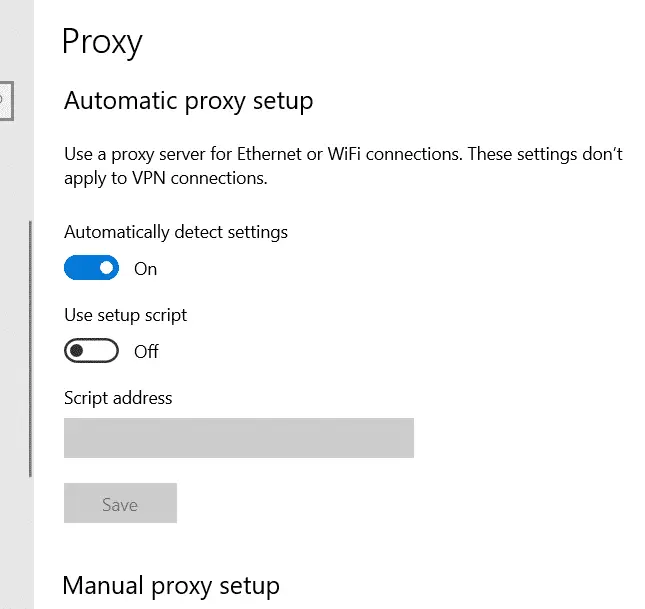
The system settings control some essential functions in Google chrome. These 3 functions are “Continue running background apps when Google Chrome is closed“, “Use hardware acceleration when available”, “Open your computer’s proxy settings”.
The first two functions can be enabled or disabled using the switch in front of the functions.
The last function opens up the computer system settings where you can choose to either automatically detect settings or use a setup script.
7. Reset and Clean up
Resets are generally very handy after we have tweaked a lot of settings and would want to revert to all the defaults. This is a default setting if you are not sure what settings would suit you.
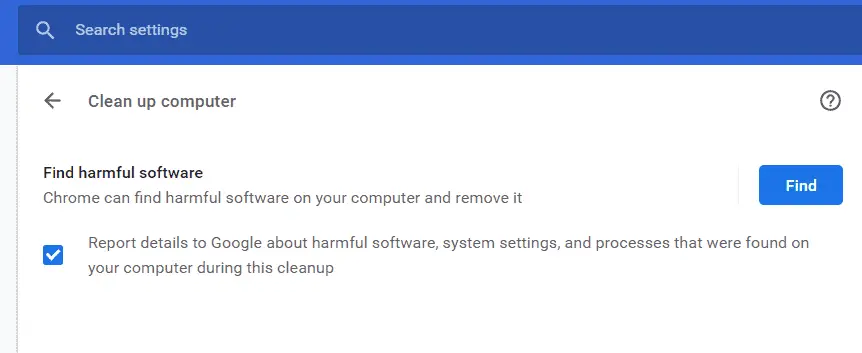
Here you could either restore settings to their defaults or clean up the computer.
With the section function, Goole Chrome acts like some sort of antivirus. It finds harmful software on your computer and removes it.
All you need to do is click the find button.
At the time of our research on “Chrome Settings: The Definitive Guide To Enhance Your Browsing”, we found a video about “8 Chrome Settings You Should Change Right Now!” which is worth watching.
Other features on Google Chrome Settings
1. Extensions
Extensions are pieces of software that add functionality to a service. Chrome has a huge library of extensions. Many are owned by Google, but also there is an avalanche of 3rd party extensions.

If you have used Chrome extensions in the past, clicking the extension settings will take you to a repository of all the extensions you have on your Chrome.
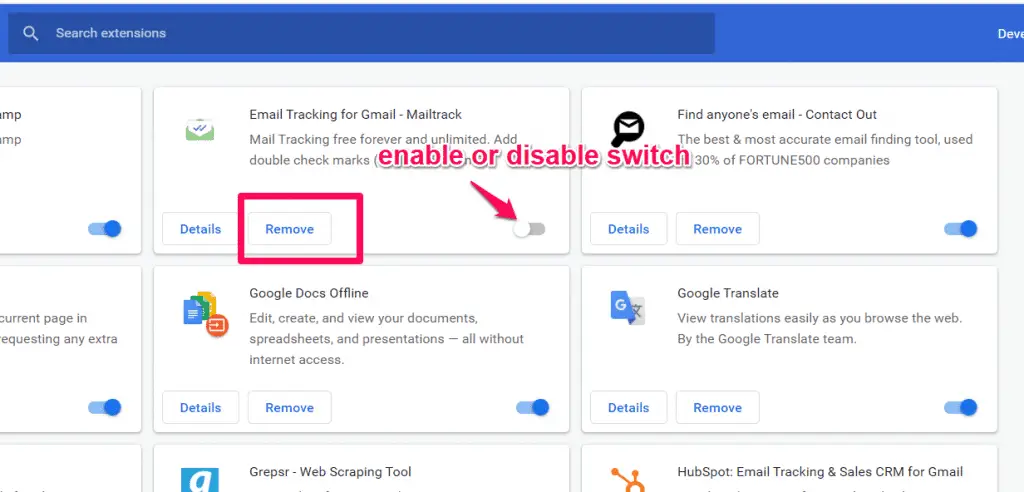
In the extensions repository, you could Disable or enable extensions, remove extensions, update extensions and carry out a few other functions.
Enabling or disabling extensions
Once in your chrome extension page, search for the extension you need to enable or disable. Switch on or off the switch on the lower right side of the extension.
Removing extension
Once in your chrome extension page, search for the extension you need to remove. Click on the Remove button at the bottom of the extension.
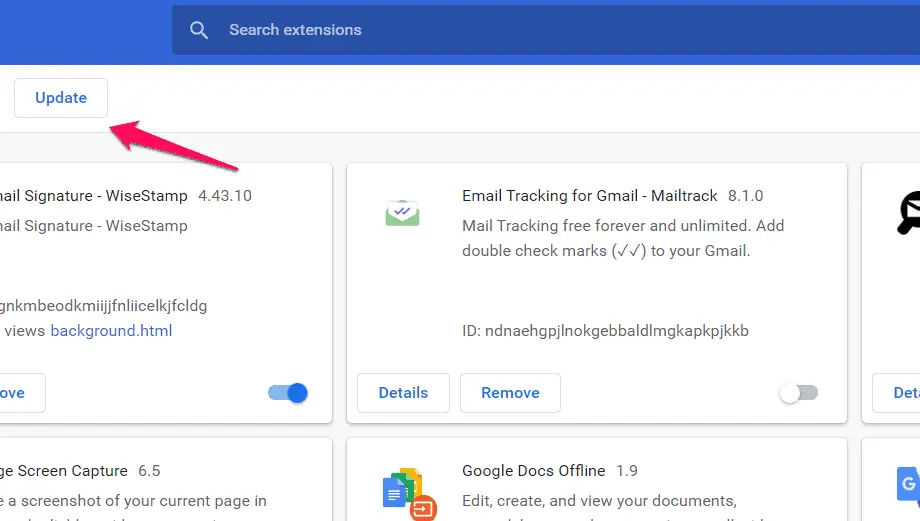
Updating Extensions
To update your chrome extensions, once in your chrome extension page, at the top right corner, turn on the “developer mode” switch.
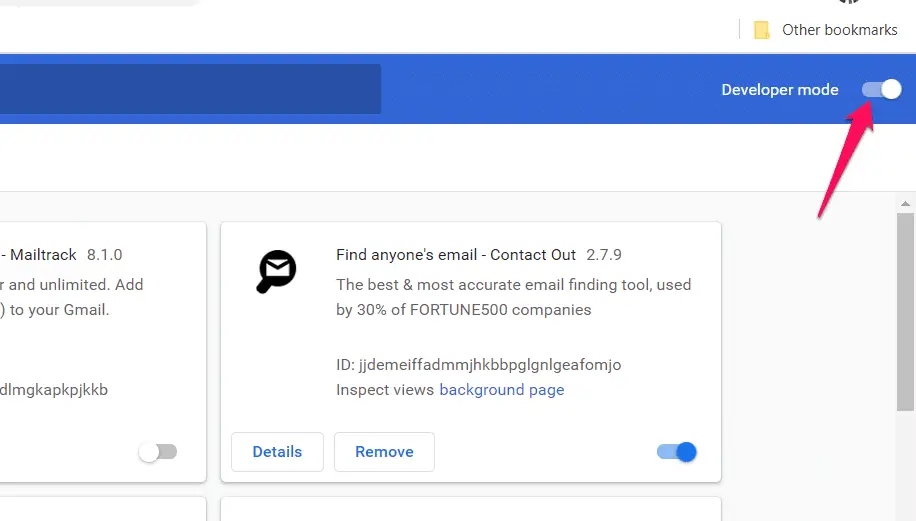
Next, at the top left corner, click the update button. After a few seconds, you will see a message at the bottom left corner telling you that the extensions have been updated.
2. About Chrome
The about part of any service or software is the best place to know about the service. It is also often used as a place to get some help with usability.
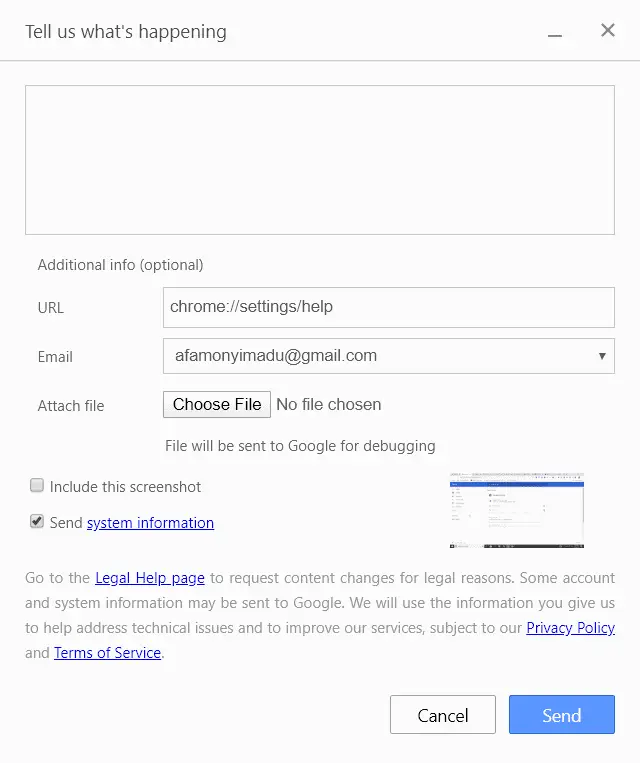
In chrome’s about us, you could find what version of Chrome you use, get help or report an issue.
Clicking on the “get help with Chrome” takes you to the official Chrome support page. Here you will be able to describe the issue you have encountered and get replies and support for this issue.
The help center also features a community center. here you could talk straight to the community and get responses from other members of Chrome’s community.
A great alternative to the get help option is using the report an issue feature. When you choose this option, a pop-up appears where you can report your issue. You could do this anonymously or using your email address.
Killer Google Chrome Tips and Tricks You Should Know
1. Open websites like apps
Chrome lets you launch your favorite web apps straight from the Desktop, without any of the browser’s usual tabs, address box, toolbar icons or bookmarks bar–so all you see is the site running in a window.
It works best with websites that behave like apps, so it’s perfect for Google tools such as Gmail, Keep, YouTube, Drive, and Photos. It also works well with other app-like sites, such as Microsoft To-Do and Outlook.com.
To open a website in this way, press Windows+R and type Chrome –app= followed by the URL.
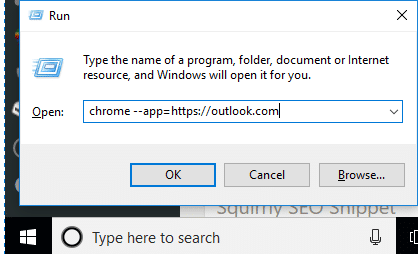
Here are some examples:-
chrome –app=https://mail.google.com
chrome –app=https://keep.google.com
chrome –app=https://youtube.com
chrome –app=https://drive.google.com
chrome –app=https://photos.google.com
chrome –app=https://to-do.microsoft.com
chrome –app=https://outlook.com
2. Create shortcuts to run websites
Typing commands into the Run box is tedious, so you could instead create Desktop icons that you click to open sites as if they were apps. Right-click on the empty area of the Desktop and select New, Shortcut. You’ll need to enter the full path to Chrome for a shortcut, so click Browse, find Chrome and select it. The following should work:
“C:Program Files (x86)GoogleChromeApplicationchrome.exe”
Place the cursor at the end, press the spacebar and type:
–app=https://photos.google.com
Click Next and give the shortcut a name. You now have a Desktop icon that opens Google Photos like a Desktop app. Try it with other URLs such as Gmail, Drive and Outlook.
Note:- I have written a post for people looking for Best Bookmark Manager Tools To Manage Your Bookmarks?, do read it If you are interested.
3. Try advanced Chrome commands
Dozens of commands can be used when starting Chrome. Most are aimed at developers, but some are useful for all users.
For example, if Chrome blocks old plugins, press Windows+R and type
chrome –allow-outdated-plugins
If a web page won’t display because it has mixed secure and insecure content, use
chrome –allow-runninginsecure-content
To run a series of diagnostic tests to see if Chrome is okay, type chrome –diagnostics
Type chrome://flags in the address box to see hidden settings, some of which are experimental.
If any you’ve changed are causing problems, press Windows+R and type
chrome –no-experiments to disable them. Return to Chrome Flags and use the button at the top to reset everything back to the default.
To start Chrome full screen, type chrome –start-maximized. To make the window a specific size, use
chrome –window-size=800,600
where the numbers show the width and height in pixels. To position the Chrome window, type chrome –window-position=50,0 where the numbers are the x,y coordinates.
To finish, try combining everything we’ve learned about Chrome. For example, to start Gmail as its own app, in an 800 x 600 window, 50 pixels in and 50 down, type:
chrome –app=https://mail .google.com –windowsize=800,600 –windowposition=50,50
That’s too long to type every time so you should create a shortcut by replacing ‘chrome’ with the full path.
At the time of our research on “Chrome Settings: The Definitive Guide To Enhance Your Browsing”, we found a video about “15 Ways to Search Google 96% of People Don’t Know About” which is worth watching.

4. Save data by compressing online images
If a web page is taking an age to load, it’s almost certainly because it’s stuffed with large, high-resolution images, which not only test your patience but guzzle your data.
You can prevent this from happening by installing a new Chrome extension called Bandwidth Hero, which compresses all pictures on web pages to save you both time and data.
It works automatically, downloading images to a proxy server, converting them to smaller files and returning them to your browser (this happens much more quickly than it sounds).
By default, the add-on reduces the file size by around 50%, but you can reduce the compression level in its settings and stop it making images black and white.
Bandwidth Hero can be disabled on specific sites to leave their pictures intact, and usefully keeps a record of all the images it’s compressed and data it’s saved. It’s also available for Firefox.
5. Manage your tabs by wrapping them
When you have lots of tabs open in Chrome, important pages can get lost among the more trivial ones, forcing you to click to and fro to find the one you need. Wrapper makes life easier by showing you at a glance the contents of all your tabs and letting you organize them into tidy groups called ‘wrappers’.
You can give each wrapper a title and description, colour-code it for easy reference and even share it with other people via email.
Click a wrapper to view all the tabs within it and either open them individually or all at once. Wrappers are saved when you close your browser, to give you instant access
to the wrapped pages next time you need them. Annoyingly, you need to
register with Wrapper to use the add-on, but this allows other people
to share their wrappers with you.
6. Install offline apps
Chrome doesn’t just display websites, it also runs apps, and these often have as many tools and options as paid-for Windows programs.
While most apps are for online use, it’s worth remembering that some of them also work offline, so you can install them in Chrome and use them even when you aren’t connected to the internet.
To find offline apps, go to chrome://apps and click Web Store. Select either Apps or Games on the left and look further down the menu. Under Features, tick the box for Runs Offline. Your results will be filtered to show all the items that can be run offline.
You can also check whether an app will run offline from its description. Click an app and, in its information column on the right, look for the lightning bolt and the words Run Offline.
Clicking this will take you back to all the other apps that run offline. When you’ve found an app you want to use, click ‘Add to Chrome’ to install it. You’ll find your apps
in chrome://apps, where you can also run them.
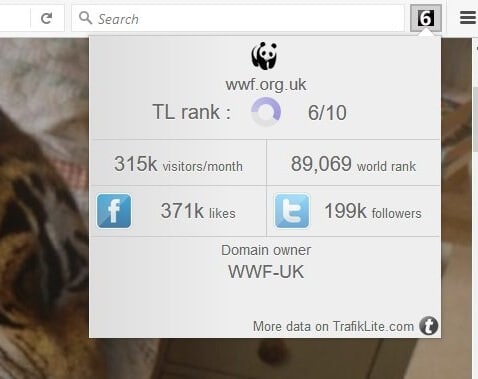
7. Check the popularity of any website
Anyone who works for a website will know how important (and addictive) it is to keep track not only of the number of visitors to your site but also how many your competitors attract.
TrafikLite (www.trafiklite.com) is an extension for Chrome, Firefox and Opera that puts this information at your fingertips, so you can check the popularity of any
site instantly.
Just click the toolbar button to see the current site’s monthly visitor numbers, Twitter
followers and ‘likes’ on Facebook, as well as its global ranking. You can also view TrafikLite’s own ‘reputation’ rank for the site as a score out of 10.
8. Mute every page on a website in one go
The stable version of Chrome 62 is now available, and among its otherwise fairly unexciting list of new features is a useful tool for controlling the sound on noisy websites.
Instead of right-clicking a specific tab and choosing ‘Mute tab’, you can turn off the sound across every page on a site.
To activate the feature, go to chrome:flags and search for the entry ‘Sound content setting’.
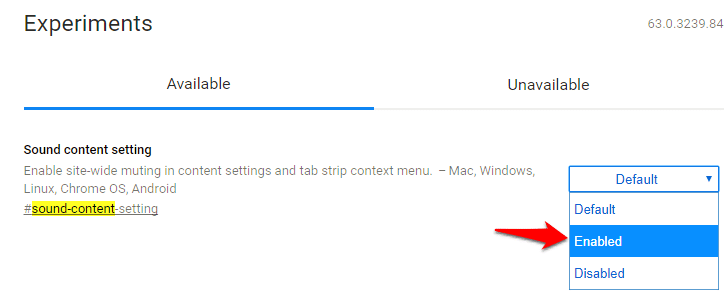
Select Enabled from the drop-down menu and restart the browser. Now, when you want to silence every page on a website, simply right-click any of its tabs and choose ‘Mute site’ to turn off the audio across the board. When you want to restore the sound, right-click a tab and select ‘Unmute site’.
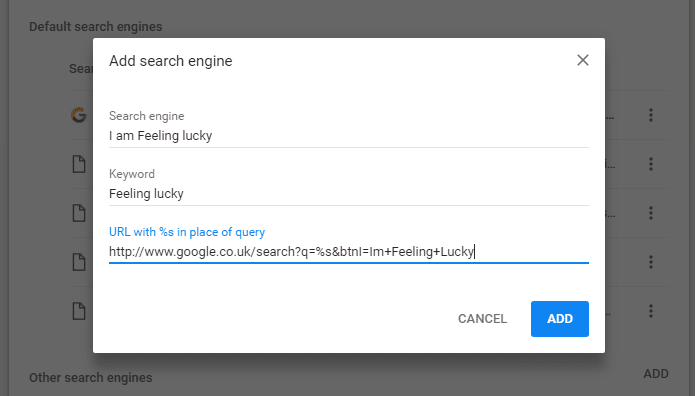
9. Feel lucky from the address bar
When you search the web by typing a term into Chrome’s address bar, you don’t get the option to click Google’s ‘I’m Feeling Lucky’ button, but there’s a workaround that adds
this time-saving feature. Go to Settings, ‘Manage search engines’ and click Add, then enter a name and keyword for the option – for example ‘I’m Feeling Lucky’ and ‘lucky’.
In the URL line, type:https://www.google.co.uk/search?q=%s&btnI=Im+Feeling+Lucky and click Save.
Now, when you want to use the I’m Feeling Lucky feature, just type the keyword
into your address bar, press the spacebar and enter your query.
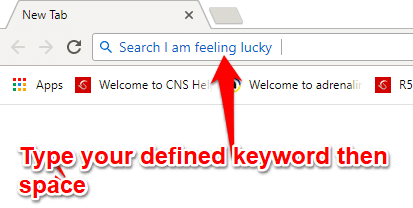
Press Enter and you’ll be taken to (hopefully) the most relevant result.
10. Stop HTML5 videos playing automatically
Autoplaying videos–particularly noisy adverts–are becoming an increasing annoyance, but because most are in the HTML5 format, Chrome doesn’t offer a ‘click-to-play’ setting as it does for Flash content.
Until now, that is, because the latest version of the browser (61)
adds an option that stops HTML5 video playing automatically and allows you to click to play it if you want.
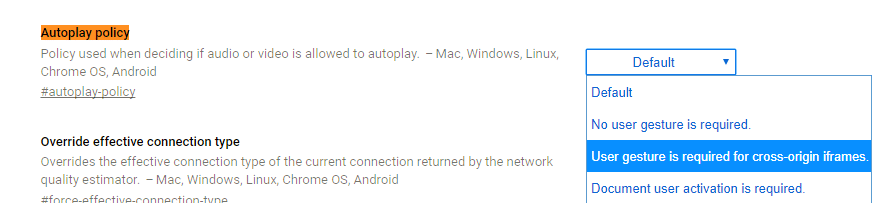
To access and activate this secret setting, type chrome:flags into the address bar, press Enter and search (using Ctrl+F) for ‘Autoplay policy’. Click the drop-down menu for the entry, select ‘User gesture is required for cross-origin iFrames’ and restart Chrome.
Note that this trick won’t work for all HTML5 content, but it should make at least
some web pages less annoying.
11. Manage your tabs or your Tabagotchi dies
The more tabs you have open in Chrome, the more memory it uses and the more distracted you become, but it’s easy to ignore the risk until it’s too late and your browser
crashes.
A new extension called Tabagotchi gives you the incentive to manage your tabs more sensibly by making your actions a matter of life or death.
Inspired by the Tamagotchi digital-pet craze of the Nineties, the idea is that you maintain your creature’s health and happiness by keeping open tabs to a minimum.

For each hour you spend browsing with five tabs or fewer, you get one step closer to evolving your Tabagotchi to a higher form. Conversely, when you open too many tabs, your pet grows angry and ill, and ultimately dies because of your negligence. You monster!
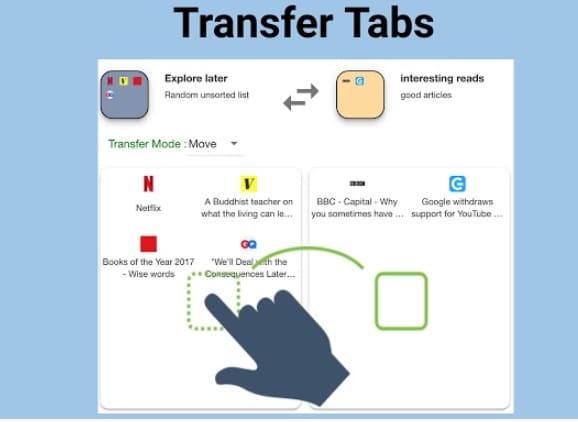
12. Unload unused tabs to view later
The more tabs you have open in Chrome, the more memory it uses, but you might be reluctant to close pages you want to view later. Rather than adding multiple bookmarks, you can use Dog Ear to temporarily ‘unload’ unused tabs, and save them in a list to reopen later.
Just click the toolbar button to unload tabs individually, or right-click it and choose ‘Dog Ear all tabs’; the list of unloaded tabs then appears on your New Tab page so you can easily restore them.
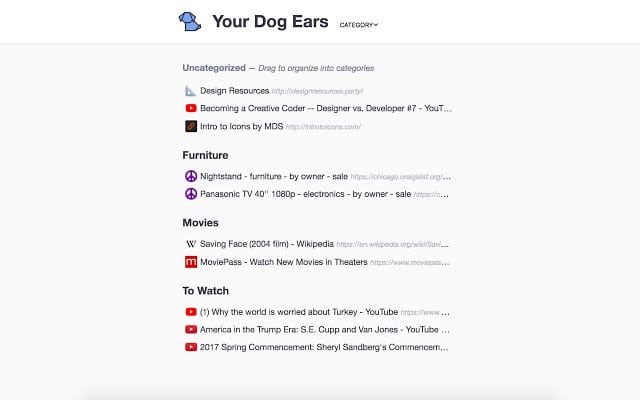
Dog Ear works in a similar way to the popular add-on OneTab (www.one-tab.com), but it’s even more efficient.
13. Reveal the passwords behind asterisks
Hiding passwords behind asterisks stops nosy parkers seeing what you’re typing, but it can also prove frustrating when you mistype a character and you’re told you’ve entered an incorrect login. If you make too many mistakes, you may even be locked out of your account.
You can avoid this problem by installing Unmask Password, which removes the asterisks from password fields so you can see exactly what you’re typing. Just click the eye symbol to reveal the characters, then click it again to hide them.
Obviously, you shouldn’t use it if there are people around you who can’t be trusted,
but it makes logging in a little easier.
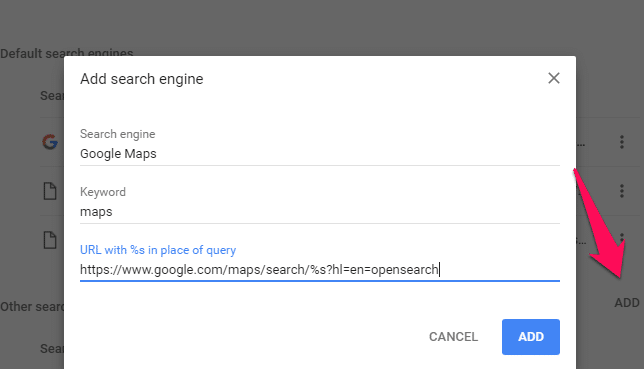
14. Search Google Maps from the address bar
Chrome provides access to a host of custom search engines, and you can search many popular sites directly from the browser’s address bar by typing in their keywords followed by your search query.
One of the most useful options is to look up any location instantly by typing maps.google.co.uk followed by the place name or postcode. You can make this even easier by shortening the search engine’s keyword to map.
Click the three-dot button in the top-right corner of the browser and select Settings, then scroll down to the ‘Search engine’ section and click ‘Manage search engines’.
Find the Google Maps entry in the ‘Other search engines’ list, click the three-dot button next to it and choose Edit. Enter map as the keyword and click Save.
While you’re there, you can add a shortcut for directions from your home address, for example, to anywhere else.
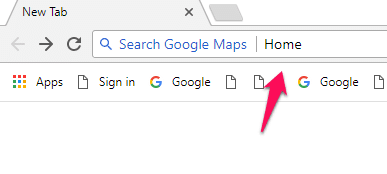
Click the Add button, then type a name for the shortcut, such as Directions, and a keyword to trigger it. In the URL field, paste the web address of your home – you can get this by clicking the Share button when viewing your home in Google Maps and copying the URL.
Click Save, and when you next enter the directions keyword, Google Maps will open with your home selected so you can quickly get the information you need.
15. Easily control the volume of your tabs
Chrome’s volume controls are disappointingly basic – it shows you which tabs are currently playing audio and lets you silence them by right-clicking and choosing ‘Mute tab’.
Thankfully, there’s now a much better option for web users who like to listen
as they browse in the form of a new extension called Volume Master.
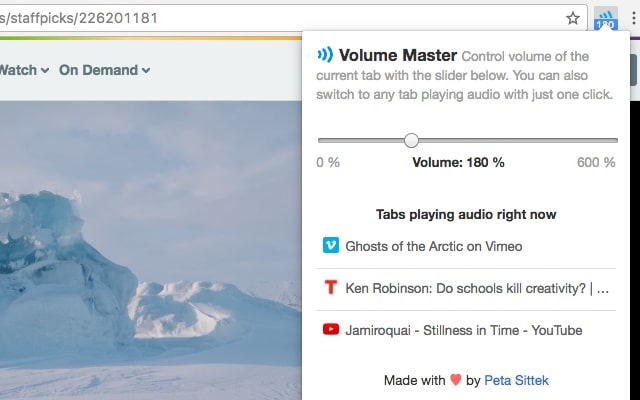
This simple but useful tool lets you control the sound emanating from multiple open tabs via a single panel.
You can use the slider to boost the volume of the current tab by up to
600% or take it down to silence; and click the title of another tab to increase
or decrease its noise level instantly. It’s an effective way to deal with sudden loud adverts and videos that make you jump out of your skin.
16.Discover the technology behind any website
You don’t have to be a professional web designer to be interested in the type of software a developer has used to create a particular site, the service that hosts it and which advertising tools it uses to make money. Now you can discover all this information and more by installing a clever new Chrome extension called Whatruns .
This handy browser tool uses special algorithms to detect the technology behind any
the website you’re viewing.
Simply click its toolbar button to view a wealth of details about how the site was built,
including its content management system (CMS), programming language, frameworks, widgets, fonts, analytics tools, web servers and miscellaneous elements.
You can click the Know More button next to an entry to see other websites that use the same software, and ‘follow’ the current site to receive a notification when it starts using different technology.
It’s geeky but interesting stuff.
17. Turn offensive online comments into emoji
It’s a sad fact that many social-media sites serve as a magnet for idiotic and obnoxious
comments, which can spoil your enjoyment of otherwise interesting posts and videos.
Rather than avoiding comments sections altogether, why not turn those unpleasant
‘opinions’ into harmless emoji?
That’s the idea behind Behave , which automatically hides “toxic comments” on YouTube, Twitter and Reddit and replaces them with cute faces and objects, including the ever-popular ‘poop’.
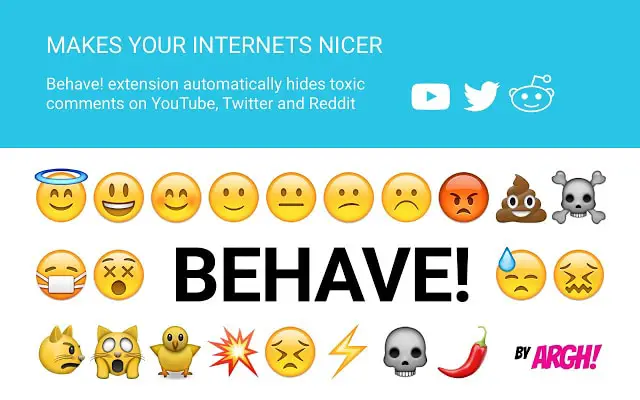
The add-on lets you specify the toxicity level you’re willing to tolerate, from ‘I’m too
young to die’ to ‘Doomed’.
You can click comments to reveal them if you dare,
and help Behave choose the right emoji for any future comments it filters by clicking
‘Improve score’ and selecting an icon. It’s a fun way to make the web a nicer place.
18. Use DuckDuckGo ‘bangs’ in Google and Bing
Aside from keeping your searches private, one of DuckDuckGo’s best features is its support for ‘bangs’ – quick commands that let you search thousands of sites by typing, for
example, !w for Wikipedia, !twit for Twitter or !azuk for Amazon .co.uk, followed by a search term.

A new extension called !Bang Quick Search adds this functionality to Chrome so you can use bangs with Google and Bing, whichever is your default search
engine.
Type your bang into the address bar, followed by your search term (or the other way around), press Enter and you’ll be redirected to the relevant site to view matching
results.
Alternatively, type the bang to open the website’s homepage.
!Bang Quick Search works with all DuckDuckGo’s bangs – to see the full list, visit duckduckgo.com/bang.
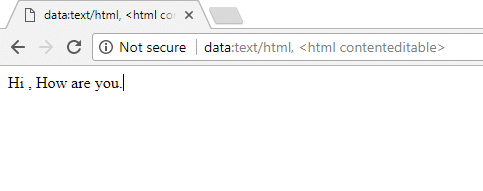
19. Use Chrome for notes
If you want to copy content from one or more websites to use later, you don’t need to open another application such as Notepad or Word – you can just use Chrome.
Type data:text/html, <html contenteditable> into the address bar and hit Enter. You can now type and paste whatever you like in that tab.
To save the contents, press Ctrl+S. In the Save dialogue box, replace the file’s ‘.html’ extension with ‘.txt’. This trick also works in Firefox.
20. Restart Chrome with a single click
When Chrome goes wrong, restarting it often fixes the problem, but there’s no easy way to do this other than closing the browser and reopening it.
One way around this problem is to create a button that restarts Chrome instantly with one click. You can do this by making a bookmarklet for Chrome’s ‘chrome:restart’ page.
On any web page, click the bookmark (star) button in your address bar or click Ctrl+D
to add a bookmark, then click Edit. Change the name of the bookmark to Restart Chrome (or similar) and enter chrome:restart in the URL field.
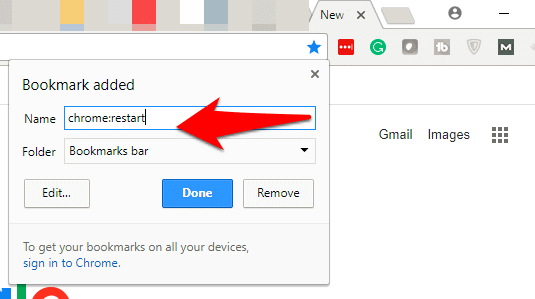
Select the ‘Bookmarks bar’ in the list below, click Save and drag the new bookmark to your Bookmarks bar to create a bookmarklet.
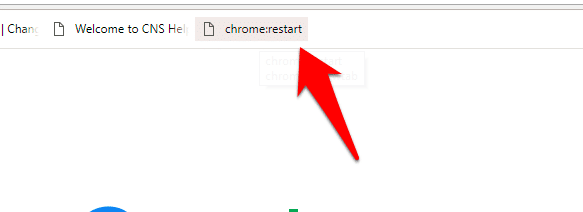
You can now click this whenever you need to restart Chrome, with no messing around
Conclusion
While there are a host of browser options, Google Chrome remains one of the most relevant in the market. Having the majority of the browser market, it lives up to its name.
Its large pool of users generally finds it attractive for its huge advantages like:
- Speed- Loading and displaying pages very quickly.
- The ability to drag tabs into separate windows with ease.
- It’s basic user-friendly design.
- A highly customizable startup page, with options to list the most used pages.
- Its translation options and the ability to have translation pop-ups come up automatically when translations are needed.
- Ability to query search engines directly from the address bar.
- Site crashes on tabs being independent.
- Incognito mode permits a user to browse the internet without being logged.
- Availability of a host of colors and themes to choose from.
- Quick installation.
- An extensive extension library and Chrome community.
Chrome is constantly being updated with an aim to improve the user experience. Many of these updates will apply as you connect to the internet, but there are other features that you could use experimentally. Chrome flags make it possible for a user to try out experimental tweaks that do not reflect in Chrome updates.
While you are warned to be cautious with these, you could use features that put you a couple of years ahead of time. These features will bring a lot of personalization to your browser use and allow for more browser customization.
This exhaustive list should improve your experience. If there are any settings you know of that are not mentioned in this post, please leave them in the comments.

