


Are you bored of always using the same lame and boring font which comes with the Command Prompt as default font? Do you wish if there was any way of adding a new custom font in command prompt?
Now, we use Command Prompt for ‘n’ no. of reasons like solving the system issues, generate reports, etc. We always end up getting frustrated by those small letters. So what to do? How to change the font type in Command Prompt?
How To Add Custom Font in Command Prompt on Windows 10
Before we start, there is something you should know first. The Command Prompt has a very limited scope for customization and editing in its interface. It is possible to make some customizations like the change of color, fonts, transparent layout, etc.
If you look and notice carefully you may notice that its layout is almost very much similar to DOS (Disk Operating System) interface. Adding to it, there is a limitation which comes with this interpreter i.e., not all the fonts available out there are functional with it. You may need to search for some of the fonts which may work with it.
So how to proceed? Can we just directly install the font and start using the Command Prompt? Will it change the font easily? The answer is ‘NO’. You may have added some creative fonts to use with certain applications like MS – Office, Photoshop, Paint, etc., but adding fonts to the interface of Command Prompt is slightly different.
Since there is no procedure to install the fonts and change them directly in Command Prompt, what we can do is add a font registry in our system files. This procedure will make some certain but not harmful changes in a registry file. So which type of fonts does it support?
Command Prompt supports only Monospace Fonts. Now, what are monospace fonts? A monospaced font, also called a fixed-pitch, fixed-width, or non-proportional font, is a font whose letters and characters each occupy the same amount of horizontal space.
This contrasts with variable-width fonts, where the letters and spacings have different widths. To know more about monospace fonts, click here.
Search for some good monospace fonts on the internet and download them on your PC and install the steps given below. You can get some cool-looking monospace fonts here.
How to install and register the Monospace Font
Now let’s just understand what type of monospace fonts are supported. You can either download custom fonts from any website as mentioned above or you can install fonts on your system using certain web-services.
Adding to the point that the Command Prompt works only with Monospace fonts, there is something that you should know.
To use custom fonts with the interpreter, Microsoft specifies that the font that you are adding to the interpreter must be FF_Modern if it is of the type .ttf (True Type Font) or OEM_CHARSET if not .ttf type font. Additionally, the font should not have a negative A or C space and it should not be an italic style font.
Here is where the trouble starts. Consider that you have downloaded a certain font and you don’t know if it will work or not, then you may have to install it and check if it is supported or not by performing the procedure given below.
Once you have found the font you want to install, unzip the file you have downloaded, open it and install the font by right-clicking on it and selecting the option Install.
Note:- If the file you have downloaded is not a zip file and a font file then install it directly.
As soon as the font is installed, we need to register it.
How to Register the Font
Press Windows key + R on your keyboard.
Type regedit and press enter.

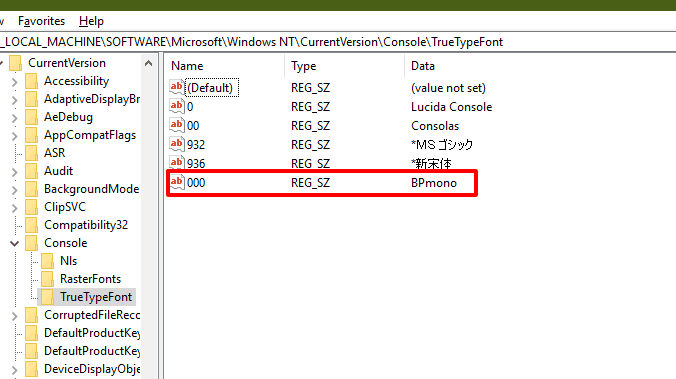
Navigate to the following path:
HKEY_LOCAL_MACHINE\SOFTWARE\Microsoft\Windows NT\CurrentVersion\Console\TrueTypeFont
There would be some already available fonts present with their own certain values.
Read our detailed guide A Complete Guide to Windows 10 Registry Tweaks
Too create a custom font, right-click on the blank area and select the option New.

Select the option String Value and give it a unique number.

For example, if any of the fonts are already having the String Value as 00 then give your font the value as 000.
Double click on the String Value you just created and enter the name of the font that you are using.
Reminder: Add the name exactly as it is shown while installing the font.
Click on OK and exit the screen.
Restart the system and you are good to go.
Note: It is necessary to restart the system as soon as some changes are made to either system files or user files. So always restart your PC after some changes are made.
How to Add the Font in Command Prompt
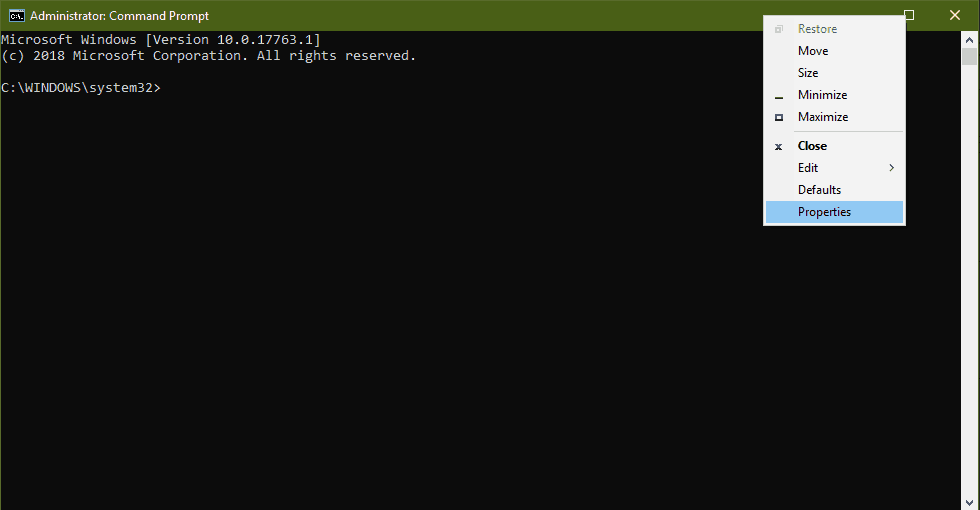
Open Command Prompt in Admin mode.

Right click on the title bar select the option properties.
In the Font tab, find the font that you just installed before restarting your machine.
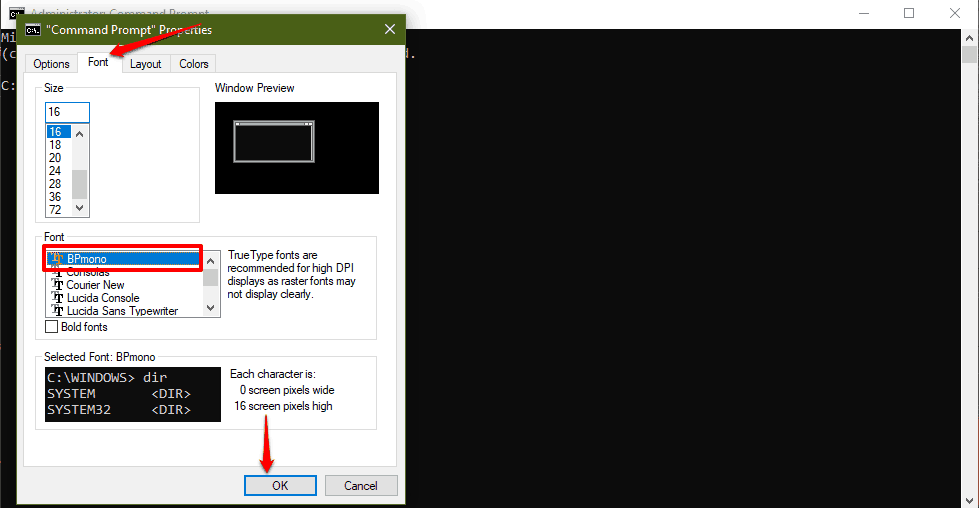
Click on OK and Voila, the font is changed.
If you didn’t find the font you saved in the registry then there may be two reasons, either the font is not operatable in Command Prompt or you have made some mistake. There can be another reason that the font is not a monospaced font.
I will recommend you to watch below mentioned YouTube Video to learn some awesome cmd tricks.

Enjoy your new font with Command Prompt and keep changing the font if you like!


