Most of the times, when our system doesn’t respond on time or it is unable to fetch the resources required by a certain task to complete, Windows generates an error report. The generation of this error report is a type of feedback mechanism. System queued Windows Error Reporting files are generated due to some software or hardware problems.
To solve such issues, the reports are temporarily stored in the system. These reports are then sent to Microsoft to find the solution to the problem. Additionally, Microsoft keeps the log of such reports to fix them in future updates for other users. But, till the time our problem is solved, the report files stay in our system files and keep on increasing their size as the errors keep on coming.
The good news is, we can delete these report files anytime we want. Deleting those files may end up giving you a huge amount of storage back (sometimes in GB’s). Before we get started, let’s learn how these errors are solved?
Whenever a report is generated, it sends the error file to the WER (Windows Error Report) Server. If the solution is available to such a problem, the server sends it back.
If the solution isn’t available or the problem is under supervision then the user gets notified and may have to wait. This waiting time increases the file size of the report.
How to delete System queued Windows Error Reporting File
If you are one of the users who keep on using Disk Cleanup provided by Windows 10, then you may know that sometimes the files don’t get deleted.
As well as, while using the Free Up Space Tool available in Settings App is unable to delete some files. Still, you should keep trying both the methods and we will see how to use both of them here.
How to delete Windows Error Reports using Settings App
Press Windows key + I on your keyboard. The Settings App will open up.
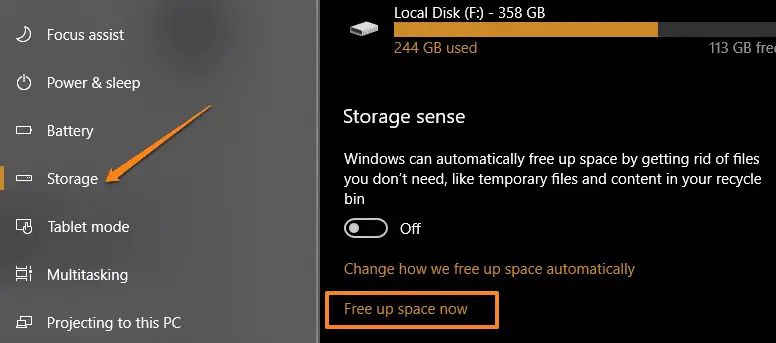
Click on System and then select Storage from the left panel.
Click on Free up space now. It will calculate the size of all the system files which aren’t useful to run the system.
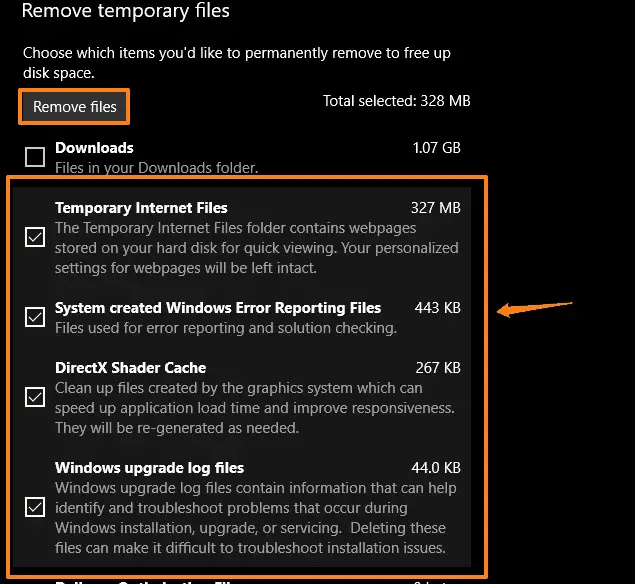
Select the options you want to remove and do not forget to select the option System created Windows Error Reporting Files.
Click on Remove files button to delete and remove the selected files from the system.
Note:- I keep on deleting those temporary files so it shows a small amount of space is acquired by them in my case.
Related Post Windows 10 Tips: How to Get Disk Space of Remote Computer
How to delete Windows Error Reports using Disk Cleanup
Open This PC from your desktop. Right click on the drive on which your Windows is installed.
Generally its Local Disk (C).
Select the option Properties. The properties window of the disk will open up.
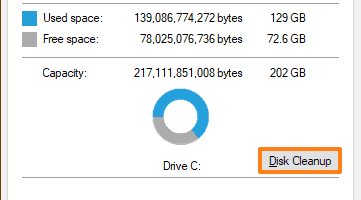
Click on Disk Cleanup. It will take some time as per your system speed. A Disk Cleanup window will open up.
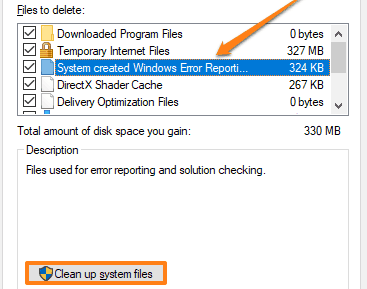
Here you will find the option of System created Windows Error Reporting Files, but click on Clean up system files. It will gather all the system files and open the cleanup window again.
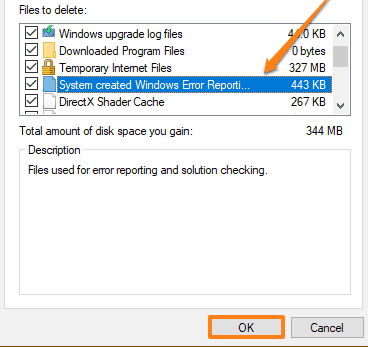
Select the options you want to remove and do not forget to select the option System created Windows Error Reporting Files.
Click on OK. A pop-up will come to take confirmation if you want to delete those files permanently. Click on Delete Files.
It will take some time to delete the files, depending on their size and system speed.
Now enjoy the free space you got and forget the notification of the system is low on disk storage.


