


Ever heard of “telnet Windows 10”? Read on to know all there is to this technology.
I will be explaining how it works, why it is not being used regularly anymore. I will also give a detailed explanation about how to enable it for anyone who’s interested in old tech.
I will also be explaining a quite useful use of Telnet. Using Telnet in the command prompt to test network connections.
What Is “Telnet Windows 10”?
We all know that Windows 10 is a popular (probably the most popular right now) operating system and chances are, that’s probably the operating system you’re using.
But you might not know what Telnet is because it is really old.
A communications protocol made in the 1960s, Telnet (Teletype Network) basically allows users access to connect to remote hosts and devices.
Through a Telnet client, you can perform many functions like managing files amongst others. There will virtually be no difference between you and the normal regular user.
Telnet has a default port – (Default Port 23)
How Is Telnet Controlled?
In the case of modern browsing, we have other controls like mouses. When using Telnet, you will have to deal with only using the keyboard. No other graphical user interface can be utilized.
To compare Telnet with something modern, you could say it is kind of like Team Viewer.
But an upside to Telnet is that you will be using that remote device through another device but the privileges will be the same.
It would basically be the same thing as exactly using the remote device locally.
Why Isn’t Telnet Used Often Anymore?
Part of the uses of Telnet includes playing very simple games, remotely running some programs, remotely checking mailboxes, and maybe even checking the weather conditions.
This list of impressive uses should be enough to make it worth using except for the part about Telnet not having any sort of encryption at all.
In this day and age where information is key, accessing information through a connection that is literally defenseless is definitely not something you should do.
Everything you do on Telnet is done in plaintext (no encryption) so any information shared can easily be stolen by hackers.
That’s why Telnet has been phased out of common knowledge.
Can Telnet Be Used In Windows 10?
People wondering what is telnet Windows 10 is, might be interested in finding out that Telnet can definitely be used in Windows 10.
It is by default disabled in Windows 10 mainly for the privacy reasons already discussed above but it can still be used as long as the user enables it first.
If you don’t enable it first, you will get error messages like
- “Create Process ‘telnet’ is not recognized (C++)”
Or
- “Telnet is not recognized as an internal or external command”
If you do get any of the above error messages, then the problem is that you haven’t enabled it yet.
You have to first enable (explained below) Telnet before trying to use it.
Do Folks Still Use Telnet Today?
You might be wondering whether Telnet is still used today and the answer is yes, it is still being used. Not as mainstream as maybe 40 or 50 years ago but it is still useful for some folks.
Some of the users of Telnet today include scientists whose equipment is so old that it only accepts Telnet. Some amateur radio operators also still keep the Telnet flame from dying.
But because of its apparent security issue, the number isn’t growing.
Enabling Telnet In Windows 10
If you’re being nostalgic (probably not old enough to have used it well unless you’re 60) or you’re just fascinated by old tech and you want to try out Telnet, then here’s how to enable it in Windows 10.
I’ll be explaining how to enable telnet through the Control Panel menu that can be found either through Settings or maybe searching for it in the search bar.
I’ll also be explaining how to enable it using the Command Prompt or Windows PowerShell below.
How To Enable Telnet Using The Control Panel
The first step, as explained above, is to navigate to the Control Panel menu.
When you’ve opened the Control Panel menu, search for and click on Programs.
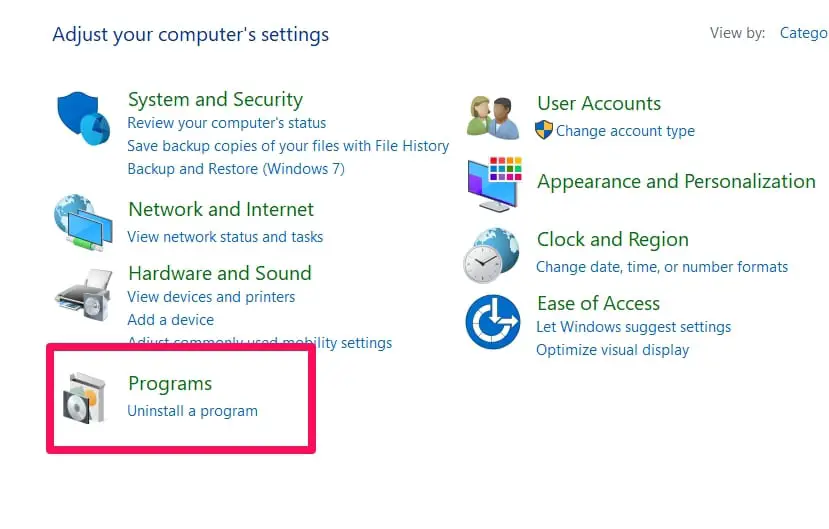
This should open up the menu too. Then in that menu, find the Programs and Features option.
Underneath it, you’ll see the option to Turn Windows Features On or Off. Click on this option because this is where you’ll find Telnet.

In the Windows Features menu that will open up, you’ll see a list of features. All you have to do is scroll down while searching for a folder named Telnet Client.
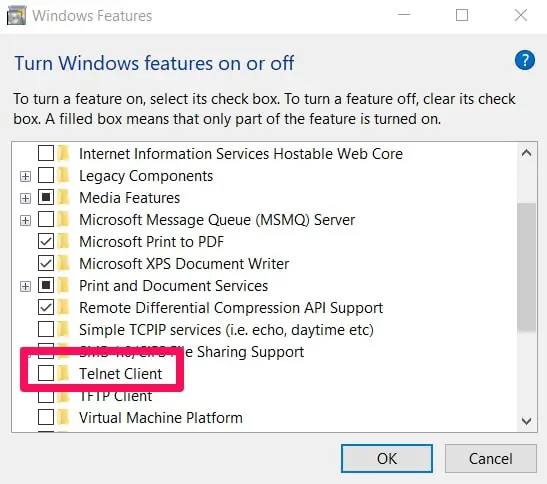
When you find that folder, tick the box to the left of the folder and then click on OK (down, to right of your screen).
How To Enable Telnet Using The Command Prompt
You will first have to open the command prompt and you can do that by using the run box.
All you have to do is type in cmd into the run box and search for it.
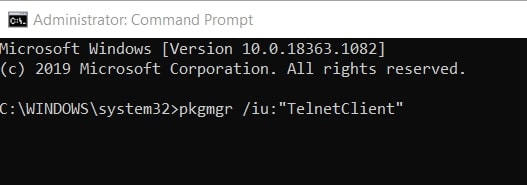
Open the Command Prompt (admin) option when the search results come back.
It is important that you open the admin version of the Command Prompt. This version makes it easier to make system-level changes to operations.
When the Command Prompt (admin) window is open, enter the command below at the command line.
pkgmgr /iu:”TelnetClient”
Remember that you have to press the Enter key after inputting the command above to run it.
When you follow the above steps correctly, you should be returned back to the command prompt.
If you want to immediately use Telnet, you will have to quit the command prompt window and reopen it back.
How To Enable Telnet Using PowerShell
Use the search box to open PowerShell (admin).
You can do that by typing powershell into the search box and when the search results come back, remember to choose PowerShell (admin).
Like I pointed out earlier, using the (admin) option is important.
When the PowerShell (admin) window is open, input the command below and then press Enter to run the command.
Install-WindowsFeature -name Telnet-Client
Don’t forget to press Enter after inputting the command at the command line.

Checking To See If Telnet Has Been Enabled
Sometimes folks might get something wrong during the enabling process even though it isn’t totally difficult.
To confirm that everything worked out and perhaps to test out Telnet, follow the steps below.
How To Open Telnet
Use the search bar to search for Telnet. Press the Start key. Then type in Telnet in the box.
When the results come, open the application by either clicking on it or clicking on Open to the right of your screen.
What will usually happen is that Telnet will open a Windows PowerShell window that will also show you a list of the supported commands.
You can now connect with other computers that also have enabled Telnet using the commands that were shown to you.
How To Use Telnet In Command Prompt To Test Network Connection
Sometimes folks ask the “telnet Windows 10” question because they have network connection issues and they know that Telnet can be used to test network connections but they don’t know-how.
I will explain how to do that below in easy to follow steps.
Testing Network Connection Using Telnet In Command Prompt
You will first have to open the command prompt and you can do that by using the run box.
All you have to do is type in cmd into the run box and search for it.
Open the Command Prompt (admin) option when the search results come back.
It is important that you open the admin version of the Command Prompt.
When the command prompt is open, input the command below and then press Enter to run the command.
telnet <IP Address> <Port>
<IP Address> – where you input the IP address you’re trying to test.
<Port> – the port you’re trying to test.
For example, below is a command to test an IP address and port. Here’s how it actually looks like.
telnet 192.168.1.12 8081
When you click on Enter after inputting the command complete with the IP address and port you’re testing if the port is open then an empty screen will appear.
If the port is blocked for some reason, then you will get a connection error message.
Note: It is however important to point out that some domains actually stop Telnet based on their security policies so there are a few ports that might be open but still give you connection error messages when you test them.
Conclusion
Telnet is old and it isn’t really used mainstream anymore but it still has it’s own fans and hardcore users who believe in tech of more than 50 years ago.
It does have its uses and very fine uses too, as outlined above. The only problem is that the security risks greatly outweigh its potential benefits.
Whatever your reason might be for asking the “Telnet Windows 10” question, the answer should be above in this article.
If you have more questions, use the comments section below and I’ll get back to you. I hope this article helps answer all your “Telnet Windows 10” questions.


