


Having issues with the “failed to play test tone” error? Then you’re in the right place. I’ll be explaining some fixes that should help you get your system back to normal working conditions.
We all can’t do without audio so it is a given that the error must be fixed. Follow the processes below step by step and try out as many fixes until the error is gone.
Fixes To Use When Confronted With The “failed to play test tone” Error
The fixes below are not in any order of effectiveness.
You can look through and choose according to which one you find easy to follow or according to what you suspect may be causing the error.
1. Uninstalling Drivers Updates And Using The Default Drivers Instead
This is a solid fix. Many issues occur because of bugs in driver files or some other malicious presence.
The idea of uninstalling the updates and returning to a default setup could help get rid of the error.
How To
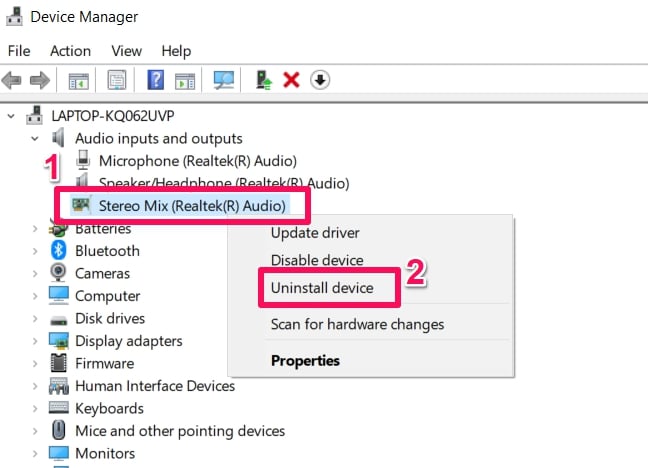
Navigate to your Device Manager (you can use the search box to search for it).
Then in the Device Manager menu, find your Audio Driver and right-click on it.
In the pop-up menu, choose the Uninstall option.
When the Uninstallation menu opens up, check a box that reads Delete The Driver Software For This Device.
Doing the above ensures the same version of your Audio Driver won’t be reinstalled again, it’ll be the default version.
Click on Uninstall after checking the box and finish the uninstallation process.
Then afterward, go back to the Device Manager menu.
In the rows of icons close to the top of your screen, click on the icon that looks like a monitor.
When you hover on the icon, it reads Scan For Hardware Changes.
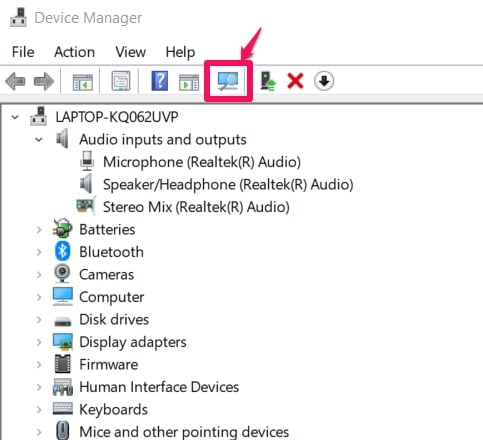
Click this icon and your system will reinstall the Audio Driver (default version). This should help fix the error you’re currently encountering.
2. Switching To High Def Audio Device
This fix has some similarities with the above in their processes but different ideas.
This idea revolves around the fact that you’ll be trying to fix the error by installing a high definition audio device.
How To
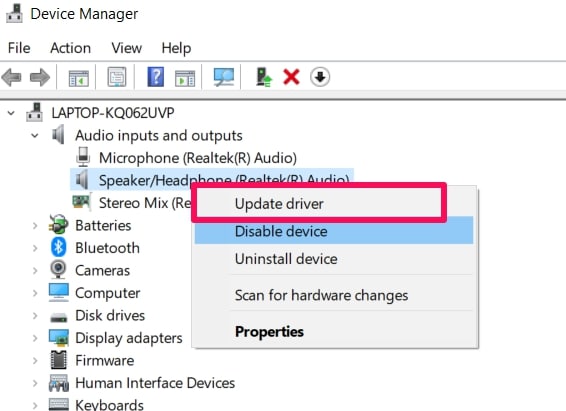
Navigate to your Device Manager (you can use the search box to search for it).
Then in the Device Manager menu, find your Audio Driver and right-click on it.
In the pop-up menu, choose the Update Driver option.
You’ll be asked how you want to search for drivers on the next menu. Choose the option that reads Browse My Computer For Driver Software.
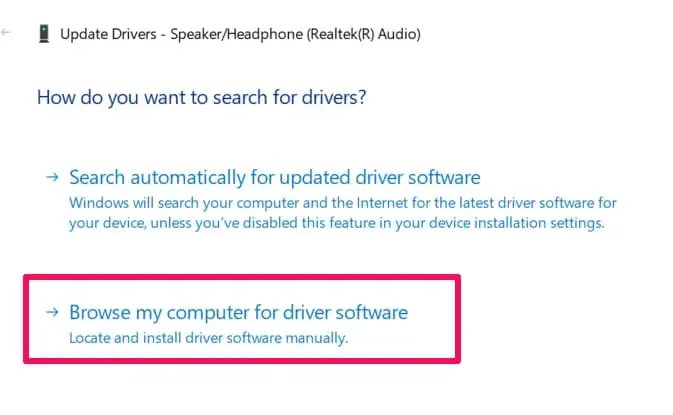
Then in the next menu, choose the Let Me Pick From A List Of Device Drivers On My Computer option close to the bottom of your screen.
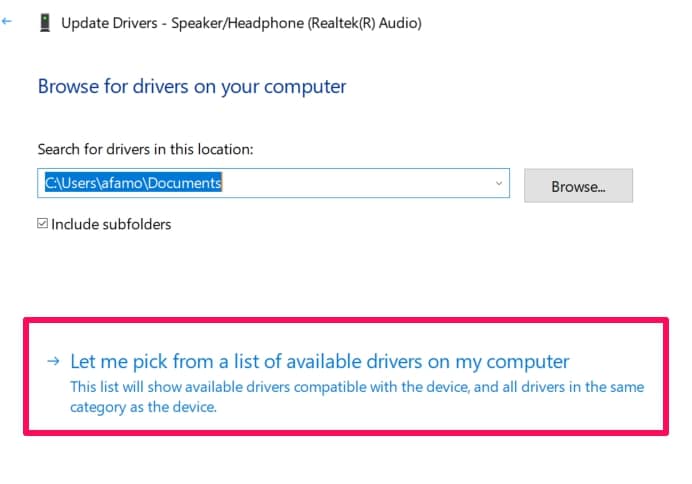
A list of drivers should appear. Choose High Definition Audio Device, then select Next.
Windows might warn you that what you’re trying to install might not be compatible but just continue by clicking on YES.
Your system should be rid of the error after the above steps are carried out correctly.
3. Switching Up Your Sound Formats (And Using The Default Settings Option)
This fix is two-pronged. The first half of the fix suggests that you switch up your sound formats until you find one that solves your error issue.
While the second part means that the Restore Default option will restore the default settings when you click on the option.
How To (Switch Up Your Sound Formats)
To switch up your formats, you have to first right-click the Volume icon on your taskbar and select the Playback option from the tab menu.
The next window that opens will be the Sound window. In this menu, you have to do two things.
The first is to confirm if your headphones and/or speakers are your default device.
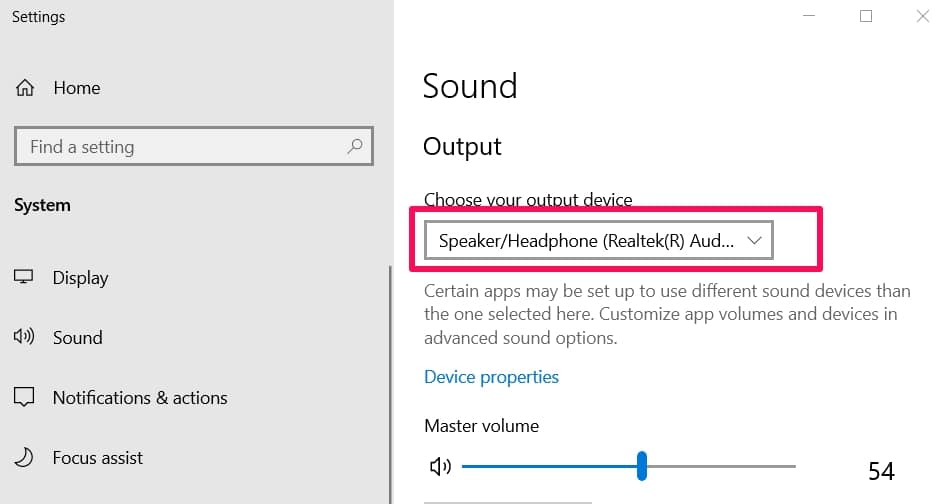
If it isn’t, just right-click the audio device you want as your default driver and select the Set As Default Device.
The second thing to do is to navigate to the bottom part of the Playback tab and select the Properties option.
Find and click on the Advanced tab in the Properties menu you’ve just opened.
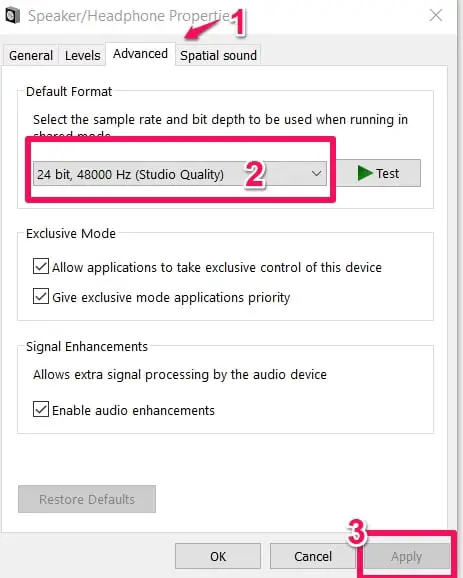
You’ll see the Default Format menu.
Choose another format and make notes on which one you chose (to avoid vain repetition if the format you changed to didn’t work).
Then first select Apply, then select OK to confirm the changes made.
You might want to try out different formats to ensure the error is fixed.
How To (Restore Defaults)
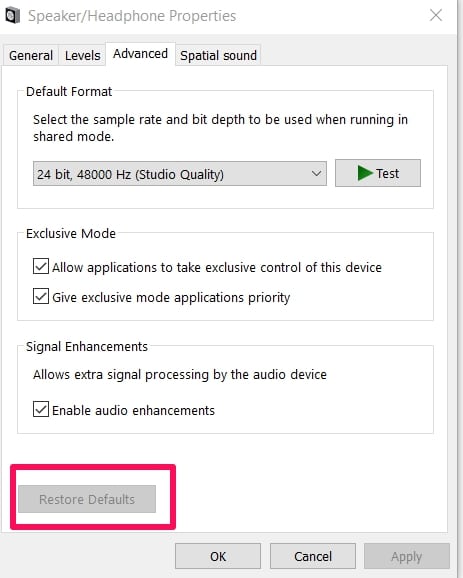
In the same Default Format menu, I discussed just above, you’ll find the Restore Default option.
It is on the bottom left-hand side of your screen.
Select that option and the error should be cleared.
4. Running The Sound Troubleshooter
This fix is a very effective one and you don’t need to do much.
Your system’s troubleshooter will do all the work, all you just need to do is navigate to where it is and run it.
The troubleshooter helps fix glitches that could occur in configurations and settings.
How To
Open the Settings menu (Windows + I).
In the open Settings menu, find and click on the Updates & Security section.
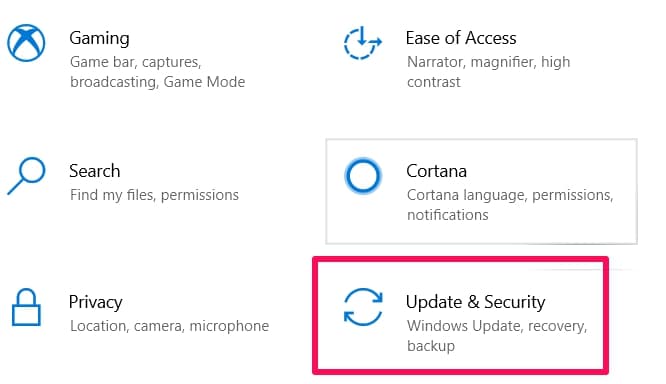
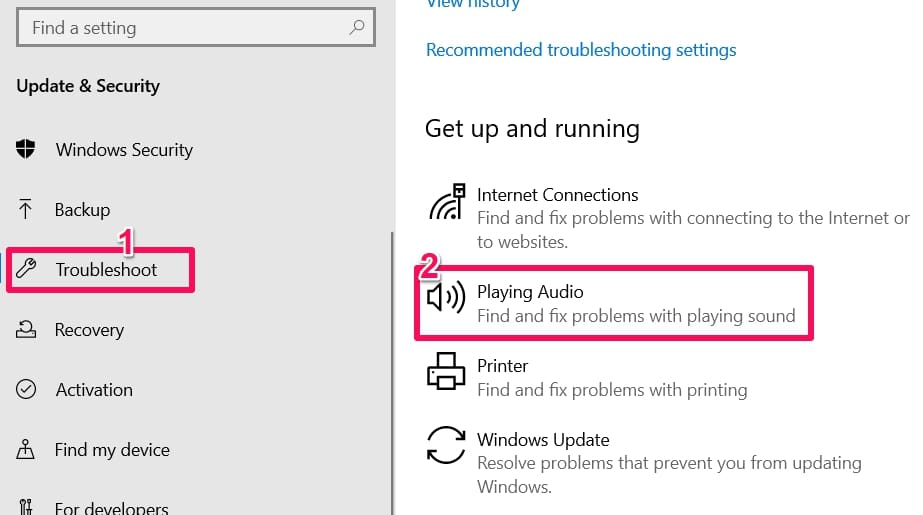
Find and click on Troubleshoot on the left-hand side of my screen under Updates & Security.
Then move to the right-hand side of my screen and click on Playing Audio. When you do click on it, the option to run the Sound Troubleshooter will appear.
Click on Run The Troubleshooter.
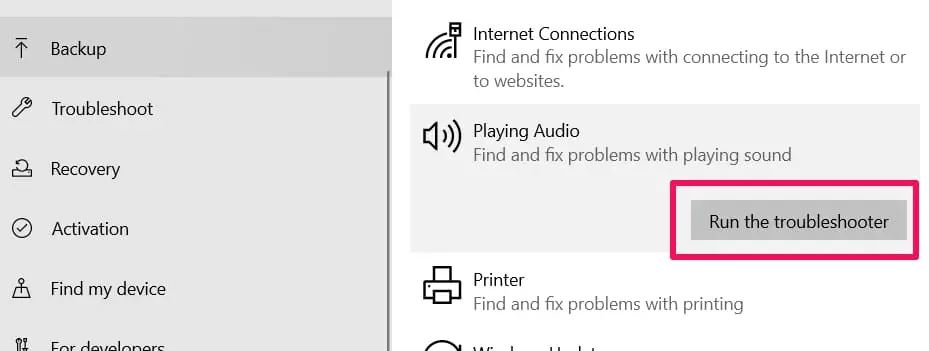
Now all you have to basically do is just wait until the Troubleshooter does its job and finds/fixes the glitches in the sound system processes.
5. Checking For Updates/Removing Recent Updates
This fix is also a two type fix. You can either check for updates or remove the recent updates you just installed.
Whichever one you pick depends on the circumstances.
If you’ve not updated your system for a while, you might want to check for updates.
If you’ve recently just updated and that was when the error started to occur, you could try removing the recent update and return Windows back to a version where everything worked normally.
Checking For Updates
Navigate to your Settings menu using the shortcut keys (Windows + I).
Then in the Settings menu, click on Updates & Security.
In the Updates & Security menu, search for and select Check For Updates.
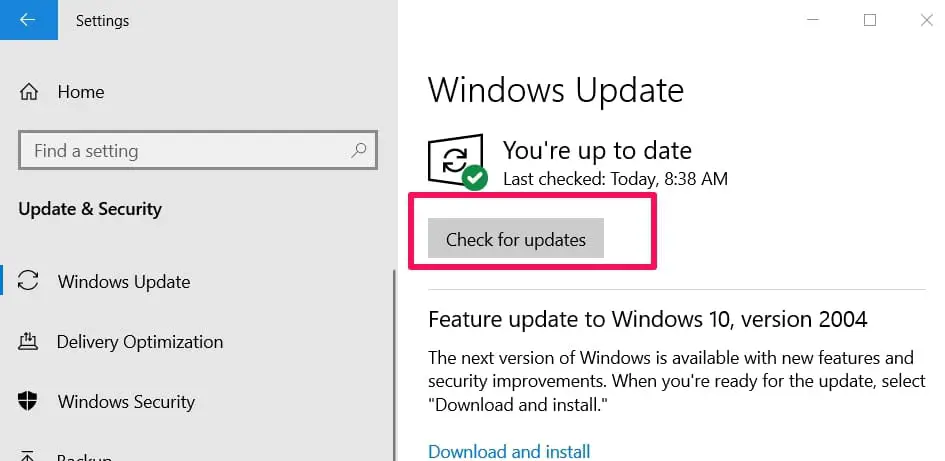
Your system will automatically check for updates and install them if available.
This should help get rid of the “failed to play test tone” error.
Removing Or Uninstalling Recent Updates
Navigate to your Settings menu using the shortcut keys (Windows + I).
Then in the Settings menu, click on Updates & Security.
In the Updates & Security menu, search for and select Update History.
You will get to see a list of the updates that have happened. Select the Uninstall Updates option close to the top of the menu.
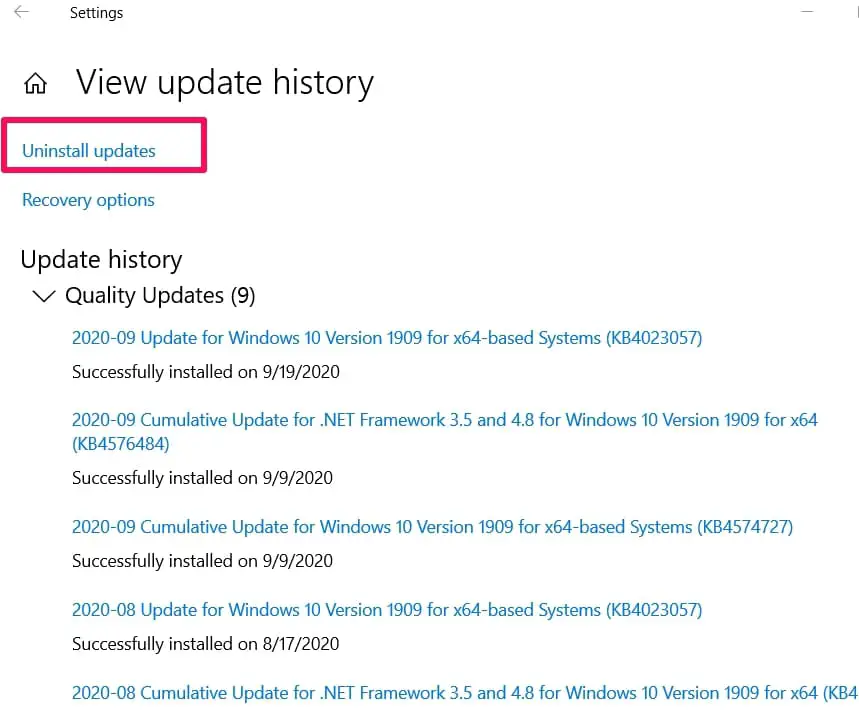
The recent updates usually appear first, double click the updates to uninstall them.
While this might not be a permanent idea, Windows will likely make new updates that will fix the error and you’ll be able to use that update and skip this problematic one.
6. Using Scans (DISM & SFC) To Find And Repair Damaged Or Corrupt Files
The “failed to play test tone” error can sometimes occur because of the presence of corrupted files in the sound system processes or some other process that’s affecting your sound.
There are two scans I will suggest you run, to be able to get rid of the error.
How To Run A DISM Scan
Use the shortcut keys (Windows + X) to open a small menu where you’ll be given choices to choose from.
Click on Command Prompt (Admin) to open the command prompt.
Note: You should always remember to use the admin version of the Command Prompt or PowerShell so as to be able to make vital changes to system processes.
In the open command prompt, input the command below and then press the Enter key.
dism /online /cleanup-image /restorehealth
Don’t forget to click on the Enter key after inputting the command.
After about 30 minutes, the scan should be over. Your files that have issues and the error itself should be fixed.
How To Run A SFC Scan
Use the shortcut keys (Windows + X) to open a small menu where you’ll be given choices to choose from.
Click on Command Prompt (Admin) to open the command prompt.
In the open command prompt, input the command below and then press the Enter key.
sfc /scannow
The SFC Scan takes a shorter period of time than the DISM scan so after like 20 minutes, it should be done.
The main advantage I would say DISM has over SFC is because DISM uses an online Microsoft Error Database to quickly find fixes when it encounters errors.
Both of the scans are effective in their own way though and you can use any of them to fix the “failed to play test tone” error.
Conclusion
I have managed to explain the fixes above and even the situations where it could be applied.
But the fixes are not just limited to these situations, some can fix the error across the board.
So I’ll advise you to first try out the ones you feel might be useful in clearing the “failed to play test tone” error, then if they don’t work, you can try out other fixes above.

