


Minecraft is arguably one of the biggest sandbox games ever played. To enjoy playing with your friends and family (PvP), you must know how to create Minecraft servers.
If you are looking for the easy way out in creating Microsoft servers, there are hosting sites that could have you running in a few minutes.
But in this article, I will be concentrating on if you want to create a Minecraft hosting server yourself which will take considerably longer (but at no cost at all) as opposed to you outsourcing to hosting sites (costs could be incurred).
Below is a step by step instruction on how to create Minecraft servers.
First Step – Download Java Edition
This step is for folks who don’t have the Java Edition of Minecraft. This guide is based on the Java programming language so you will need the Java Edition.
Even if you have the Windows 10 edition or the pocket edition or other editions, as long as it’s not the Java Edition, then you will need to download it.
You can download the Java edition by following this link or you can get it from other reputable sources.
Whichever way you choose is okay, as long as you get the Java edition of Minecraft at the end of it.
Second Step – Download or Update Java
If you already had Minecraft (Java Edition) installed before reading this guide, then this second step will count as the first step for you.
To be able to create your custom server, you will need to make sure that the Java version you have on your device is the latest version of Java available.
Downloading the latest version of Java reduces the risk of your server developing issues later when it has been created.
You could follow this link or update it through any other sources. Just make sure that the sources you are downloading from are trusted and verified.
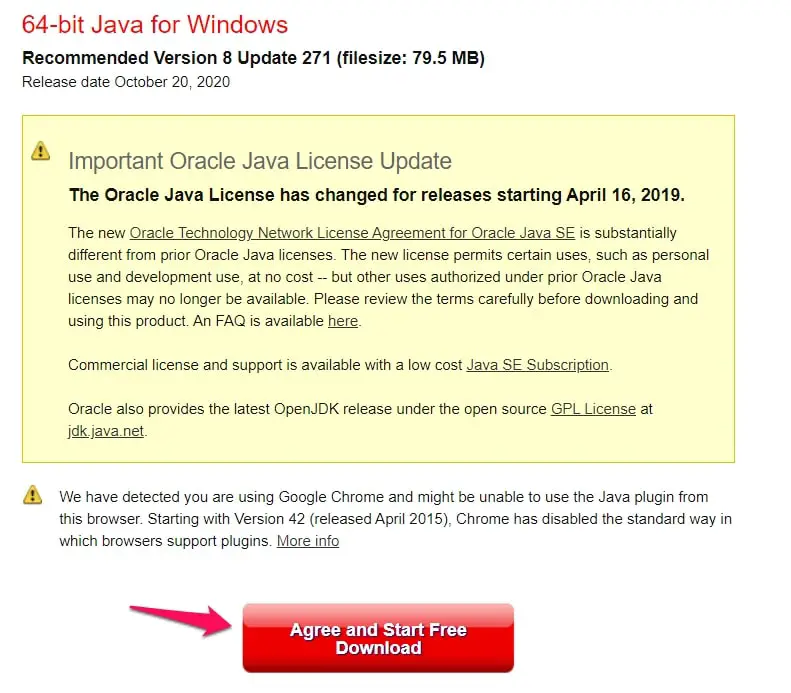
Once the download is complete, navigate to the download and click on it to open the file. Follow the on-screen installation instructions to complete the update.
During the update process, you might be asked to delete or uninstall older versions of Java you already have installed on your device and you might also be asked to provide passwords.
It is important to uninstall older versions of Java to ensure a smooth server hosting experience. Sometimes having older versions of Java might cause process conflicts, this might hamper the efficiency of your server.
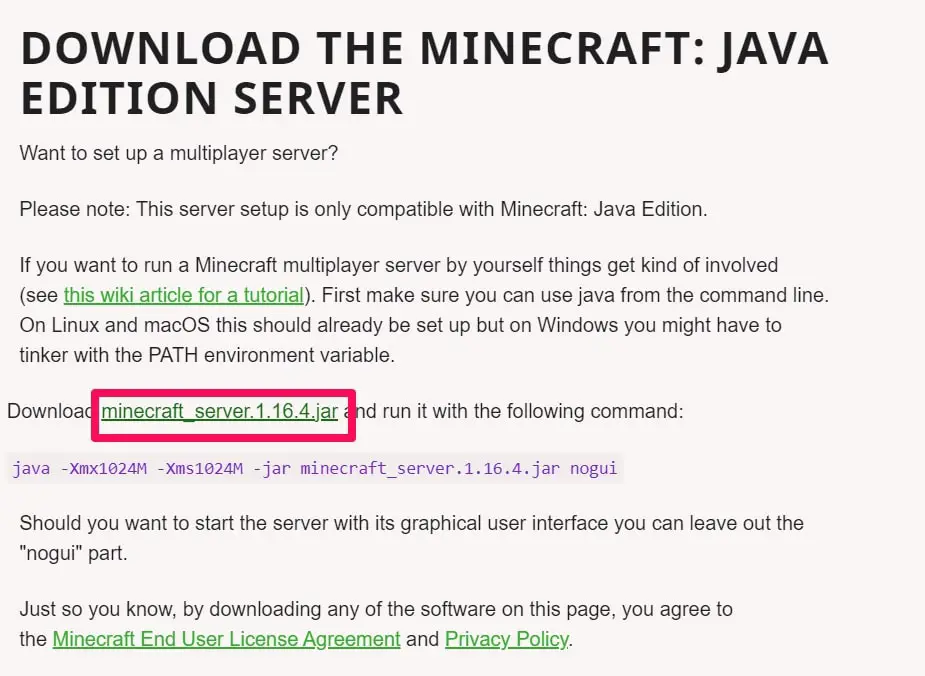
Third Step – Get Server File
After completing the first two steps, you will need to download the Server.jar file from the Microsoft website.
Follow this link to get the latest version but note that the versions are updated regularly.
Next click on “minecraft_server.1.16.4.jar” as shown below:
In some cases when trying to download the jar file, your computer will send a notification that the download is a harmful file. This is because most browsers treat jar files as harmful files.
Don’t worry about it and just select the Keep option to continue downloading. It isn’t harmful as long as you got the file from the verified source (Microsoft Website).
Please note that some Jar files can be harmful to your device, that is why it is security conscious to always download files from verified sources.
Fourth Step
When the Server.jar file download is complete, don’t open the file.
First, create a new folder on your desktop and name it Minecraft_Server.
![How To Create Minecraft Servers [Step-By-Step Guide]](https://technicalustad.com/wp-content/uploads/2020/12/mm.png)
You can do this easily by going to your desktop and right-clicking on any open space. Navigate to New and then click on Folder. Then select the Create A New Empty Folder option. Name the folder as explained above and then continue with the instructions below.
Go back to the Server.jar file you downloaded, copy it and then paste it into the new folder you just created on your desktop.
Open the new folder and right-click on the Server.jar file. Open the application. Your configuration files will be placed in the same folder you just created.
![How To Create Minecraft Servers [Step-By-Step Guide]](https://technicalustad.com/wp-content/uploads/2020/12/file.jpg)
Fifth Step – Configure EULA.text
The next step is to agree to the EULA agreement to ensure the server created does not shut down immediately after start-up.
In the configuration files placed in the folder, search for and open the EULA.text file. You will see a text that reads
eula=false
Change the “false” part to “true” as shown below.
eula=true
Then in the text editor open, go to and click on File and then click on Save.
![How To Create Minecraft Servers [Step-By-Step Guide]](https://technicalustad.com/wp-content/uploads/2020/12/truee.jpg)
This ensures that the changes you made are saved, you must follow the above steps to properly and completely agree to the EULA statements.
Sixth Step – Running Jar Application
Now that you’re done with agreeing to the agreement, this next step will take you back to the server.jar file itself.
Open (or run) the jar application to launch the server. This will generate more downloads of other necessary files needed to run the server smoothly.
What you will see appear when you run the application the second time are a lot more text documents and a new server window.
![How To Create Minecraft Servers [Step-By-Step Guide]](https://technicalustad.com/wp-content/uploads/2020/12/server.jpg)
When you see these new files appear, then you’re on the right track.
Seventh Step –
What you will need to do here is create a batch file that will be used to launch the server. It also helps eliminate drag in gameplay by allocating more system resources to the game.
First, go to your server folder and create a new text document by right-clicking in the folder. Rename the new document created with something you’ll easily notice like “minecraft_server“.
In the new document, you just named, input the text below.
java -Xms1024 -Xms1024 -jar server.jar pause
Navigate to the File option at the top left side of your screen and click on it. Then click on the Save As option.
Here’s where you’ll change the text document to a batch file.
In the Save As menu, change the Save As Type from Text Documents to All Files.
Then add .bat at the end of the filename and click on Save. If you followed the instructions closely, you should now have a batch file, instead of a text document.
You will need to delete the old text document you created before that has the same name as the batch file you just created.
To test the modifications you made, open the batch file you just made. It should run your Minecraft server window if you followed the instructions correctly.
Conclusion
If you follow this “how to create Minecraft servers” guide as precisely as explained, you will be able to create your customized server in less than an hour.
Some folks who are familiar with a lot of these processes might even take less than 30 minutes.
The key parts to this guide are making sure you have a Java edition of the Minecraft game, getting the latest version of Java installed on your device, and signing (basically changing from false to true) the EULA agreement.
If you avoid mistakes in these key areas, your “how to create Minecraft servers” journey should work out just fine.

