


Looking for an easy to follow article on how to cut video in VLC? Then you’ve come to the right place.
We all know how useful the VLC media player is because of its ability to play videos with different formats and also help increase audios with an inbuilt feature that increases audio volume to 300%.
Another feature which you would be most interested in is the option of cutting and trimming video portions to create shorter video clips.
How Steps On “How To Cut Video In VLC” Works
This feature is really useful in getting portions of favorite scenes in movies and sharing them with friends online or creating a meme with the short video clip.
It is now the rage and this article is best primed to offer you the easiest methods on how to cut video using the VLC media player.
This feature works by users selecting a first point (usually called a beginning point) and then selecting a second point (called the endpoint) and then use the necessary buttons to ensure VLC automatically cuts the portion you indicated and saves it for easy access.
Don’t worry, the steps are outlined below in a way that you can easily follow. You can use other really intensive video editing apps but usually, their processes are always complex even for simple procedures like cutting a video.
If you’re just interested in a simple editing function, then the VLC Media Player cutting video feature will totally do the job.
Let’s dive into how to cut video in VLC steps properly, I will be explaining two methods you can use to cut videos.
- Using Advanced Controls
- Using Shortcut Keys
Steps On How To Cut Video In VLC (Advanced Controls)
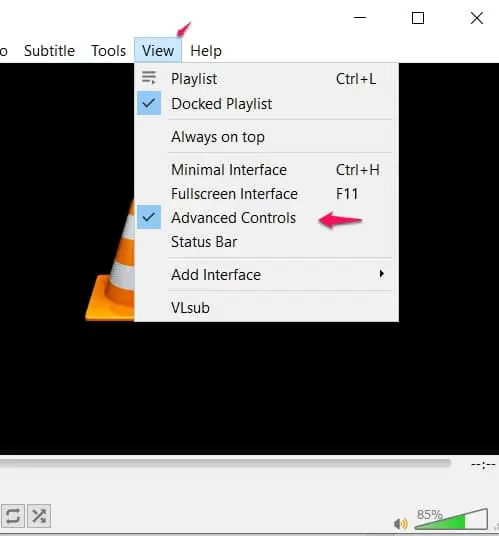
Step 1 – Launch the VLC app on your system and wait for it to open. When it does, navigate to the Menu feature and click on it to open up a list of functions.
Step 2 – In the Menu feature, locate and click on the View tab which is usually at the top of your screen.
Step 3 – In the View tab, select Advanced Controls When you correctly perform step 3, new recording options will show up at the top of your normal video control buttons.
Step 4 – Select and start playing the video you want to cut up into smaller clips.
Step 5 – Navigate to the point where you want to start the new video clip from (beginning point)
Step 6 – When you’re really really close to that point, hover on the Record button (the one that basically looks like a red circle)
Step 7 – Press the Record button exactly when you get to where you want to start the video clip from and start recording.
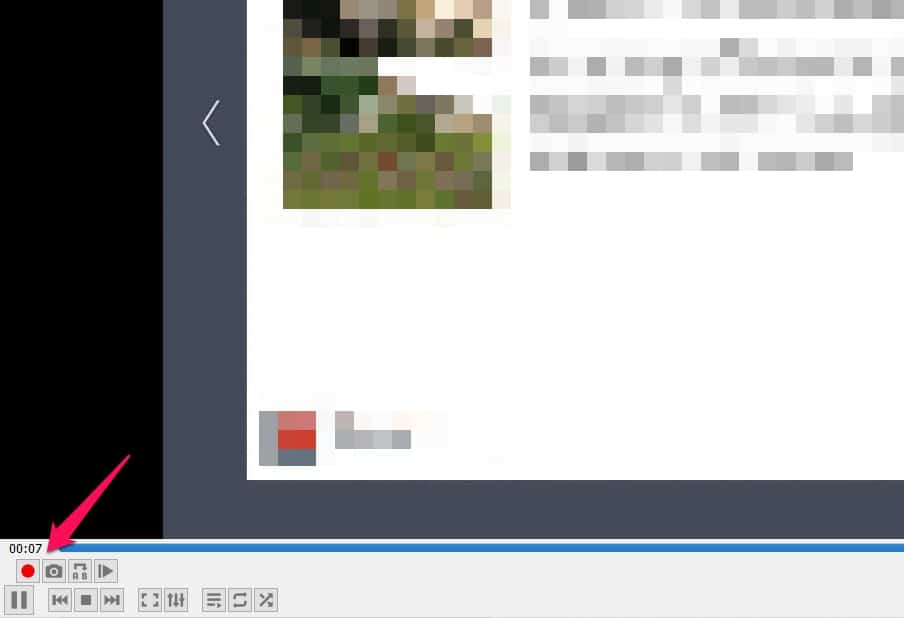
Step 8 – To be able to cut videos more efficiently, enable the Frame By Frame option that slows down your video to help you determine where the ending point is more accurately.
The Frame By Frame button is the third button to the right of the Record button.
![How To Cut Video In VLC [ A Step By Step Guide ]](https://technicalustad.com/wp-content/uploads/2020/08/frames.jpg)
Step 9 – Assuming you’ve followed the instructions correctly up to this point, click the ending point by also using the Record button to end the cut.
That’s basically how to cut videos using VLC.
Steps On How To Cut Video In VLC (Shortcut Keys)
This step is much faster but you probably need to be a little tech-savvy to be able to be efficient while using this technique.
Don’t despair though, I will explain it easily enough that even people without much experience with computers should be able to follow through.
The idea is to sidestep all the controls and buttons and just go straight to cutting much larger videos into shorter video clips faster.
Step 1 – Launch the VLC Media Player and start playing the video you want to cut into smaller video clips.
Step 2 – Navigate to the beginning point (where you want your video clip to start from) and press this shortcut keys at the same time (Shift + R)
Step 3 – Navigate to the endpoint (the point the cut of your video clip ends) and use these shortcut keys also at the same time to end the video cut process (Shift + R).
Feedback Feature While Using Shortcut Keys
A feature that helps in this process is that when you use the shortcut keys, you get a message on your screen.
Such as when you use it to start the cutting process, you get – (Recording) displayed on your system’s screen.
When you use it again to end the process, you will get feedback saying – (Recording Done).
This helps users know that they are on the right track. In three steps you’ve managed to cut a video into smaller clips.
The second option is much faster than the first but the first method is more precise with its frame by frame feature.
You can combine both methods if you feel comfortable enough to try out new ideas but for now, use any of the methods above to solve the question “how to cut video in VLC”.
Where To Find The Video Clips You Cut Using The Methods Above
This VLC media player feature of editing out video clips from longer videos helps make things really easy. You won’t have to keep full videos just because of a five-minute scene. You can just cut it out and delete the main video to save space.
You can also easily share these scenes through social media with your friends. Most social media sites have video limits so cutting out the video into smaller clips will help solve your problem.
Knowing where the edited video clips are being kept is important info that users should know because the edited video clip would not be of much use to you if you cannot find it afterward.
Here’s how to find your video clips after you cut them using VLC Media Player in (Windows OS).
Steps On Finding The Video Clips You Cut Using VLC Media Player
Navigate to your C: Drive and select Users.
Select the Username you used to log in and cut the videos, then select Videos.
![How To Cut Video In VLC [ A Step By Step Guide ]](https://technicalustad.com/wp-content/uploads/2020/08/vid.jpg)
It usually should be in this Videos folder.
Users with a different operating system to Windows should also navigate to their default Videos folder usually found in the Users folder and find their edited video clips there.
You can also use the search bar to quickly find your videos or find out which folder they’re in.
The video clips are usually saved in the same name format so input this text into the search bar –
{ vlc-record- 2020 – 7 – 22 (Date Of Recording) }
It is important to note that the parenthesis isn’t needed and the Date Of Recording signifies what the numbers before the word are.
So, type in the first words, followed by the date you recorded the video clip and you should be able to access your video clips.
Fixing VLC (Crashing, Skipping And Lagging) Problem
Because I have also faced some of the problems you can encounter while using the Media player, I have decided to add a little guide that should help solve these issues.
You cannot edit video clips correctly if your VLC keeps skipping, lagging, or crashing so follow these fixes to get rid of the problems first, and then you can easily cut out videos in VLC.
Increasing File Cache (MS)
This step is a very easy fix to the skipping or lagging issue especially if the cause of the problem was the file cache.
Here’s how to use this fix.
Launch VLC media player and then select Tools in the bars at the top of your screen.
In the Tools popup menu, select Preferences. (Or to get to this point faster, use the shortcut keys – Ctrl + P).
In the Preferences menu, select Advanced Preferences.
When the menu opens up, navigate to the bottom left corner of your screen and select All under the menu Show Settings.
When you do, on the left-hand side of the screen, search for Input / Codecs and click on it.
![How To Cut Video In VLC [ A Step By Step Guide ]](https://technicalustad.com/wp-content/uploads/2020/08/codec.jpg)
When the Input / Codecs window opens up on the right-hand side of your screen, search for Advanced by scrolling down.
In the Advanced feature, select File Caching (ms) and you will notice a normal value of 300 in a box.
Edit this value to 600 and navigate to the bottom of the menu to click on Save.

If you followed the instructions correctly, your VLC media player should be working perfectly now.
Tweaking Video Output Module Settings
The first steps mirror that of the fix above.
Launch VLC media player and then select Tools in the bars at the top of your screen.
In the Tools popup menu, select Preferences. (Or to get to this point faster, use the shortcut keys – Ctrl + P).
In the Preferences menu, select Advanced Preferences.
When the menu opens up, navigate to the bottom left corner of your screen and select All under the menu Show Settings.
On the left-hand side of your screen, search for and click on Videos in the list of features.
When the Videos list opens up, select Output Modules.
When you do that, the Output Modules window will open up at the right-hand side of your screen.
You will see a feature that reads – Video Output Module.
Click on the drop-down menu right in front of the feature and select Automatic out of the list of options in the drop-down menu.
![How To Cut Video In VLC [ A Step By Step Guide ]](https://technicalustad.com/wp-content/uploads/2020/08/auto.jpg)
Navigate down to the bottom right-hand side of your screen and click on Save to enable the settings you’ve just tweaked.
This should help with any lagging, skipping or crashing issues you’re facing when using VLC media player.
Conclusion
We all really enjoy some scenes in movies and we wish to rewatch those scenes over and over again.
Using these methods described above in the article to help with your “how to cut video in VLC” issue will guarantee you the best and easiest ways possible to cut out video clips using VLC media player instead of some fancy video editing app that might need advanced knowledge of editing.
The tips on how to fix problems also go well with cutting out clips because it won’t be possible to create short video clips if your VLC media player keeps acting up so use the fixes to get rid of that first if you’re facing issues like lagging or skipping.
Have you ever created short video clips using a VLC media player and did you use any of the methods above? Please tell us all about it in the comments section below.

