


Windows 10 IOT Core is a version of Windows 10 that is optimized for small devices with or without a monitor and runs on Raspberry Pi 3 and 3, the Sword Dragon 410c and the Minnow Board MAX. The Windows 10 IOT core builds outstanding solutions with a rich, scalable Universal Windows Platform (UWP) API. If you are new to Windows 10 IOT, this article describes how to install Windows 10 IOT on the Raspberry Pi 3.
If you do not know, you can get a free upgrade if you are currently running Windows 8, Windows 8.1 or Windows 7. However, Microsoft also makes a completely free version of Windows 10 for the Raspberry Pi 3/3, This ultra-low-cost circuit board computer. It is also very easy to get. We installed the IOT version of the Windows operating system within two and a half hours.
All you need is a Raspberry Pi 3/3 mini SD memory card with an SD adapter (Microsoft recommends a minimum of 8GB) and a Windows computer with an internet connection and an SD card slot or USB card reader. Unfortunately, one of the steps requires an .EXE file and the process will not work with Apple Computer.
One thing to note before you’re so excited is that the Raspberry Pi 3 runs a special developer’s version of Windows 10 designed for IOT devices. This is a very easy way to run the application with a full version.
Step-by-Step process to install Windows 10 IoT on the Raspberry Pi 3
Step 1: Get the Board and Software tools Ready
Collect the requirements
- PC running Windows 10
- Raspberry pie 5v Micro USB power supply, the current is at least 1.0A. If you plan to use more power-consuming USB peripherals, use a higher-current power supply (> 2.0A).
- 8GB Micro SD Card – Class 10 or higher.
- HDMI cable and monitor Ethernet Cable
- Micro SD Card Reader – Due to the problem of most built-in mini SD card readers, we recommend using an external USB micro SD card reader
Step 2: Install the Windows 10 IOT Core Software’s
- Download the Windows 10 IOT Core image from here. Save the ISO to a local folder.
- Double-click ISO (IOT Core Raspberry Pi.iso). It will be automatically mounted as a virtual drive so you can access the content.
- Install Windows_10_IoT_Core_RPi3.msi. After the installation is complete, flash.ffu will be located at C: Program Files (x86) Microsoft IOT FFU RaspberryPi3.
- After the installation is complete, eject the virtual CD-ROM – This can be done by navigating to the top-level folder of File Explorer, right-clicking the virtual drive and selecting “Eject”.

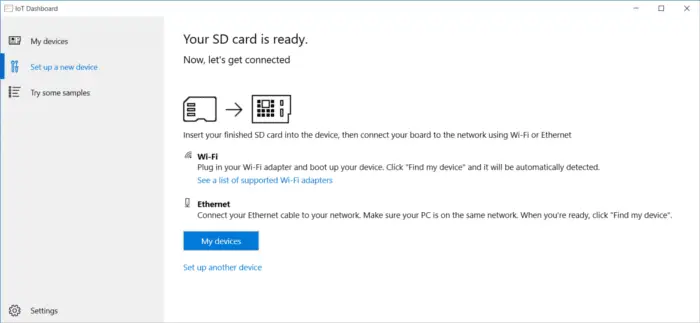
Step 3: Put the Windows 10 IOT Core Image ISO files on Your micro SD Card
- Insert the Micro SD card into the SD card reader.
- Use IoTCoreImageHelper.exe to refresh the SD card. Search for “WindowsIOT” from the Start menu of your current window so then you select the shortcut “WindowsIoTImageHelper”.
- Select the SD card to flash, then provide the location of the FFU to blink the image.
- Safely remove the USB SD card reader by clicking “Safely Remove Hardware” in the taskbar or by finding the USB device in File Explorer, right-clicking and selecting “Eject”. Failure to do so may result in corruption of the image …….
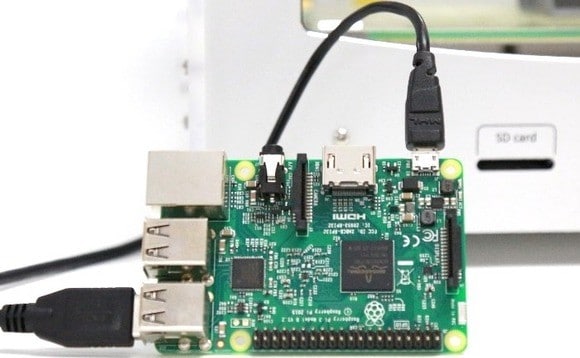
Step 4: Hook Up Your Raspberry pi 3 board
Insert the prepared micro SD card into the Raspberry Pi 3 (the slot is shown with arrow # 1 in the figure below).
Connect the local network cable to the Ethernet port on the circuit board.
Make sure your development computer is on the same network.
Connect the HDMI monitor to the HDMI port on the board.
Connect the power supply to the micro USB port on the board.
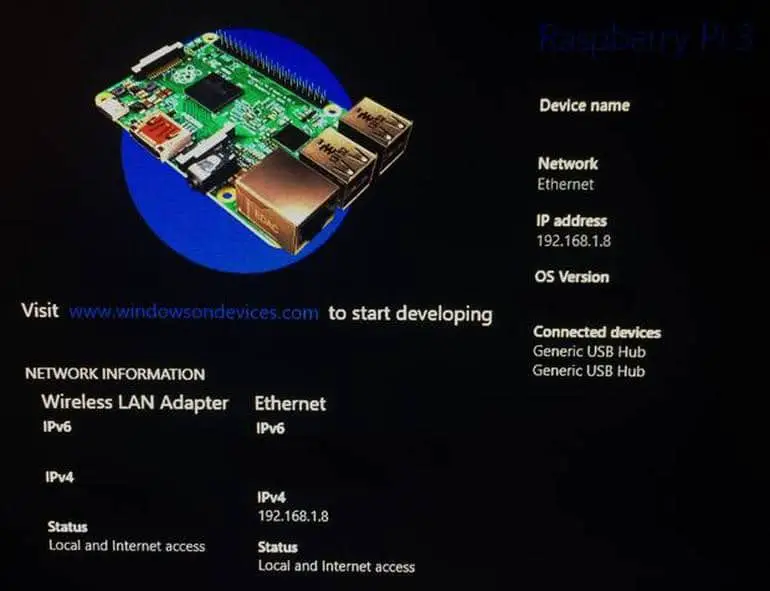
Step 5: Boot Windows 10 IOT Core
Windows 10 IOT Core will be started automatically after power is connected. This process will take a few minutes. After seeing the Windows logo, the screen may turn black for about a minute – do not worry, it is up and running. You may also see a screen prompting you to choose a language for your Windows 10 IOT Core device – connect the mouse and select your options, or wait about 1-2 minutes for the screen to disappear.
Once the device is up, Default App will launch and display the IP address of RPi3.
Step 6: Connecting to Your Device
You can use Windows Device Portal to connect to your device through your favorite web browser. In addition to advanced diagnostic tools, this Device Portal provides will be configuration and device management help you to troubleshoot with real-time performance of Windows IOT devices such as raspberry pi 3.
Step 7: Finish Off
Now you should be ready with a windows 10 raspberry pi. If you have any doubt just ask in the comments.
You may also like to read these articles
How to Build your own Super Computer with Raspberry Pi 3 Cluster
How to Build Project using CO2 Sensor with Raspberry pi Introduction
Hope this article “How to install Windows 10 IoT on the Raspberry Pi 3” helps you to install Windows 10 IoT on the Raspberry Pi 3. If you have any query, feel free to comment.


