


The DNS cache can sometimes be susceptible to malware or aggressive network attacks that will hamper your system’s performance by tampering with the IP address mapping feature. The Linux flush DNS process then becomes a valuable hack for every computer user.
In simpler terms, if your DNS cache has been infiltrated by malware or attackers, your searches or visits of popular websites like Twitter or Facebook will be redirected to IP addresses of malicious websites (which the attacker put in your DNS record) or you might continue getting a lot of 404 errors.
What Is DNS Cache Flushing
DNS Cache flushing is a way that allows users access to clearing all the IP entries to IP addresses already stored in a browser’s cache and then by default, making the browser get new connections whenever you revisit the IP addresses.

I advise most people to flush their DNS regularly. This really helps resolve issues like IP address conflicts. It also helps dispose of usually useless residual information on our system. Sort of spring cleaning, only on computers.
What Exactly Does Linux flush DNS or Flushing DNS Cache In Linux Accomplish
1. Clearing Bad Connections
If for some reason, other than aggressive attackers, you have bad IP connections, then flushing your DNS will enable your browser to clear the former list which contains good and bad connections and pulls new ones which will almost certainly contain only good IP entries.
Some websites might also change addresses so it is a good way to stay updated and avoid IP address conflict.
2. Clearing Malicious Misdirections
Attackers can infiltrate your system and plant addresses of malicious websites disguised as common popular sites. You will keep getting redirected as long as your DNS isn’t flushed.
Flush your DNS and the next time you try to access normal websites, you’ll get updated information directly from the servers which will contain the real IP addresses of the sites you want to visit. This helps get rid of your attackers and also helps refresh your connections.
Flushing Linux DNS:-
Depending on the Linux distribution you’re using, it is fairly important to always remember to clear your DNS cache probably monthly.
There are exceptions (Linux Distributions) that don’t use default DNS services, distributions like Ubuntu and also, DNS service differs in different distributions but the idea is the same.
Clear them all to ensure optimal performance every now and then. Some distributions have DNS enabled by default, some don’t.
Step By Step Guide On How To Flush DNS In Linux Distributions
I will be using three DNS services to explain how to clear your DNS cache, then there will also be a guide on how to enable DNS and also personalize its settings to ensure you get the best out of using DNS.
BIND – Berkeley Internet Name Domain
dnsmasq
NSCD – Name Service Caching Daemon
These are the three services I will explain starting with
Flushing BIND (Berkeley Internet Name Domain) DNS Cache
The first step is to open a terminal window. You can do that by using these short keys (Ctrl+Alt+T).
When the terminal window is open, enter this command.
sudo /etc/init.d/named restart
On some systems, you might be asked to input your password. Do so correctly and continue the process.

You will be prompted when the service is cleared.
Now you can get new valid connections once you access the IP addresses again. It is worth pointing out that there are other commands you can use whenever you want to clear your DNS service.
sudo rndc restart
sudo rndc exec
You can also target specific domains if you’re using BIND, this gives users the access to tinkering with only the IP addresses that have faulty connections while the rest of their data is intact.
Here’s how to input that in a command. Let’s use facebook.com
sudo rndc flushname facebook.com
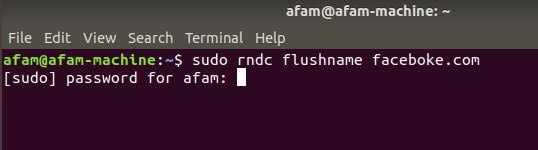
This will only flush out info about Facebook and you can reestablish your connection.
Flushing NSCD (Name Service Caching Daemon) DNS Cache
The first step is also like in Bind.
Open a terminal window. You can do that by using these short keys (Ctrl+Alt+T)
When the terminal window is open, enter this command.
sudo /etc/init.d/nscd restart
On some systems, you might be asked to input your password. Do so correctly and continue the process.
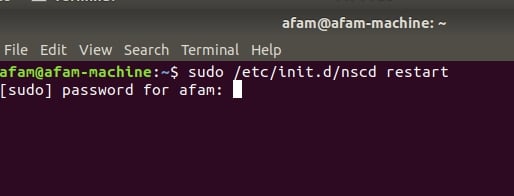
You will be prompted when the service is cleared. Now you can get new valid connections once you access the IP addresses again.
Flushing dnsmasq DNS Cache
The first step also mirrors the BIND and NSCD.
Open a terminal window. You can do that by using these short keys (Ctrl+Alt+T)
When the terminal window is open, enter this command.
sudo /etc/init.d/dnsmasq restart
On some systems, you might be asked to input your password. Do so correctly and continue the process.
You will be prompted when the service is cleared. Now you can get new valid connections once you access the IP addresses again.
This is basically how to clear DNS cache in the DNS services you will most likely be using in your Linux distros.
Flushing DNS Cache In Ubuntu
The first step is to open a terminal window. You can do that by using these short keys (Ctrl+Alt+T).
Enter this command
sudo/etc/init.d/dns-clean restart
then enter this second command
sudo /etc/init.d/networking force-reload
After that, you’re pretty much done. Your DNS cache related issues have been cleared
Below is a guide on how to check if your Linux distro has DNS caching enabled.
Steps On How To Check If DNS Caching Is Enabled
The first step is to open a terminal window. You can do that by using these short keys (Ctrl+Alt+T).
Enter this command
ps ax | grep dnsmasq
When the command gives you feedback, search for cache size. When you’ve found it, check the value. If the value is 0, then it means there is no cache saved which in turn means it isn’t enabled. You will have to enable it yourself. Try the steps below.
Note: The DNS service used here is dnsmasq, substitute it for the one you’re using.
How To Enable DNS Caching
The first step as always is to open a terminal window. You can do that by using these short keys (Ctrl+Alt+T).
Enter this command
sudo dnsmasq -c 100
The number (100) in the command signifies the number of entries that the dnsmasq should cache so you can choose a bigger or smaller number according to your preferences.
How To Tinker With DNS Settings
I have always said that the Linux flush DNS hack is vital to every user. Well, the ability to play around with your DNS settings is too. There are two ways you could do this. Using The Terminal Or Using GUI. But I will be explaining the easier way.
Using the GUI
Here’s how to go about it.
Navigate to System Settings > Network
Search for the name of the network you’re currently connected to and click on the arrow next to the connection name.
When the connection menu opens up, look at the bottom right part of your screen, and click on Settings.
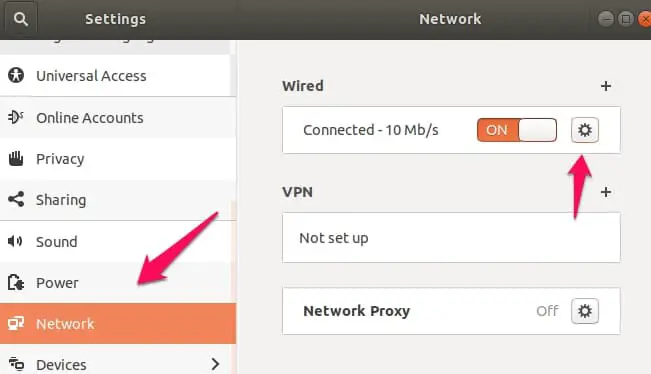
In the Settings menu, click on the IPv4 Settings. This is where you will find the option to add multiple DNS servers.
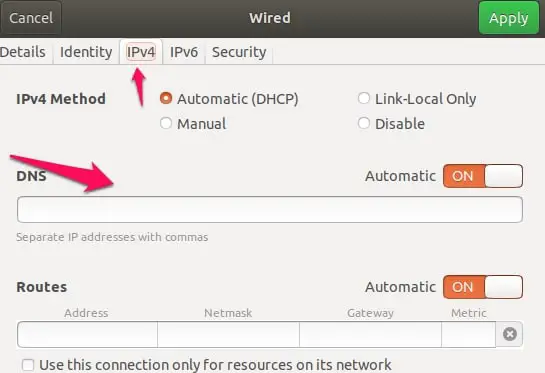
When you’re adding more than one, separate them with commas.
Note: If you have multiple network connections, changing the DNS settings for one will not affect the other. You will have to manually change all of the settings for the different connections.
Flushing DNS cache in Windows 10
The good news is that this process can be used for most Windows versions, not just 10.
Here’s how to go about it.
Launch the Command Prompt (Admin). Remember to launch the admin version (be logged in with an account that has administrator privileges) to be able to make changes to system preferences.
You can access the command prompt (admin) by searching for it in the Start menu.
Open the command prompt and enter this command
ipconfig /flushdns
Wait patiently while the process is completed and the cache removed. Usually, it lasts a few seconds.
When you get a message that reads Successfully flushed the DNS Resolver Cache, then the process was successful. All of your DNS cache issues should be resolved and you should be updated when next your system sends a DNS query.
Flushing DNS Cache in macOS
The first step here too is to run the terminal app. You can do that by either using the short keys Command + Space and searching for the terminal app or navigating Applications > Utilities.
Whichever way you choose, as long as you get to the terminal app.
Enter this command when the app fully opens
sudo killall -HUP mDNSResponder ; say dns cleared
Note: The last three words (; say dns cleared) in the command are only needed if you want a prompt when the process is done. This process was done using macOS Mojave 10.14
Then select Return on your keyboard. You will be asked for your password, input it correctly, and press Return to finish the process.
Conclusion
DNS Domain Name Systems are really important, they sort website names into the corresponding IP address. When DNS cache has issues, you will know when web pages aren’t loading well or you’re getting a lot of errors.
This is why the DNS cache must always be periodically cleared to get rid of bugs, malware, or get updated when websites change addresses. The Linux flush DNS process or its equivalent in other OS is a very important user hack.
Do you know any other method to clear DNS cache or did you use any of the above? We would really love to know how it worked out for you. Use the comment section to tell us how you cleared the DNS cache on your system.

