


Folks who use Google Sheets regularly will already know it is of great help because of the amazing functions it performs. The option of being able to record a macro in Google Sheets is one of these amazing functions.
Even if you don’t know much about using Google Sheets or recording a macro, this guide will help explain all you need to know in easy to follow steps. As long as you follow the steps outlined, you should be able to perform the operations below.
Macro In Google Sheets: What Is It Exactly?
Macro is a predefined instruction that you can use to run the same activity over and over again, without having to manually input the instruction again every time you want to run that exact activity.
In tech terms, it is a piece of code in Google Sheets’s backend that is saved when a user records their actions on data so that the same set of actions can be automatically applied to other data sets.
Example
Let’s say you’re always working with data and you need to always remove extra spaces between words, border the whole data, and color the first line of your data blue.
These activities above are different activities that folks usually carry out on data every day manually.
It usually isn’t hard but when you have to do it over and over again, it can get very boring and exhausting.
With the help of macro in Google Sheets, you won’t have to manually perform that operation anymore. You can just record your actions (you going through the processes above) and then when new data comes in, apply the recorded actions.
Pretty cool, right? Yes, it is, it makes work faster and less exhaustive. Repetition is always boring but with the macro feature, you can eat rid of that easily.
How To Record Macro In Google Sheets
The first step in recording a macro in Google Sheets is to outline the work steps you want to record.
You don’t want to skip steps, that might just make your work harder. Take a look at the example below.
Example
On the data, I want to…
- Open cell A1
- Input the word – Macro
- Then color the cell Blue
These are the steps I always repeat on data and I want them saved so I don’t have to repeat it manually when new data sets come in.
How To Record
I’m assuming you’re already in a worksheet with the data set you want to work on.
Navigate to the tabs close to the top of your screen and select the Tools option.
In the pop-up menu that appears, choose the Macros option. It should be the third on the list.
In the Macros menu that you’ve just opened, click on the first option. The Record Macro option.
![Recording Macro In Google Sheets [Step-By-Step]](https://technicalustad.com/wp-content/uploads/2020/10/macro-recording.jpg)
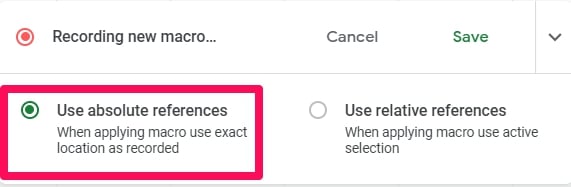
A Macro Dialog box will appear with two choices.
- Use Absolute References
- Use Relative References
These two options are based on whether you want to use the macro exactly as designed and recorded (absolute) or you want it relative to the position of the data set it is used on.
I will be explaining in detail these two references below, but for now, click on Absolute references.
When you perform the steps above, Google Sheets will now begin recording your moves. It will track them and when you stop the macro recorder, it will convert all the tracked steps into code.
Carrying Out The Process
The next thing to do is now carry out the processes in the order you want it to happen.
Still using the same example as above, you will now do the following (or whatever steps you want to save).
- Open cell A1
- Input the word – Macro
- Then color the cell Blue
When you’re done with carrying out the steps, go to the Macro Dialog box and click on the Save option.
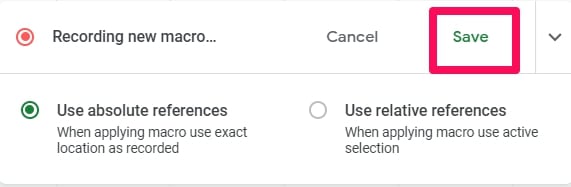
When you click on Save, you’ll be asked to name the macro you’re saving. You must save the macro with something that will specify the steps it carries out.
Choosing A Shortcut (Optional)
Here, you can also choose a shortcut for the macro you’re saving. Choosing a shortcut is optional but if you prefer it, the option is available.
The format is Ctrl + Alt + Shift + (0-9)
![Recording Macro In Google Sheets [Step-By-Step]](https://technicalustad.com/wp-content/uploads/2020/10/macro-shortcode.jpg)
The only change you’ll make here is specifying the number you want to use from zero to nine.
Saving The Macro
After that, click on the green Save option in the box to complete the process.
It usually takes more than a few seconds (especially if the steps are a lot) because Google Sheets is turning your recorded macro into something the program can understand (Google Sheets Script).
A notification will appear once your macro has been saved. An option to edit the script saved will also appear but don’t touch that for now (I’ll explain more on that just below).
How To Run Your Recorded Macro In Google Sheets
Moving on to running the recorded macro, there are quite a few ways you could run it.
These ways are listed in my order of ease. You of course can choose any of the four ways to use, it will still give you the same result if done properly.
- Run Macro By Using A Keyboard Shortcut
- Run Macro By Using The Macros Menu In The Tools Tab
- Run Macro By Using The Google Apps Script Editor
- Run By Assigning Macro To A Shape
Here’s how to use these methods to run your recorded macro in Google Sheets.
Using A Keyboard Shortcut
Remember when I explained how to save your recorded macro and the option of assigning a keyboard shortcut was given?
This for me is the fastest way of running a macro.
Assuming you chose [Ctrl + Alt + Shift + 1] as the macro’s keyboard shortcut.
All you have to do is open the worksheet of the data set you want to work on, use the keyboard shortcut above, and in a few seconds the actions you saved on the macro will be carried out on the data set.
If the actions you saved are quite lengthy, it could take more than a few seconds for them to be carried out.
Using The Macros Menu In The Tools Tab
Assuming you’ve already opened the data set you want to work on.
Navigate to the tabs close to the top of your screen and select the Tools option.
In the pop-up menu that appears, choose the Macros option. It should be the third on the list.
In the Macros menu that you’ve just opened, click on the macro’s name (the name you saved it with it).
![Recording Macro In Google Sheets [Step-By-Step]](https://technicalustad.com/wp-content/uploads/2020/10/macro-test.jpg)
The macros you have saved are usually below the first three options in the Macros menu.
When you click on the macro’s name, the steps recorded in that macro will be carried out in a matter of seconds.
The time also differs when using this method, shorter recorded steps take a shorter time to be automatically carried out and vice versa.
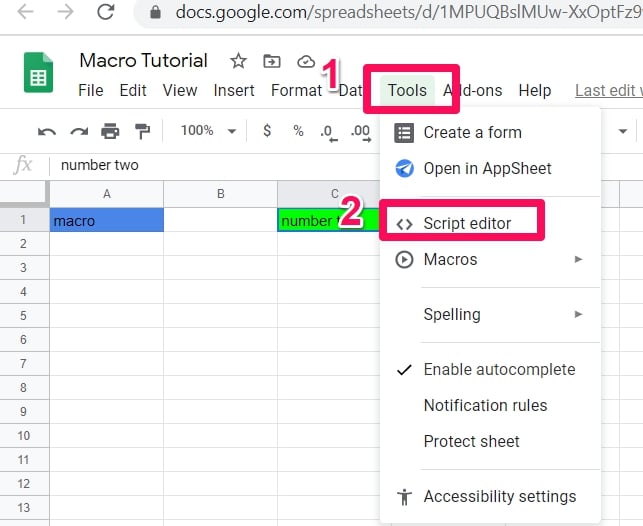
Using The Google Apps Script Editor
Remember when I pointed out that when you save a macro, it turns into something Google Sheets can understand?
It turns into a script. This method is based on users running the macro from the Google Apps Script Editor.
To open the Script Editor, navigate to the Tools tab and click on it. In the Tools menu, click on the Script Editor option. It is just above the Macros menu.
When the Script Editor opens, you’ll see a list of the saved scripts (macros) in a Select function drop-down menu.
![Recording Macro In Google Sheets [Step-By-Step]](https://technicalustad.com/wp-content/uploads/2020/10/saved-scripts.jpg)
When you’ve selected the macro you want to run, go to the toolbar of the script editor and click the icon that looks like a Play icon.
This immediately runs the macro on the worksheet you opened. It runs faster when the steps recorded aren’t much.
Using A Shape (Assigning A Macro To A Shape)
This method works well but I’ll advise folks that aren’t tech-savvy to use the more straightforward options above.
The whole idea is to pick a shape, draw that shape, assign a macro to the shape and then use the shape to run the assigned macro.
Before starting this process, please find out the exact name of the macro you want to assign to a shape. It is vital to the process.
How To Assign A Shape
In an open worksheet, navigate to the taskbar options above and click on Insert.
Then click on Drawing in the Insert drop-down menu that appears. To get to the Drawing option, you’ll have to scroll down a bit.
![Recording Macro In Google Sheets [Step-By-Step]](https://technicalustad.com/wp-content/uploads/2020/10/drawing.jpg)
When you click on the Drawing option, a dialog box will appear.
In the taskbar of the Drawing dialog box that appeared, click on the icon that’s third from the right (looks like a circle on a square).
![]()
It’ll open a drop-down menu.
Creating/Choosing A Shape
Click on Shapes in that drop-down menu. It should be the first option.
![Recording Macro In Google Sheets [Step-By-Step]](https://technicalustad.com/wp-content/uploads/2020/10/shapes.jpg)
In the Shapes follow-up menu, click on the shape you want to assign a macro to.
![Recording Macro In Google Sheets [Step-By-Step]](https://technicalustad.com/wp-content/uploads/2020/10/shape.jpg)
Clicking on any of the Shapes provided will take you to your left where you’ll be required to draw that same shape.
Don’t worry you won’t be expected to draw freehand, you’ll just be expanding the shape.
When the shape is drawn (a little big), click on Save and Close on the top of the window.
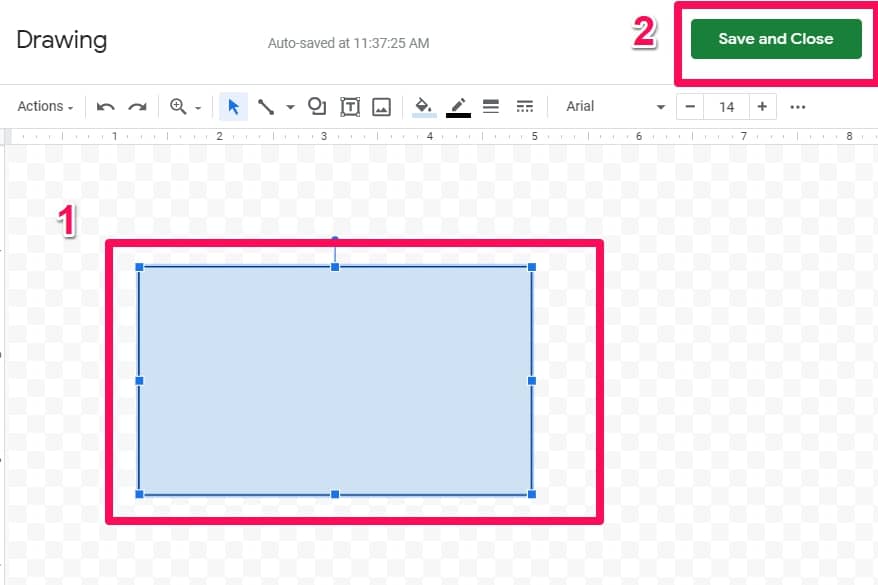
The shape should be inserted into the worksheet after you carry out the process above.
Assigning The Macro
Now go back to the inserted shape and click on the shape.
When you do, you’ll notice a vertical three-dot icon at the top right-hand side of the shape.
![Recording Macro In Google Sheets [Step-By-Step]](https://technicalustad.com/wp-content/uploads/2020/10/three-dots.jpg)
Click on the vertical three-dot icon. In the menu that appears, select the Assign Script option.
![Recording Macro In Google Sheets [Step-By-Step]](https://technicalustad.com/wp-content/uploads/2020/10/assign-.jpg)
An Assign Script Dialog Box will appear. You’ll be expected to input the exact name of the script (or macro) you want to assign to the shape.
![Recording Macro In Google Sheets [Step-By-Step]](https://technicalustad.com/wp-content/uploads/2020/10/assign-s.jpg)
After that, save the changes you’ve made.
Whenever you want to run the macro, all you have to do is go click on the shape you assigned the macro to.
Although this method works, it requires a bit more than the other methods above. This is why I have suggested it last.
The Difference Between Absolute References And Relative References
I asked folks to choose Absolute References first above in the guide but here’s why most folks will probably need Absolute References more.
It is important to point out that Relative References will prove useful in many cases too.
But to be able to use both effectively, you will have to know how both of them work and what exactly they offer when recording a macro.
Using individual or collective cells in Google Sheets can be absolute or relative.
Absolute (Cell) References
In easy to understand terms, using the absolute cell references option when macro recording refers to users locking down the cells or remembering the exact range of cells used.
Choosing the absolute references option when recording a macro will mean using the same cells or range of cells when the macro is run on other data sets.
Example
Assuming I chose the absolute references option when starting the process of saving a macro, here’s how it will work.
Let’s say you recorded a macro and all you did in that macro was input the text Macro in the cell A1.
When you use that macro again on a worksheet, the step (inputting the word Macro) carried out will be exactly in the same cell A1 as the above.
Relative (Cell) References
In this option, cell references are not locked or exact. They are instead used relatively to the positions selected.
You might not totally get this but in the example below, I’m sure you’ll understand what I mean.
Example
Assuming I chose the relative references option when starting the process of saving a macro, here’s how it will work.
Let’s say when I started recording a macro, I first selected Cell B1, then I moved to Cell A1 and inputted the word – Macros and then saved the macro.
When I’m on a new worksheet and I want to use that macro to run the same process, here’s what will happen.
Assuming I selected Cell D1 on a worksheet and I ran the macro above.
The relative references option will take into cognizance the fact that I moved a cell back in the recorded macro and then move back to Cell C1 and input the word – Macros there.
This is what it means when I explained that in the relative references option, cells aren’t locked.
Users will have to decide between both options when they record macros based on the data they work with and based on the actions they want to carry out on the data.
Why Using Macro In Google Sheets Is Helpful
- Makes repetitive processes easier with just a few clicks.
- Using the relative reference option can sometimes help with fluid data sets.
- Recording a macro is not just a way to get stuff done faster, it is also a way to iron out mistakes in work steps.
- Folks learning to use the Google App Scripts will find that using the macro recorder option is vital in the learning process.
Limitations Of Recording And Using A Macro In Google Sheets
While recording and running a macro is useful in many situations, there are quite a few limitations that still drawback it’s overall effectiveness.
- Custom Functions Can’t Be Created Using Macro
These functions are quite useful and very popular among users of Google Apps Script, but it can’t be done automatically.
The only way it can be done is manual. You will have to manually write the code (script) and specify the function and the results you want from the function you created.
- Can’t Get A Macro To Be Triggered By Specific Events Or Actions
It would be cool (and faster) if you could get to run macros by specific events like (choosing a cell or opening a workbook).
But it does not work that way. Users still have to manually create the event and then trigger the macro (after recording the macro previously).
- Recording A Macro Is Limited To The Steps It Can See On The Screen And To The Worksheet That Is Open On That Screen
While this isn’t a flaw exactly, it would still have made our lives easier if we could record a macro across different data sets and not just the one that is selected.
Conclusion
Recording actions that we perform regularly on datasets using Macro in Google Sheets can greatly enhance our work productivity and reduce the time we normally use in meaningless processes.
You have to be careful when recording macros because everything you do on your screen in the document or worksheet will be recorded and carried out exactly (if you chose absolute) or relatively (if you chose relative) when you run the macro later on other data sets.
If you have any issues recording macros, please use the comments section to share your issues. I’ll get back to you with tips to help.

