


Most smartphones, tablets, and PCs produced now come with the ability to wirelessly mirror their screen on to another display. The need to use an HDMI cable for such connections is declining.
Miracast is the technology that makes this seamless projection of content—such as videos—from the screen of one device to another display possible. There is Miracast Windows 10 feature, and this is possible because Windows 10 devices have all the software capabilities required to wirelessly project to other devices.
This article will explain what Miracst is and why it is so important. The simple methods for checking if your Windows 10 device has Miracast capabilities will be explained, as well as how to enable and use Miracast on your PC. But before moving into the Miracast Windows 10 Feature, let’s talk just a bit about Miracast.
What is Miracast
As has been mentioned, Miracast is the technology that makes it possible to wirelessly display content such as videos on from your device to another screen such as a TV, or another PC monitor. Many people refer to Miracast as “HDMI over WiFi”.

Rather than connect a physical HDMI cable for your transmission, a WiFi network is used instead. Miracast is a standard that is ratified by the WiFi alliance and is now available on millions of modern devices.
One good thing about Miracast is that it doesn’t require the presence of an existing network. Rather than going through your home network or router, the transmission is direct from the sending device to the receiver.
This means that Miracast will come handy in a high traffic environment such as a business or school. Heavy traffic videos can easily be moved off the network. Not only does this feature save bandwidth, but it also adds security to the connection.
Miracast was designed to be a cross-platform standard. This differentiates it from Apple’s AirPlay (on Apple TV) and Google’s Chromecast (on Chromecast and Android TV devices). Miracast works on devices running Windows 8.1 and above and Android 4.2 and above.
Another advantage of Miracast is that it allows keyboards, mice, and even touch-enabled displays to wirelessly become extensions of a PC. This makes the interaction and control of the display easier, more natural, and flexible.
You should note that Miracast is only a screen mirroring protocol. Hence, the screen of the device sending the content must remain on throughout the connection.
If you are projecting a movie from your PC to a television or a projector, the screen of your PC has to remain on throughout the duration of the movie.
Miracast is a very useful innovation. It has applications in commerce, education, and entertainment. Businesses that see a lot of traffic over their network can use Miracast to mirror content from one screen to another without affecting the bandwidth of their home network.
Teachers can project images, videos, and other instructional materials from their mobile devices or PC to a larger screen such as a projector. This makes it easier to communicate with particularly large audiences.
Other presentations can be given using Miracast as the means of transmitting from a small screen to a larger one.
At home, you can watch movies with friends and family on a bigger screen easily. You can project your gaming on a larger screen for an audience to see.
You can share up to 1080p HD video (H.264 codec) and 5.1 surround sound. This is more than adequate for most purposes.
How to Check of Your Windows PC Supports Miracast
It had already been mentioned that Windows 10 has all the software requirements to support Miracast. Miracast does not need the installation of any third-party app.
There is however a hardware component to using the Miracast technology. It is possible that your PC does not meet all the requirements to support Miracast Windows 10 feature.
This is especially true if you upgraded your operating system from Windows 7 and below to Windows 10. Most new Windows 10 computers are equipped with both the software and hardware capabilities to support Miracast.
To support Miracast, you need a WiFi adapter and driver that supports Miracast, as well as a video card and driver that can support Miracast. There are three methods to check if your Windows PC supports Miracast.
Method 1:-
This is perhaps the fastest method of checking if your PC has Miracast capabilities. It involves you quickly attempting to cast. Press the Windows key and P simultaneously. The prompt that appears will make it known if you can Miracast with your PC.
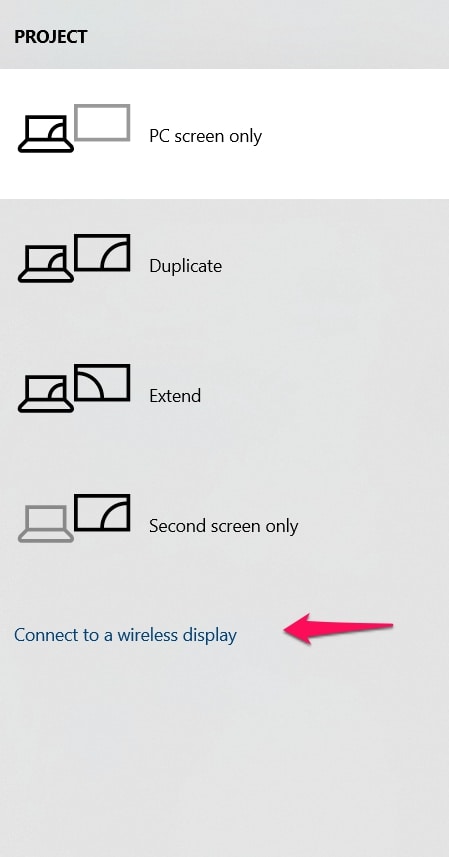
Options to cast will be presented to you on the right if Miracast is supported on your system. Different choices on how to project will be presented if Miracast is supported.
If your PC does not support Miracast, you will see a message suggesting you reinstall drivers or use a different video card.
With the simple step of pressing Windows key + P, you can know if your computer is able to Miracast.
Method 2:-
This method involves checking the display settings of your PC. Go to your device settings by clicking the start menu and selecting settings. Under settings, select “System“.
Select “Display”, this is found at the left side in the system settings page. Under the “Multiple Displays” section look for “Connect to a wireless display“.
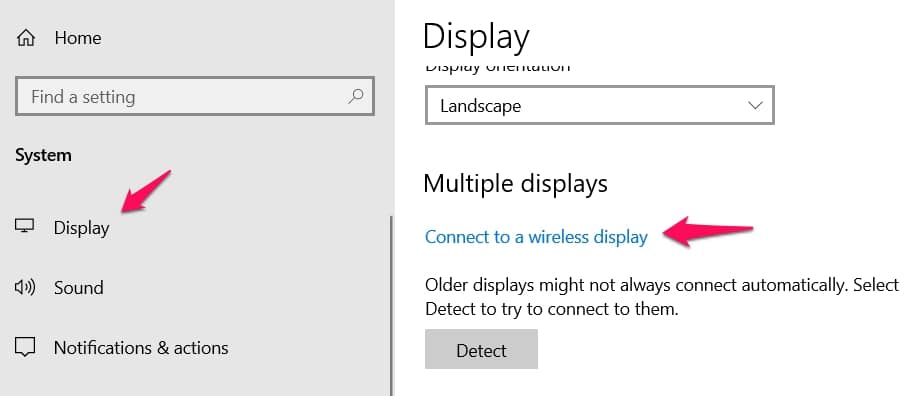
If the “Connect to a wireless display” text appears under “Multiple displays”, then you know that your PC supports Miracast. If the text doesn’t appear under “Multiple displays”, then you’ll know your system does not support Miracast.
Method 3:-
This is the method most people are familiar with. It involves using DxDiag to check if your system has Miracast capabilities. DxDiag is a utility that helps you obtain precise information about your system and its various capabilities.
This is the longest of the methods, but also the one likely to give you the most accurate results.
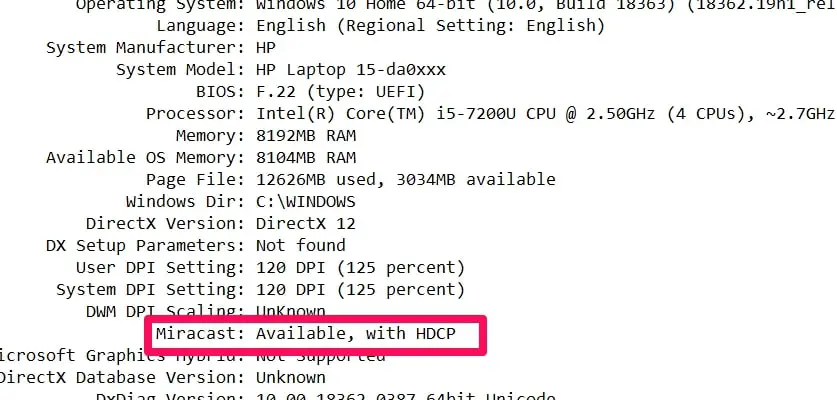
Right-click on the start menu, then select “Run“. You can also use the shortcut: Windows key + R to open the run window. In the run window, type ” DxDiag” then click ok.
Click “Save all information” at the bottom of the DirectX Diagnostic Tool. Next, select “Desktop” at the left and hit save.

You select Desktop so that the saved file will be easy to find on the desktop. The file name will have already be filled as DxDiag before you save.
Open the DxDiag text file you saved on your desktop. Under the system information look for Miracast. If your system has Miracast capabilities, it will be stated that Miracast is available (usually with the HDCP feature). If Miracast is unavailable, it will also be stated.
How to enable and use Miracast on Windows 10
If the Miracast Windows 10 feature is available on your computer, then you’re ready to begin transmitting the content on your screen to other displays.
If you want your Windows 10 computer to be enabled as a Miracast display, follow these steps.
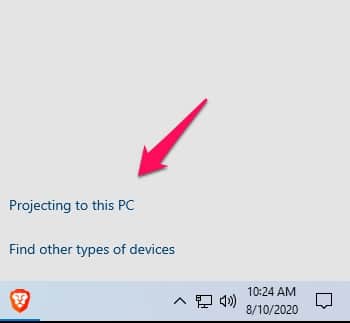
Open the action center. The action center is the speech bubble icon at the lower right corner of your screen.
Once the action center is open, select “Connect“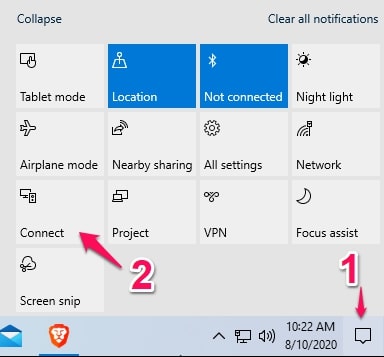
Select “Projecting to this PC”
In the settings window that appears, you can select ‘Available everywhere ” or “Available everywhere on secure networks”.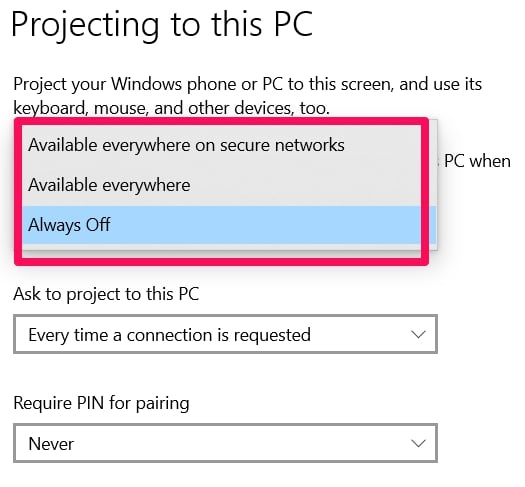 Next, under ‘Ask to project to this PC”, select ” First time only” or “Every time”. You can choose if you want a pin to be required for pairing.
Click yes when you get the prompt that another computer wants to project to your computer.
To mirror your screen to another Windows 10 device, the procedure is similar to the one described above. Follow these steps:
- Open action center
- Click on connect. You will see a list of available devices. The device you want to connect to should be on that list.
- Select the receiving device. Be prepared to wait for up to a minute for the devices to pair. Also, be ready for the possibility of attempting pairing multiple times before you connect.
- If you want the other device to be able to control your PC with its keyboard and mouse, toggle “allow input ” on.
- If you want to use the other display as a second desktop, rather than a mirror of what is on your screen, tap “Change projection mode” and then select “extend”.
- Click disconnect to end the connection.
Connecting to other devices is also similar to the process described above.
- Turn on your TVs Miracast support, or connect the external adapter to the HDMI port. Don’t forget to power on the adapter.
- On your PC, go to settings, then devices, then connected devices.
- Click on add devices. When the adapter appears on your screen, click on it to connect.
- You can configure both displays by simultaneously pressing Windows key and P, and choosing your preferred settings.
Conclusion
Wireless connections save you the time and effort of having to use a cable to connect devices. Miracast is one of the foremost technology for mirroring your screen on another device wirelessly. Using Miracast on Windows 10 is a very important skill in business, education, and entertainment.
Thanks to the Miracast Windows 10 feature users can do away with cables and still enjoy multiple screens.


