Did your network adapter give up on you? This can be a pretty annoying occurrence, but there are many ways to troubleshoot it and get it working again.
It would not matter if it is the Ethernet or Wi-Fi; the steps I will outline should be enough to resolve any problem associated with the network adapter not working.
What is a Network Adapter?🤷♂️
One of the many components that connect you to the internet is the network adapter. They’re typically built-in antennas or cards, but they can be USB antennae or dongles that allow strictly wired devices to access data wirelessly.
Computers and other digital devices use these network adapters to connect to a LAN (local area network) or other network forms to access the internet.
Note that a router and a network adapter are not the same things. The latter allows devices to connect to a network and access data, while the router is the gateway that sends wireless traffic from the internet to your devices.
Before utilizing external network adapters on your computer, you must first install the driver software for that adapter. When your adapter is initially plugged in, your computer may automatically install the latest driver, or the manufacturer may include it with the adapter.
Recommended Fixes For Network Adapter Not Working
1. Verify it’s an Adapter Problem
It’s pointless to waste time repairing something if it is not broken. So, before you conclude it’s a network card issue, you must rule out the following possibilities:
- Do your computer’s other network adapters function properly?
- Is it possible to connect other devices that use the same type of adapter without problems?
- Does using a different Ethernet cable resolve problem?
- Is it only a problem with the internet connection? Whether this is the case, first check with your Internet Service Provider (ISP) to see if the issue is with them.
- Verify that it’s not a software or hardware issue by booting from a Live CD operating system.
Assume the issue occurs on other computers, on the same computer’s network adapters, or at the router. In that situation, you’re most likely dealing with a problem that isn’t related to the network adapter.
2. Scan for Possible Hardware Changes in the Device Manager
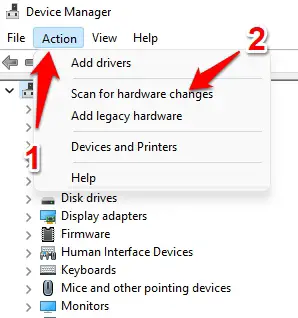
If your network adapter does not appear in Device Manager’s list of adapters, you can prompt Windows to scan for connected hardware.
First, at the top of the list in the Device Manager, you will have to select the name of your computer, then navigate “Action” and “Scan for hardware changes.”
If the scan is not successful, there could be a more physical issue with the connections between the network adapter and your computer, or the adapter itself could be defective.
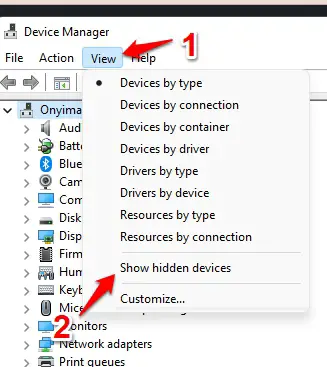
It’s also possible that your adapter is hidden in Device Manager, preventing you from checking its status or changing its drivers from there.
Simply go to “View,” then “Show hidden devices” to see if this is the case.
You might want to run another hardware scan for changes after this, just in case.
3. Check Adapter status in the Device Manager
We have talked a bit about the Device Manager, but there is additional troubleshooting you can try using this utility. They can be used to check if hardware components are working properly or not.
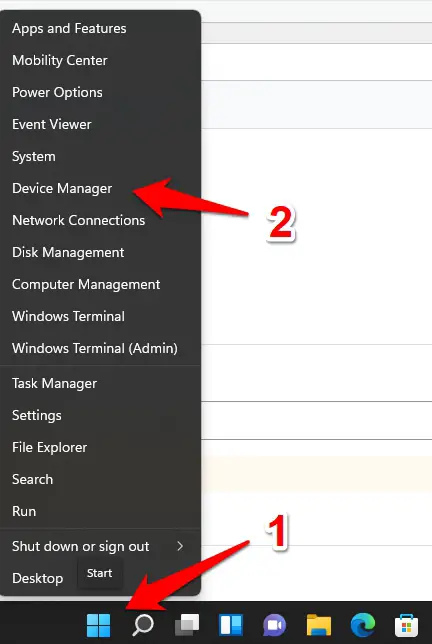
To start right-click on the start menu and select the Device Manager option.
Under the list of devices, expand the “network adapters” category. You can do this by clicking on the arrow “>” sign in by this option.
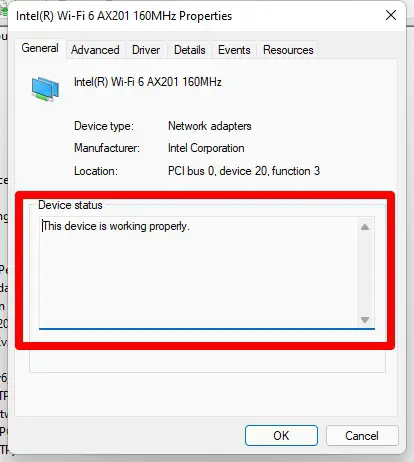
Once expanded, right-click for the network adapter you are having issues with, and select the “Properties” option. Here verify if the status section indicates that the device is working correctly.
If it is not working correctly, take notes of what the error message states. This message could be a pointer that the adapter is faulty. An internet search of the error message would give you a better idea of the next steps.
4. Use the Device Manager to Disable and Re-enable the Adapter
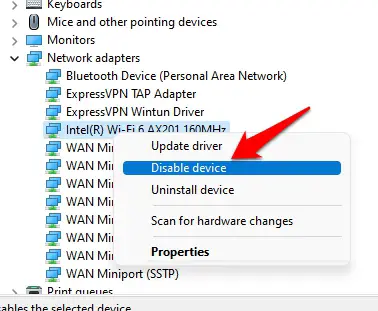
This process is different from merely switching the adapter on and off. Once more, you would need to access the Device Manager, expand the network adapters option as we did in method 3, then right-click on the problematic adapter and select the “Disable” option.
Repeat the same process, but this time, after right-clicking on the problematic adapter, select the “Enable” option. This reset can shake out minor issues and restore your connection.
Alternatively, you may choose to uninstall and reinstall the network adapter.
5. Install the Correct Drivers
Repairing is not always the solution. Sometimes the driver is damaged, and only a new download will fix it. It would be best if you headed to your manufacturer’s website for a new download. I use HP, so I will be following an adapter link for Hp computers.
In other cases, you need to know who the motherboard manufacturers are and track down specific adapters from the motherboard or adapter makers. Download its installation app and execute it. Once this is done, reboot the computer and verify the problem is fixed.
6. Check For Issues With the Physical Connection
If the network adapter was operating perfectly then suddenly stopped working, you should perform a physical examination on it. This is particularly true if it does not appear in the device manager.
There’s not much to verify if you are utilizing an integrated network adapter. If you think a built-in adapter is no longer in a good state, you should have a technician examine the motherboard.
You can double-check that a USB adapter or expansion card is placed correctly if you’re using one. To test the adapter, you can also use a different USB port, computer, or PCIe slot. If the adapter is not working, no matter where you connect it, it could just be dead.
7. Launch a Network Troubleshooter
In most Windows versions, the Network Troubleshooter is a handy tool in detecting configuration problems and resolving them.
Open the start menu, type Network troubleshooter, and click the first option that shows up.
Click on next and allow this utility to check, fix and restore your adapter to normal.
On Windows 10 to open the troubleshooter, navigate Start Menu / Settings App / Network & Internet / Status / Change your network settings, and Network troubleshooter.
8. Restore the Computer
That might be a bit of a haphazard solution. Still, you might try restoring your computer using the system restore or a recent system backup to a time when the adapter was operating correctly.
This is a better option if you discover that your network adapter functions properly when inserted into another computer or while booting from a Live Operating system. Because any number of minor modifications could cause the network adapter to fail, reverting to a previous backup of your OS may be the best option.
Alternatively, you can try reverting to a previous network adapter driver or removing the most recent operating system update to see if it damaged something that will only be rectified in a future patch.
To restore the computer:
In the start menu, type “recovery” and select the recovery control panel option.
Here, select the “Open system restore” option and follow the instructions to restore your computer.
9. Run a Netsh Winsock Reset
Many changes performed by your network software, utilities, and drivers might cause problems with Windows’ basic network settings. The Winsock Catalog is where all of these settings are saved. Resetting the catalog to its default values can fix a lot of network adapter issues.
To begin, open the command prompt. Depending on whatever version of Windows you’re running, this may have a different name. It’s known as the Terminal in Windows 11. You can use either the Command Prompt or PowerShell in Windows 10.
To use any command-line utility to perform a Winsock reset, you’ll need to open it with administrator access. Right-click the CMD app on Windows 10 and 11 and select “Run as administrator.”
To save a duplicate copy of your current Winsock catalog, open a command line and run the below command.
netsh winsock show catalog > winsock-before.txt
The copy settings will be saved to a text file in the currently specified directory when you press Enter.
After that, type netsh winsock reset and hit Enter once again. You’ll get a confirmation message, and then you’ll need to restart your computer.
10. Check the Wi-Fi Button or Switch
The Wi-Fi switch on most laptops can be accessed by a physical toggle or a keyboard shortcut. Even if it’s a keyboard shortcut, this switch acts at the firmware level, thus if it’s turned off, your OS may not recognize the adaptor.
It’s a simple oversight, but we’ve all made it, so double-check that the device Wi-Fi switch is set to “on” before presuming there is a problem.
11. Check the BIOS Settings
The BIOS on a motherboard can be used to disable integrated devices. If your os can’t find an integrated component on the motherboard, check the UEFI or BIOS menu to ensure the network adapter hasn’t mistakenly been turned off.
Because each computer’s BIOS is slightly different, consult your motherboard handbook for further information.
12. Disable or Uninstall Virtual Network Adapters
The final hack for a network adapter not working problem is disabling and enabling virtual network adapters.
When you look at the network adapters’ list on your computer, you might be shocked to realize that there is more than just an Ethernet or Wi-Fi adapter listed.
There could be multiple virtual network adapters produced by software applications for various reasons. Virtual machine (VM) software, for example, allows VMs to interface with the host computer. The same can be said for some VPNs and remote desktop software.
You might want to try temporarily deactivating these adapters in Device Manager, as mentioned above, to see if any of them are interfering with your genuine network adapters.
Final Thoughts
Troubleshooting the problem of a network adapter not working can be a difficult exercise. But with some patience, you will almost always be able to resolve the problem without the need for a technician.
Please note that just like it is the case with many computing problems, you should start with a simple computer restart. The issues are sometimes very minor and will disappear after the computer cools off and restarts.
I hope you have found these hacks very useful. If there is something you believe I have left out, I will be glad to hear from you in the comment section. I wish you luck fixing your network adapter issues.


