


The Process Monitor is a Windows tool that monitors Registry activity, real-time file system, and process/thread activity.
It is quite an advanced tool. Most users who are adept at using it will tell you it is very effective for system troubleshooting and for rooting out malware.
In tech terms, the Process Monitor offers simultaneous logging to a file, process information you can trust, a filtering capability that’s extensive, and a host of other really important features.
Features Of The Process Monitor:-
- Advanced filtering feature that allows you to filter data fields that are not configured as columns
- Columns can be configured/moveable for any event property
- Process image information can be accessed easily using the process tooltip
- Searches can be canceled
- Getting info about the relationship of all processes referenced in a trace is possible using the process tree tool
- Boot time logging is available of all operations
- Formatted data that doesn’t fit into the column can be accessed using a detail tooltip
- Capturing more data for operation input/output parameters is possible
- Filters are specially made to guide against losing data while still allowing user preference in setting up filters
- Process details like image path, command line, user and session ID are captured and the information can be relied on
- Root causes of operations can be identified (to a reasonable extent) because of the capture of thread stacks for individual operations
Using Process Monitor To Troubleshoot And Find Registry Keys
It is important to point out that I can’t just give you a one size fits all explanation about using the Process Monitor to troubleshoot because there are so many different complications that can’t be accounted for.
What I will do instead is give you an example of how I used it and I hope that helps you get more familiar with the way it can be used to troubleshoot.
First, you could download it HERE
Troubleshooting Problems
The example I’ll be using is a case of unwanted software that just won’t leave.
If you’re facing an app that won’t uninstall even in the Uninstall Programs menu, here’s what you need to do.
Running Process Monitor
The first thing to do is to launch the Process Monitor and then go back to the software and try to uninstall it again.
In that time, the ProcMon (Process Monitor) should have gotten a huge amount of data as expected.
The reasoning is based on what I have already explained above about the ProcMon, when I explained that it offers real-time file system, Registry activity and process/thread activity.
Launching ProcMon, it will capture any system process and that is why you then try to uninstall the process again so that it’ll be captured.
You end ProcMon afterward so that it does not capture too many irrelevant processes that will just make your data bulkier and harder to work with.
Finding Specific Information In ProcMon Data
Now there are two ways you could use to find any specific info you want in the data in ProcMon.
- Using (Ctrl+F) or also known as the Find feature
- Using the Filter
You can use the Find feature in cases like apps are not deleting, the Filter feature is more useful in finding Registry Keys.
Find using information like the “app name” you’re trying to uninstall.
In the data, the problem you will most likely see is that although Windows was definitely trying the necessary registry keys that are tied to the Uninstaller process, they were not found.
Fixing The Problem
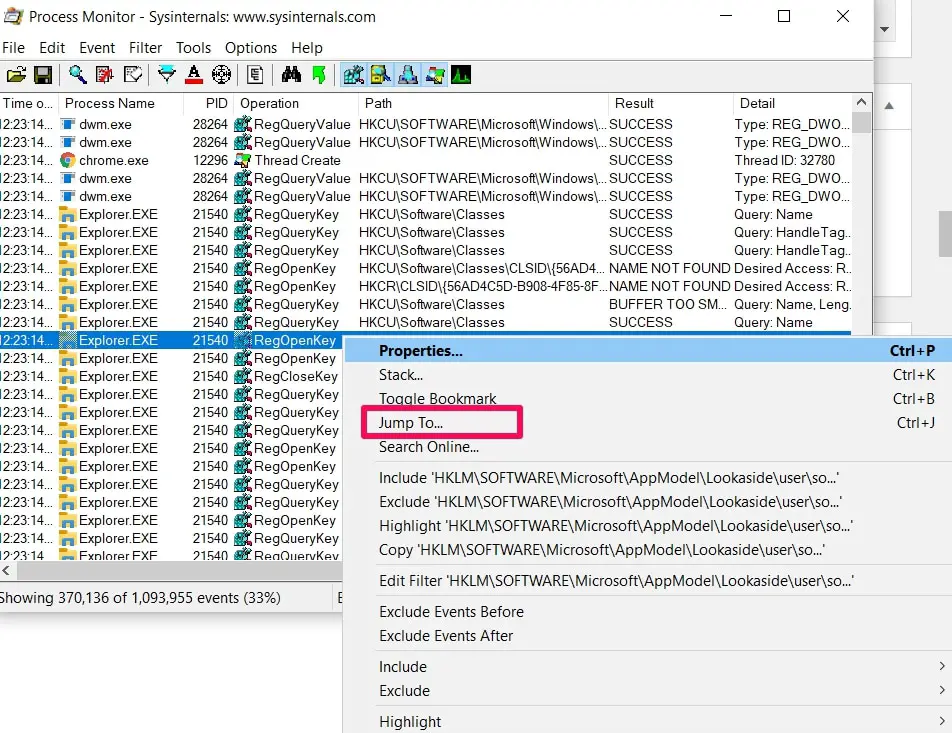
Finding the key in the registry is not hard.
All you need to do is use the Jump To feature by right-clicking on the app process and choosing the feature from the list of options that appear.
Use the Jump To feature and you’ll be shown a menu that should still have the registry keys of the software you’ve been trying to delete. in this case my discord.
That’s why apps continue appearing on the Programs & Features list without being able to be uninstalled.
From here on, it should be plain sailing. All you need to do is just to manually delete the registry key.
Note: If you get an Access Denied message while trying to delete the registry key, just use the Permission option to get access and then come back and delete the registry key.
The Permissions option is on the same list you’d get the Delete option (which appears when you right-click on the file you want to delete).
Normally though, the deletion process works out just fine and you will be able to remove the software that had been dodging you for quite some time.
Finding Registry Keys
The Registry is home to everything in Windows so when you see and check checkboxes or you see drop-down menus that allow you to change the values of something, you’re seeing something that’s stored in the Registry.
Here’s a tip on how to figure out where a particular setting is stored in the registry.
The option used as an example here is in the Taskbar & Navigation Properties (the first option on the first panel.
The option is – Lock The Taskbar
I’m using this option because it’s a common option that’s available on the likely Windows versions you’re using. So, follow me and in the end, you should be able to pick another option and figure out where it is stored by yourself.
How To Go About It
The first step here is to launch the Process Monitor, remember that the aim here is to capture information.
So, launch ProcMon and change the setting (the option chosen in the beginning).
You have to immediately stop ProcMon so that you won’t get too much data to work with.
Filtering The Data
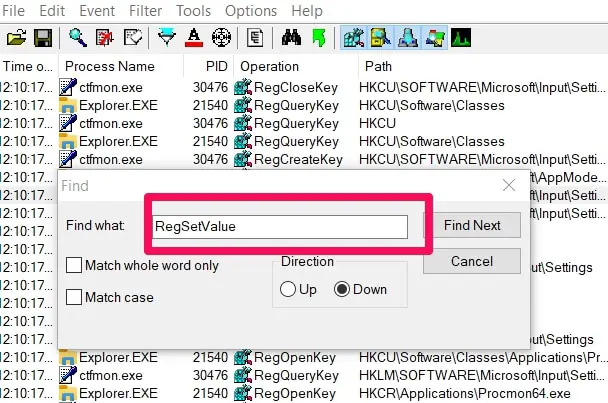
The first thing you need to do is to use the Filter feature to ensure a more streamlined data, this makes it easier for users to find the particular data they need.
In this case, you will have to filter by RegSetValue because that’s how Windows sets a registry key to a new setting.

You’ll need to choose the Include RegSetValue option to ensure what’s left on your data list is the events that are tied to Windows setting a registry key to a new setting.
Finding The Exact Data We Need
Doing the above steps correctly will reduce the huge list of data to a few options that should contain the info you need to find the Registry Key.
The name of the setting you chose, in the beginning, is important here.
Remember I chose Lock The Taskbar. Whatever setting you choose, just look at the name and then use the name to follow the next instruction.
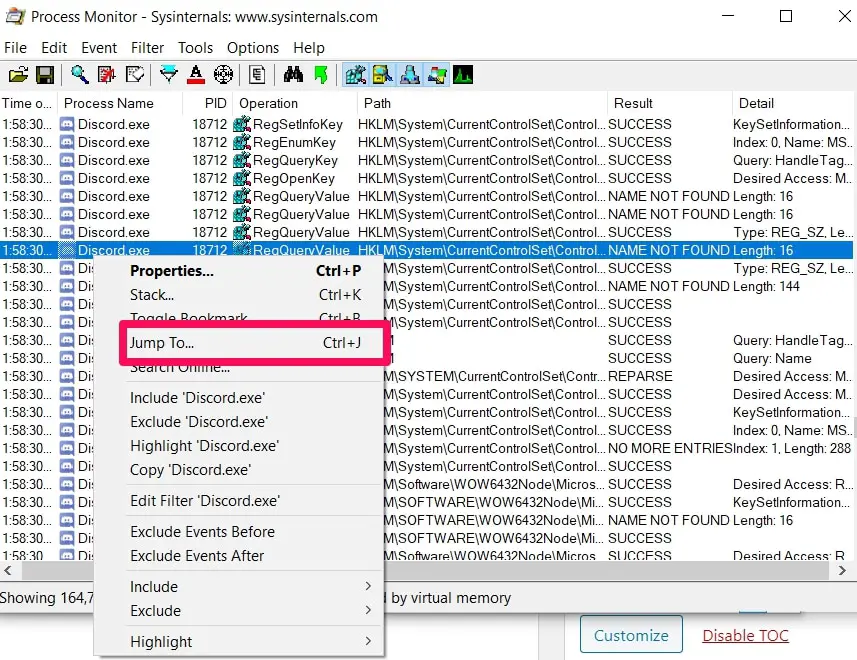
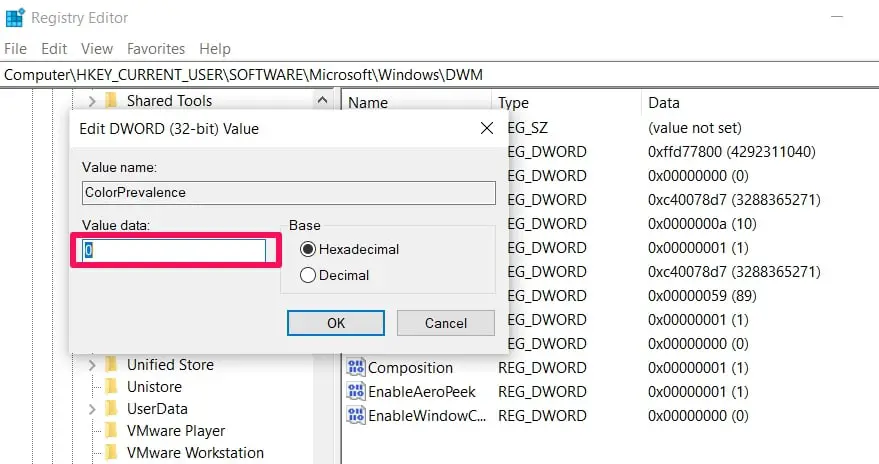
To make things easier, you just have to look at the Path description. When you find one with the name of the setting whose Registry key you’re looking for, right-click on it.
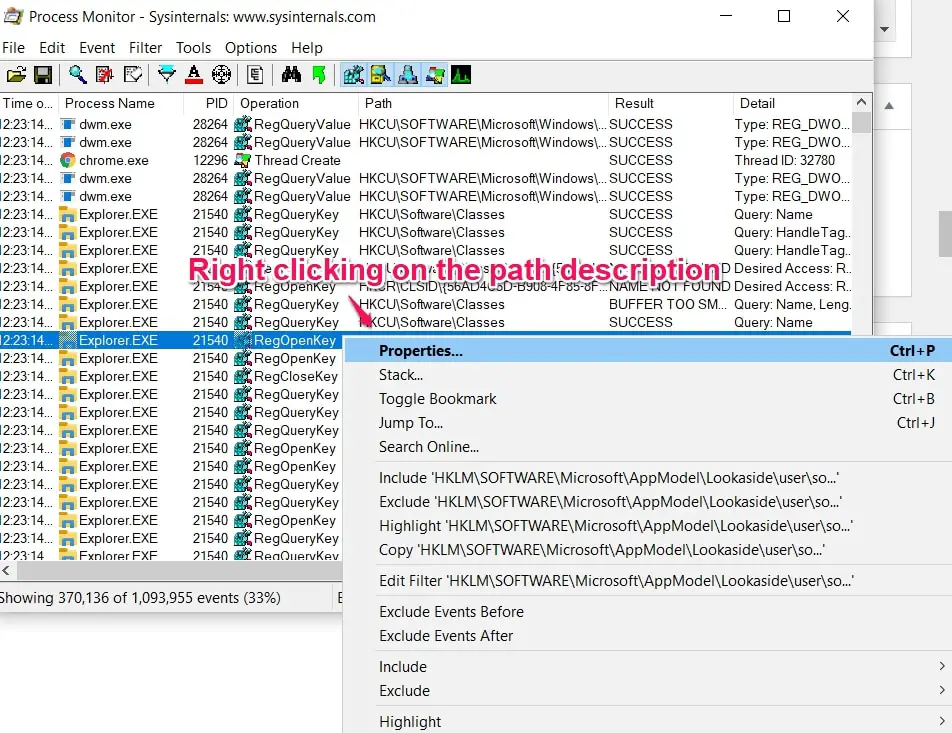
In the list of options that appear, click on the Jump To option. What this means is that ProcMon will open the Registry Editor and highlight the key of what you just clicked on.
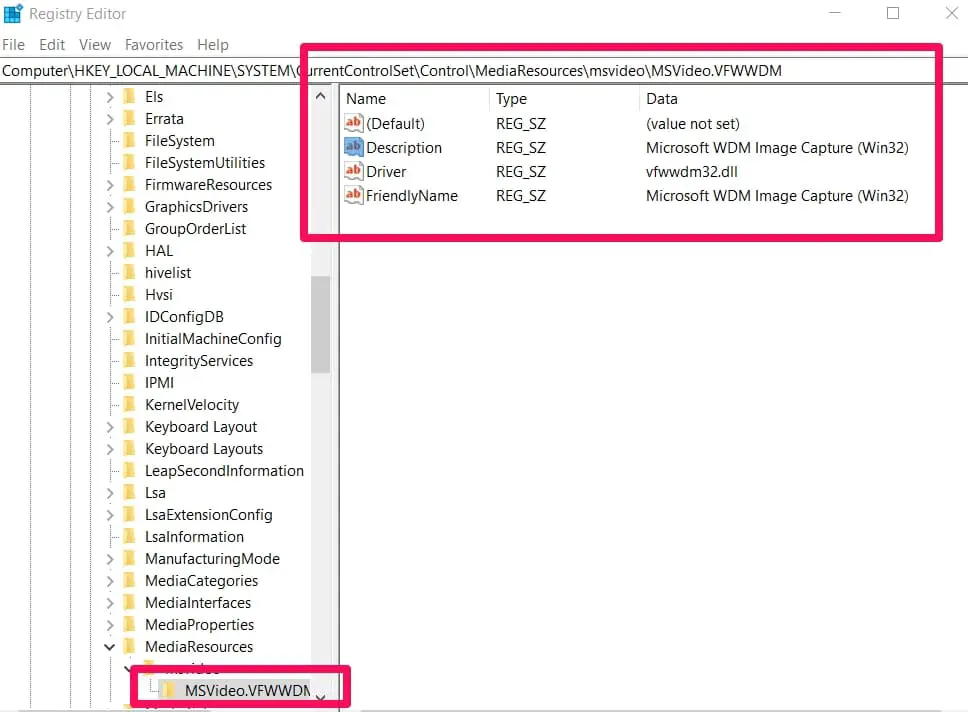
Confirming The Key
To ensure you got the right key, you have to now look at the data part of the highlighted key. The key should be set to 0 if the setting is undisturbed (the 0 that’s in the bracket at the end of a string of numbers).
You have to change the Lock The Taskbar setting again, apply it, and then refresh the still open Registry Editor (you should use the shortcut option – F5 to refresh the Registry Editor).
When you refresh, check the highlighted key, the key should now be set to 1 (the 1 that’s in the bracket at the end of a string of numbers).
This will tell you that you got the right setting and the corresponding Registry key.
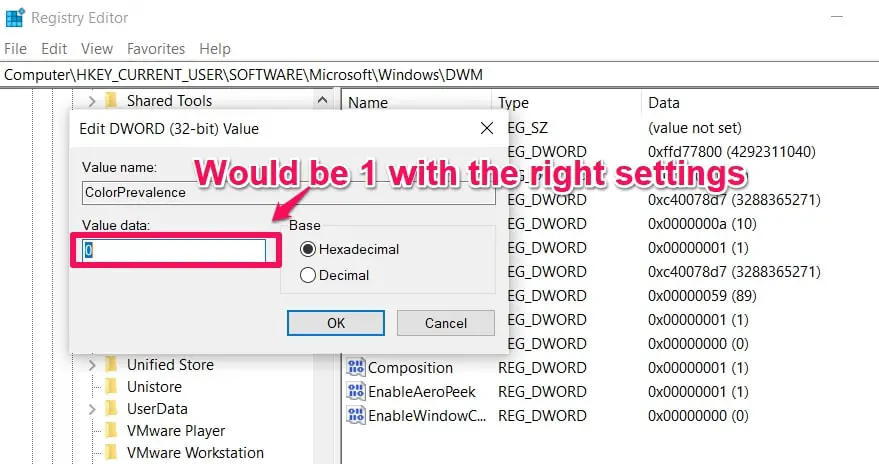
You will almost always pretty much get the right key as long as you use the path description tip properly but it is important to still cross-check to ensure correct results.
If you didn’t see a change in the key, then you didn’t choose the right key. You can just go back and look through your data for other plausible options (using the path description idea).
You then have to go through the confirmation process again to be sure you’ve gotten the right key.

Conclusion
There are quite a number of things you can accomplish using the Process Monitor and the above processes are just a few of them.
The ProcMon is really important to folks who understand how to use it and where. You will be able to find out info that normally won’t be available without using the ProcMon.
If you know other processes that you used the ProcMon to great effect, please use the comments section below to share the idea with everybody.
Thanks for reading and I hope you understand quite a bit about the Process Monitor now.

