


In this article, I will describe how to connect the infrared sensor to the Raspberry Pi. These sensors are most commonly used for small robots such as linear following robots and edge avoidance robots.
In short, it detects objects that exist before and distinguishes between white and black. We have covered many raspberry pie projects with many sensors in this article we will cover Raspberry Pi IR Distance Sensor. The raspberry pie is also a boon to the IoT project because it is a pocket-sized built-in Wi-Fi computer with microcontroller capabilities.
What is IR Sensor Module?
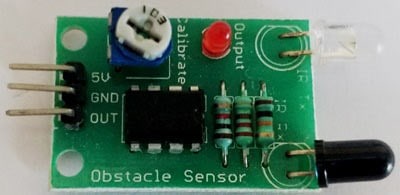
Infrared sensors (infrared sensors) are modules that detect the presence of objects in front of them. If the object exists, it gives an output of 3.3V, or 0V if it does not exist.
This is achieved by using a pair of infrared (emitter and receiver) emitters (infrared light-emitting diodes) that emit infrared and reflect infrared light if there is an object in front of it. This infrared light will be received by the receiver (photodiode) and the output will be amplified after amplification with the op-amp link LM358.
Collect Hardware to Build Distance Sensor with Raspberry Pi using IR Sensor Module
- Raspberry Pi 3 (any model) Buy Now
- IR sensor Module Buy Now
- Green and Red LED lights
- Breadboard Buy Now
- Connecting wires
Wiring
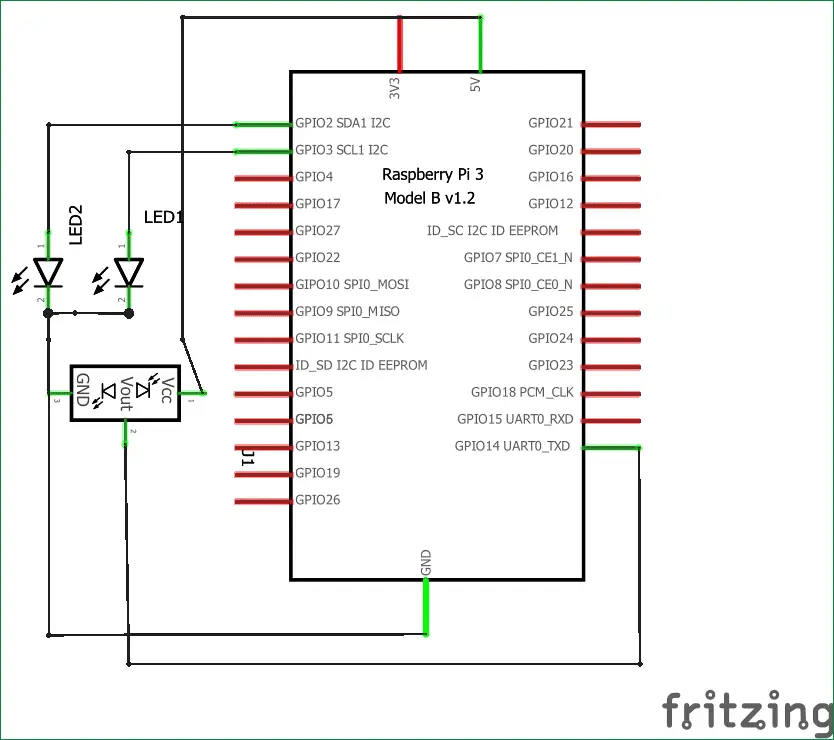
The circuit diagram for connecting the infrared sensor to the raspberry pie is shown below. As you can see the circuit diagram is very simple. We’ve powered the IR module directly from the Raspberry Pi’s 5V and ground pins. The output pin of the IR module is connected to GPIO14. We also use two LEDs (green and red) to indicate the status of the object. These two LEDs are connected to GPIO3 and GPIO2, respectively.
Programming of Raspberry Pi
Here we use the Python programming language to program RPi. There are many ways to program your raspberry pie. In this tutorial, we are using the Python 3 IDE because it is the most commonly used one.
Note If you are Beginner in Raspberry pi Then I will Suggest you Have a look at my previous Tutorial How To Setup noobs in raspberry pi
Run Source Code
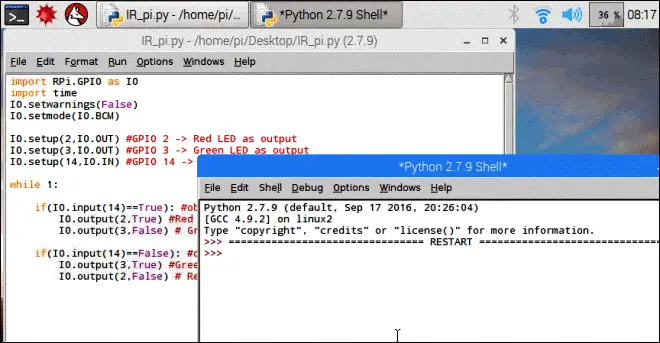
import RPi.GPIO as IO
import time
IO.setwarnings(False)
IO.setmode(IO.BCM)
IO.setup(2,IO.OUT) #GPIO 2 -> Red LED as output
IO.setup(3,IO.OUT) #GPIO 3 -> Green LED as output
IO.setup(14,IO.IN) #GPIO 14 -> IR sensor as input
while 1:
if(IO.input(14)==True): #object is far away
IO.output(2,True) #Red led ON
IO.output(3,False) # Green led OFF
if(IO.input(14)==False): #object is near
IO.output(3,True) #Green led ON
IO.output(2,False) # Red led OFF
Note:- I have written a post for people looking for the Best Monitor for Raspberry Pi to buy?, do read it If you are interested.
Compiled program
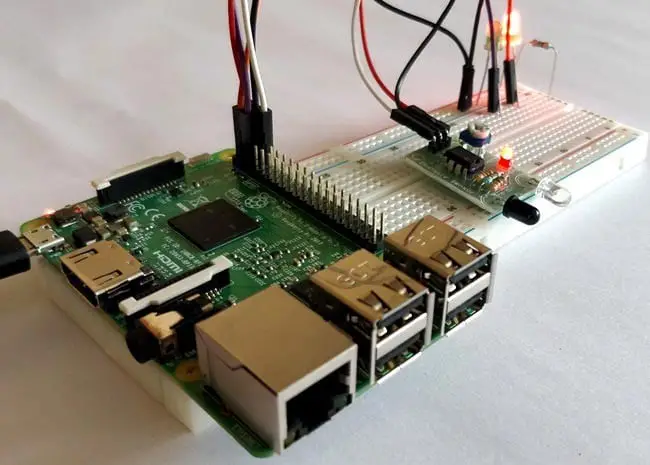
Once you have created the Python code, execute it using the run command. If the program is executed without any errors, you should get the screen below.
Here is the test video

it will work just great if you face any problem with then please do comment write below!
Visit similar tutorials on Raspberry Pi
How to Build your own Super Computer with Raspberry Pi 3 Cluster
Build Super Computer with 5$ Raspberry pi zero using Cluster HAT


