


As long as you’re a regular system user, you should know the importance of backing up your system occasionally. This is where the “SyncToy Windows 10” tool comes in.
There are many ways to create backups or sync folders but some of them don’t have easy to use interfaces. This is why Microsoft made its own tool that’s compatible and can be used by just about anybody.
I will be explaining what SyncToy is, what it does, how to download and use it effectively. I’ll break it down in sections so that you can just go read a particular part especially if you’re already familiar with some sections.
What Is The SyncToy Windows 10 Tool (And What Does It Do)?
The SyncToy Windows 10 application is a freeware that was made by Microsoft to help users in synching files (and folders) between different locations.
Part of the much-vaunted Microsoft PowerToys Series, the SyncToy Windows 10 tool guarantees smooth compatibility with your Windows 10 (or some immediate lower versions).
Utilizing the Microsoft Sync Framework, the tool was written using the Microsoft .NET framework. This translates into an easy-to-use interface that new users can easily understand and try out.
Other important functions include sharing files with other computers.
All of these functions and descriptions above translates into you being able to move files and folders to external memory sources easily using the tool above.
How To Download & Install The SyncToy Windows 10 Tool
Now that I’ve explained what the tool is and what it does, I’ll be diving into how to download and install it.
It isn’t complicated, just follow the simple steps below.
How To Download
To make it easier for you, just follow this link to download the SyncToy Windows 10 tool from the Microsoft website.
Select the Download option on the site and then choose the version that’s appropriate (important) for your Windows 10.
x86 version for 32-bit Windows 10 users.
64-bit version for 64-bit Windows 10 users.
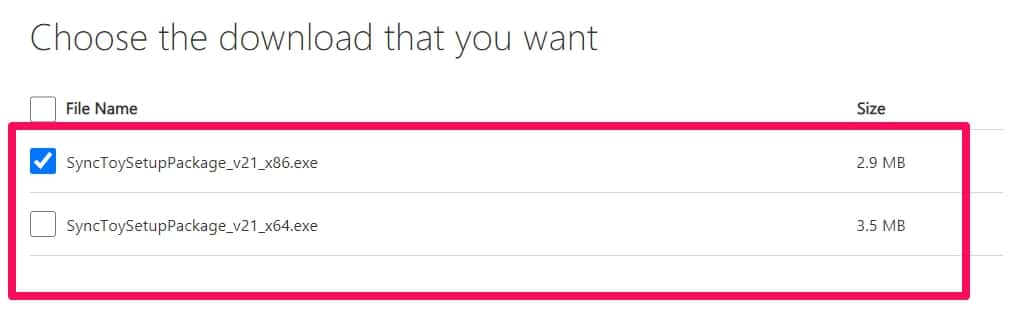
Click on Next to ensure the download starts after choosing the appropriate version.
How To Install
Follow the download. Once it is done, double click the .exe file you just downloaded to start the installation process.
You’ll be asked to read some Microsoft Sync terms and conditions about the Framework Components. You can read it if you want.
When you’re done, select the Accept option to continue the installation process.

You’ll get a message that says Microsoft is installing Core Components. Just wait patiently.
You’ll be asked again to agree to the terms and conditions of using the tool.
Mark the box next to I Have Read And Understand The Warning Above. Then select the I Agree option.
Then the next part is to choose the directory you want the installed tool to go. After that, just confirm the installation process and you’re good to go.
Note: While trying to install the synctoy Windows 10 tool, you might get a prompt saying this setup requires .NET Framework Version 2.0.50727
Don’t fret just yet. Follow this link and get the version required. After that, come back to the tool and continue the installation process.
How To Use The SyncToy Windows 10 Tool
Here’s where the fun starts. If you’ve been following, I first explained what the tool is and what it does, then I explained how to get the tool. Now, this is how to use it.
Part of why the SyncToy Windows 10 tool is effective is because it offers a one-time use and also offers scheduled automatic uses.
What this means is that you can use it any time you want to move files and folders and you can also schedule times you want certain sync processes carried out.
You won’t have to actually do it yourself, the process (as long as you’ve scheduled it) will become automatic. This definitely will reduce your work and worries about backing up files.
I’ll first explain using the tool, then I’ll go on to schedule automatic processes.
How To Sync Folders
Open the SyncToy tool by double-clicking it. When it’s open, search for and click on the Create New Folder Pair option.
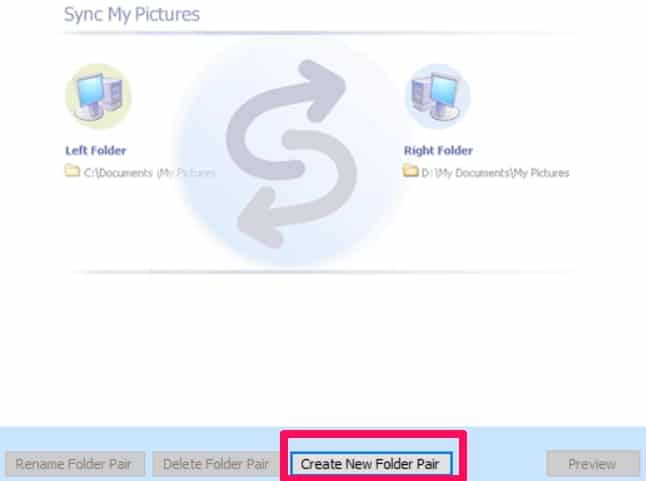
You’ll see a pop-up window next. Select the Browse option. You’ll then be asked to choose a Left Folder and then choose a Right Folder, then click on Next.

Left Folder
Where all the data you want to backup currently is. Data like songs, documents, videos amongst others.
Right Folder
This is usually where (for example, an external hard drive) you want to back up your data to.
It’ll be easier if you create new folders on the external storage you’re using as your backup. These folders will indicate that they are backups.
Example – Documents_Backup
So you might want to look into creating different folders for different types of files to ensure your backup is orderly and easier to navigate.
Choosing The Sync Method You Want
There are three ways you could sync folders. All of them have their strong suits and you should choose according to your files and personal preference.
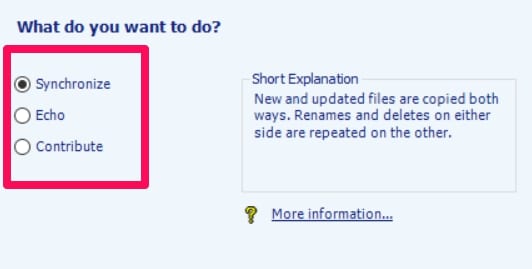
Echo
Remember the left folder (data on your system) and the right folder (backup folder) explanation?
Yeah so in this case of syncing folders using the synctoy Windows 10 tool, any changes you make to the left folder will be reflected in the right folder.
But if you make any changes to the right folder, it won’t reflect back on the left folder.
Changes made on the left folder that will be reflected in the right folder include deleting files, renaming files, or getting new files in.
Contribute
This option is a close associate of the first option I explained.
The key difference is that deleting any file from the left folder won’t affect the same file in the right folder.
Other changes like renaming or getting new files in on the left folder will still be reflected in the right folder.
Synchronization
As the name suggests, this is a two-way operation.
Any changes made on the left folder will reflect on the right folder. Any changes made in the right folder will also impact the left folder.
This ensures that both folders (left and right) have exactly the same files. Changes to be reflected include renaming, deleting, and adding new files.
Continuing The Sync Process
Now that you know what your options are, you can continue the sync process by choosing the sync option you prefer.
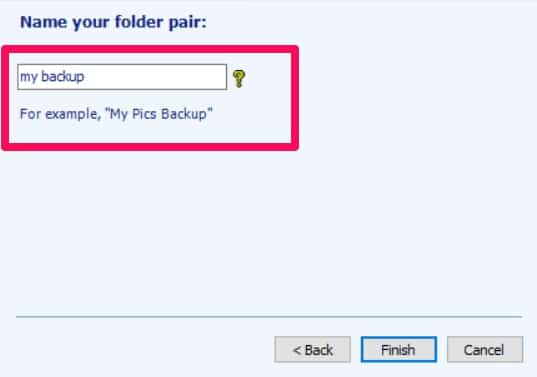
You’ll be asked to enter the name of the folder pair. Basically where you want the backup to go. Then you’ll have to click on the Finish option.
On the next page, there are a few details here. You can use the Preview option just to see exactly what is being synched and also exclude some files from being synched.
You can even change your mind and stop the process entirely.
If you’re satisfied with everything and you want to continue the process, click on Run.
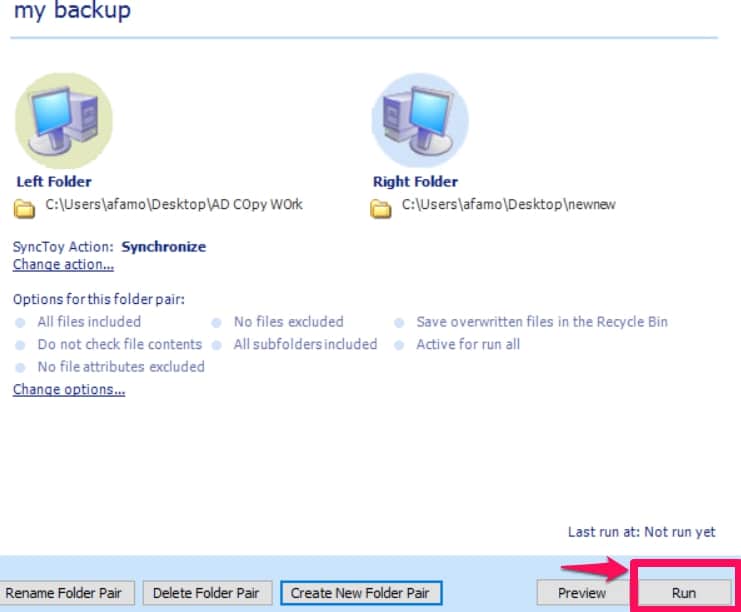
When the process is successful, you’ll get a detailed report about it. If there were a few issues, you’ll also be able to see where the issues are occurring.
How To Schedule Sync Processes
Now you know how to sync using the SyncToy Windows 10 tool, so I’m going to be explaining how to make it even easier by just scheduling the process to take place automatically.
There’s a bit of leeway in allowing users to create their own schedules. You can choose to automatically sync every day or once a week or month or any other variation you may desire.
In scheduling, you will be making use of the Windows Task Scheduler. This is what will help make our syncs automatic.
How To Schedule (Using Windows Task Scheduler)
Navigate to your Windows 10 search box and input Task Scheduler. Search, then select the Task Scheduler option in the search results.
Go to the Actions tab at the right-hand side of the Task Scheduler and select the Create Basic Task option.
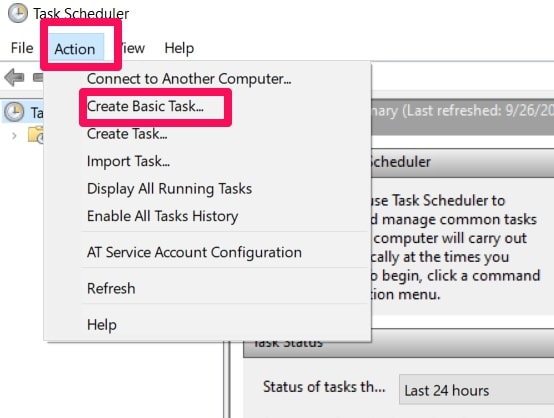
A pop-up menu will now appear. You’ll be asked to input a name and a description. Use terms that will immediately let you know what task is being carried out.
Then you’ll be asked to choose when you want to synchronization to start and the time point for the task to run.

After you’re done, click on Start A Program.
Find Program/Script and click on the Browse option. Then search for the synctoy.exe process.
You should find it in this navigation – C:\ProgramFiles\SyncToy2.1\SyncToyCmd.exe
When you do find it, input the letter R in the Add Arguments textbox.
You’ll be privy to any overview of how the task will run and then you can finish up the process by clicking on Finish.
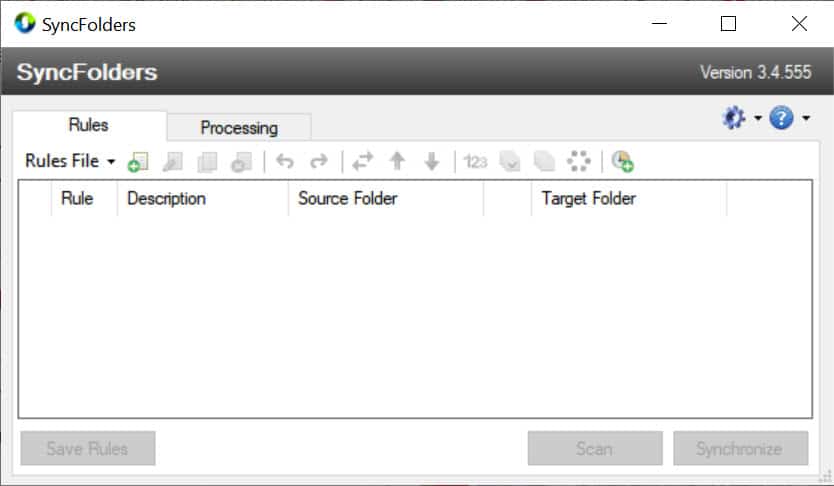
Keep two folders synced automatically with SyncFolders
SyncFolders (Download Here) lets you synchronize the files contained in any two of your folders. This means you won’t waste time copying and pasting files from your primary folder to your backup or USB drive, or constantly uploading individual files to the cloud.
It’s a very effective tool that’s easy to use and packs plenty of options to control how, where, what, and when files are synchronized.
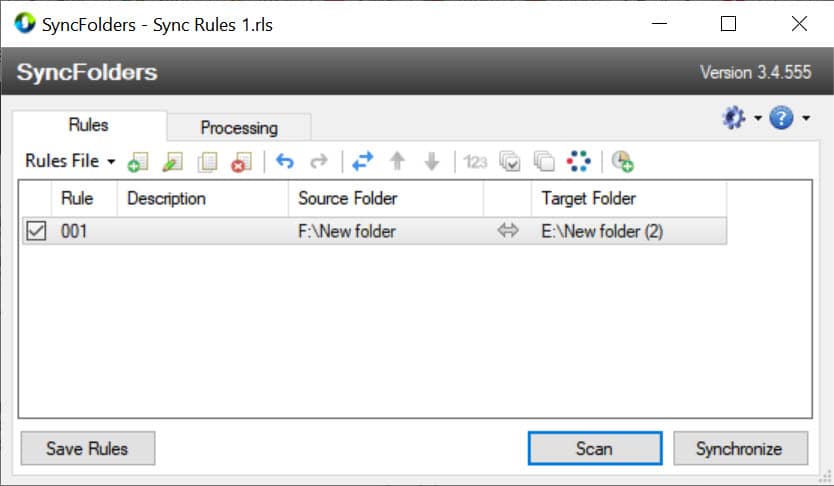
1. Launch SyncFolders and you’ll see two tabs: Rules and Processing. The Rules tab contains a drop-down menu labeled Rules File, where you can upload files and import rules. Running alongside is a toolbar of actions, with a panel of columns below, where your sync rules are listed.
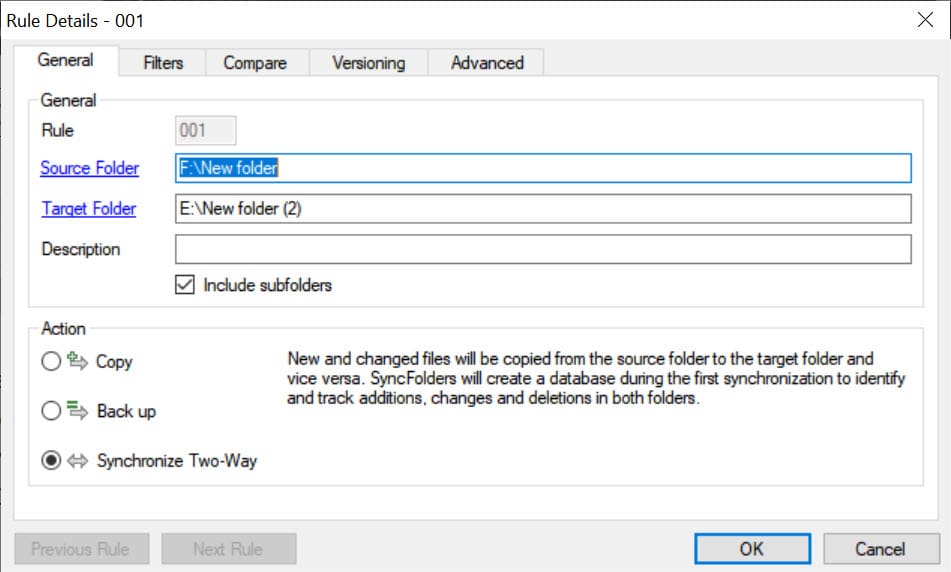
2. Create a sync rule by clicking the page icon with a green plus sign. This opens the Rule Details box, where you choose both a Source and a Target Folder. Click each one and, as the dialogue box suggests, Browse For Folder or create a new one. Click OK to confirm.
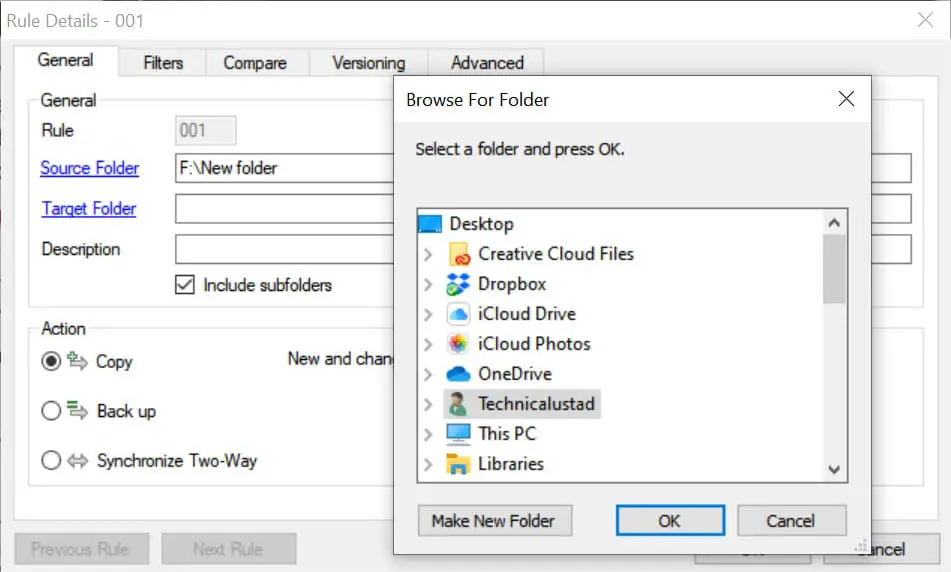
3. Back in Rule Details, add a rule description. Under Action, Copy just copies files from Source to Target; “Back up’ saves Target files if they’ve been modified in the Source; and Synchronize Two-Way syncs both ways, so if you edit a Target File, this will be reflected in Source. Click OK.
4. Your rule is added to the task list and makes new actions available to edit, copy and delete the rule, and use ‘Swap Source and Target Folder’. Rule Colors lets you personalize your rules. Click Save Rules when you’re done, then click the clock icon to synchronize schedules.
5. In the Scheduled Synchronization Tasks window, click the ‘Task is enabled’ box and go to the Triggers tab. Schedule syncing using the date and time fields, then click OK. Once you create a trigger, click Add to make more and use the drop-down arrow to switch between them.

6. Double click any rule. Besides General, there are four tabs: Filters are used to determine when syncing occurs, based on filename matches and recent edits; Compare and Versioning are used to set rules if there’s a sync conflict, and Advanced offers additional sync settings.
Conclusion
The SyncToy Windows 10 tool is quite important in ensuring backups are made easily.
The fact that you can schedule synchronization also greatly enhances the tool and helps users in ensuring that once it is set up to happen regularly, they never have to worry much about backups.
You can use any of the sync methods according to your own preference or your work dictates. You can switch the methods too if you feel like you want to try out another one.
Thanks for reading and I hope this article helps you out in syncing files and folders.


