This skill of underlining a text is quite useful even though it sounds rather mundane. Graphic artists use this a lot for websites, logos, and other marketing materials.
With Photoshop, you can accomplish a lot in editing. From the flexibility in choosing the appearance of text to making backgrounds transparent, Photoshop has always been the to-go tool for professionals.
This sometimes puts amateurs off because it can come across as too technical or too complicated but this process of underlining text in Photoshop has been simplified so much that just about anybody can follow these steps below and learn how to Underline Text In Photoshop.
The steps outlined in this article will explain in simple terms how to underline text in Photoshop CS5 (That’s the version we’re going to be using but the idea is pretty much the same thing across all versions).
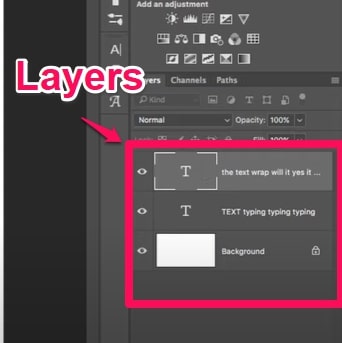
The text is contained within a text layer which makes the text separate from the image and easier to tinker with. With a text layer present, you can apply different fonts, reposition texts and other editing forms like custom blending can be performed on texts.
Photoshop usually creates a new text layer whenever you add text to an image which makes underlining that text possible but even if a text is part of an image and it doesn’t have a text layer, you can still create a text layer for it to make your editing simpler.
Creating a Text Layer
This is pretty easy, all you have to do is select the “Type” tool and click on the image area. You can also click and drag to create a text area.
Note: To commit to changes in editing using hotkeys, press CTRL+Enter for Windows users, or Command+Return for Mac users.
Now that we’ve figured out how text layers work, let’s move on to underlining text.
Underline Text in Photoshop: Step-By-Step 👌
Step1:- The first step is to open the file that contains the text you want to underline. Usually, you can access your files by clicking on the aptly named “File“.
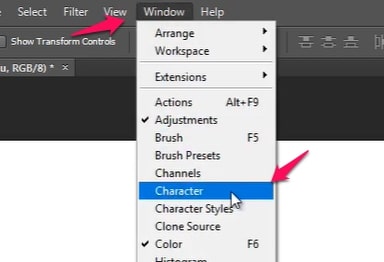
Step2:- The next move is to click on the text layer that contains the text you’re trying to underline. Then after that, click on “Windows“.
This is usually located at the top of the Photoshop window. A drop-down menu will pop up and you will have to scroll down looking for “Character“. Click on the “Character” option to check it.
You’re doing this to make sure the Character panel is visible. You have to be careful to note if the “Character” option is already checked, if it is then the “Character Panel” is already visible so you have to just leave it alone because that is exactly what is needed to edit the text.
Step3:- The next step involves searching for the “Type” tool. The tool is on the left side of the window and its icon is a capital T.
When you hover on it, the text that pops out says “Horizontal Type Tool (T)“. The “Type” tool is what you will use to select the text you want to underline.
NB: Sometimes you might just want to underline half or two-thirds of the text so selecting the text to underline is basically under your discretion.
Step4:- After selecting the text to underline, you will need to find the “Character” icon.- It is important to note that this icon is different from the first “Character” icon which we found in the drop-down “Windows” menu earlier.
This new “Character” icon is found on the right bar of the window. The icon to look for is a capital “A”, click on it and a menu will pop out.
Under the “Character“, look for the “Underline” icon which is represented by an underlined capital T. Click the icon to underline the text you have selected earlier and you’re done.
You’ve successfully underlined a text in Photoshop. The more you become familiar with the menus and uses, the easier and faster it will become for you.
Formatting Text
Another skill that might prove useful in using texts in Photoshop is formatting text. It may be useful for project presentations, designing logos, fliers or just making e-cards. It is pretty easy and the steps aren’t that much.
You will be using the “Character Panel“. This panel is where you’ll find the formatting options that Photoshop offers. Tools like style, color, and font size will help in making sure your work looks neat and professional while still retaining an air of creativity.
Do you want to format texts in Photoshop? Here’s how to go about it.
- Choose a picture with the text you want to format.
- If you are working on a new document then choose a blank space to work on. (You will have to add texts to format)
- Search for the “Window” menu and when you find it, click on it.
- This will open a sub-menu and inside the sub menu search for “Character” and click on it.
- The text formatting panel usually comes out on the right hand of the screen and that is what will happen when you click on “Character”
- Choose the “Text” tool from the panel on the left side of your screen.
NB: These are all very similar to when you need to underline texts as shown in the previous section.
If the icon that you’re clicking on looks like this T, then you’re pretty much on the right path.
Click on anywhere in the image that contains the text you’re trying to format. This will create a new text layer and you now have to type in the text.
If you already have existing text on the image and you want to edit it, you just have to click on the layer. Either way, you’ve got the text to format now.
Highlight parts of the text or the entire text according to your preferences and use the “Character” panel to format the text according to what you had in mind.
Even when you’re done formatting, the highlighting will still be there. Until you exit the “Text” tool, the changes will be highlighted too.
Some quick hacks of formatting texts are:-
- You don’t always have to use the Character panel. Highlight the text and some of the character panel options appear at the top of the screen.
- A shortcut for accessing the “Text” tool is the keyboard button “T”.
Requirements for Adobe Photoshop:-
Below is a short guide on how to install Photoshop CS5 just in case you don’t even have the editing tool and you’re finding it difficult to go through the process of installation.
The first thing to know is that there are minimum specs requirements that your system has to have to be able to run the program.
It usually isn’t much of a problem unless you bought your system when George Bush was president.
Here are the major specs requirements you should note.
- 1GB of RAM (Random Access Memory)
- 1GB of available hard-disk storage space (Photoshop can’t be installed on flash-based storage space).
- Microsoft Windows Vista or 7 and above
How To Install The Photoshop Software:-
You can get the software by either downloading it online or installing the software off a DVD. Both methods are easy to install and they follow similar patterns.
For DVD installation
- Insert the DVD and follow the instructions that will come up. If nothing comes up, go to the root level of the DVD, in the folder marked Adobe Photoshop CS5.1 folder, and double click on the Setup.exe to start the installation process.
- Follow the instructions until it is installed and an Adobe Photoshop icon pops up on your home screen.
The same process goes with downloading online, if nothing comes up after downloading, you have to follow the same process of looking for the Adobe file and kick start the installation process yourself.
If you’re still having problems downloading or installing the app, perhaps you should best visit the Adobe Website for additional info on installing Adobe Photoshop.
Keypoint Answers to Text Manipulation on Adobe Photoshop
Question: Can I underline texts even if they’re part of the image without creating a new layer?
Answer: Yes, you can draw a manual line underneath the text but to edit the font, customize the text and smartly underline text, you have to create a new layer for the text.
Question: How about removing lines from the text, how does that work?
Answer: The same process works for removing lines from the text. Remember how you selected the text to underline, you can also select the “line” to remove.
Question: Can I underline parts of the text?
Answer: Yes, it is possible to just underline some parts, the part to underline as outlined in the article will be chosen by you.
Conclusion
Using Photoshop is not just reserved for specialists anymore, now anybody can use it and the processes might seem complicated at first but if you follow the steps as explained here, it will become really easy for you as you edit more.
Do you have easier ways to underline texts in Photoshop? Perhaps there is a shortcut you know of. We would like to know and share this information to help others. Please use the comment section to share your ideas.


