


VirtualBox Guest Additions come with your standard copy of VirtualBox. The Guest Additions are additional software that enhances the performance of your virtual machines and contains some useful tools that could make your VM interaction with the host system more seamless and efficient.
What Is A VirtualBox
VirtualBox allows users to create and use virtual machines. You can basically install any operating system inside VirtualBox and it will run as if it’s running on actual hardware.
A VirtualBox is not altogether perfect though, there will be some expected kinks due to running an operating system right on an app window.
An example is the resolution issue. Windows running on normal hardware does not have this problem, it immediately just accesses your graphics card and uses your drivers to know what resolution to display. In VirtualBox, Windows instead displays an imperfect resolution because it cannot access your actual hardware.
What Exactly VirtualBox Guest Additions Do
Guest Additions are device drivers and system applications that help bridge the gap between the host operating system (actual hardware) and the guest operating system.

Guest Additions basically just improve the interrelationship between the systems in a variety of ways like
- Clipboard Sharing
- Running Alternate Windows OS side by side
- Allowing Copy And Paste of files between guest and host systems
- Easy Folder Sharing between guest and host
- Smooth integration of mouse pointer
Let’s now see how to actually access these Guest Additions functions.
Clipboard Sharing
There is no way you won’t eventually need to move files, folders, or content from one system to the other. The Drag and Drop support is what makes this a seamless and quite efficient process.
To access this tool, open your VirtualBox, and access your VM and navigate to Settings. Find the General section and click on it.
In the menu that opens, search for, and click on Advanced Tab.
In this menu, the following options for a Shared Clipboard and Dragging/Dropping will be displayed.

Disabled – No shared clipboard or dragging and dropping among host and guest systems
Host To Guest – Shared Clipboard and Dragging/Dropping is allowed only from the host system to the guest system
Guest To Host – Shared Clipboard and Dragging/Dropping is allowed only from the guest to host system
Bidirectional – Shared Clipboard and Dragging/Dropping will be enabled both ways. Guest to host, host to guest.
Of course, the best option would be to enable the Bidirectional movement but choose according to your preference.
Enhanced Graphics Support
Remember that one drawback we mentioned about running an OS in a tab is reduced resolution quality. This guest addition feature will help get back your resolution to a much better quality.
Assuming you’ve installed the Guest Additions, this immediately allows you access to tinker with your resolution in the guest operating system settings. You can then make adjustments for your guest OS to fit in your screen size.
When using apps or games that demand high graphics usage, Guest Additions can use your actual hardware to enhance the quality of the game or app on your guest operating system.
The Guest Additions also allows users to use their VMs in any screen size they want. It will seamlessly adjust as you shorten or lengthen your VirtualBox window.
Allowing Sharing Of Folders
You might want to access host system folders on your guest system. Guest Additions help with that by allowing you to mount a host folder as a network feature.
Here’s how to use this feature:
Navigate to Settings in your VM and look for the Shared Folders section.
Use the Add Share feature to make folders from the host system available to the guest system.
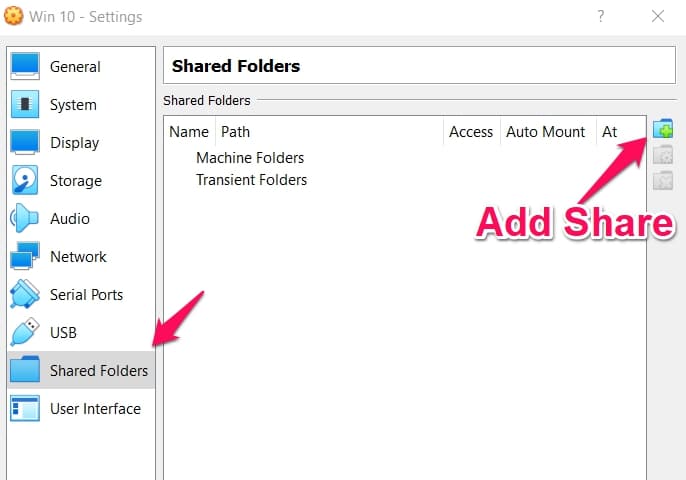
You can rename the folder if you wish and you can choose to auto-mount the file if you want an automatic connection.
The best part is that you won’t even need a network to access the folder, It only just appears as a network drive.
Running App Windows From Both Guest And Host Windows Simultaneously
This feature is quite cool because it makes both systems appear in sync. It will feel lie just one giant system when you run apps side by side on the systems.
Here’s how to use this feature.
Use the shortcut Host Key + L in your VM.
Note:- The default host key in VirtualBox is the right Ctrl button.
This will remove your VirtualBox background and your VM will enter full-screen mode.
Now you can use your normal system software and your VM windows. To turn off this mode, once again use the same shortcut keys that got you there Host Key + L.
Easy Mouse Integration
If you’re using a quite modern host operating system, then you can enjoy a problem-free transition of moving your mouse from host to guest systems without hassle.
This feature might not be available on older host operations systems. This is because some of these systems have a non-inclusive control over features like the mouse and the keyboard.
There is a system workaround though that might help. It won’t be a seamless transition between the host and guest operating systems but it will be a transition nonetheless.
When you click anywhere inside your VirtualBox windows, your mouse immediately is trapped inside the VirtualBox. You cannot move that mouse and use it for the host system unless you press the Host key.
So if you want to move your mouse from host to guest and vice versa, pressing the host key will help you do that on old host operating systems that have exclusive controls over mouse and keyboards.
Some Other Features:-
There are other features that VirtualBox Guest Additions bring that might not totally be of much use to a normal user.
Features like the automated login option can save time on logins if you have a set schedule of using VirtualBox.
There are the time synchronization feature and monitoring communication between the systems.
These features might not be mainly important but they show that VirtualBox Guest Additions really deliver a huge helping hand to maintaining a host operating system and a guest operating system.
How To Install VirtualBox Guest Additions
Installing Guest Additions is not really complicated, all you have to do is follow the easy steps outlined below.
Here’s how to install the Guest Additions on Linux and Windows Virtual Machines, we will start with Linux.
Installing On Linux VMs
Assuming you’ve booted up the VirtualBox.
Navigate to Devices in the VirtualBox menu taskbar and click on Insert Guest Additions CD Image.
Remember that you’re not actually inserting a hard copy disk, just a virtual one.
The next menu that appears depends on what flavor of Linux you’re running on.
Normally though, it can either automatically run the contents of the virtual Guest Additions CD image or you will have to manually open the file browser and search for this specific file – VBox_GAs_x. You should find it at the sidebar on the left of your VM screen.
You might also access the contents by looking for the CD in the taskbar.
If you’re using Ubuntu, a Run Software feature button should be at the top right-hand side of your window.
This feature will immediately help you start the installation process so click on it after inserting the virtual disk. It will ask for your admin password, input this correctly, and continue the process.
Whatever method that works, the main aim is to access the contents of the virtual disc inserted and install its content. Follow the installation process instructions till it’s over and reboot your VM.
Remember to eject the virtual disk when you’re done.

Installing On Windows VMs
The way to install VirtualBox Guest Additions in Windows isn’t really different from the process used above for Linux.
Assuming you’ve booted into your guest OS.
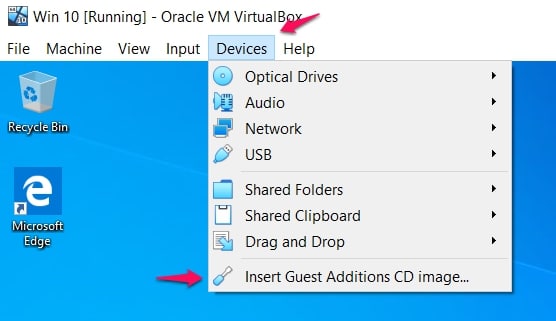
Navigate to Devices in the VirtualBox menu taskbar and click on Insert Guest Additions CD Image.
The virtual disk will be mounted and your guest Windows system should respond normally as if you’ve inserted a physical disk. Run it and follow the installation instructions until it’s complete and then reboot afterward.
However, if you didn’t get any prompt, you will have to manually search for the file.
Launch a File Explorer window and navigate to This PC.
Search for VBox_GAs_x in the CD Drive.
Open VBox_GAs_x and run the VBxWindowsAdditions file.
There is another option for a 32-bit VM, the VBxWindowsAdditions-x86 file is the suggested option.
Follow the installation instructions until it’s completed and then reboot afterward. Also, remember to eject the virtual disk when you’re done.
Conclusion
Every time your VirtualBox is updated, we recommend the Guest Additions also be updated to ensure you get the best performance from your guest/host system relationship.
Remember that VirtualBox Guest Additions aren’t available for macOS, only Windows, and Linux. VirtualBox Guest Additions are really necessary for the smooth integration of host and guest systems. It only makes your transition easier and much more interactive.
Do you use VirtualBox Guest Additions? We would really like to know what your experiences are about the Guest Additions. Use the comment section to air your views. We look forward to reading them.

