In today’s’ digital world, nowadays, one can not survive without fast internet. Therefore, the demand for Wifi has also increased. So, if your Wifi keeps disconnecting regularly then you might want to fix it permanently as it causes you a great loss in the long run.
And in this article, we are going to do just that to find a permanent solution for disconnecting Wifi.
Wifi keeps disconnecting is not a new problem, it has been for ages. Here are some of the problems experienced by Windows users.
- After you wake your laptop from sleep: There are many users, who admitted that there Wifi keeps disconnects once they awake their laptop from sleep.
- Wifi disconnects with the message “err_internet_disconnected”: If your Wifi disconnects leaving this message then you know that you are dealing with a bigger problem.
- Random connection loss: Many users experience this as for no reason their wifi disconnects.
- Limited access: This a problem when you receive a message of limited access. Therefore, in this case, the Wifi will get connected but without internet access.
- Wifi can’t connect: In this case, you won’t be able to connect to the Wifi as it says “Can’t connect”. This is a very famous problem and tons of users have experienced it.
- Wifi gets disconnects the moment you add a device to the network: This is the most easily solved problem and occurs due to you restricting the network for a certain number of devices.
- VPN issue: In this case, the moment you try to connect your laptop to the Wifi it disconnects, therefore, you will not be able to use your Wifi with the VPN’s privacy.
In this article, we will be rectifying all your problems by giving you different ways to solve them.
Fix Wifi keeps Disconnecting on Windows
1. Perform Network Troubleshoot
This is one of the easiest and the most effective methods one can perform in order to fix his/her wifi disconnecting issue. In this case, your problem will get found and resolved by the Window itself.
To perform Network Troubleshooting you need to follow the prescribed steps:-
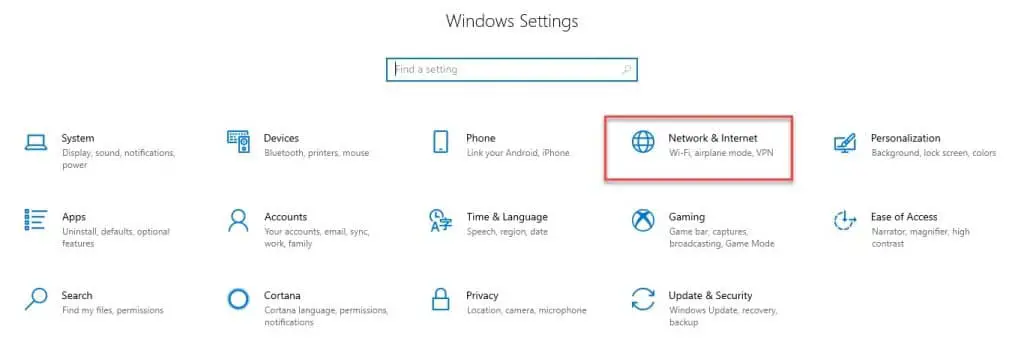
Step 1: Launch setting by either searching it out from the start menu or by right-clicking on the start menu and selecting “settings” from the appeared list.
Step 2: Now from the appeared window, you need to click on the “Network and Internet” button.
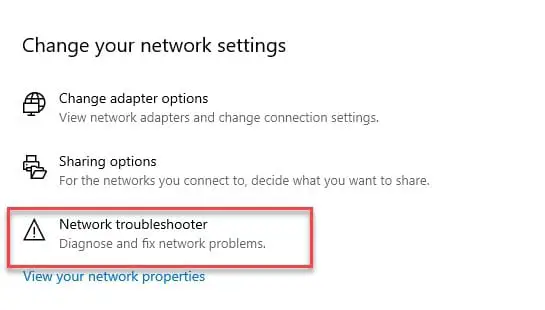
Step 3: From the appeared Window, Click on Network Troubleshooter placed under the “Change your settings” section by making sure that you have selected the Status tab.
Now you need to do as per the on-screen instruction and you are good to go as you the window will find your problem and will rectify it(if it is capable of doing that).
2. Uninstall the Network Driver card
Most of the time the installed Network Driver card is responsible for your WIFI keeps disconnecting. Therefore, the best solution would be to uninstall the Network Driver Card.
To uninstall the network driver card in Windows 10/8/8.1 you need to follow the prescribed steps:-
Step 1: Launch Device Manager by searching it out from the start menu.
Step 2: Then from the appeared list, search for the Network adapters<span style=”font-weight: 400;”>, expand it, right-click on the adapter that you want to uninstall, and then click on uninstall device from the appeared list.
After the completion of the process, you need to restart your computer and hopefully, your problem will be resolved.
3. Change the power options
A lot of the times you in order to save the battery we tend to compromise on the performance of the laptop which includes your laptop’s connectivity.
Therefore, in this section, we will be looking to change the power option in such a manner that your Wifi disconnecting problem will be resolved.
There are two methods by which you can change the power options.
The first method:-
Step 1: Launch Device Manager by searching it out from the start menu.
Step 2: Then from the appeared list, search for the Network adapters, expand it, right-click on the adapter that you want to uninstall, and then click on properties from the appeared list.
Step 3: Now you will be redirected to your adapter’s setting, there you need to select the Power Management tab and then disable the “Allow computer to turn off this device to save the power”, finally, end the proceeding by clicking OK.
The second method:-
Step 1: Launch the control panel by either searching it from the start menu or from RUN(Win + R), type “control” and hit enter.
Step 2: From the Control Panel window you need to click on the Power Options button.
Note: Make sure that you have not selected view by Category.
Step 3: Now, click on the Change plan settings button placed under the Selected plan.
Step 4: On the appeared window click on the Change advanced power settings button.
Step 5: Then click will redirect you to the Power Options setting, there you need to expand as Wireless Adapter Settings>Power Saving Mode>On battery and then from the appeared list select Maximum Performance for the On Battery option as Maximum Power is enabled by default for the Plugged in option.
4. Uninstall the antivirus
This may sound counterintuitive but you need to understand the fact that there are many antiviruses out there in the market which are not up to the standards, that’s why they are causing a problem.
This problem is usually observed by the users using free antivirus or the one they downloaded from an open-source. Therefore, if this is you then you might want to remove the software.
I didn’t say uninstall as uninstalling will not work here as all the antiviruses tend to leave some packet or cookies that will cause trouble in the long run. Therefore, in this case, you need to download an antivirus remover from their official website.
Finally, install one from the trusted source and you are good to go.
5. Turn of the roaming aggressiveness
roaming aggressiveness is notorious for causing Wifi disconnecting problems. Therefore, in this section, we will see how to disable the roaming aggressiveness.
To do that, we need to follow the prescribed steps:-
Step 1: Launch the control panel by either searching it from the start menu or from RUN(Win + R), type “control” and hit enter.
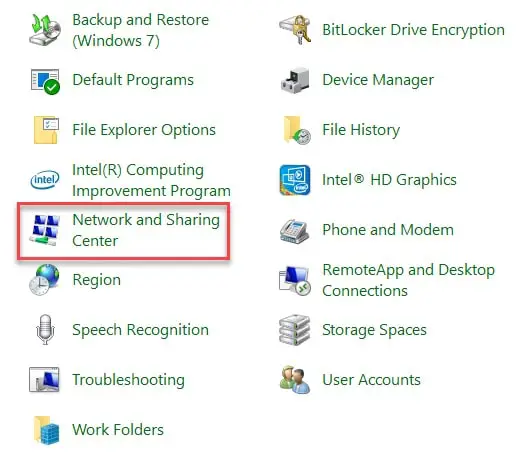
Step 2: Now from the appeared list click on the Network and Sharing Center.
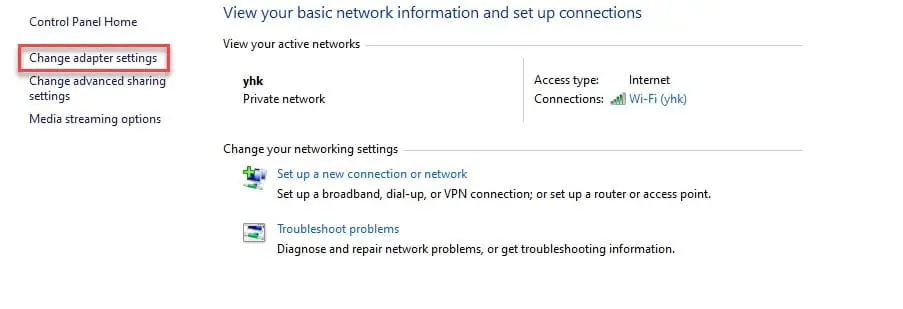
Step 3: Now, you need to click on Change adapter settings from the list placed on the left side of the screen.
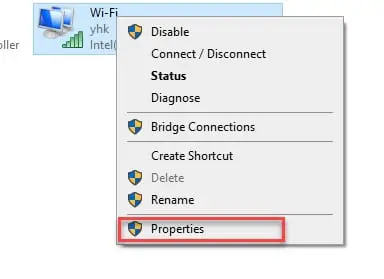
Step 4: Now, you need to right-click on the Wifi option and then click on the Properties from the appeared option.
Step 5: Click configure on the properties window.
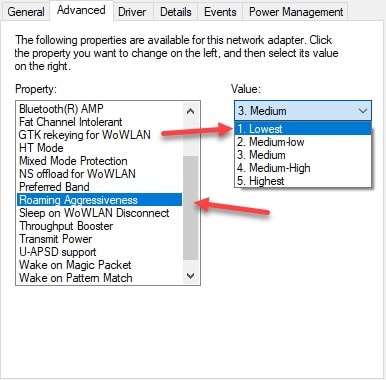
Step 6: On the appeared window, head to the Advanced tab, select roaming aggressiveness, and select lowest from the appeared list.
Finally, restart your computer and hopefully, your problem will be resolved.
6. Flexible 802.11n
As the famous quote says, “Old is Gold”. In this article, we are going to prove.
There is nothing wrong with the new 802.11n wireless standards which are obviously better than its predecessors, but most of us don’t have the latest routers, therefore, because of lack of compatibility, our Wifi disconnects a lot. So, this section, we are going to make it flexible by putting it in the Auto mode
This problem has an easy fix as you just need to do some setting twitches and put 802.11n in the auto mode. To do that, you just need to be obedient to the following steps:-
Step 1: Launch the control panel by either searching it from the start menu or from RUN(Win + R), type “control” and hit enter.
Step 2: Now from the appeared list click on the Network and Sharing Center.
Step 3: Now, you need to click on Change adapter settings from the list placed on the left side of the screen.
Step 4: Now, you need to right-click on the Wifi option and then click on the Properties from the appeared option.
Step 5: Click configure on the properties window.
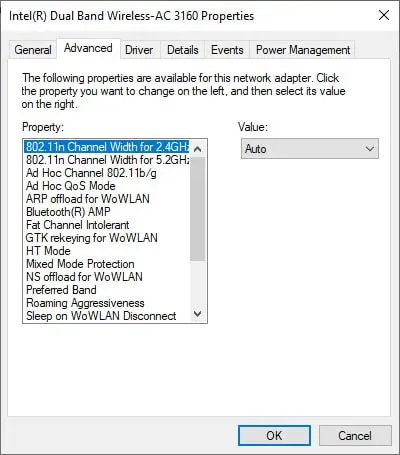
Step 6: On the appeared window, head to the Advanced tab, select 802.11n Channel width for 2.4GHz, and then select Auto from the Value section. You need to do the same for the 802.11n Channel width for 5GHz which will be placed below it.
7. Switch Router Channels
Sometimes, the fix can be as easy as switching the Router’s channel. This should be the first thing that you should do as you start experiencing your router being constantly disconnected.
There is a phenomenon called interference that the routers experience when they are operated on the same channel. This interference can lead to your Router frequently disconnecting.
This problem has a very easy fix as you just need to head to your Wifi’s setting by inserting its IP in the google search bar.
8. Try Google’s DNS
This can be a very substantial fix but most of the users are not aware of this fix.
Note: This solution will only work if your wifi is disconnecting because of a DNS issue
To use the Google DNS you just need to be obedient to the following steps:-
Step 1: Launch the control panel by either searching it from the start menu or from RUN(Win + R), type “control” and hit enter.
Step 2: Now from the appeared list click on the Network and Sharing Center.
Step 3: Now, you need to click on Change adapter settings from the list placed on the left side of the screen.
Step 4: Now, you need to right-click on the Wifi option and then click on the Properties from the appeared option.
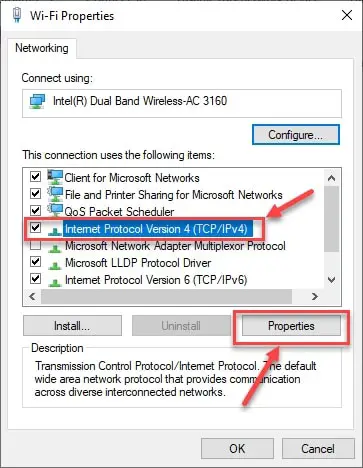
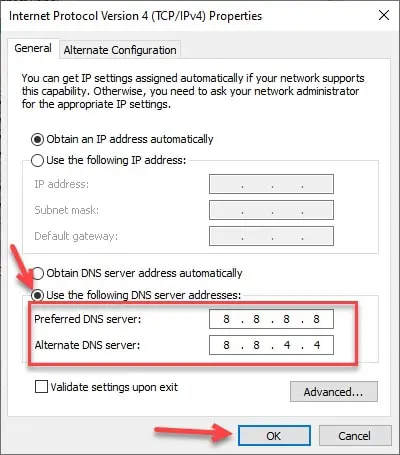
Step 5: From the appeared Properties window, you need to search for Internet Protocol Version 4 (TCP/IPv4), select it, and then click on Properties.
Step 6: The click will redirect you to the IPv4 properties, there you need to tick “Use the following DNS server address”, insert Preferred DNS server: 8.8.8.8 and Alternative DNS server: 8.8.4.4, click OK to end the proceedings.
Now you need to restart your computer and hopefully, your problem will be resolved.
9. Use a Private Connection
Public networks are pretty complex, therefore, they tend to cause connectivity breakage. In order to fix this problem, we need to make the connection private.
To make your connection private you need to follow the prescribed steps:-
Step 1: Launch setting by either searching it out from the start menu or by right-clicking on the start menu and selecting “settings” from the appeared list.
Step 2: Now from the appeared window, you need to click on the “Network and Internet” button.
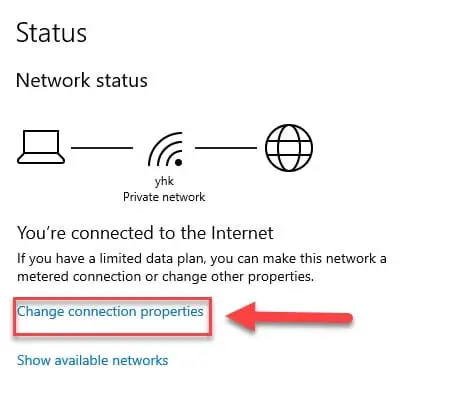
Step 3: From the appeared Window, you need to click on the “Change connection properties” button, by making sure that you have selected the Status tab.
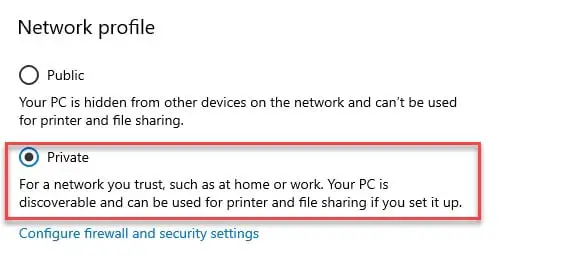
Step 4: The click will redirect you to the Wifi connection settings, there you need to check the Private button under the Network Profile section.
Now you need to restart your computer and hopefully, your problem will be resolved.
10. Call your ISP
A lot of times, this problem arises due to the slow internet. Most of the laptops out there in the market tend to disconnect to Wifi if the Wifi has no internet.
Therefore, to testify this you need to observe different devices connected to that particular Wifi. If all of them are showing no internet then you know that there is a problem which will only be solved by your Internet Service Provider.
11. Switch Wifi channel width
This is another common reason behind your Wifi keeps Disconnecting.
Most of the modern routers are engrained with both 2.4 and 5GHz network adapter. But 5GHz being relatively fresh users tend to experience compatibility issues.
But the problem has an easy fix as you just need to switch your Wifi channel width to 2.4GHz or Auto.
Just login with your router’s IP address and change the settings.
Fix Wifi keeps Disconnecting issue in Android
Your laptop is not the only device that sufferers from Wifi fluctuation, your Android suffers as well. Therefore, we are going to lay different methods by which you can easily fix the Wifi disconnection issue.
1. Restart the Connection
The first and foremost method you should use is to forget and then reconnect to the same network.
To do that, you need to follow the following step:-
Step 1: Launch your Mobile’s settings and head to Wifi.
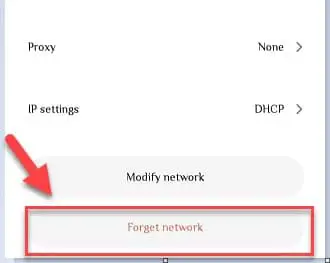
Step 2: Select the network that you are connected to or saved, open its setting(different for different devices), and then click on Forget Network.
Step 3: Now, you need to again connect to that network.
Hopefully, your problem will be resolved
2. Reset Network Settings
One of the simplest ways to resolve any problem related to Wifi, Hotspot, etc is to reset the Network Settings.
There are different myths about resetting Network Settings, as it will remove all the applications and files from your device which is completely false.
It will just reset the network settings such as your Wifi, therefore, before going through with the process you should take a note of all the Wifi that you have saved.
To reset network settings in android you need to follow the prescribed steps:-
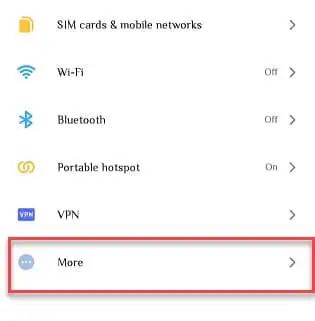
Step 1: Launch Settings and then press More.
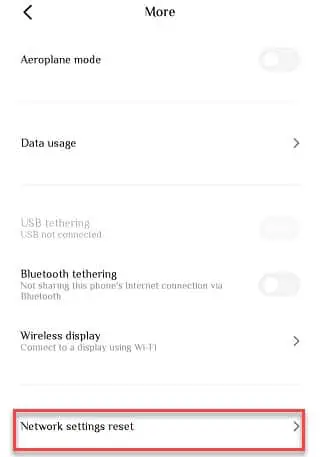
Step 2: From the appeared window, you need to select Network Settings reset.
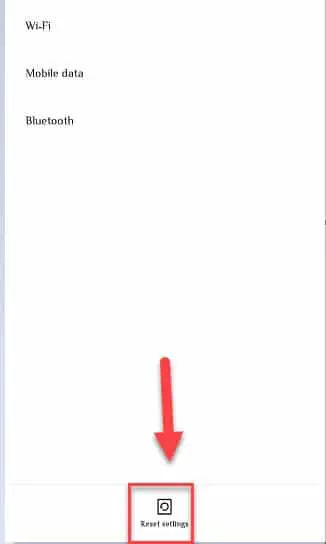
Step 3: Now, you will be redirected to the Network Settings window, there you can see different Settings that it will effect, finally press Reset Settings.
Note: The steps might differ according to the Android skin that your phone is using.
Fix Wifi keeps Disconnecting issue in Mac
windows and android are not the only operating system where we are seeing the wifi keep disconnecting issue, same issue is coming with mac also if you are using the mac and facing the wifi keeps disconnecting issue then follow the below steps to fix it.
1. Forgot the WiFi Network
The solution that you need to try is to forget the wifi network in the system preferences then rejoin.
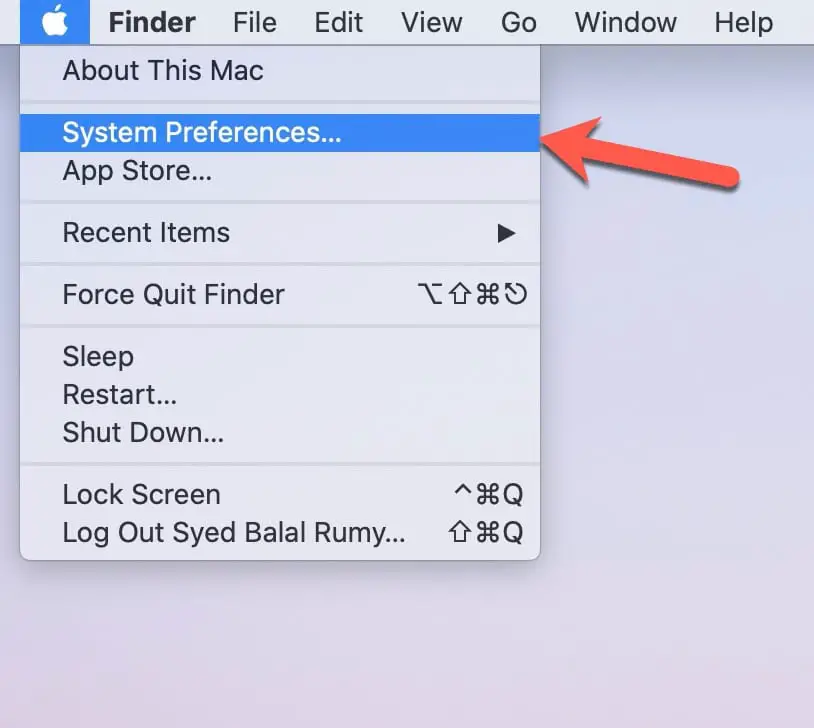
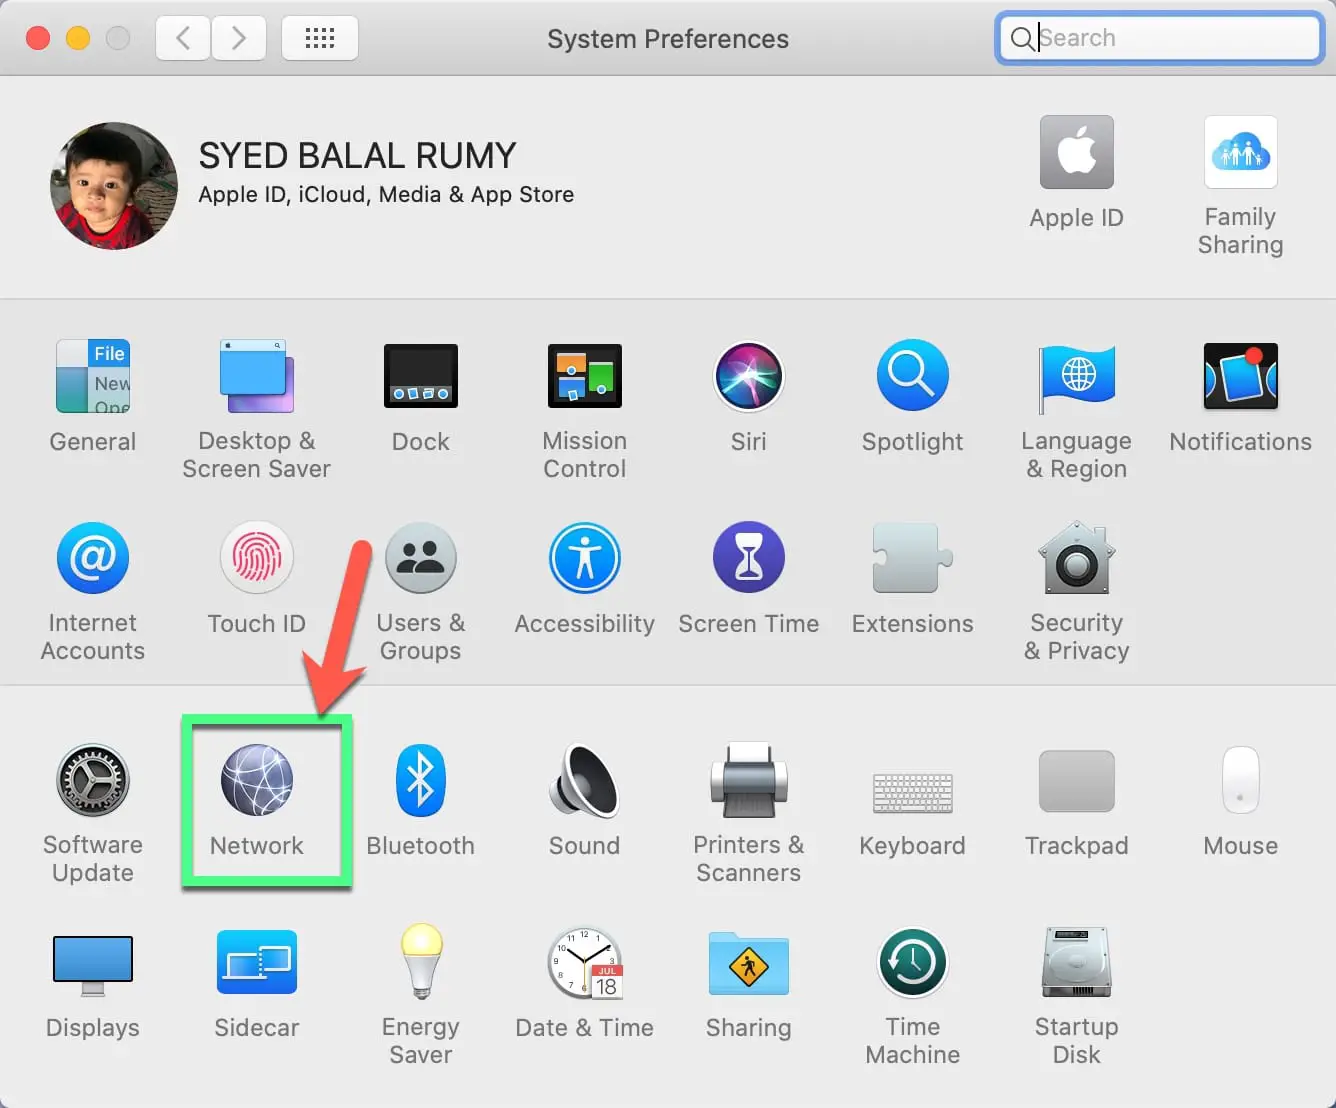
Click on the Mac icon in the left-right corner and select the “System Preferences” option.
select the “Network” option here
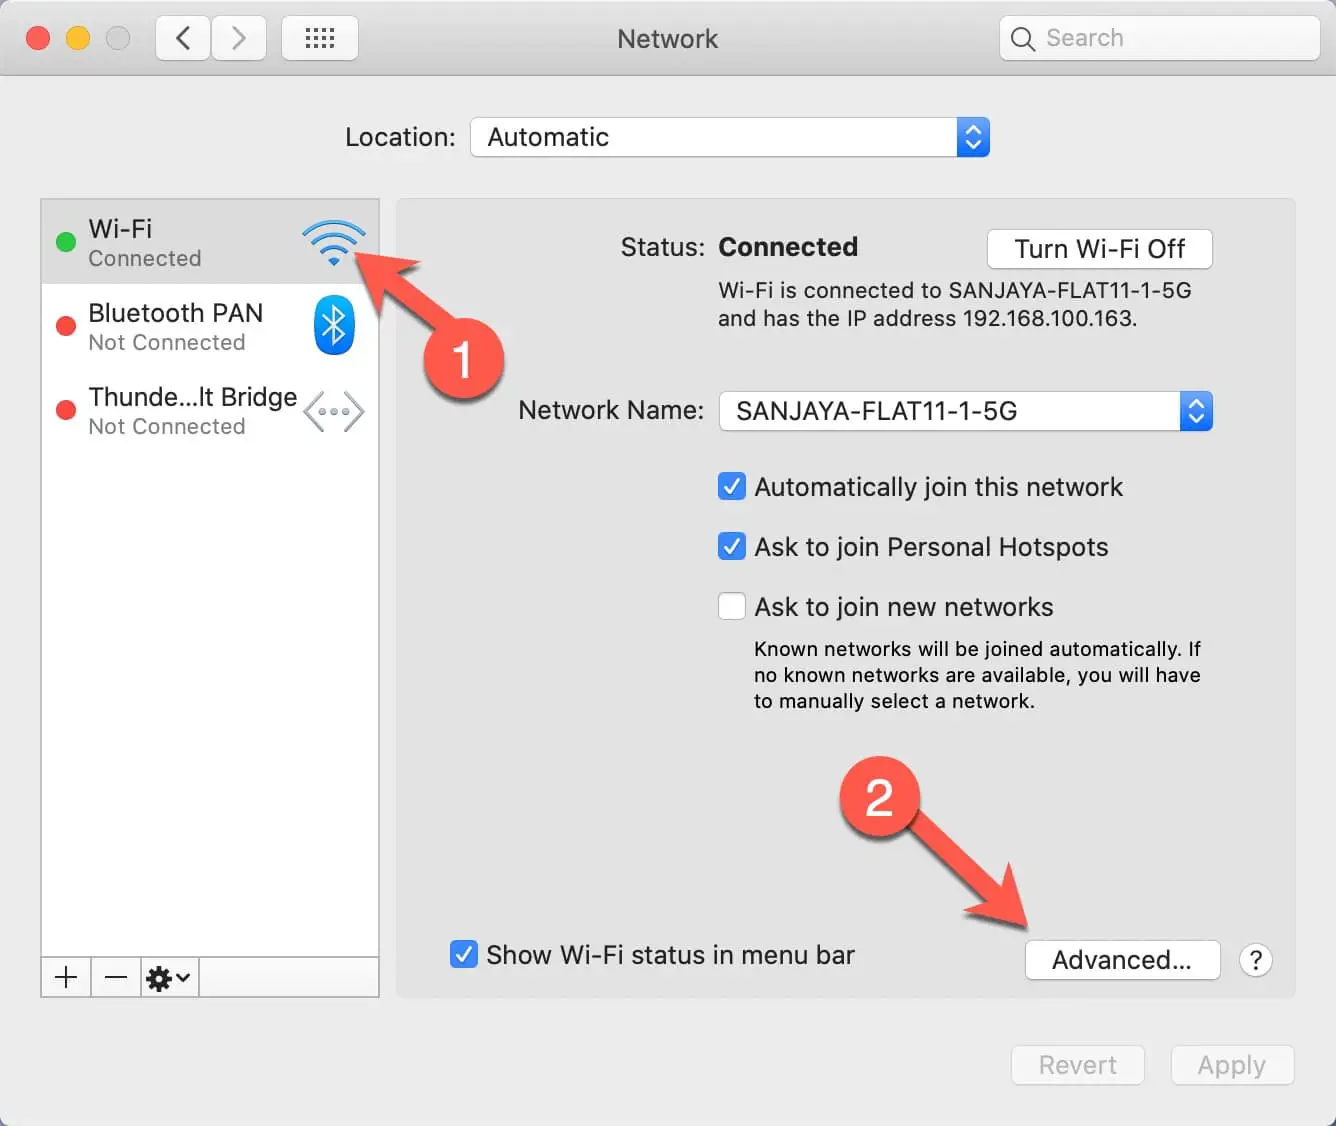
select the wifi option and click on the advanced option.
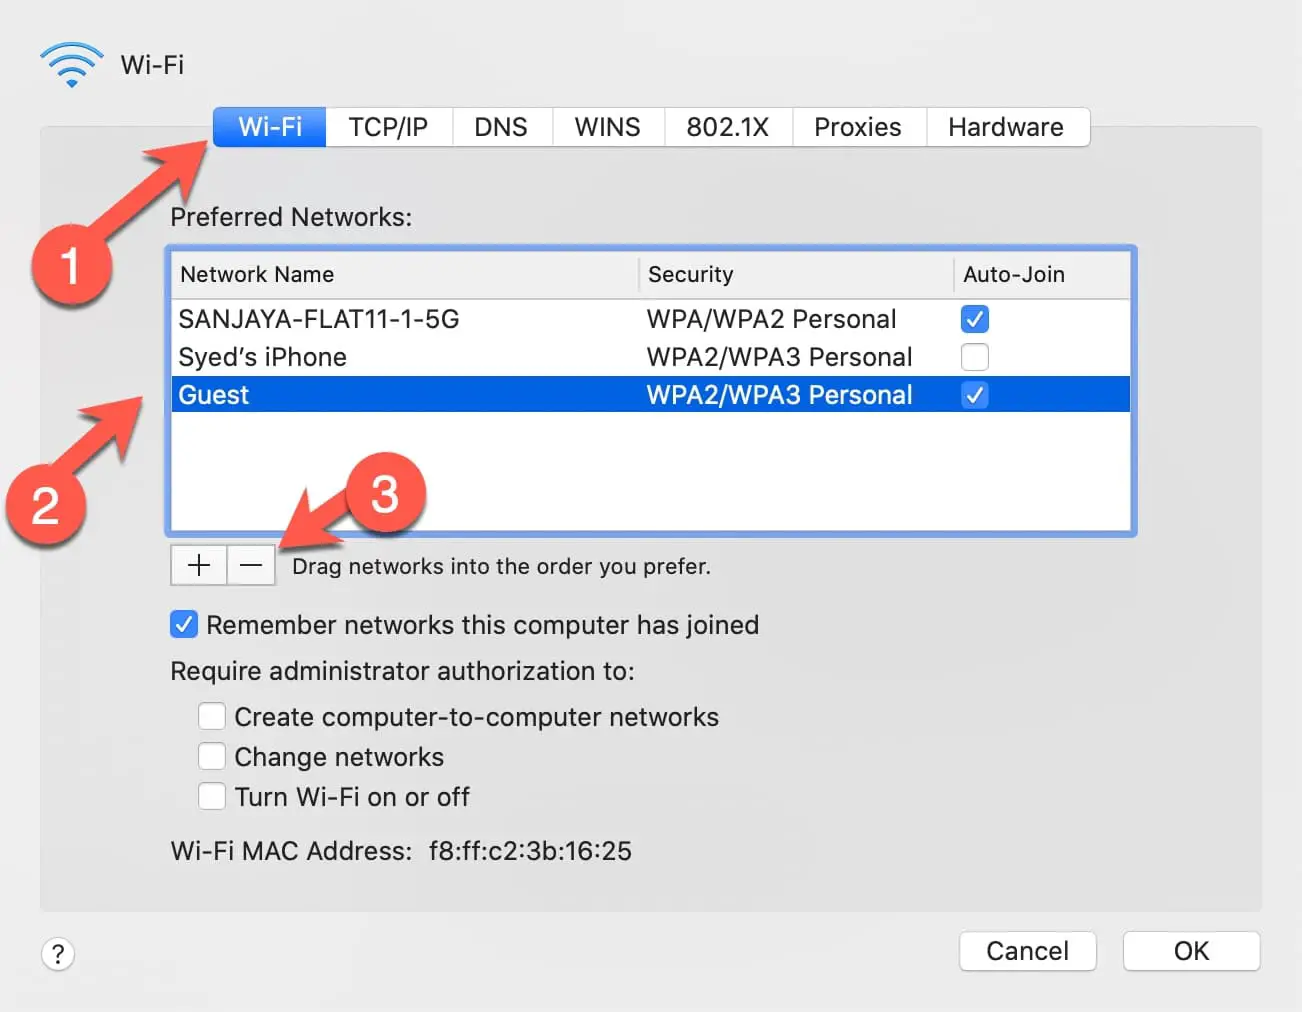
now select your wifi in which you are facing the wifi keep disconnecting issue and click on the Minus – icon to remove this wifi from your network.
after removing the wifi network, reboot your mac and again go to the same option and join the wifi network again.
2. Change the DNS Address
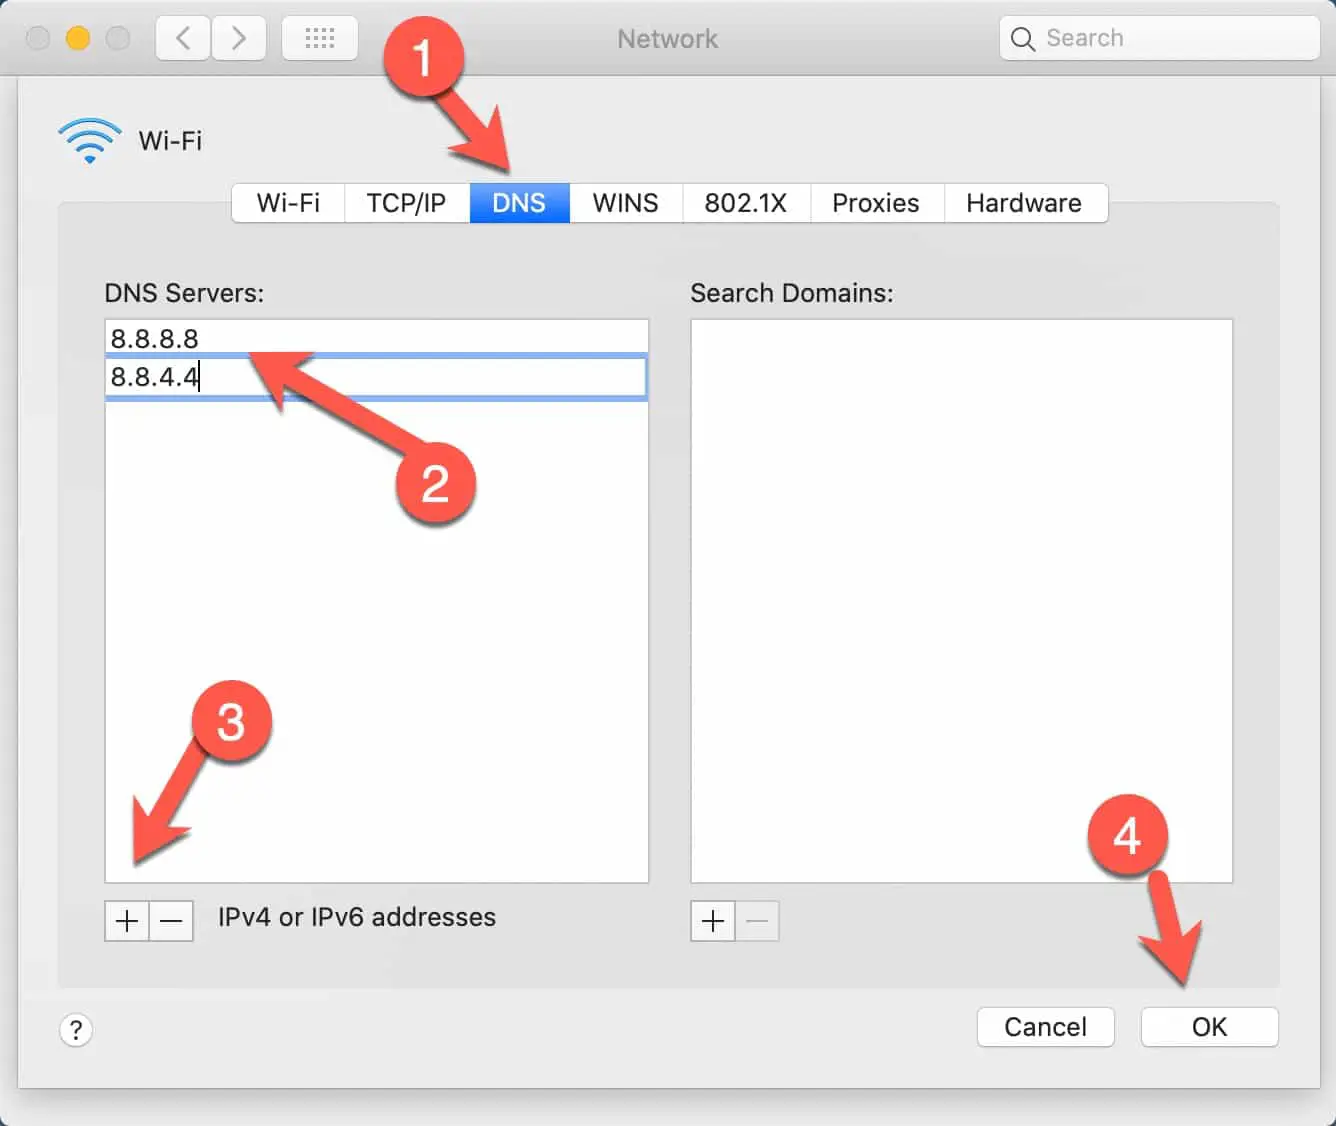
DNS is a service that is responsible for the address resolution in your mac and by-default it’s selecting your ISP DNS server which might be causing the issue. It’s better to use the google DNS address that we also showed in the windows troubleshooting.
To change the DNS address, on the same network screen, click on the DNS option and enter the 8.8.8.8 as a primary address and 8.8.4.4 as a secondary address and click on the Ok and then click on the Apply.
3. Change Location To Automatic
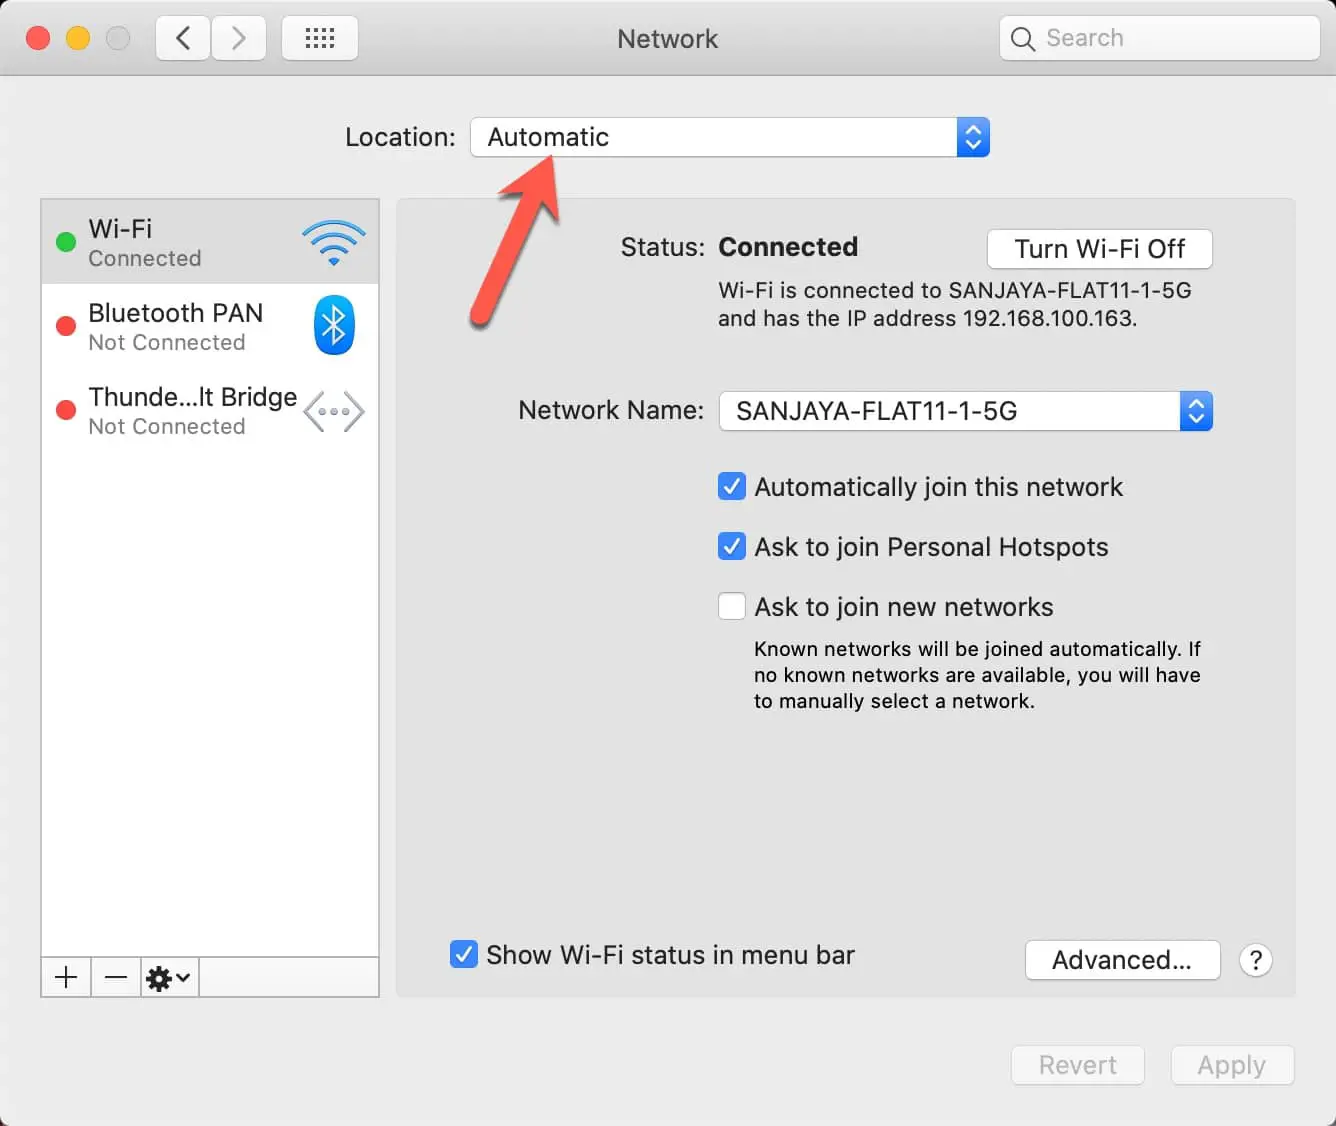
Whenever you are joining any wifi network it’s asking for the location to make your network more user-friendly for you but it’s also might be cause for wifi keep disconnecting.
navigate to the same network icon and select the WiFi and select the location “Automatic”.
4. Adjust MTU
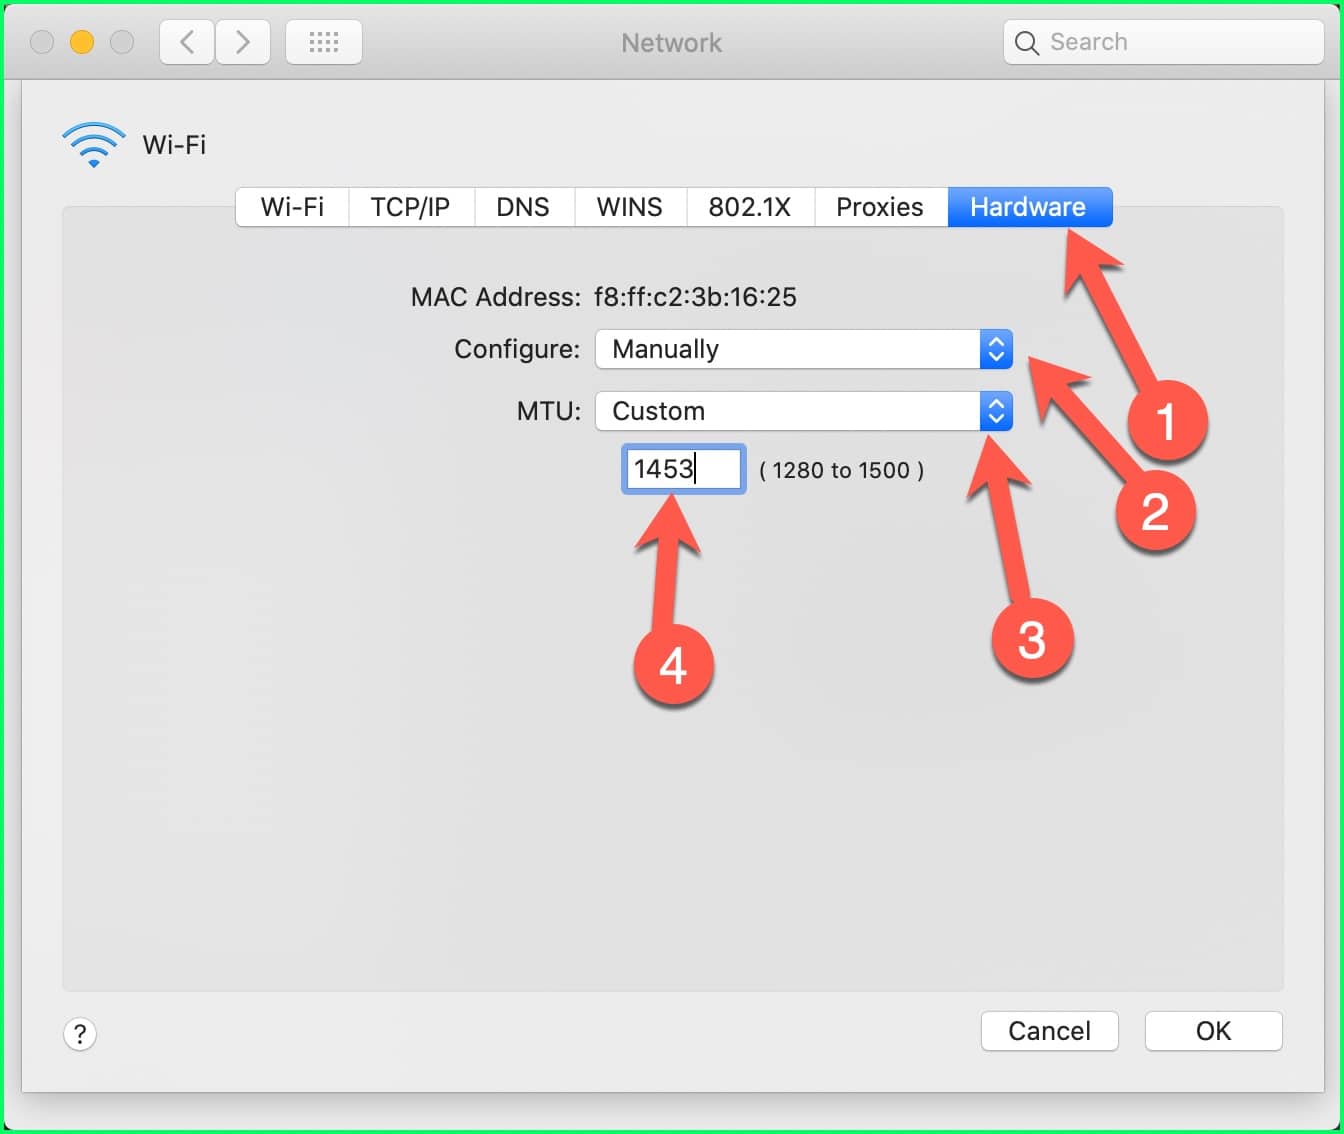
MTU stands for maximum transmission unit that is used to measure how much data can transmit on the network, many times if your packet is high then defined amount then it will cause the wifi keeps disconnecting issue that we can adjust in the network setting.
on the same network tab, click on the Hardware tab, under configure option, select manually and under the MTU option select the custom and enter the 1453 value and click on the OK.
Wrap-up:-
Wifi keeps disconnecting is a very common issue and has very easy fixes which we have discussed above in this article. If these methods didn’t work then you need to consult an expert as the problem can be in your laptop’s wifi hardware.
Hopefully, this is beneficial for you please write your experience in the comment section below.


