


A switch towards a more professional python coding practice is separating every functionality in a separate file, and that’s called modules.
Hello everyone and welcome to the article where we are going to learn everything that you need to know about python modules.
Some of the questions we will answer in this article:-
- What is a module in python?
- How do I create a Python module?
- How do I import objects of a module?
- What happens when a module is called?
- How many modules are in Python?
With every topic or question, we will apply what we learned in examples to make sure the concept is acquired.
First of all, we choose python as the programming language for many reasons, that includes: code readability and simplicity, a wide community, and needing fewer lines to write the same functionality as another language such as C.
In this article, we will assume that you already know the concept of functions and use them in your coding practice. if you want to learn about Python functions read our guide on Python Functions: The Definitive Guide.
Python Modules: The Definitive Guide 👌👌
What is a module in python?
In simple words, a Python module is a python namespace that will be called and used in another one. The module can be made of variables, functions, and classes, usually, that have a certain common ground or used for specific functionality.
How do I create a python module?
Let’s create a folder called “Object detection” where we will write our scripts. The folder contains 2 scripts, the first-named “TakeImage.py” and the second “DetectObject.py”
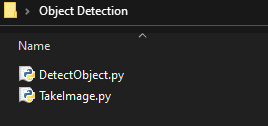
Each of those “.py” files is a python namespace that we created using an IDE (like sublime, Atom, VS Code…) or a simple text editor.
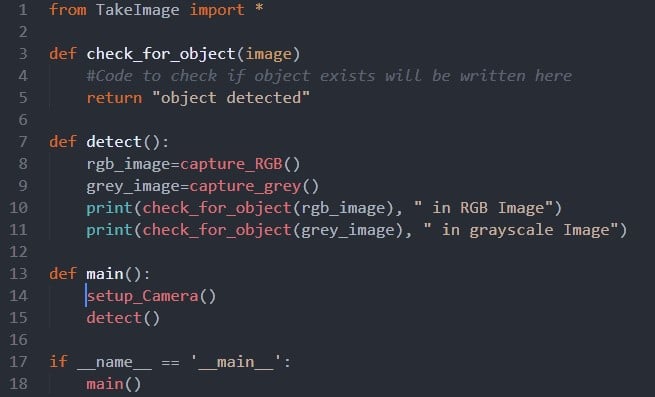
Inside the “TakeImage.py” file we will write the script that will take an image from a camera, which is the following.
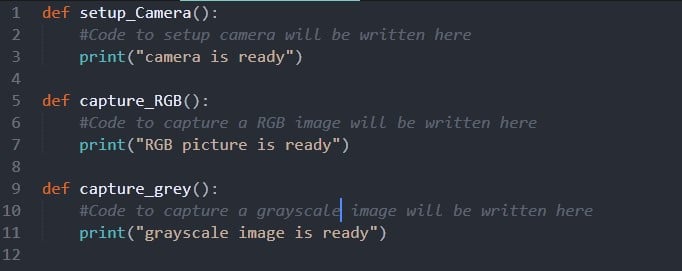
The namespace contains three functions, “setup_Camera” will be called at the beginning of our script to make the camera ready, and then depending on whether we need an RGB or grayscale image, we will call the other functions to return an image.
Each one of those functions can be called separately and in another namespace.
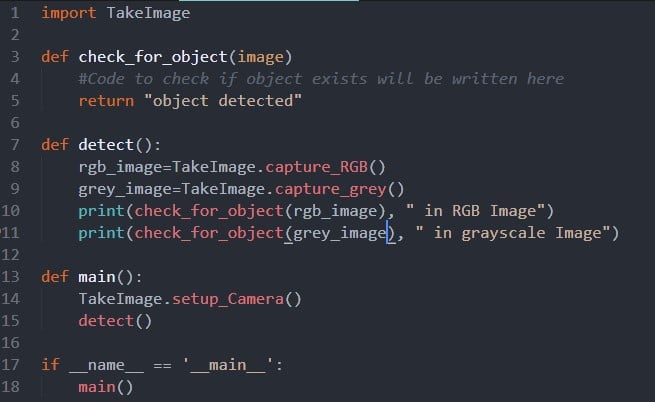
Now in the “DetectObject.py” file is where the magic happens. We will import the TakeImage module we created using “Import TakeImage”, note that this only works if both files are in the same folder. Now that the import is done, we can use all the functions of “TakeImage.py” inside “DetectObject.py”.
In this example, when the script is executed, line 18 is called, which calls the function “main ()”.
Now we need to setup the camera, to do this we will call the function “setup_camera ()” from the “TakeImage” module using the module’s name then the function we need. In this example it will be “TakeImage.setup_Camera ()”, then the function “detect ()” is called.
The second time we will use the module “TakeImage” to call the functions “capture_RGB ()” and “capture_grey ()”, and based on their results we will call the function “check_for_object” , inside the print statement.
In this example, the “DetecObject” module imports the “TakeImage” module, which enables it to use functions implemented in that module.
How do I import objects of a module?
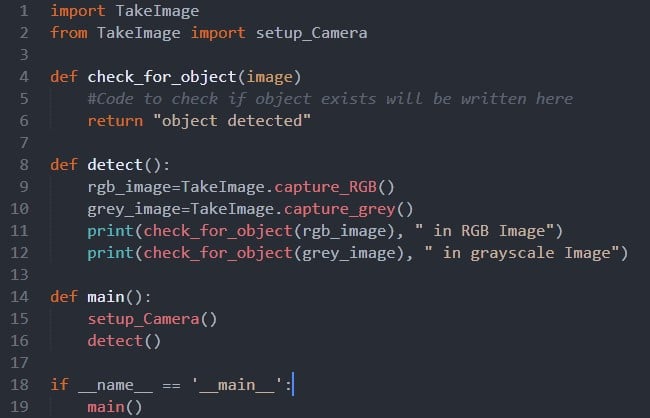
We already saw how to import the entire module and use its functions, but if we want to use only a specific object from the module, we can simply import this one only using “from TakeImage import setup_camera” and now it can be used without the “TakeImage” keyword.
In this example, it was easy to call the functions using the “TakeImage.captureRGB()” format, but if our module contains hundreds of functions and we need to call them several times, we can use the “from TakeImage import * ”.
Now all the objects from the module are imported and we can use them directly without writing “TakeImage.”. But you should be attentive as this can get tricky. This example below will directly show you how it’s done.
Custom import name
Sometimes we can import a module under another name than its original one. This can be used in many situations, for example when the module’s name is long or will be used a lot.
We can use short abbreviations instead of the original name. One of the widely used module is called “numpy” and is often import as “np” using “import numpy as np”. Now when we need a specific object from the “numpy” module we will write “np.” instead of “numpy.”
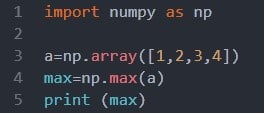
In this example, we import “numpy” and then used two objects from this module. To create a “numpy array” we used “np.array” and then to find the biggest number in this array we used the function “np.max”.
Note that importing numpy won’t work unless you’ve already installed it. To do so, open a terminal or CMD, and install it using pip by writing:
“PIP install numpy”.
This will install numpy all it’s dependencies and you will be able to use it anywhere.
The second usage of import modules with custom names is when we have similar functionality between two modules.
This could be useful when we want to import a module conditionally to use the same name later in the code. So, depending on a certain condition we may import a module or another, both under the same name.
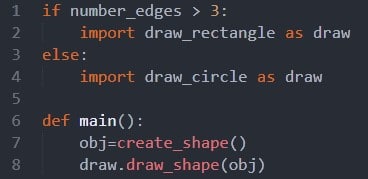
In this example, we are importing the module “draw_rectangle” or “draw_circle” depending on a variable called “number_edges”, both modules are imported under the name “draw”.
Now in the rest of our code, we can use “draw” considering we already made the choice of a module at the beginning. This could be useful if we have many shapes in a bigger code and both modules have the same objects, we will always use the “draw” keyword which will be faster and more efficient.
How to import modules from a different folder?
When we create custom modules, we could tell the Python interpreter where to look for them, aside from the default, which is the local directory and the built-in modules. You could either use the environment variable PYTHONPATH to specify additional directories to look for modules in, like this:
“PYTHONPATH=/my_folder python my_module.py”
Another method is the sys.path.append function. You may execute it before running an import command:
“sys.path.append(“/my_folder”)”
Writing a real example
Now that we got all the theory, it’s time to create our own small project. We will create two python files named “calculate.py” and “numbers.py”. Inside “calculate.py” we will create the functions that will be used in the “numbers.py” namespace.
First of all, we will create both files with their respective names and place them in the same folder.
![]()
Inside “calculate.py”, we will define two functions, let’s go threw them and what each one does.
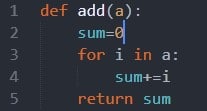
The “add” function, takes one argument, called “a”. The object of this function is to return the summation of all the elements of the array “a”.
To store the value in every iteration, we will use a variable that we defined as “sum” that is initialized with the value 0 because it doesn’t affect addition.
Now we will use a for loop to iterate threw all the elements of the array, and in every iteration, we will add the value “i”, which is the value of the array in this step, to the variable sum.
Note that writing “sum+=i” is similar to “sum = sum + i” but in more professional way. Finally, when the loop is over, we will return the variable “sum”.
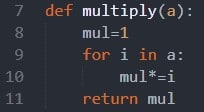
The second function is pretty similar to the first one. We will define it as “multiply”, it also takes one array as an argument and needs to return the multiplication of all the elements inside it.
Just like we did in the “add” function, we will iterate threw all the elements of the array and in every step, we will multiply our “mult” variable with the corresponding element.
Note that in multiplication we can’t use 0 as an initial value because it’s value won’t change in multiplication, that’s why we will start with 1, which is neutral in multiplication.
Now our module is ready and it’s time to use it in another namespace.
Inside the “numbers.py” namespace we will write the following:
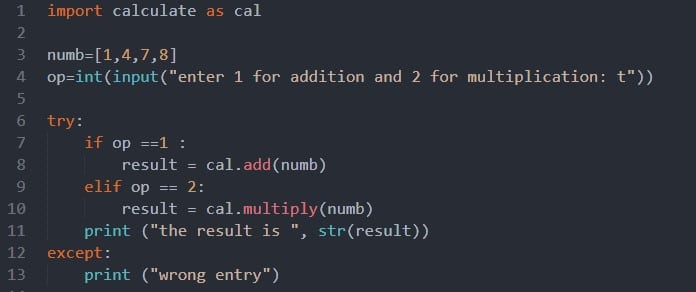
In the first line we will import the module we already created under a new name because it’s too long. So, from now we can just write “cal” instead of “calculate”.
We start by creating an array called numb which contains the values that we will use later on. The user is prompted to choose between addition or multiplication by entering 1 or 2.
Note that getting an input from the user will not work in the sublime ide, we will need to run it from a command line or terminal.
This input will be converted to an integer because it is returned as a string from the input function. Now depending on whether the user entered 1 or 2 we will call a function from the calculate module.
In case the user pressed 1, we will call the function add and pass “numb” as an argument, it will return the summation of all it’s elements. Similarly, will happen if 2 is pressed and the multiplication will be returned.
This returned element is stored in a variable called “result” in both cases so we can print it later on. We could have directly printed the result in every if condition, both ways have the same output.
You may have noticed the try and except keywords used here, those are for error handling. If the user entered a number different than 1 or 2, none of the conditions will be met and the “result” variable won’t be created.
When calling the print function, we passed the “result” variable, so if it wasn’t created, we will have an error and a crash will happen. To avoid this, we will use the “try and except” keywords.
The lines in the “try” block are first executed, if an error happens, instead of crashing, the lines in the “except” block will be executed, in our case we will print a message for the user to know that he entered a wrong number.
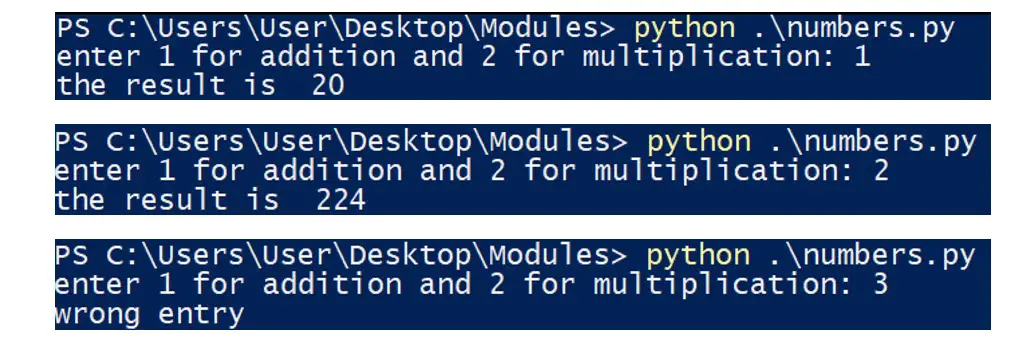
When executing the following script, you should have a similar result:
Python bytecode files
You may have noticed that when importing a module, like TakeImage a “.pyc” file appears, with the same name but an extension of “.pyc” instead of “.py”, this is a compiled Python file.
Python compiles files into Python bytecode so that it won’t have to parse the files each time modules are loaded. The first time a module is imported this bytecode file is created and then it gets loaded instead of the “.py” file.
The user isn’t required to do any actions for this process to happen, it’s done automatically.
![]()
Some useful functions
When using built-in python modules, sometimes we often don’t know the objects they contain. To check the list of a module’s objects we can use the “dir ()” function and as argument write the module’s name.
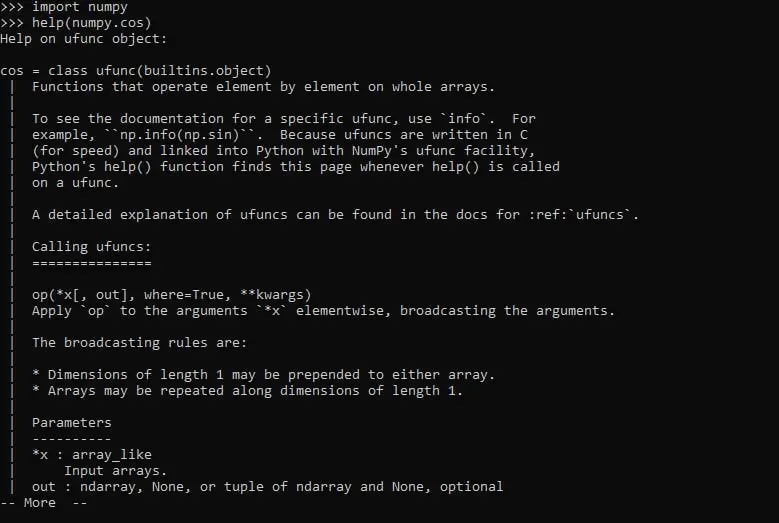
And then when we choose the object, we can get more information by using the ”help ()” function and passing the specific object.
For example, in the following we imported “numpy” and then called the “help” function for the “cos” object from the “numpy” module.
Tasks to practice
To make sure that you completely mastered this topic, here are some tasks to try by yourself
- Create two modules in a folder and then import them in a namespace located in another folder.
- Create a module that you will import in a namespace in a different folder, then use it as a module to import in a third namespace in a new folder.
- Explore different built-in python modules likes numpy, matplotlib, pandas.
This article comes to an end here, I hope everything was clear. Now it’s time to explore our video tutorial.
If you have any questions don’t hesitate to drop a comment in the section below.


