


Have you ever noticed your computer running unusually slow, heating up without a clear reason, or heard the fan spinning furiously despite not having any resource-intensive applications running?🤷♂️
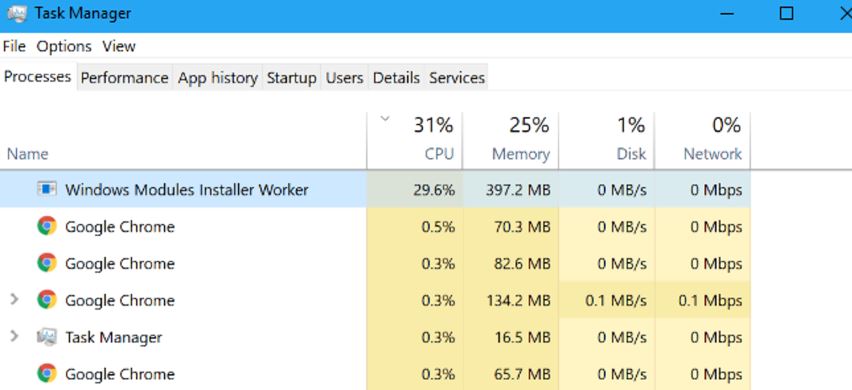
You might have checked the Task Manager only to find an unfamiliar process consuming a large amount of CPU usage – the Windows Modules Installer Worker.
This seemingly mysterious tool might have caused you a lot of frustration, affecting your productivity and turning your daily computer use into a tedious task.
Despite your attempts to end the task or perform a reboot, it stubbornly reappears, leaving you bewildered and concerned about your system’s overall performance and health.
This comprehensive guide demystifies the Windows Modules Installer Worker for you. We will explore what it is, its role in your operating system, and why it sometimes consumes many system resources.
Additionally, we will dive deep into common issues related to this tool and provide straightforward solutions to ensure your system runs smoothly again.
By the end of this article, you’ll better understand the Windows Modules Installer Worker and know how to manage it effectively.
Let’s reclaim your computer’s optimum performance!
In-depth Look at Windows Modules Installer Worker
In Windows operating systems, one component often shrouded in mystery is the Windows Modules Installer Worker. This article aims to unravel the enigma surrounding this vital cog in the Windows machinery. We can better understand this unsung hero by delving into its inner workings, functions, and impact on system performance.
At its core, the Windows Modules Installer Worker (also known as TrustedInstaller.exe) is crucial in facilitating the installation, modification, and removal of Windows updates, system components, and optional features.
Its presence ensures that your computer remains up-to-date with the latest security patches, bug fixes, and feature enhancements furnished by Microsoft.
The Windows Modules Installer Worker boasts a repertoire of diverse functions and operations. Foremost among these is the management of updates for the Windows operating system.
When new updates become available, this diligent worker springs into action, adeptly downloading the requisite files, scrutinizing their integrity, and orchestrating their seamless integration into the system.
The Windows Modules Installer Worker fortifies your computer’s security, stability, and overall performance by undertaking this vital duty.
In addition to its involvement in update management, this worker installs and removes system components and optional features. It deftly handles crucial elements such as language packs, device drivers, and other software components essential for the smooth functioning of the Windows ecosystem.
While the Windows Modules Installer Worker remains a linchpin in ensuring the integrity of your operating system, it can occasionally impose a significant toll on system resources, potentially impacting overall performance. This is most noticeable when the worker installs updates or executes maintenance tasks.
During such episodes, users may experience a surge in CPU usage, translating into a momentary reduction in system performance and responsiveness.
Furthermore, disk usage may spike as the worker diligently reads and writes data throughout the update process. It is crucial to note that these resource-intensive operations are transient and subside once the updates or installations reach completion.
Common Issues Related to Windows Modules Installer Worker
The Windows Modules Installer Worker is a critical component of the Windows operating system responsible for managing updates, installing and removing system components, and ensuring the overall stability and security of the system.
However, like any complex system, it is not immune to encountering issues that can disrupt its normal operation.
Let’s explore some common Windows Modules Installer Worker issues and discuss potential solutions.
1. High CPU Usage
One of the most frequent issues users may encounter is high CPU usage caused by the Windows Modules Installer Worker. This occurs when the worker consumes a significant portion of the CPU’s processing power, decreasing system performance and sluggishness. Several factors can contribute to this problem, including pending updates or conflicts with other processes.
To address high CPU usage, you can start by allowing the Windows Modules Installer Worker to complete its tasks. Sometimes, the worker may perform extensive background processes, and patience is necessary until it finishes operations.
If the high CPU usage persists for an extended period or becomes excessive, you can try restarting your computer to see if it resolves the issue.
2. Disk Usage Spikes
Another issue users may encounter is spikes in disk usage caused by the Windows Modules Installer Worker. During the update process, the worker reads and writes a significant amount of data to the disk, which can result in temporary disk congestion. This can lead to slower performance and delays in accessing files or applications.
If you notice prolonged or excessive disk usage, you can try adjusting the active hours for Windows updates. By configuring the active hours to when you are less likely to be actively using your computer, you can minimize the impact of the worker’s disk operations during your regular work hours.
Optimizing your disk storage by removing unnecessary files or upgrading to a faster storage device, such as a solid-state drive (SSD), can help alleviate disk usage spikes.
3. Update Failures
Occasionally, the Windows Modules Installer Worker may encounter update failures. This can happen for various reasons, such as corrupted update files, incompatible system configurations, or conflicts with third-party software.
When an update fails, it can prevent the installation of important security patches and feature enhancements, leaving your system vulnerable.
You can start by running the Windows Update troubleshooter to address update failures. This built-in tool can automatically detect and resolve common issues related to Windows updates, including those affecting the Windows Modules Installer Worker.
Additionally, ensuring that your system has sufficient storage space, a stable internet connection, and the latest device drivers can contribute to successful updates.
4. System Freezes or Crashes
The Windows Modules Installer Worker may sometimes contribute to system freezes or crashes. These issues can occur if the worker becomes stuck in a loop or encounters conflicts with other system processes. System freezes or crashes can be frustrating and disrupt your workflow.
If you experience system freezes or crashes related to the Windows Modules Installer Worker, a simple restart may help resolve the problem.
However, if the issue persists, you can try temporarily booting your computer into Safe Mode and disabling Windows updates. This can provide temporary relief while you investigate the underlying cause of the problem, such as incompatible drivers or software conflicts.
In conclusion, while crucial for system maintenance and updates, the Windows Modules Installer Worker can encounter common issues affecting its performance and stability.
By understanding these issues and employing appropriate troubleshooting techniques, users can overcome obstacles and ensure a smooth and reliable Windows operating system.
Troubleshooting Windows Modules Installer Worker Issues
Explore effective troubleshooting techniques to address Windows Modules Installer Worker issues and restore optimal performance.
1. Monitor Resource Usage
The first step in troubleshooting Windows Modules Installer Worker issues is to monitor resource usage on your system. Use the Task Manager to identify any abnormal CPU or disk usage spikes caused by the worker. If you notice unusually high resource consumption, it may indicate a problem that requires attention.
2. Allow Sufficient Time
The Windows Modules Installer Worker performs essential maintenance tasks, including installing updates and modifying system components. These processes can be resource-intensive and may take some time to complete.
Patience is key, as interrupting the worker prematurely can lead to incomplete installations or other issues. Allow sufficient time for the worker to finish tasks before troubleshooting.
3. Update Windows
Outdated versions of the Windows operating system may contribute to issues with the Windows Modules Installer Worker. Ensure that your system is running the latest version of Windows by checking for updates in the Windows Update settings.
Installing the latest updates can resolve known issues, enhance system performance, and provide compatibility improvements for the worker.
Follow these steps to update Windows:-
Step 1: Check for Updates
- Click on the Start menu and open Settings (gear icon).
- In the Settings window, select Update & Security.
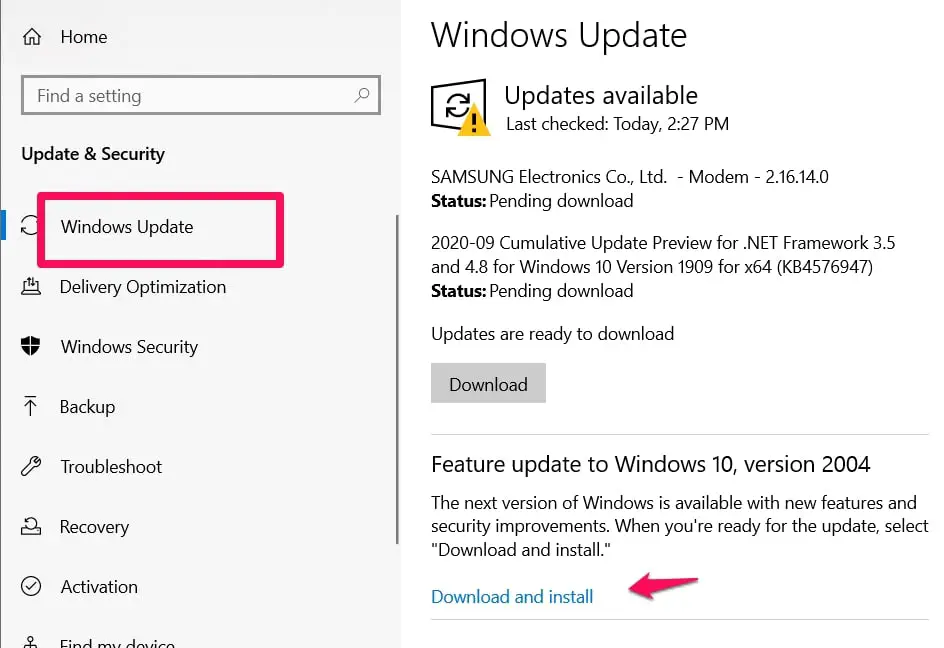
- Click on the Windows Update tab in the left-hand menu.
- Click the Check for updates button.
Step 2: Install Available Updates
After clicking “Check for updates,” Windows will search for available updates.
If updates are found, click the Download or Install button to start the update process.
 Depending on the size and number of updates, downloading and installing them may take some time. Ensure you have a stable internet connection and a sufficient battery or power supply.
Step 3: Restart Your Computer
- Once the updates are downloaded and installed, Windows will prompt you to restart your computer to complete the process.
- Save any unsaved work and close any open applications.
- Click the Restart button to initiate the restart process.
Step 4: Automatic Updates
- By default, Windows is set to install updates automatically. However, you can customize the settings to suit your preferences.
- In the Windows Update settings, click on Advanced options.
- You can select the desired options under Choose when updates are installed, such as the active hours when updates will not be installed or temporarily pausing updates.
Step 5: Additional Update Options
- You will find additional options in the Windows Update settings, such as View update history, which displays a list of installed updates.
- You can also click Optional Updates to check for driver updates or other non-essential updates you may want to install.
4. Run Windows Update Troubleshooter
Windows provides a built-in troubleshooter designed to diagnose and resolve issues related to Windows updates. Running the Windows Update Troubleshooter can help identify and fix common problems affecting the Windows Modules Installer Worker.
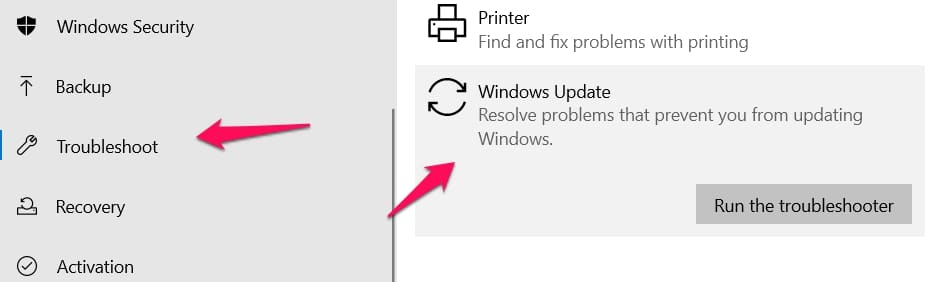
To access the troubleshooter, go to the Windows Settings, navigate to Update & Security, and select Troubleshoot.
5. Clean Boot
Performing a clean boot can help identify any third-party software or services conflicting with the Windows Modules Installer Worker. To perform a clean boot, open the System Configuration utility by typing “msconfig” in the Run dialog box.
Select “Selective startup” in the General tab and uncheck the “Load startup items” option. Then, go to the Services tab and check the “Hide all Microsoft services” box.
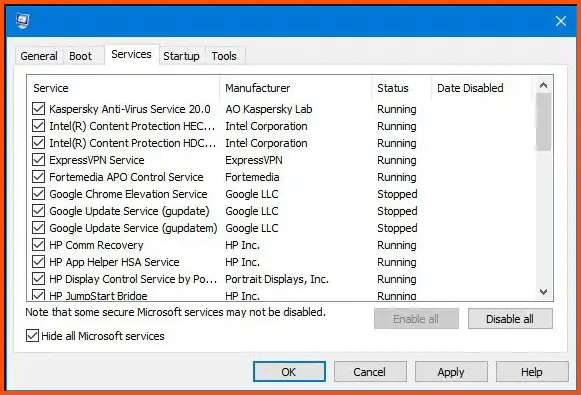
Disable any remaining services, click Apply, and restart your computer. This process will help determine if any third-party software is causing conflicts.
6. Scan for Malware
Malware infections can disrupt the normal operation of the Windows Modules Installer Worker. Perform a thorough system scan using reputable antivirus software to detect and remove malicious programs. Malware removal can eliminate potential threats and restore the proper functioning of the worker.
To scan for malware in Windows, follow these steps:
Step 1: Use Windows Security
- Click on the Start menu and open Settings (gear icon).
- In the Settings window, select Update & Security.
- Click on the Windows Security tab in the left-hand menu.
- In the Windows Security window, click on Virus & threat protection.
Step 2: Initiate a Quick Scan
- In the Virus & threat protection window, click on Quick scan.
- Windows Security will now scan your system for common malware and threats. This scan is usually faster but may not detect all types of malware.
Step 3: Perform a Full Scan
- Click Scan options for a more thorough scan covering the entire system.
- Select Full Scan and click the Scan Now button.
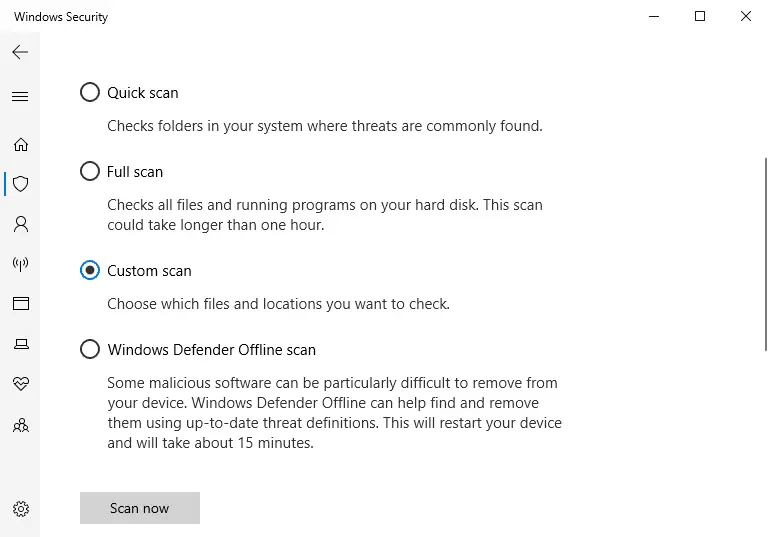
3. Windows Security will now comprehensively scan your system, including all files and folders. This scan may take longer but offers more comprehensive malware detection.
Step 4: Review Scan Results
- After the scan is complete, Windows Security will display the scan results.
- If any threats or malware are detected, follow the recommended actions provided by Windows Security to quarantine or remove them from your system.
Step 5: Additional Malware Removal Options
- If Windows Security doesn’t detect or remove all malware, consider using reputable third-party antivirus software to perform a more in-depth scan. Install and run a trusted antivirus program, ensuring it is up to date.
- You can also use Windows Defender Offline, which allows you to create a bootable USB or DVD that scans your system before Windows starts. This method can help detect and remove persistent malware.
It is essential to regularly scan your system for malware to protect your data, privacy, and overall system security. Keep your operating system and antivirus software up to date to ensure the best protection against the latest threats.
7. Check Hardware and Drivers
Faulty hardware components or outdated drivers can also lead to issues with the Windows Modules Installer Worker. Ensure your hardware functions correctly by performing diagnostics tests or consulting a professional.
Additionally, update your device drivers to the latest versions from the manufacturer’s website. Outdated or incompatible drivers can cause conflicts and impact the worker’s performance.
To update drivers in Windows, follow these steps:
Step 1: Identify the Device and Driver
- Identify the device for which you want to update the driver. It can be a graphics card, network adapter, sound card, or other hardware component.
- Note down the manufacturer and model of the device. You can usually find this information in the Device Manager or by visiting the manufacturer’s website.
Step 2: Use Windows Update for Basic Drivers
- Windows Update can automatically download and install basic drivers for many devices. It is recommended to start with this method.
- Click on the Start menu and open Settings (gear icon).
- In the Settings window, select Update & Security.
- Click on the Windows Update tab in the left-hand menu.
- Click the Check for Updates button and allow Windows to search for available driver updates.
- If any driver updates are found, Windows will download and install them automatically.
Step 3: Visit Manufacturer’s Website
- If Windows Update doesn’t find the appropriate driver or you require a specific version, visit the manufacturer’s website. For Intel drivers, visit Here
- Look for a “Support” or “Downloads” section on the website.
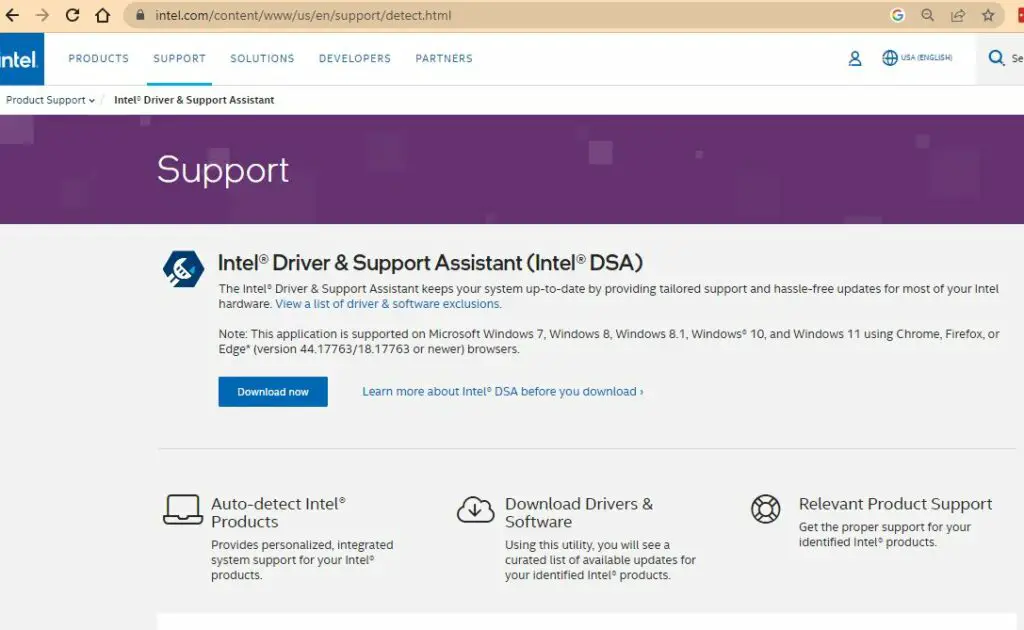
- Enter the model number or browse through the product categories to find your device.
- Locate the latest driver for your device compatible with your version of Windows.
- Download the driver to your computer.
Step 4: Install the Updated Driver
- Once the driver is downloaded, locate the file on your computer.
- Double-click the downloaded file to run the installer.
- Follow the on-screen instructions provided by the installer to complete the driver installation.
- Restart your computer if prompted to ensure the changes take effect.
Step 5: Use Device Manager
- If you prefer to update drivers using Device Manager, right-click on the Start menu and select Device Manager from the list.
- In Device Manager, locate and expand the category related to the device you want to update.
- Right-click on the specific device and select Update driver.
- Choose the option to search automatically for updated driver software.
- Windows will search for the latest driver online and install it if found.
Step 6: Use Third-Party Driver Updater Software (Optional)
- Alternatively, you can use third-party driver updater software to simplify updating drivers.
- Research and choose a reputable driver updater tool that suits your needs.
- Install and run the software, and it will automatically scan your system, detect outdated drivers, and provide options to update them.
8. Reset Windows Update Components
If the Windows Modules Installer Worker continues to experience issues, resetting the Windows Update components can help resolve underlying problems.
Open the Command Prompt as an administrator and run the following commands one by one:-
net stop wuauserv
net stop cryptSvc
net stop bits
net stop msiserver
ren C:\Windows\SoftwareDistribution SoftwareDistribution.old
ren C:\Windows\System32\catroot2 catroot2.old
net start wuauserv
net start cryptSvc
net start bits
net start msiserver
These commands will stop the relevant services, rename the SoftwareDistribution and catroot2 folders, and restart the services. This process will effectively reset the Windows Update components, potentially resolving issues with the worker.
9. Using The DISM Tool To Fix Corrupted Or Missing Files
Another tool, much like the SFC above, is the DISM tool (also known as the System Update Readiness Tool).
It is a good option if the SFC tool located the errors but could not fix them.
Navigate to Command Prompt (admin) using the same process outlined above and input this command
Dism.exe /Online /Cleanup-Image /Restorehealth
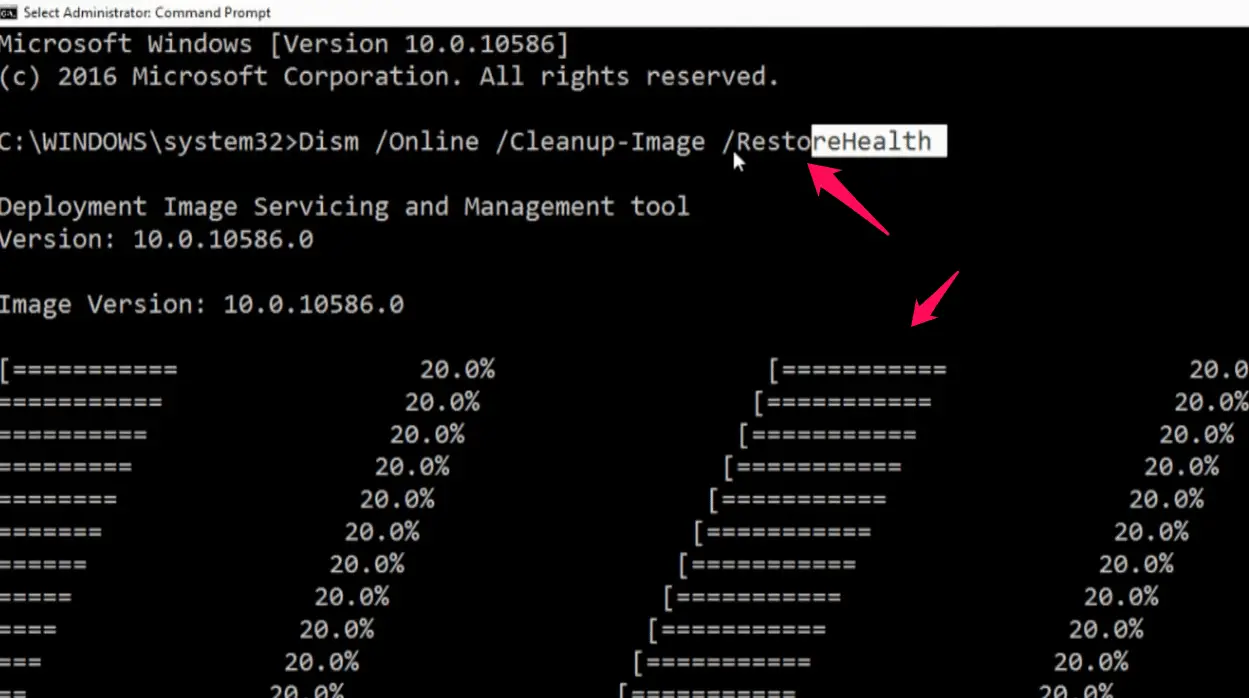
As explained in the SFC tool above, patiently wait and don’t restart or turn off your system until the process is complete. Restart after being prompted about the completion of the scan. The corrupted/missing files issue should be resolved.
10. Deleting The SoftwareDistribution Folder
This method works if the problem is from the updates automatically downloaded by your system.
The Windows Modules Installer Worker as we earlier explained updates processes in the background, the SoftwareDistribution Folder is where the Windows Modules Installer Worker gets the update files from.
Issues can occur if there are bugs in the updates downloaded. What the bugs do is that they make the Windows Modules Installer Worker stuck while trying to update Windows processes which will in turn increase the CPU usage because the process of updating is just stuck.
Clearing the files and re-downloading the updates have proven to be instrumental in eliminating the bugs causing the errors.
To delete or clear the SoftwareDistribution folder, you must stop the Windows Update process from running.
Here’s how to stop the Windows Update process.
Open the Run box by pressing these shortcut keys (Windows + R) Input this text into the Run box – services.msc and click OK.
In the menu that appears, navigate to the Windows Update feature by pressing the W key to get to it faster.
Double-click on Windows Update and click on Stop in the menu that opens.
Apply the changes you have made and then exit.
Then deleting the SoftwareDistribution folder.
Navigate to C:\Windows\ and look for the SoftwareDistribution folder. When you find it, delete it and restart your system.
You can even re-download the updates by checking for updates, and the folder will be recreated. The downloads, this time bug-free, will be stored for the Windows Modules Installer Worker to access and update without leading to high CPU usage errors.
11. Use the Windows Repair Program
Till these steps, we didn’t use any third-party tool; Now it’s time to use one of the best tools to fix Windows Modules Installer Worker Windows 10 High CPU usages.
Navigate to https://www.tweaking.com/ and download the Windows repair program, which comes in both free and paid versions; our work-free version is more than enough.
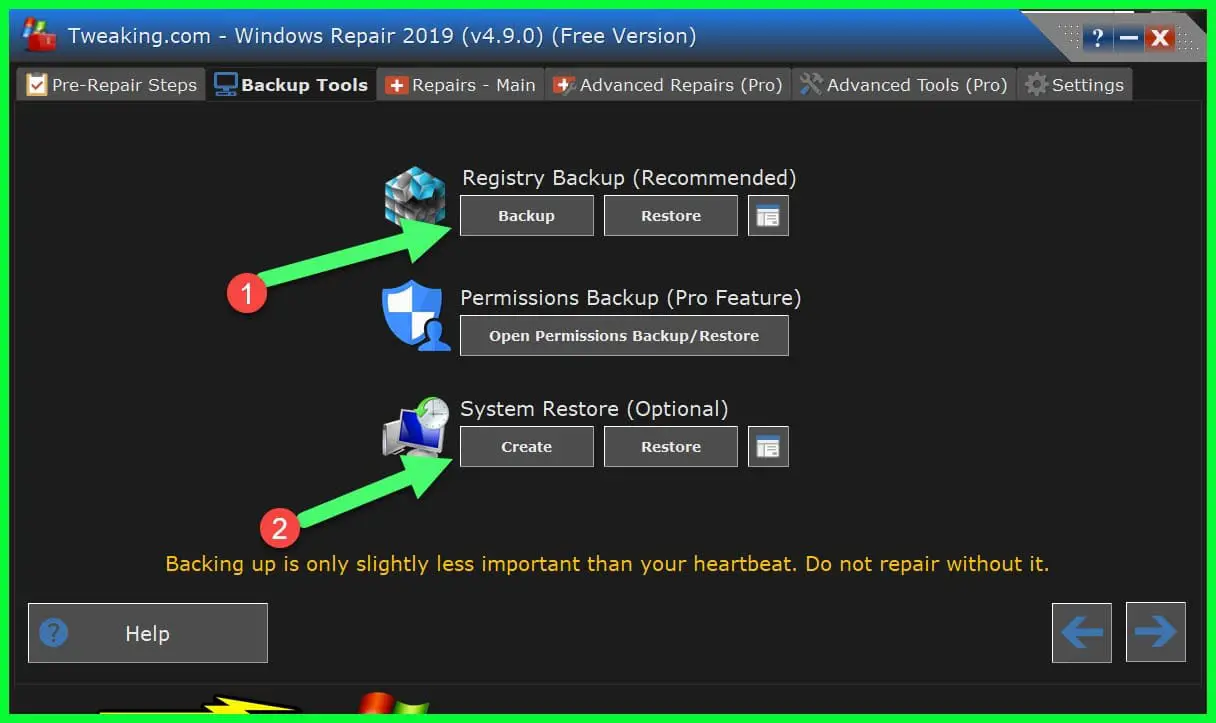
Using this tool in the Safe mode is recommended to get the best result. Open the tool, click on “Backup Tools,” and click on “Backup” to take the Windows registry backup.
Now click on the Repairs tab and the “Open Repairs” option.
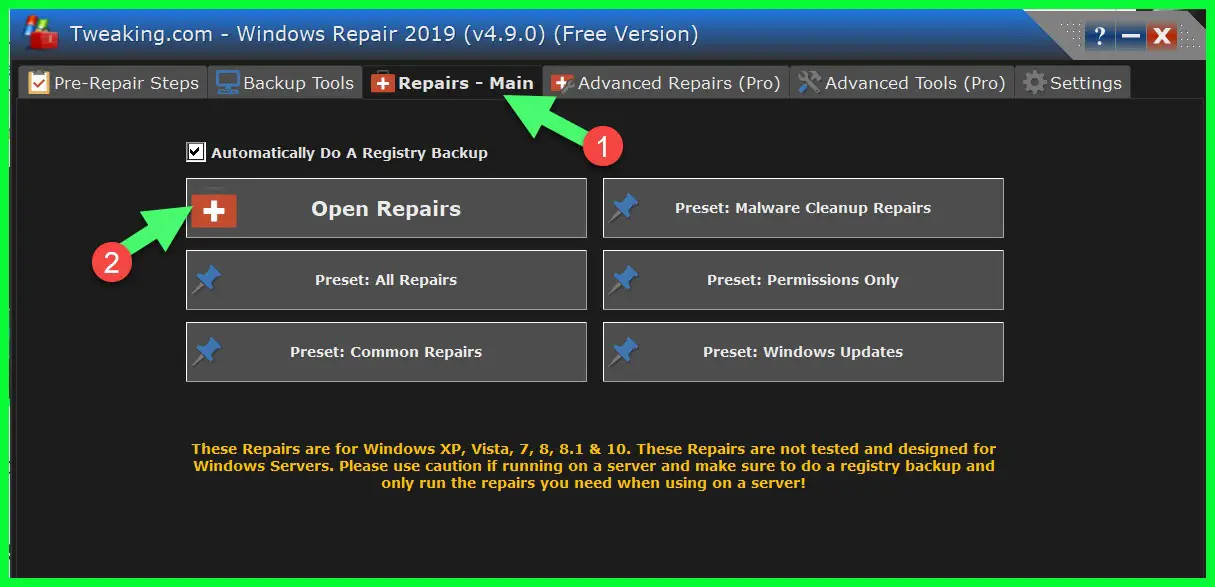
Here by default, all repair options are selected; leaving all selected is recommended and clicking on the “All repairs” option to start repair.
If you only want to repair only “Windows Modules Installer Worker,” then uncheck other options, select the ‘Repair WMI” option, and click on the Start repair option.
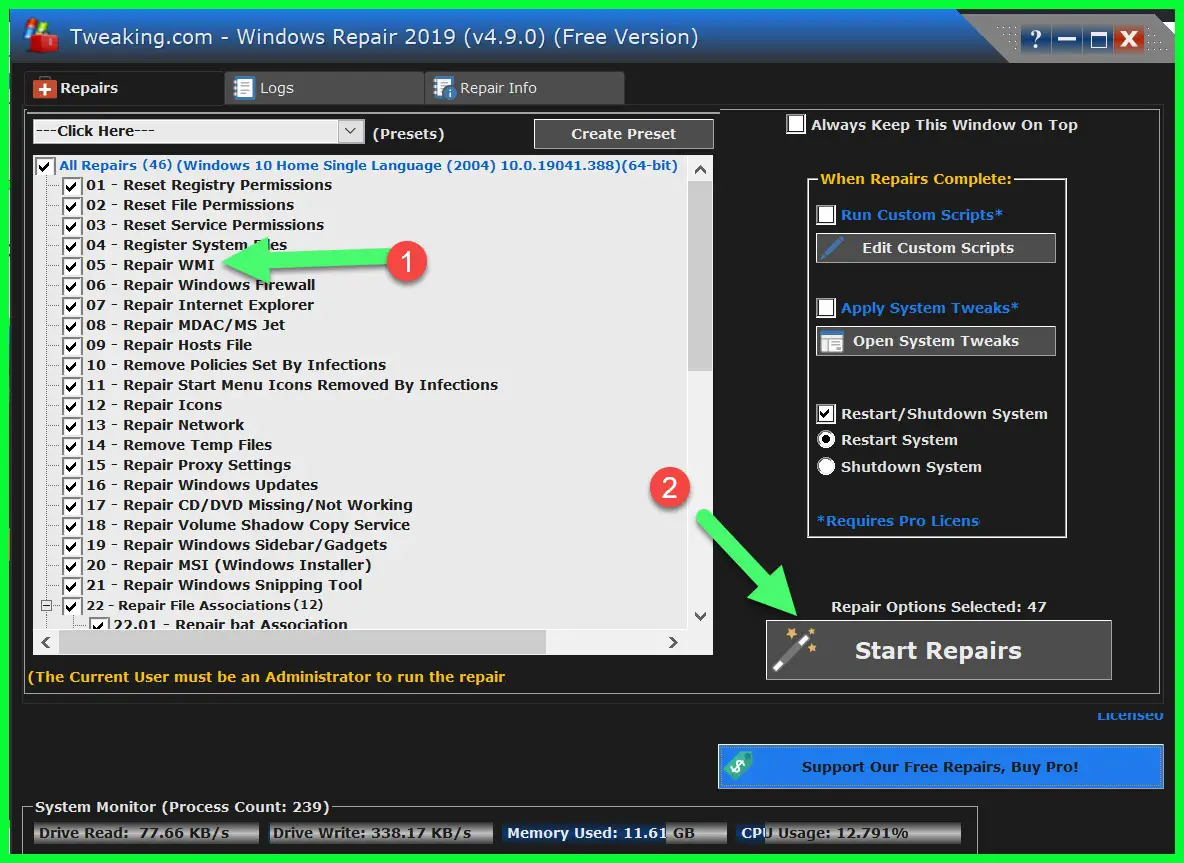
This application will take 15 to 20 minutes to fix all your PC issues.
11. Seek Professional Assistance
If you have followed the troubleshooting steps mentioned above and are still experiencing persistent issues with the Windows Modules Installer Worker, it may be time to seek professional assistance.
Contact Microsoft Support or consult with an experienced technician who can provide specialized guidance and help resolve complex issues.
How to disable Windows Modules Installer Worker (and when it might be necessary)
To disable the Windows Modules Installer Worker temporarily or permanently, here are the steps to accomplish it:
Step 1: Accessing Services The first step involves accessing the Services application, which allows you to manage various system services. To do this, press the Windows key + R on your keyboard to open the Run dialog box. Type services.msc and press Enter to launch the Services window.
Step 2: Locating Windows Modules Installer Once the Services window appears, scroll down to locate the Windows Modules Installer service. You can easily identify it by looking for its corresponding name in the list.
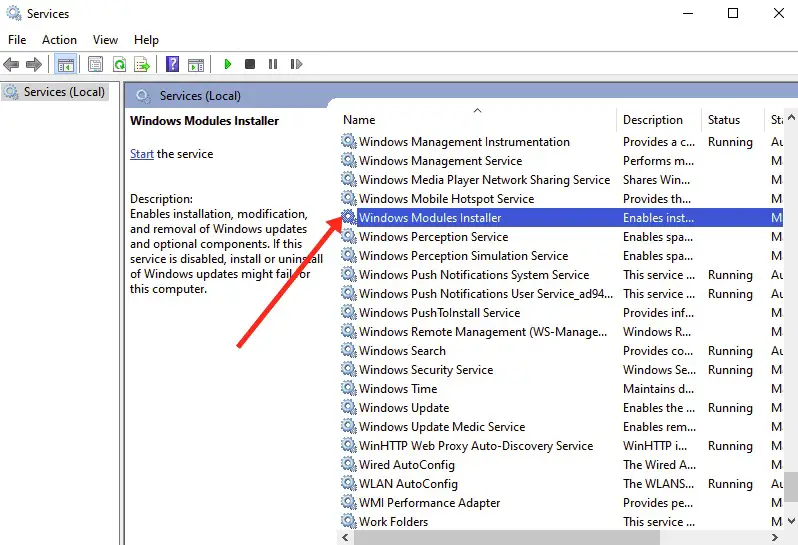
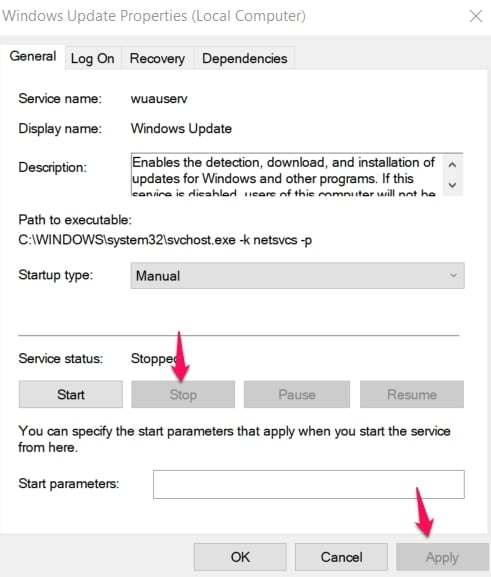
Step 3: Disabling the Service To disable the Windows Modules Installer service, right-click on it and select Properties from the context menu. In the Properties window, go to the General tab and locate the Startup type section. From the dropdown menu, choose Disabled to prevent the service from starting automatically.
Step 4: Stopping the Service After disabling the service, click on the Stop button in the same Properties window to halt the currently running instance of the Windows Modules Installer Worker. This will ensure that the changes take effect immediately.
Step 5: Restarting your Computer To complete the process, it is recommended to restart your computer. This will allow the changes made to the Windows Modules Installer service to be applied effectively. Once your computer reboots, the Windows Modules Installer Worker will remain disabled until you enable it again.
By following these steps, you can effectively disable the Windows Modules Installer Worker and alleviate the excessive CPU usage caused by this component.
However, it is important to note that disabling the service means you will no longer receive automatic updates from Windows. Therefore, it is advisable to regularly check for updates manually to ensure the security and stability of your system.
In conclusion, understanding how to disable the Windows Modules Installer Worker allows you to manage system resources and optimize your computer’s performance. By taking control of this service, you can balance system efficiency and software updates, ultimately enhancing your overall computing experience.
📗FAQ’s
Can I end Windows Modules Installer Worker?
It is not recommended to end the Windows Modules Installer Worker process manually. This component is responsible for managing Windows updates and ensuring system stability. Terminating it abruptly may lead to incomplete installations or potential errors.
How do I fix Windows Modules Installer Worker with high CPU usage?
To address high CPU usage caused by the Windows Modules Installer Worker, you can try restarting your computer, running the Windows Update troubleshooter, or performing a clean boot to identify conflicting software. Additionally, ensuring that your system has the latest updates installed can help resolve the issue.
What happens if I close Windows Modules Installer Worker?
Closing the Windows Modules Installer Worker process forcefully can disrupt ongoing update installations and may lead to system instability. It is best to allow the process to complete its tasks or follow recommended troubleshooting methods to address any issues related to high CPU usage.
How to set Windows Modules Installer Worker process to low priority?
To set the priority of the Windows Modules Installer Worker process to low, you can open the Task Manager, locate the process under the “Processes” or “Details” tab, right-click on it, and choose “Set Priority” or “Priority” from the context menu. Then, select the “Low” option to assign a lower priority to the process.
Is it OK to delete Windows Installer?
No, it is not recommended to delete the Windows Installer. The Windows Installer is a vital component of the operating system that manages software installation, maintenance, and removal. Deleting it can cause issues with installing or uninstalling programs.
How do I stop Windows Module installer from running?
To stop the Windows Module Installer from running, you can access the Services application, locate the “Windows Module Installer” service, and stop it. This can be done by right-clicking on the service, selecting “Stop” from the context menu, and confirming the action.
What can I delete from Windows Installer?
It is not recommended to delete files from the Windows Installer folder manually. The Windows Installer folder contains essential files for installing, repairing, or uninstalling software. Deleting files from this folder can lead to issues with software installations or removals.
What happens if you delete the Microsoft installer package?
Deleting a Microsoft Installer (MSI) package can result in the inability to repair, update, or uninstall the associated software. The MSI package contains information and files for managing the software installation process. Removing it can cause problems with the software’s functionality or maintenance.
How long does Windows Modules Installer Worker run?
The Windows Modules Installer Worker’s duration varies depending on the system’s update requirements. It typically runs during Windows updates, and the length can range from a few minutes to several hours, depending on the complexity and number of updates being installed.
Why won’t Task Manager let me set priority?
If Task Manager does not allow you to set process priority, it may be because you do not have administrative privileges. To change the process priority, you must run Task Manager as an administrator by right-clicking on the Task Manager icon and selecting “Run as administrator” from the context menu.
How do I permanently set process priority in Windows?
To permanently set the process priority in Windows, you can create a shortcut to the application, access its properties, and specify the desired priority under the “Shortcut” tab. This allows the application to always launch with the assigned priority.
How do I clean up unused Windows Installer files?
You can use the Windows Disk Cleanup utility to clean up unused Windows Installer files. Launch the utility, select the drive where the operating system is installed, and check the “Windows Installer Cleanup” option. Follow the prompts to remove unnecessary files.
What is the point of Windows Installer?
The Windows Installer is a system service that provides a consistent and standardized method for installing, uninstalling, and maintaining software on Windows systems. It ensures proper installation, handles software dependencies and efficiently manages software.
Should you delete installers after installing?
It is generally recommended to keep the installers after installing the software. The installers allow for easier future reinstallation or updating of the software. However, if you are running low on storage space, you can delete the installers if you have a backup or access to them if needed.
How to change process priority with cmd?
To change process priority using the command prompt (cmd), you can use the wmic process command to identify the process and the priority parameter to set the desired priority. For example, wmic process where name="process_name.exe" CALL setpriority "priority_level" sets the priority level of a specific process.
Conclusion
In this article, we’ve embarked on an enlightening journey, unraveling the mystery behind the Windows Modules Installer Worker.
We’ve comprehended its role and importance in the context of your Windows operating system and demystified the reasons behind its occasional high system resource consumption.
We’ve also tackled some common issues associated with this tool and walked through practical solutions to address them effectively, aiming to enhance your computer’s performance and overall user experience. Knowledge, after all, is the first step toward resolution.
Remember, system tools like the Windows Modules Installer Worker play crucial roles in maintaining the health and functionality of your computer. By understanding and managing these tools effectively, you can ensure that your system continues to run smoothly and your productivity remains uninterrupted.
The world of Windows is vast and intricate. Don’t be overwhelmed. Stay curious, stay informed, and continue learning to navigate it effectively. Because in this digital age, a well-maintained computer is not just a convenience; it’s a necessity.

