


Did you know that ignoring the health of your CPU can lead to system crashes, slowdowns, and potentially expensive hardware replacement?💁
As a tech enthusiast or professional, you understand that your computer’s Central Processing Unit (CPU) is its beating heart. But, just like a heart, it can be under stress, and if you’re not regularly checking on it, you could be pushing your device to its limit without even knowing it.
Imagine being in the middle of an important project or game, only for your computer to suddenly slow down or crash completely. It’s frustrating, isn’t it? The worst part is that the damage to your CPU might already be significant when these symptoms manifest.
Regular activities like gaming, rendering, or even having too many tabs open can overwork your CPU, causing it to overheat and, over time, degrade its performance.
This is where a CPU stress test comes into play. It’s like a fitness test for your processor, pushing it to its maximum capacity so you can observe how it performs under pressure.
With the right tools, you can easily perform a CPU stress test and ensure your system is always running optimally.
Read on as we delve into the intricacies of CPU stress testing, its importance, and how you can conduct one on your machine.
What is CPU Stress Testing?💁
CPU stress testing is a crucial procedure for evaluating the performance and stability of a computer’s central processing unit (CPU). It involves subjecting the CPU to intense workloads and demanding scenarios to assess its limits and ensure optimal functionality under extreme conditions.

During a CPU stress test, specialized software pushes the CPU to its maximum capacity, triggering a significant workload that intensively utilizes the processor’s computational capabilities. This process helps uncover overheating, system instability, or inadequate cooling solutions.
The stress testing procedure assesses various aspects of the CPU, including its ability to handle multitasking, high loads, and complex calculations. It can reveal limitations in clock speeds, cache, thermal management, and power delivery systems.
By subjecting the CPU to these strenuous conditions, stress testing aids in identifying potential weaknesses or vulnerabilities that may affect system performance, particularly in tasks such as gaming, video editing, or data processing. It assists enthusiasts, overclockers, and professionals optimize their systems and ensure long-term stability.
CPU Stress Testing Tools To Unleash Your CPU’s Power
1. Prime95
When it comes to pushing your CPU to its limits and ensuring its stability, Prime95 stands as an unparalleled stress-testing tool. Developed by George Woltman, this software has gained recognition among tech enthusiasts and professionals for its exceptional capabilities.
At its core, Prime95 utilizes the Fast Fourier Transform (FFT) algorithm to stress test the central processing unit. Subjecting the CPU to intense mathematical computations exposes any weaknesses or instabilities within the system.
With its extensive set of customizable options, including test duration and stress levels, this tool offers a precise and comprehensive analysis of the CPU’s performance.
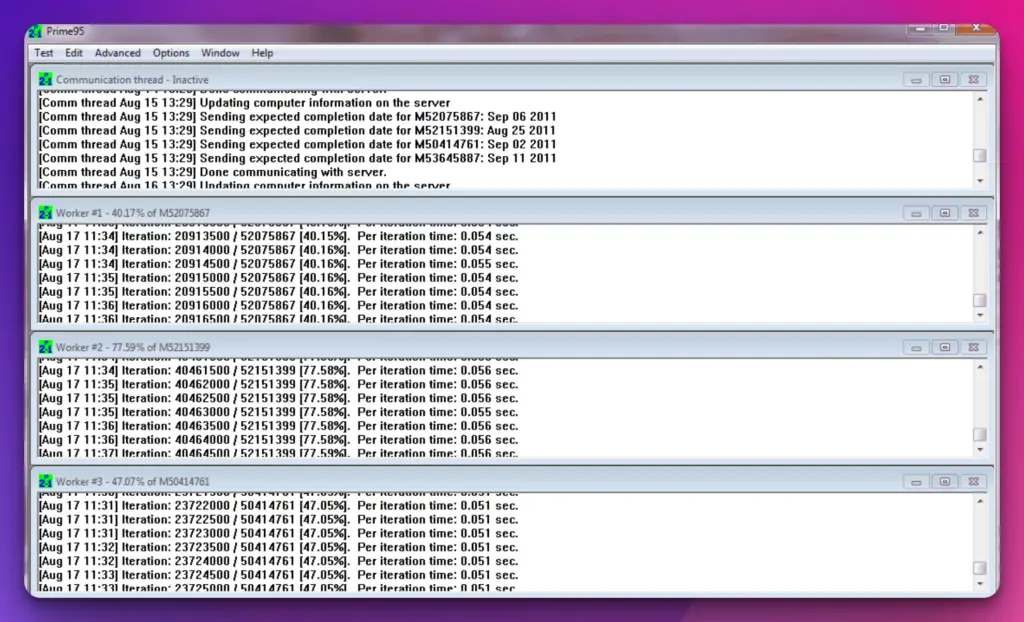
During the stress test, Prime95 meticulously evaluates various aspects of the CPU, such as thermal dissipation, power consumption, and multi-threaded processing efficiency.
This thorough assessment enables users to identify potential bottlenecks, overheating issues, or inadequate cooling solutions. Furthermore, Prime95 facilitates the identification of hardware defects and compatibility issues, ensuring optimal system functionality.
One noteworthy feature of Prime95 is its ability to detect rounding errors in floating-point calculations. These errors, often elusive and difficult to uncover, can compromise the accuracy of scientific computations. Prime95 unveils these rounding errors by intensively stressing the CPU, allowing users to fine-tune their hardware and achieve precise results.
In conclusion, Prime95 is an invaluable tool for CPU stress testing, surpassing conventional methods with its comprehensive analysis and detection capabilities. Its effectiveness in evaluating CPU performance and uncovering system vulnerabilities solidifies its place as an essential component of any enthusiast’s or professional’s toolkit.
Features:-
Fast Fourier Transform (FFT) Algorithm: Utilizes the power of FFT algorithm to stress test the CPU and identify potential weaknesses or instabilities within the system.
Customizable Options: Offers a wide range of customizable options, including test duration and stress levels, allowing users to tailor the stress test according to their specific requirements.
Thorough Assessment: Evaluates various aspects of the CPU, such as thermal dissipation, power consumption, and multi-threaded processing efficiency, providing a comprehensive analysis of the system’s performance.
Identification of Hardware Defects: Assists in identifying hardware defects and compatibility issues, ensuring optimal system functionality and preventing potential failures.
Detection of Rounding Errors: Unveils elusive rounding errors in floating-point calculations, enabling users to fine-tune their hardware and achieve precise and accurate results in scientific computations.
Real-world Stress Testing: Pushes the CPU to its limits, replicating real-world scenarios and providing a realistic system stability and performance measure.
Established Reputation: Gained recognition among tech enthusiasts and professionals for its effectiveness and reliability as a CPU stress testing tool.
Continuous Development: Continuously updated and improved by developer George Woltman, ensuring it remains at the forefront of CPU stress testing technology.
Integration with Benchmarking Tools: Compatible with benchmarking software, allowing users to assess their CPU’s performance relative to other systems and establish performance benchmarks.
Essential Toolkit Component: An essential component of enthusiasts, overclockers, and professionals seeking to optimize their CPU’s performance and ensure system stability.
Pros:-
Comprehensive Analysis: Prime95 thoroughly assesses the CPU, including aspects like thermal dissipation, power consumption, and multi-threaded processing efficiency, giving users a comprehensive understanding of their system’s performance.
Precise Customization: The software offers a range of customizable options, allowing users to tailor the stress test according to their specific needs, including test duration and stress levels.
Detection of Hardware Issues: Prime95 effectively identifies hardware defects and compatibility issues, helping users address potential problems and ensure optimal system functionality.
Unveiling Rounding Errors: The tool’s intensive stress testing can detect rounding errors in floating-point calculations, enabling users to fine-tune their hardware and achieve more accurate scientific computations.
Realistic Stress Simulation: Prime95 pushes the CPU to its limits, simulating real-world scenarios and providing a realistic measure of system stability, ensuring it can handle demanding tasks.
Cons:-
Intensive Resource Usage: Since Prime95 stresses the CPU to its maximum potential, it consumes many system resources, which may cause temporary performance degradation or high power consumption during the test.
Complexity for Beginners: The software’s wide range of options and technical nature might be overwhelming for beginners or those unfamiliar with stress testing, requiring some learning curve and research to utilize it effectively.
Limited Scope: While Prime95 excels at stress testing CPUs, it may not comprehensively evaluate other system components, such as graphics cards or memory modules. Additional tools may be necessary for a holistic system assessment.
Potential Heat Generation: The stress testing process can generate excessive heat, especially when combined with inadequate cooling solutions, potentially leading to higher CPU temperatures and the need for appropriate thermal management.
Lack of User-Friendly Interface: Prime95’s user interface is utilitarian and lacks modern design elements, which may make it less intuitive or visually appealing for some users. However, its functionality remains robust.
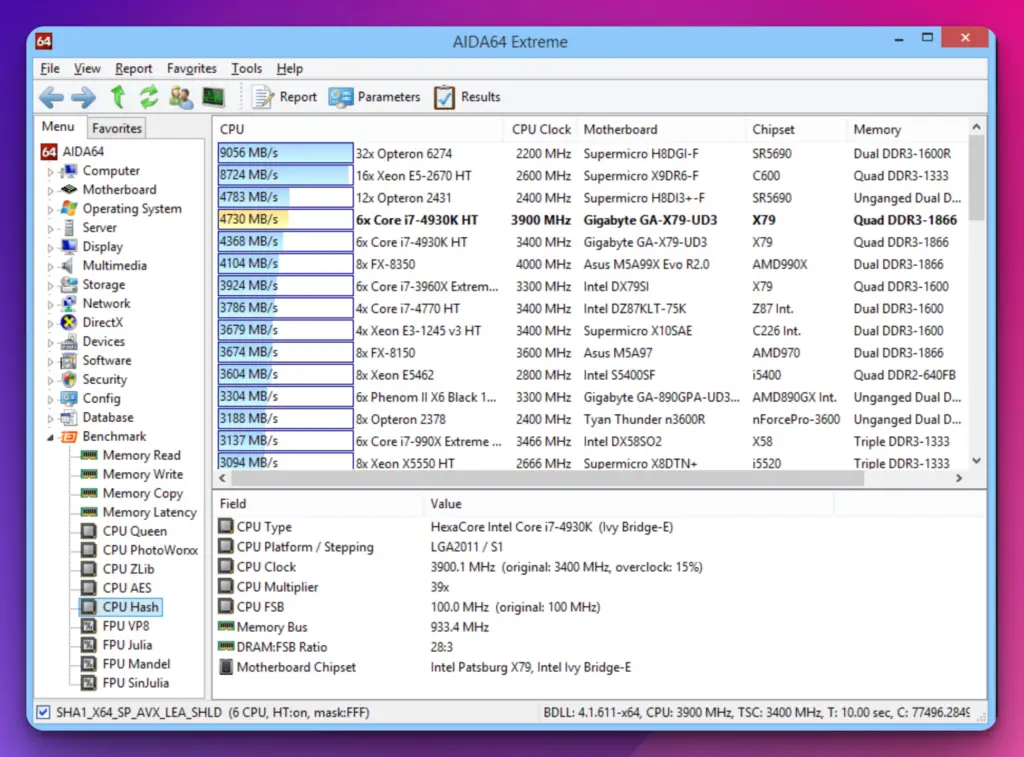
2. AIDA64 Extreme
When it comes to system analysis and benchmarking, AIDA64 Extreme stands as a formidable tool in the realm of computer diagnostics.
Developed by FinalWire Ltd., this comprehensive software offers an array of features that empower enthusiasts, overclockers, and IT professionals to delve into the intricate details of their systems. At its core, AIDA64 Extreme provides a multifaceted approach to system assessment.
Its sophisticated diagnostic modules meticulously examine various hardware components, including the CPU, GPU, RAM, and storage devices, unearthing crucial performance, temperature, and stability information.
This wealth of data empowers users to identify bottlenecks, troubleshoot issues, and optimize their systems precisely.
One of the key strengths of AIDA64 Extreme lies in its ability to conduct comprehensive benchmarking. It generates insightful reports on its capabilities and performance by subjecting the hardware to tests. From CPU and FPU benchmarks to memory and disk tests, this software leaves no stone unturned, ensuring a meticulous evaluation of the system’s potential.
Additionally, AIDA64 Extreme boasts a user-friendly interface, providing a seamless experience even for novices. Its intuitive layout and navigation allow users to effortlessly explore the vast array of information at their fingertips.
Furthermore, with its extensive hardware database and compatibility with the latest technologies, this tool ensures that users receive accurate and up-to-date information about their systems.
In conclusion, AIDA64 Extreme emerges as an indispensable companion for anyone seeking to uncover the inner workings of their computer.
Its comprehensive diagnostics, benchmarking capabilities, and user-friendly interface make it valuable for enthusiasts, overclockers, and IT professionals. With AIDA64 Extreme, the power to unlock your system’s true potential lies at your fingertips.
Features:-
Comprehensive System Analysis: Provides detailed information and analysis of various system components, including the CPU, GPU, memory modules, and storage devices, delivering a comprehensive overview of the system’s architecture.
Rigorous Stress Testing: Conducts thorough stress tests to evaluate the system’s stability and endurance under heavy workloads, ensuring optimal performance and reliability.
Real-Time Monitoring: Offers real-time monitoring of crucial system parameters, such as temperatures, voltage levels, and fan speeds, allowing users to keep a close eye on their system’s health and make informed decisions.
Benchmarking Capabilities: Enables benchmarking of various system components, providing comparative performance data to gauge the system’s capabilities against industry standards and other systems.
Customizable Reports: Generates detailed and customizable reports, allowing users to analyze system data, troubleshoot issues, and share information with technical support or fellow enthusiasts.
Hardware and Software Inventory: Provides comprehensive information about installed hardware and software, facilitating inventory management and ensuring compatibility with software requirements.
Extensive Sensor Support: Supports a wide range of sensors, enabling accurate monitoring of system parameters and ensuring compatibility with various hardware configurations.
Multi-Language Support: Offers support for multiple languages, catering to a diverse user base and enhancing accessibility for users worldwide.
Intuitive User Interface: Presents a user-friendly and intuitive interface, allowing beginners and experienced users to seamlessly navigate the software’s features and capabilities.
Regular Updates: Receives regular updates and enhancements from FinalWire Ltd., ensuring users have access to the latest features and compatibility with new hardware technologies.
Pros:-
Comprehensive System Analysis: AIDA64 Extreme provides in-depth information and analysis of various system components, offering a holistic view of the computer’s hardware and software.
Versatile Stress Testing: The software allows rigorous stress testing, enabling users to evaluate system stability and performance under heavy workloads, ensuring reliability and endurance.
Real-time Monitoring: AIDA64 Extreme offers real-time monitoring of essential system parameters, providing users with up-to-date information on temperatures, voltage levels, and fan speeds for proactive system management.
Benchmarking Capabilities: The benchmarking feature allows users to compare their system’s performance against industry standards and other systems, helping identify improvement and optimization areas.
Customizable Reports: AIDA64 Extreme generates detailed and customizable reports, empowering users to analyze system data, troubleshoot issues, and share information with technical support or other stakeholders.
Cons:-
Complexity for Novice Users: The software’s extensive features and technical nature might be overwhelming for novice users or those with limited technical knowledge, requiring some learning curve and research to utilize it effectively.
Premium Version Required for Advanced Features: While AIDA64 Extreme offers a wide range of features, some advanced functionalities and capabilities may be limited to the premium version, which requires a separate purchase.
Limited Scope: Although AIDA64 Extreme provides comprehensive system analysis, it focuses primarily on hardware diagnostics and may not delve deeply into software-related issues or optimization.
Resource Consumption: The software may consume significant system resources, especially during stress testing and real-time monitoring, potentially impacting overall system performance or causing temporary slowdowns.
Platform Compatibility: AIDA64 Extreme is primarily designed for Windows-based systems, which may limit its usability for users operating on different platforms or seeking cross-platform compatibility.
3. IntelBurnTest
In the realm of CPU stress testing, one tool that stands out is IntelBurnTest. Created to assess the limits of your processor’s capabilities, this powerful software pushes your hardware to its boundaries, unveiling its true potential. Designed specifically for Intel processors, IntelBurnTest is a go-to choice for enthusiasts, overclockers, and system stability enthusiasts.
The primary goal of IntelBurnTest is to subject your CPU to extreme stress levels. Using Linpack, a powerful mathematical software library, generates complex calculations that place an immense load on your processor.
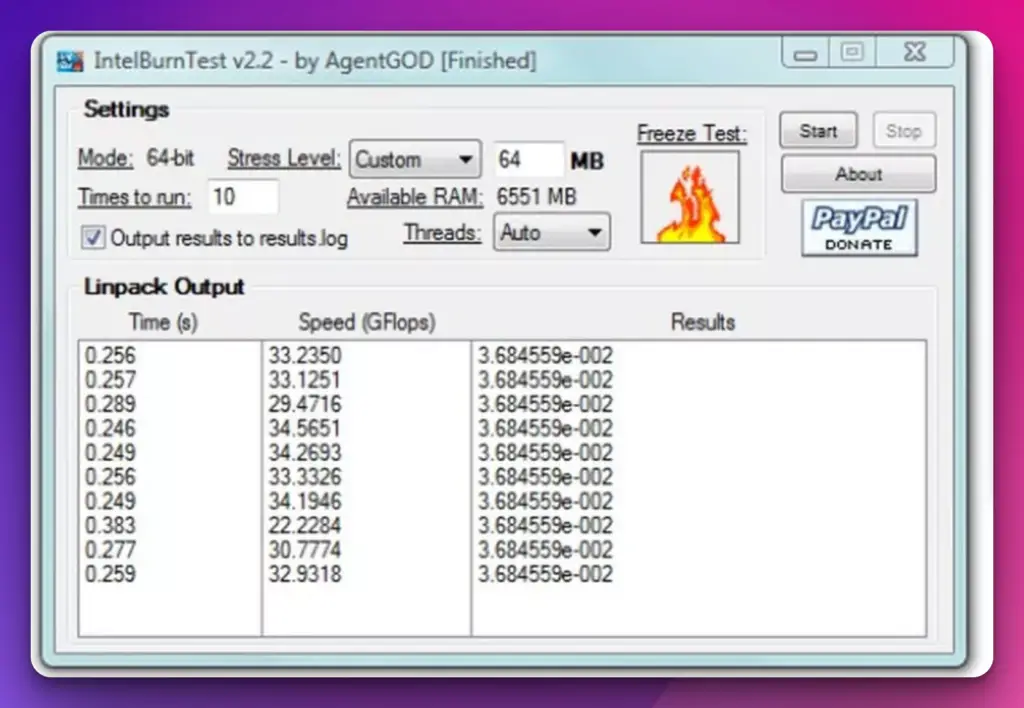
This dramatically increases temperature and power consumption, simulating the most demanding scenarios your CPU may encounter.
With IntelBurnTest, you can choose between different stress levels, such as Standard, High, or Very High, depending on how much you want to push your CPU.
This flexibility allows you to tailor the stress testing experience to your specific needs, whether testing for system stability, assessing the effectiveness of cooling solutions, or striving for maximum overclocking performance.
One of the key advantages of IntelBurnTest is its ability to detect system instability rapidly. Utilizing stress testing techniques that push your CPU to its absolute limits effectively exposes any weaknesses or errors in your system’s configuration.
This makes it an invaluable tool for troubleshooting, ensuring your system remains stable even under the most demanding workloads.
In conclusion, IntelBurnTest is a formidable tool for those seeking to push their CPUs to the brink. Its ability to generate intense stress, identify system instability, and fine-tune overclocking performance makes it a go-to choice for enthusiasts and overclockers.
With IntelBurnTest, you can unleash the full potential of your CPU and ensure optimal system performance.
Features:-
Intense CPU Stress Testing: Utilizes sophisticated algorithms and the Linpack benchmark to subject Intel processors to intense workloads, maximizing power consumption and heat generation for comprehensive stress testing.
Full Core Utilization: Ensures every CPU core is fully utilized, pushing the processor to its limits and uncovering potential system instabilities or overheating issues.
Efficient Testing Time: Offers quick and efficient stress testing compared to other tools. This reduces testing time while maintaining high accuracy, thanks to Intel’s Advanced Vector Extensions (AVX) that accelerate floating-point operations.
Optimized for Intel Processors: Leverages Intel-specific optimizations, including the Intel Math Kernel Library (MKL), to extract maximum performance from Intel processors and provide accurate stress testing results.
Multi-Run Functionality: Allows users to perform multiple test runs, enabling assessment of long-term system stability and identification of recurring issues, particularly beneficial for overclockers and system builders.
Detailed Results Reporting: Provides detailed reports on stress test results, including CPU temperatures, performance metrics, and any detected errors or instability, facilitating analysis and troubleshooting.
User-Friendly Interface: Features a user-friendly interface, making it accessible to both beginners and experienced users, with intuitive controls and clear progress indicators.
Supports Multiple Intel CPU Generations: Compatible with a wide range of Intel processors, supporting various generations and architectures, ensuring broad usability for Intel-based systems.
Reliable and Trusted: Developed by AgentGOD, IntelBurnTest has gained a reputation for its reliability and accuracy, trusted by overclockers, enthusiasts, and professionals in evaluating CPU performance and system stability.
Pros:-
Intense Stress Testing: IntelBurnTest puts Intel processors through intense workloads, maximizing power consumption and heat generation, and providing thorough stress testing for system evaluation.
Efficiency: The tool offers quick and efficient stress testing compared to other solutions, reducing testing time while maintaining high accuracy.
Intel-Specific Optimizations: IntelBurnTest leverages Intel-specific optimizations, such as the Intel Math Kernel Library (MKL) and Advanced Vector Extensions (AVX), to extract maximum performance and stress the CPU effectively.
Multi-Run Functionality: Users can perform multiple test runs to assess long-term system stability, allowing for the identification of recurring issues and fine-tuning of hardware configurations.
Detailed Reporting: IntelBurnTest provides detailed reports on stress test results, including CPU temperatures, performance metrics, and error detection, facilitating analysis and troubleshooting.
Cons:-
Limited to Intel Processors: The tool is specifically designed for Intel processors, limiting its usability for users with non-Intel CPU architectures.
Focused on CPU Testing: While IntelBurnTest excels at CPU stress testing, it may not provide extensive evaluations of other system components, such as graphics cards or memory modules.
Advanced Technical Knowledge Required: Proper utilization of IntelBurnTest may require technical knowledge and understanding of CPU stress testing, which could be challenging for novice users.
Intense Resource Usage: The stress testing process can result in high power consumption and heat generation, which may put strain on the system’s cooling capabilities and impact overall system performance.
No Frequent Updates: IntelBurnTest may not receive frequent updates or ongoing development, which could result in limited compatibility with newer CPU architectures or features.
4. Cinebench
Regarding CPU benchmarking in digital content creation, Cinebench stands as an industry-standard tool that artists, animators, and designers rely upon.
Developed by MAXON, this powerful software enables users to measure the raw processing power of their CPUs, providing invaluable insights into performance capabilities.
At its core, Cinebench utilizes the rendering engine of Cinema 4D, a renowned 3D animation software, to evaluate a system’s CPU performance.
Simulating complex rendering tasks and calculating the time required to complete them generates scores that reflect the speed and efficiency of a CPU in handling intensive creative workloads.
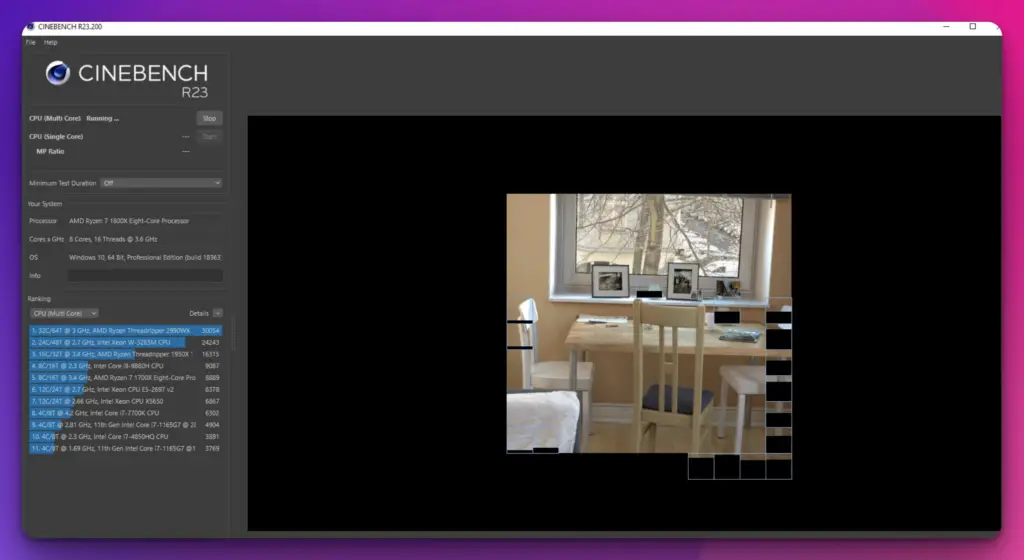
One of the key advantages of Cinebench is its accuracy and reliability. Its tests are designed to stress every CPU core, evaluating both single-threaded and multi-threaded performance.
This comprehensive approach ensures that users receive a holistic assessment of their CPU’s capabilities, allowing them to make informed decisions regarding system upgrades or optimizations. Furthermore, Cinebench provides a user-friendly interface, allowing users to navigate the benchmarking process easily.
Users can initiate the tests with a few simple clicks and obtain results that showcase their CPU’s performance in real-world scenarios. This information can be particularly useful for professionals who rely heavily on CPU-intensive tasks, such as 3D rendering, video editing, or simulation.
In conclusion, Cinebench is an essential tool for digital creatives seeking to harness the full potential of their CPUs. Its accurate and comprehensive benchmarking capabilities and user-friendly interface make it an indispensable asset in performance evaluation.
With Cinebench, artists and designers can confidently optimize their systems and ensure seamless productivity in their creative endeavors.
Features:-
Realistic Rendering Benchmark: Utilizes the Maxon Cinema 4D engine to execute demanding rendering tasks, providing a realistic benchmark for evaluating CPU performance in 3D graphics and visual effects.
Single-Core and Multi-Core Evaluation: Measures the performance of both single-core and multi-core processing, offering insights into the efficiency and scalability of CPUs.
Reliable and Repeatable Results: Adheres to strict industry standards and employs real-world rendering scenarios, ensuring reliable and repeatable benchmark results for accurate performance comparisons.
User-Friendly Interface: Features a user-friendly interface that simplifies the benchmarking process, allowing users to easily initiate tests, monitor progress, and obtain detailed results.
Industry-Standard Tool: Trusted by professionals in 3D graphics and visual effects, Cinebench provides a standardized tool for comparing and selecting hardware based on rendering performance.
Accurate Performance Metrics: Generates detailed results showcasing rendering performance, including scores and frame rates, enabling informed decision-making for hardware upgrades and system optimization.
Wide Compatibility: Compatible with a wide range of hardware configurations, supporting both Windows and macOS operating systems, providing broad accessibility for users.
Benchmark Comparisons: Allows users to compare benchmark results with other systems or industry standards, assisting in evaluating the relative performance of CPUs and identifying areas for improvement.
Resource Efficient: Designed to maximize the utilization of CPU resources without excessive strain on other system components, ensuring efficient benchmarking without compromising system stability.
Regular Updates: Receives regular updates from MAXON, ensuring compatibility with new hardware technologies and providing users with the latest features and optimizations.
Pros:-
Realistic Rendering Benchmark: Cinebench utilizes the powerful Maxon Cinema 4D engine, providing a realistic rendering benchmark that accurately evaluates CPU performance in 3D graphics and visual effects.
Reliable and Repeatable Results: Cinebench adheres to strict industry standards and employs real-world rendering scenarios, delivering reliable and repeatable benchmark results for accurate performance comparisons.
Wide Acceptance and Standardization: Cinebench has gained wide acceptance and is recognized as a standard tool for benchmarking and comparing CPU performance in 3D graphics and visual effects.
User-Friendly Interface: The user-friendly interface of Cinebench simplifies the benchmarking process, making it accessible for users to initiate tests, monitor progress, and obtain detailed results.
Resource Efficient: Cinebench maximizes CPU resource utilization without excessive strain on other system components, ensuring efficient benchmarking without compromising system stability.
Cons:-
Focus on Rendering Performance: Cinebench primarily focuses on rendering performance, and may not provide a comprehensive evaluation of other aspects of CPU performance or system components.
Limited Applicability: Cinebench is specifically tailored for 3D graphics and visual effects, and may not be as relevant or useful for users outside of that domain.
Single Application Dependency: The benchmark relies on the Maxon Cinema 4D engine, which may limit the scope of its testing and not fully represent the performance of CPUs in all applications or workloads.
Less Suitable for General Performance Comparison: While Cinebench excels in evaluating rendering performance, it may not be the ideal benchmark for general CPU performance comparisons across different applications or usage scenarios.
Lack of Real-Time Monitoring: Cinebench does not offer real-time monitoring features, limiting its ability to provide instant feedback on CPU performance during the benchmarking process.
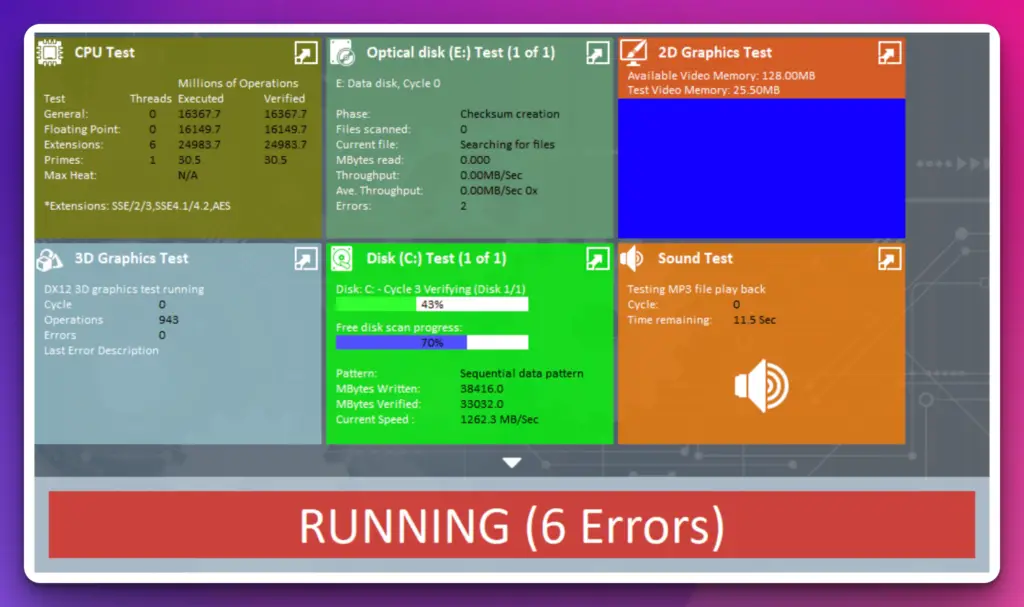
5. OCCT
Regarding rigorous system stress testing and precise error checking, OCCT is a formidable tool in the arsenal of enthusiasts, overclockers, and system stability enthusiasts. Developed by OCCT Development, this software provides a suite of features that enable users to push their systems to the limits and ensure optimal performance.
At its core, OCCT excels in stress testing multiple system components, including the CPU, GPU, and power supply. By subjecting these crucial components to intense workloads and simulating extreme scenarios, OCCT reveals any weaknesses or instability in the system’s configuration.
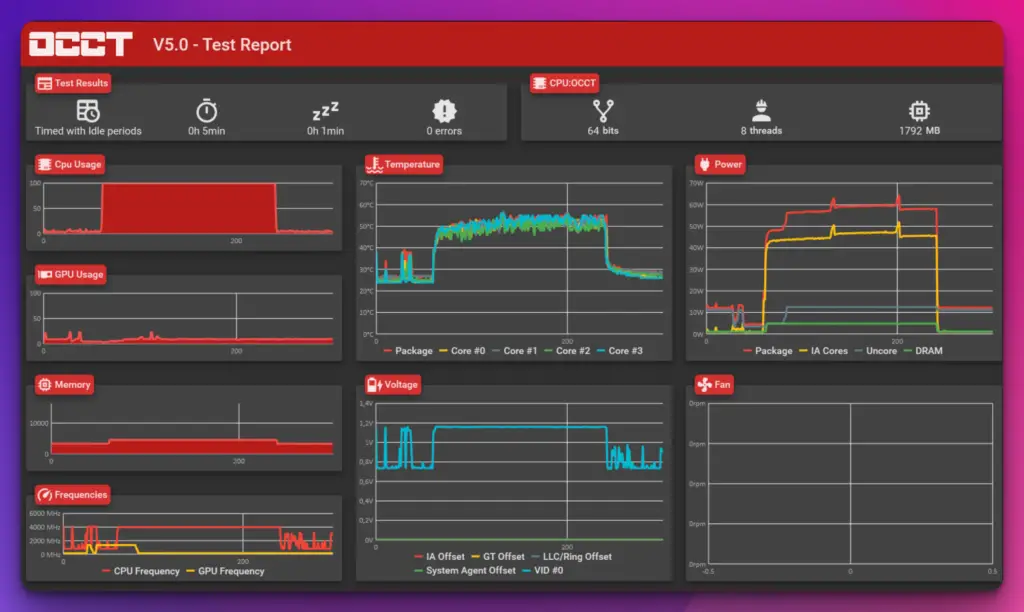
This comprehensive stress testing empowers users to fine-tune their systems for maximum performance and stability. In addition to stress testing, OCCT offers advanced error-checking capabilities.
During stress tests, it can detect anomalies or irregularities indicating system instability or potential hardware issues by meticulously monitoring voltages, temperatures, and other key parameters.
This proactive error checking helps users identify and address problems before they can escalate and cause system failures. With its intuitive interface and customizable testing options, OCCT provides a user-friendly experience for novice and experienced users.
Its ability to generate detailed reports and real-time monitoring data allows users to gain valuable insights into their system’s performance and pinpoint areas for improvement.
In conclusion, OCCT is a powerful system stress testing and error-checking tool. Its comprehensive testing capabilities, advanced error detection, and user-friendly interface make it an essential companion for enthusiasts and overclockers seeking optimal system performance and stability.
With OCCT, you can push your system to the limits and ensure a smooth and reliable computing experience.
Features:-
Comprehensive Stress Testing: OCCT provides comprehensive stress testing for both CPUs and GPUs, allowing users to evaluate stability, thermal characteristics, and performance limits of their hardware.
Error Detection and Monitoring: The software detects errors and instabilities through rigorous testing and real-time monitoring of temperatures, voltages, and fan speeds, providing users with detailed reports and graphs for analysis.
CPU and GPU Testing: OCCT offers specific tests for both CPUs (Linpack) and GPUs (3D), ensuring thorough evaluation of each component’s capabilities and potential issues.
Customizable Testing Options: Users can customize stress tests by adjusting test duration, stress levels, and even perform multi-threaded testing, catering to specific requirements and workload scenarios.
Real-Time Monitoring: OCCT provides real-time monitoring of critical parameters, enabling users to observe temperature fluctuations, voltage stability, and fan performance during stress testing.
Graphical Results and Reporting: The software generates detailed reports and graphs illustrating stress test results, aiding in analysis, troubleshooting, and tracking performance over time.
Compatibility and Cross-Platform Support: OCCT supports various hardware configurations and is available for both Windows and Linux platforms, ensuring broad compatibility and accessibility for users.
Multi-Language Support: OCCT offers support for multiple languages, enhancing accessibility for users worldwide.
User-Friendly Interface: OCCT features a user-friendly interface, allowing users to navigate the software’s features and functionalities easily.
Continuous Development: OCCT receives regular updates from OCbase, ensuring compatibility with new hardware technologies, bug fixes, and adding new features to enhance the testing experience.
Pros:-
Comprehensive Stress Testing: OCCT provides comprehensive stress testing for both CPUs and GPUs, ensuring a thorough evaluation of hardware stability, thermal characteristics, and performance limits.
Real-Time Monitoring: The software offers real-time monitoring of critical parameters such as temperatures, voltages, and fan speeds, allowing users to observe and analyze system behavior during stress testing.
Customizable Testing Options: OCCT allows users to customize stress tests by adjusting parameters like duration, stress levels, and multi-threaded testing, providing flexibility to cater to specific requirements.
Error Detection and Reporting: OCCT detects errors and instabilities during stress testing, generating detailed reports and graphs that aid in analysis, troubleshooting, and tracking performance over time.
Compatibility and Cross-Platform Support: OCCT supports various hardware configurations and is available for both Windows and Linux platforms, ensuring broad compatibility and accessibility.
Cons:-
Steep Learning Curve: OCCT’s advanced features and technical nature may require technical knowledge and familiarity with stress testing, making it less suitable for novice users.
Resource Intensive: OCCT’s stress tests can consume a significant amount of system resources, leading to increased power consumption, heat generation, and potential system performance impact during testing.
Limited Scope: While OCCT excels in stress testing CPUs and GPUs, it may not provide comprehensive evaluations of other system components, such as memory modules or storage devices.
No Frequent Updates: OCCT may not receive frequent updates or ongoing development, resulting in limited compatibility with new hardware technologies or a lack of additional features and improvements over time.
No Mac Support: OCCT is currently unavailable for macOS, limiting its usage to only Windows and Linux platforms.
6. PassMark BurnInTest
PassMark BurnInTest is an invaluable tool for enthusiasts, IT professionals, and system builders regarding comprehensive system stress testing and evaluating your hardware’s reliability.
Developed by PassMark Software, this software unleashes a battery of tests that push your system to its limits, ensuring its stability and performance under extreme conditions.
At the heart of PassMark BurnInTest lies its ability to subject your system to intense workloads and stress-inducing scenarios. With a wide range of tests covering the CPU, RAM, hard drives, graphics cards, and more, this software pushes each component to its maximum potential, identifying any weaknesses or potential points of failure.
By simulating real-world workloads and putting your system through rigorous tests, PassMark BurnInTest highlights any instabilities, overheating issues, or compatibility problems that may arise. Its extensive testing capabilities ensure that your system is reliable, efficient, and capable of easily handling demanding tasks.
One of the key strengths of PassMark BurnInTest lies in its customizable testing options. Users can choose specific tests, duration, and parameters to tailor the stress testing experience to their unique requirements. This allows for targeted evaluations and optimization of specific hardware components.
In conclusion, PassMark BurnInTest is a vital tool for ensuring the reliability and performance of your system. With its comprehensive stress testing, customizable options, and ability to uncover potential issues, this software provides the peace of mind that your hardware is up to the task.
With PassMark BurnInTest, you can push your system to the limits, guaranteeing its stability and readiness for demanding workloads.
Features:-
Comprehensive System Stability Testing: PassMark BurnInTest offers comprehensive testing for various system components, including the CPU, GPU, memory modules, and hard drives, ensuring thorough system stability evaluation.
Real-World Scenario Simulation: The software employs test patterns, algorithms, and benchmarks that simulate real-world workloads, enabling users to assess system performance and reliability under demanding conditions.
Advanced Stress Testing: PassMark BurnInTest subjects system components to intense workloads, uncovering potential issues such as overheating, hardware failures, or compatibility problems that may arise during demanding usage.
Detailed Reporting and Analysis: The software generates comprehensive reports with temperature readings, performance metrics, error logs, and system stability measurements, aiding in diagnosing hardware issues and optimizing system performance.
Customizable Testing Options: PassMark BurnInTest offers customizable testing options, allowing users to tailor the testing parameters and duration to meet their specific requirements.
Multi-Platform Support: The software is compatible with various platforms, including Windows, Linux, and macOS, providing flexibility and accessibility for users on different operating systems.
Extensive Component Testing: PassMark BurnInTest covers a wide range of system components, including CPU, GPU, memory, hard drives, and more, ensuring comprehensive testing and evaluation of the entire system.
Stress Testing Tools and Patterns: The software provides various stress testing tools and patterns to apply different types of loads on system components, assisting in identifying weaknesses and ensuring stability.
Reliable and Trusted: PassMark BurnInTest is developed by PassMark Software, a reputable name in the industry, known for delivering reliable and accurate testing solutions.
Continuous Development: PassMark BurnInTest receives regular updates, ensuring compatibility with new hardware technologies and providing users with the latest features and improvements.
Pros:-
Comprehensive System Testing: PassMark BurnInTest allows for comprehensive testing of various system components, ensuring a thorough evaluation of system stability, performance, and reliability.
Real-World Scenario Simulation: The software simulates real-world workloads, giving users a realistic assessment of system performance and reliability under demanding conditions.
Detailed Reporting and Analysis: PassMark BurnInTest generates comprehensive reports with temperature readings, performance metrics, error logs, and system stability measurements, aiding in diagnosing hardware issues and optimizing system performance.
Customizable Testing Options: The software offers customization options, allowing users to tailor the testing parameters and duration to meet their specific requirements.
Multi-Platform Support: PassMark BurnInTest is compatible with various platforms, including Windows, Linux, and macOS, providing flexibility and accessibility for users on different operating systems.
Cons:-
Steep Learning Curve: PassMark BurnInTest may have a steep learning curve for novice users or those with limited technical knowledge, requiring some familiarity with stress testing and system diagnostics.
Resource Intensive: The stress tests conducted by PassMark BurnInTest can consume significant system resources, including CPU usage, power consumption, and heat generation, which may impact overall system performance.
Limited Scope: While PassMark BurnInTest covers a wide range of system components, it may not provide comprehensive evaluations of certain specialized hardware or software configurations.
Paid Software: PassMark BurnInTest is a paid software, and the advanced features may require a commercial license, which may not be suitable for users looking for free or open-source alternatives.
No Frequent Updates: PassMark BurnInTest may not receive frequent updates or ongoing development, which could result in limited compatibility with new hardware technologies or a lack of additional features and improvements over time.
Different Types of CPU Stress Tests
When it comes to pushing your CPU to its limits and assessing its true capabilities, various types of CPU stress tests come into play.
These tests are valuable tools for gauging performance, stability, and the ability to handle intense workloads. Let’s explore some of the different types of CPU stress tests.
Burn-in Tests:- Burn-in tests subject the CPU to a sustained heavy load for an extended period, aiming to identify any potential hardware flaws or weaknesses. These tests can be particularly useful during the initial stages of a system build or overclocking experiment.
Floating Point Tests:- These tests primarily focus on assessing the CPU’s ability to perform complex mathematical calculations, especially those involving floating-point operations. They stress the CPU’s arithmetic and floating-point processing capabilities.
Prime Number Tests:- Prime number tests, such as the well-known Prime95, stress the CPU by engaging it in intense calculations related to prime numbers. These tests are excellent for evaluating the CPU’s integer calculation capabilities and its efficiency in handling algorithmic tasks.
Multi-Core Tests: Multi-core stress tests target the CPU’s multi-threading capabilities by simultaneously subjecting each core to heavy workloads. These tests effectively simulate real-world scenarios where multiple demanding applications are running concurrently.
Real-time Application Tests involve running resource-intensive applications or games that significantly strain the CPU. Simulating real-life workloads provides valuable insights into the CPU’s performance and responsiveness in practical scenarios.
Power and Thermal Tests:- Power and thermal stress tests evaluate the CPU’s power consumption and temperature under heavy workloads. They help identify potential thermal issues, cooling deficiencies, or power inefficiencies that could impact long-term performance and stability.
Advanced CPU Stress Testing Techniques
When it comes to pushing the boundaries of your CPU and truly exploring its capabilities, advanced CPU stress testing techniques are essential. These techniques allow you to delve deeper into your processor’s performance, stability, and overclocking potential.
Here are some of the most effective advanced CPU stress testing methods.
Extreme Overclocking:- Extreme overclocking involves pushing the CPU beyond its factory-set limits by increasing the clock speed and voltage. This technique requires specialized cooling solutions and meticulous attention to detail to ensure the system remains stable under increased stress.
Multithreaded Stress Testing:- Multithreaded stress tests exploit the full power of modern CPUs with multiple cores and threads. These tests simulate heavy workloads by running demanding applications or specialized stress test programs that efficiently utilize multiple threads. This approach allows you to assess the CPU’s performance under intense multitasking scenarios.
Power Virus Testing:- Power virus stress tests aim to measure the CPU’s power consumption and thermal performance by subjecting it to high-intensity workloads.
These tests simulate worst-case scenarios, pushing the CPU to its limits to assess its power efficiency, heat dissipation, and stability under extreme conditions.
Real-Time Rendering Tests:- Real-time rendering stress tests utilize graphics-intensive applications or benchmarking tools that heavily rely on the CPU’s rendering capabilities. These tests evaluate the CPU’s performance in handling complex graphics calculations, shader processing, and rendering tasks.
Customized Workload Simulations:- Advanced users can create customized workload simulations tailored to specific use cases or applications. This involves designing test scenarios that mimic the real-world demands of your intended CPU usage, allowing you to accurately assess performance and stability under targeted workloads.
By employing these advanced CPU stress testing techniques, you can unlock your processor’s full potential, identify system limitations, and fine-tune the performance for optimal results.
Remember to exercise caution and closely monitor temperatures and voltage levels during stress testing to ensure the safety of your hardware.
A Step-By-Step Guide To Performing a Stress Test
Performing a stress test on your CPU is crucial in evaluating its performance, stability, and overall capabilities.

Following this step-by-step guide, you can conduct an effective stress test to uncover potential bottlenecks and ensure your system is up to the task.
1. Select a Reliable Stress Testing Tool:- Choose a reputable stress testing tool that suits your requirements. Popular options include Prime95, AIDA64, and Intel Burn Test.
2. Prepare Your System:- Ensure your system is ready for the stress test by closing unnecessary applications, updating drivers, and monitoring temperatures. A stable environment is essential for accurate results.
3. Configure Stress Test Parameters:- Set the desired stress test parameters such as workload intensity, test duration, and a number of threads. Adjust these settings based on your specific goals and the capabilities of your CPU.
4. Run the Stress Test: Initiate and monitor the CPU’s performance metrics, such as temperature, clock speed, and voltage, using monitoring software or the stress testing tool’s built-in features.
5. Monitor System Stability: Keep a close eye on system stability throughout the test. If you encounter any crashes, freezes, or abnormal behavior, it may indicate instability or hardware issues.
6. Analyze Stress Test Results: Once the stress test completes, analyze the results and examine performance metrics. Look for signs of thermal throttling, excessive temperatures, or inconsistencies that may require further investigation.
7. Interpret the Findings: Interpret the stress test findings and identify any areas for improvement or potential optimizations. Use the data gathered during the test to make informed decisions about system tweaks or hardware upgrades.
Following this step-by-step guide, you can perform a comprehensive stress test on your CPU, gaining valuable insights into its performance and ensuring a stable and optimized system.
Remember to conduct stress tests responsibly, considering hardware safety and following recommended guidelines to prevent any potential damage.
Best Practices and Safety Measures in CPU Stress Testing
When engaging in CPU stress testing, it is essential to prioritize best practices and safety measures to ensure the well-being of your hardware and maintain a stable system.

By following these guidelines, you can mitigate potential risks and optimize the effectiveness of your stress testing process.
Maintain Proper Cooling:- Heat is a significant byproduct of stress testing. Ensure your CPU has adequate cooling to prevent overheating. High-performance cooling solutions like liquid coolers or robust air coolers can efficiently dissipate heat and maintain optimal temperatures.
Monitor System Temperatures:- Continuously monitor the CPU temperatures during stress testing. Use monitoring software to track temperature levels and avoid surpassing safe thresholds, which could lead to thermal throttling or potential damage to the CPU.
Gradually Increase Stress Levels:- Begin testing with moderate stress levels and gradually increase the intensity. This approach helps identify stability issues in a controlled manner and allows you to take corrective measures before pushing your system to the limits.
Ensure Stable Power Supply:- Unstable or insufficient power supply can jeopardize stress testing. Use a reliable power supply unit (PSU) and connect it securely to your system. Consider investing in a UPS (Uninterruptible Power Supply) to safeguard against power fluctuations or outages.
Backup Critical Data:- Before embarking on a stress test, back up any critical data on your system. While stress testing typically doesn’t involve data loss, it’s better to be prepared and protect important files in case of unexpected issues.
Monitor System Stability:- Monitor system stability throughout the stress testing process. If you encounter system crashes, freezes, or erratic behavior, it may indicate instability or hardware limitations. Take note of these instances for further analysis.
Follow Manufacturer Guidelines:- Adhere to the guidelines provided by your CPU manufacturer regarding stress testing and overclocking.
Manufacturers often specify safe voltage and temperature limits; exceeding these thresholds can void warranties or cause permanent damage.
Real-Life Applications of CPU Stress Testing
CPU stress testing goes beyond benchmarking and performance evaluation; it has numerous real-life applications that can benefit various users and industries.

Let’s explore how CPU stress testing can be valuable in practical scenarios.
Gaming and Graphics-Intensive Applications:- Gamers and professionals working with graphics-intensive applications can utilize CPU stress testing to ensure smooth performance and optimal frame rates.
Stress testing helps identify potential bottlenecks, ensuring the CPU can handle the demands of modern games and complex visual tasks.
Server and Datacenter Optimization:- In server environments, CPU stress testing is crucial in optimizing resource allocation and workload management.
By subjecting servers to stress tests, administrators can assess their capacity, scalability, and reliability, ensuring efficient operation and minimizing the risk of system failures.
Hardware Enthusiasts and Overclockers:- CPU stress testing is a fundamental practice for hardware enthusiasts and overclockers seeking to push their systems to the limit.
Stress tests validate the stability of overclocked configurations and aid in fine-tuning performance by identifying the maximum capabilities of the CPU.
Software Development and Testing:- CPU stress testing is vital in software development and testing, as it helps evaluate how applications perform under heavy workloads.
By subjecting software to stress tests, developers can identify performance issues, optimize resource allocation, and ensure efficient software operation.
Data Analysis and Scientific Computing:- Professionals engaged in data analysis, scientific computing, or complex simulations can benefit from CPU stress testing.
Stress tests validate the CPU’s ability to handle intensive computational tasks, ensuring accurate results and reducing processing time.
IT Infrastructure Validation:- CPU stress testing is essential when validating IT infrastructure, including networking equipment and virtualization platforms.
By simulating demanding workloads, stress tests assess the infrastructure’s ability to handle peak loads, ensuring optimal performance and preventing potential bottlenecks.
📗FAQ’s
What is the best CPU memory stress test?
Some popular options include Prime95, MemTest86, and OCCT (OverClock Checking Tool). These stress tests can help identify stability issues and potential CPU memory performance errors.
How do I run a CPU GPU stress test?
You can use software tools like FurMark or 3DMark to perform a CPU GPU stress test. These programs simultaneously stress the CPU and GPU to assess their performance under heavy loads.
Run the stress test for a sufficient duration to evaluate the stability and temperature of your CPU and GPU.
Is AIDA64 safe?
Yes, AIDA64 is generally considered safe to use. It is a reliable and widely-used diagnostic and benchmarking software that provides detailed information about your computer’s hardware.
How do I know if my CPU is healthy?
To check the health of your CPU, you can monitor its temperature, usage, and performance. Use software tools like HWMonitor or Core Temp to monitor temperature and Task Manager or third-party monitoring applications to observe CPU usage.
It is likely in good health if your CPU remains within safe temperature ranges and performs optimally without excessive slowdowns or errors.
Here’s a table outlining some common signs to help you determine if your CPU is healthy or experiencing issues:-
| Signs of a Healthy CPU | Signs of an Unhealthy CPU |
|---|---|
| Normal operating temperature | Excessive heat or overheating |
| Consistent and stable performance | Frequent system crashes or freezing |
| Efficient processing speed | Slow or sluggish performance |
| Proper functioning of all cores | Inconsistent or erratic core usage |
| No unusual noise or fan speed | Loud or abnormal noise from the CPU or fans |
| No error messages or system instability | Blue screen of death (BSOD) or error messages |
| Normal power consumption | Abnormally high power usage |
| Compatible with the operating system | Incompatibility or driver issues |
| No physical damage or signs of wear | Bent or damaged CPU pins or sockets |
| Properly recognized by the system | CPU not detected or unrecognized by the system |
How hot is too hot for the CPU?
The specific temperature threshold varies depending on the CPU model, but as a general guideline, temperatures above 90°C (194°F) are considered too hot for most CPUs.
Sustained operation at high temperatures can potentially lead to thermal throttling, performance degradation, and even damage to the CPU.
Here’s a table outlining temperature ranges for CPUs and when they might be considered too hot:-
| Temperature Range | Status | Risk |
|---|---|---|
| Below 40°C | Cool | Very Low |
| 40°C – 60°C | Normal | Safe |
| 60°C – 70°C | Warm | Acceptable, but monitor closely |
| 70°C – 80°C | Elevated | Potentially problematic, investigate |
| 80°C – 90°C | Hot | High risk, take action immediately |
| Above 90°C | Very Hot | Critical situation, shut down and cool down |
Does more RAM reduce CPU stress?
More RAM can help reduce the strain on your CPU in certain scenarios. When your system has ample RAM, it can store and access data more quickly, reducing the need for the CPU to fetch data from slower storage devices continuously.
This can improve overall system performance and potentially lower CPU stress, particularly when running memory-intensive tasks or multiple applications simultaneously.
Is there a way to stress test RAM?
You can stress test your RAM using software such as MemTest86 or Windows Memory Diagnostic.
These tools check for errors, stability, and performance issues in your RAM by running comprehensive tests that stress its functionality. Running a RAM stress test can help identify potential problems and ensure the memory modules function correctly.
How do I test my CPU and GPU bottleneck?
To assess if there is a bottleneck between your CPU and GPU, you can monitor their usage during intensive tasks or use software tools like MSI Afterburner or HWiNFO.
If the CPU usage is consistently close to 100% while the GPU remains underutilized, it suggests a CPU bottleneck. Conversely, if the GPU usage reaches close to 100% while the CPU usage is significantly lower, it indicates a GPU bottleneck.
Why is my CPU usage so high?
Several factors can contribute to high CPU usage, including resource-demanding applications or processes running in the background, malware infections, outdated drivers, or system configuration issues.
To identify the cause, check Task Manager or use third-party software to monitor CPU usage and pinpoint the specific processes or applications consuming CPU usage excessively.
Once you identify the culprit, you can take appropriate actions such as closing unnecessary programs, updating drivers, scanning for malware, or optimizing system settings to reduce CPU usage and improve overall performance.
| Possible Reasons for High CPU Usage | Description |
|---|---|
| 1. Background Processes | Background programs or services consuming CPU resources. |
| 2. Malware or Viruses | Malicious software using CPU power without your knowledge. |
| 3. Insufficient RAM | Limited memory causing excessive CPU usage due to swapping. |
| 4. Outdated or Faulty Drivers | Incompatible or malfunctioning device drivers. |
| 5. Overheating | High temperatures triggering CPU throttling. |
| 6. Inefficient Software | Poorly optimized or resource-intensive applications. |
| 7. Multitasking | Running multiple resource-intensive tasks simultaneously. |
| 8. Corrupted System Files | Operating system files that are damaged or missing. |
| 9. Power Settings | Incorrect power settings leading to high CPU usage. |
| 10. Background Updates | Automatic updates or installations consuming CPU power. |
How can I test my CPU and GPU performance?
To test CPU and GPU performance, you can utilize benchmarking software like Geekbench, Cinebench, or 3DMark.
These tools provide standardized tests that measure the capabilities and performance of your CPU and GPU. By running these benchmarks, you can obtain scores or compare results with similar systems to gauge the performance of your CPU and GPU.
Is AIDA64 a good CPU stress test?
AIDA64 is a comprehensive system diagnostic and benchmarking software with CPU stress testing capabilities. It offers various stress test options, such as the CPU, FPU, or cache stress tests, to evaluate the stability and performance of your CPU.
While AIDA64 is popular and widely used, alternative stress test tools are available, and the choice ultimately depends on your specific requirements and preferences.
Can I use AIDA64 for free?
AIDA64 is commercial software, and its full version is not free. However, you can usually find a trial or limited-feature version on the official website that allows you to evaluate its capabilities before purchasing a license.
Remember that the trial version may have certain limitations or restrictions compared to the full version.
What is the lifespan of a CPU?
The lifespan of a CPU depends on various factors, including usage patterns, operating conditions, and technological advancements. In general, modern CPUs are designed to have a lifespan of several years, typically ranging from 5 to 10 years or more.
However, this can vary significantly, and it’s not uncommon for CPUs to remain functional even longer if properly maintained and operated within safe parameters.
| CPU Type | Lifespan |
|---|---|
| Consumer-grade | 5-10 years |
| Server-grade | 7-12 years |
| Mobile CPUs | 2-5 years |
| Overclocked CPUs | Varies significantly |
| Embedded CPUs | 10+ years |
| Wearable CPUs | 2-5 years |
| Industrial CPUs | 10+ years |
How do I know if my CPU needs replacing?
There are a few signs that may indicate the need for CPU replacement. These include frequent system crashes or freezes, persistent overheating issues despite proper cooling, degraded performance in tasks that used to run smoothly, and compatibility limitations with newer software or hardware.
Before deciding to replace the CPU, ensure that you have thoroughly troubleshot and ruled out other potential causes for the observed issues.
Here’s a table summarizing various signs that may indicate your CPU needs replacing:-
| Signs that your CPU may need replacing | Description |
|---|---|
| Frequent system crashes or blue screens | If your computer frequently crashes or shows the infamous blue screen of death (BSOD), it could be a sign of a failing CPU. This can happen due to overheating, age, or other hardware issues that affect CPU stability. |
| Sluggish performance and slow processing | If you notice a significant decrease in your computer’s overall performance, such as slower boot times, application launches, and general processing tasks, it could indicate that your CPU is struggling to handle the workload. |
| High CPU usage and excessive heat | If your CPU usage is consistently high even when the system is idle, or if your computer generates excessive heat, it could be a sign that your CPU is being overloaded or that the cooling system is not functioning properly. |
| Incompatibility with new software or hardware | Upgrading to new software or hardware components may expose compatibility issues with an outdated CPU. If you’re unable to install or run certain programs or devices, it might be time to consider upgrading your CPU. |
| Error messages related to the CPU | If you encounter error messages specifically mentioning CPU-related issues, such as “CPU fan failure,” “CPU not supported,” or “CPU overheating,” it suggests that your CPU is experiencing problems that may require replacement. |
| Outdated and unsupported socket or architecture | If your CPU uses an older socket or architecture that is no longer supported by newer motherboards and software, it can limit your system’s upgradability and performance. In such cases, replacing the CPU becomes necessary. |
| Continuous loud fan noise and excessive fan speed | If your computer’s fans are constantly running at high speeds, producing loud noises, and attempting to cool the system excessively, it may indicate that your CPU is overheating and struggling to dissipate heat efficiently. |
| Age of the CPU | CPUs have a lifespan, and as they age, they may become less efficient and more prone to issues. If your CPU is several years old and you are experiencing performance problems, it might be worth considering a replacement. |
How often should I reapply thermal paste?
The frequency of thermal paste reapplication depends on several factors, such as the type of thermal paste used, operating conditions, and CPU usage.
As a general guideline, it is recommended to reapply thermal paste every 1 to 2 years or whenever you remove the CPU cooler for maintenance or hardware upgrades.
This helps maintain optimal heat transfer between the CPU and the cooler, ensuring efficient cooling performance.
Conclusion
Don’t wait until it’s too late. Conduct a CPU stress test today to ensure your computer can handle the pressure.
Remember, a well-maintained system is key to efficient and hassle-free computing. With regular CPU stress tests, you can secure your data, optimize your system’s performance, and stay ahead of any potential issues.
Don’t let a preventable problem take you by surprise – stay prepared, stay stress-tested.

