


SSH (Secure Shell) is a set of network protocols for securing connections between computers. In plain English, you can use a utility on another device such as a PC to control your Pi as if you were using the Pi’s Terminal directly.
Because your Pi has a default username and password, it could be targeted remotely by a
hacker, and for this reason, SSH is disabled by default. If you can temporarily connect your Pi to a monitor, you can enable SSH.
First, open Terminal and run the following command:
sudo raspi-config
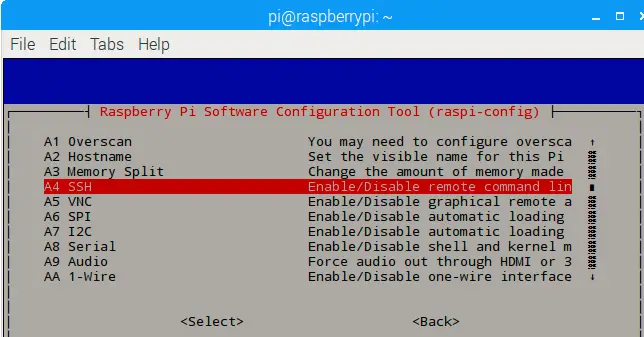
Using your arrow keys, choose Option 5 (Interfacing Options), then select it by pressing Enter.
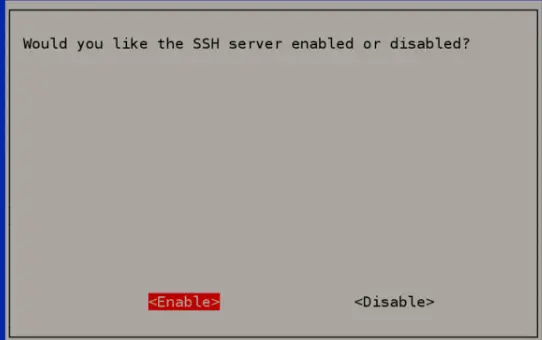
Next, choose Option P2 (SSH). Raspi-config will ask if you’re sure you want to enable.
Press Enter once again to confirm. You will see a confirmation message stating “The SSH
a server is enabled”.
If you do not have a monitor, don’t worry. Power off the Pi, remove its SD card, insert it into a card reader, and plug this into your computer. Find the /boot partition and create a file there named ssh.
You can use a text editor such as Microsoft’s Notepad or Apple’s TextEdit to do this but make sure that the file has no filename extension such as .txt. Safely eject the SD
card and reinsert into your Pi. SSH will now be enabled.
The next time you load the Pi with a monitor attached, you will see a warning that the default password for the Pi user has not been changed from “raspberry”.
To fix this, open Terminal and enter the following command:
sudo passwd pi
You’ll be asked to enter the new password twice. Note that this command itself can also be run over SSH.
Raspberry Pi SSH not working after restart
If your Raspberry Pi won’t allow you to SSH in after a restart, there could be several causes.
To solve the problem, try a few of the following:-
Step 1:– Verify that the Raspberry Pi is turned on and is connected to the internet.
Step 2:- On the Raspberry Pi, check the network connection. The ping command can check whether the Raspberry Pi is reachable on the network.
Step 3:- Verify the Raspberry Pi’s SSH service’s performance. To verify the SSH service’s status, use the systemctl command:
sudo systemctl status ssh
The following command can be used to start the SSH service if it is not already running:
sudo systemctl start ssh
Step 4:– The following command can be used to restart the SSH service if it is currently functioning but you are still unable to connect:
sudo systemctl restart ssh
Step 5:– You might wish to examine Raspberry Pi’s firewall settings if the procedures above do not solve the problem. Check to see if the firewall is preventing incoming SSH connections.
Step 6:- Be sure to use the right IP address and network settings when trying to login over SSH if you’ve recently updated the Raspberry Pi’s IP address or network configuration.
Raspberry Pi headless ssh is not working
Make that the Raspberry Pi’s SSH service is operational. With the systemctl status ssh command, you may determine the SSH service’s current status. You can start the service if it isn’t already operating using the sudo systemctl start ssh command.
Verify that the Raspberry Pi is connected to the internet and that its IP address is active. The ifconfig command or the router’s client list are two ways to find out the Raspberry Pi’s IP address.
Verify that the computer you’re using to try to connect to the Raspberry Pi is part of the same network.
Make sure that port forwarding is configured on your router to direct traffic to the Raspberry Pi’s IP address and port 22 if you’re connecting to it through the internet (the default port for SSH).
Verify that port 22 is not blocked by any firewalls running on the Raspberry Pi or the client PC.
Make sure the hostname or domain name you use to connect to the Raspberry Pi resolves to the right IP address before continuing.
Try switching to a cable connection if you are now utilizing a wireless connection to see if that fixes the problem.
Ensure you are using the right password when attempting to log in if you have modified the default password for the pi user.

Raspberry Pi Imager ssh is not working
Verify that the Raspberry Pi Imager is running at the most recent version. In some cases, updating to the most recent version will address problems.
Ascertain that your Raspberry Pi is a part of the same wireless network as your PC. Ensure the Ethernet cable is firmly inserted into your computer and the Raspberry Pi if you use a wired connection.
Ensure your Raspberry Pi is logged into the appropriate WiFi network if you use a wireless connection.
Verify that SSH is enabled on your Raspberry Pi. To accomplish this, check that the SSH option is enabled on the Raspberry Pi Configuration window’s Interfaces tab.
You might need to examine your Raspberry Pi’s network configuration if you still have issues. Verify the DNS and default gateway settings on your Raspberry Pi and that it has a valid IP address.
If you can still not connect to your Raspberry Pi via SSH, you might need to look through its log files for any error messages that could point to the root of the problem. The journalctl -u ssh command can be used to read the logs.
Raspberry Pi ssh connection refused
You might not be able to log in via SSH to your Raspberry Pi for the following reasons:-
Step 1:– Ensure that the Raspberry Pi is switched on and connected to the same network as the computer or device you intend to connect to.
Step 2:– Verify the Raspberry Pi’s SSH service is operational. Run the following command to accomplish this:
sudo systemctl status ssh
Step 3:- Run the following command to start the SSH service if it is not already running:
sudo systemctl start ssh
Step 4:-A firewall may prevent incoming SSH connections if the SSH service is already up and running. The following command can be used to verify the firewall rules:
sudo ufw status.
Step 5:– You can accept inbound SSH connections if the firewall is enabled by executing the following command:
sudo ufw allow ssh
Step 6:– You might need to modify your SSH client’s setup to account for recent changes to Raspberry Pi’s network settings, such as changing its IP address or hostname.
Step 7:– If none of these fixes work, you might need to look through the Raspberry Pi’s logs to see if any other error messages can be found that might help you figure out what’s wrong. The following command can be used to see the logs:
sudo journalctl -u ssh
Note:- I have written a post for people looking for the Best Monitor for Raspberry Pi to buy?, do read it If you are interested.

