


Picture this: you’re eagerly trying to access a website or launch an online application, but all you get is frustration as the page takes an eternity to load.
We’ve all been there, and the culprit behind this sluggishness could be your DNS cache. Fear not!
This article will delve into DNS cache flushing and how it can revolutionize your internet browsing experience.
Sometimes, your computer’s DNS (Domain Name System) cache becomes cluttered, slowing internet connectivity.
The DNS cache is a temporary storage containing records of previously visited websites and their corresponding IP addresses.
While this caching mechanism aims to speed up subsequent visits, it can lead to complications when the cache becomes outdated or overloaded.
Imagine the frustration of waiting for what feels like an eternity for a website to load. Slow internet speeds can hinder productivity, disrupt online gaming experiences, and damage browsing pleasure.
Fortunately, a simple solution can alleviate these troubles and give you a faster, smoother online experience.
Flush DNS cache is the answer to your internet connectivity woes. By flushing or clearing the DNS cache, you wipe out outdated records and start afresh, allowing your computer to obtain fresh and accurate IP address information when accessing websites.
It’s like giving your internet connection a refreshing boost.
In this comprehensive guide, we’ll walk you through the step-by-step process of flushing your DNS cache on different operating systems, such as Windows, macOS, and Linux.
Whether you’re a tech-savvy enthusiast or a casual user, we’ve got you covered.
So, if you’re tired of waiting for websites to load or experiencing intermittent connectivity issues, it’s time to take matters into your own hands.
Let’s dive into the world of flushing DNS cache and unlock a seamless browsing experience that will leave you wondering why you didn’t do it sooner.
Remember, a smoother internet connection awaits just a few clicks away.
Let’s get started!
What is DNS Cache?
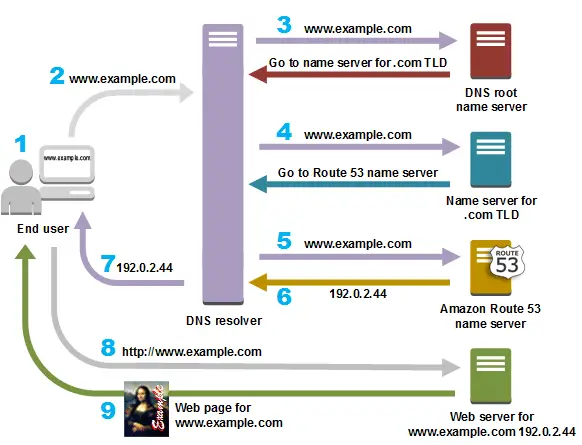
DNS/Domain Name System cache is a collection of addresses that you have recently visited from your smartphone or computer browser.
The DNS mechanism allows you to access frequently visited web pages much faster.
In other words, the DNS is analogous to an address book; the computer looks up the record of DNS entries to communicate with the webserver and eventually fetch the IP addresses. However, sometimes a faulty DNS entry causes peculiar problems.
The Problem
Ever encountered a browser error that says “DNS server not responding.” Well, this particular issue is caused due to faulty DNS settings.
As explained earlier the computer makes use of the DNS cache and uses it like an address book to fetch the IP address. Sometimes things go awry and this is when the DNS errors raise their ugly head.
That being said, sometimes the DNS caching doesn’t work as intended and one of the main reasons behind this is DNS poisoning. The poisoning or the pollution occurs when the DNS cache is inserted with unauthorized domain names and IP addresses.
This problem is referred to as DNS Cache poisoning and is caused by viruses, redirects to malicious websites. DNS Flushing is one of the most effective manners by which we can handle the DNS errors.
Let us take a closer look at how to flush DNS across several computing platforms,
FlushDNS on Windows PC (ipconfig method)
Windows is arguably one of the most used operating systems worldwide. So let us begin this mini tutorial by understanding how to Flush DNS on Windows PC.
Open the Start Menu by pressing the Windows logo or directly clicking on the Start Icon
Type “command prompt” in the search bar
Click on Command Prompt as shown in the screenshot above
Now just type or copy paste the command below and press Enter
“ipconfig /flushdns”
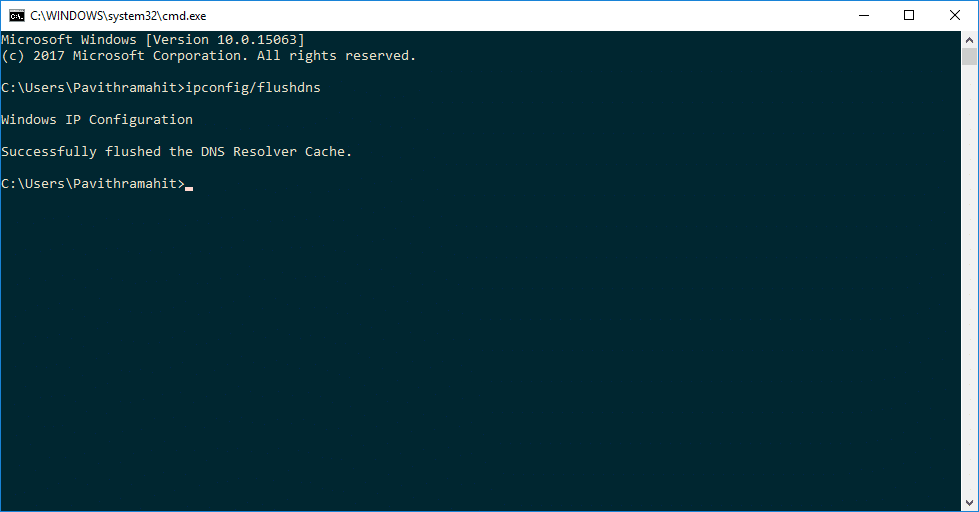
If you have performed all the steps listed above then your DNS is flushed on Windows PC and you should be good to go.
FlushDNS on Mac

Well many of us are sort of stuck when it comes to flushing DNS on Mac. Well, fret not we are here to help and yes like always we will keep it simple.
Open the Spotlight by clicking on the Spotlight Icon as shown in the above image
Alternatively, you can also press Command+Space to open Spotlight
Type “terminal” into the Spotlight
Generally, the first option is the “Terminal” click on it
Now type or enter the following code into the Terminal and press “Return”
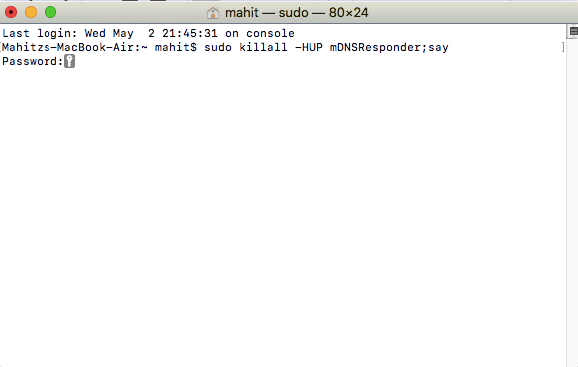
sudo killall -HUP mDNSResponder;say DNS cache has been flushed
In some cases, the Terminal asks for your Mac password and you are required to enter the same. As a final step restart your browser and you should be good to go.
📗FAQ
Is it safe to flush DNS cache?
Yes, it is safe to flush your DNS cache. Flushing your DNS cache only removes the cached data and does not affect your computer or network’s functionality.
How often should I flush my DNS cache?
There is no specific frequency for flushing your DNS cache. However, it is recommended to do it occasionally, especially if you are experiencing connectivity or website access issues.
How do I flush and restore DNS?
To flush DNS cache, open Command Prompt and type “ipconfig /flushdns”. To restore DNS, you can try resetting your router, restarting your computer, or contacting your internet service provider.
Does a restart flush DNS cache?
Yes, restarting your computer or device can flush the DNS cache and help resolve connectivity issues.
Does flushing DNS change your IP address?
No, flushing DNS cache does not change your IP address. Your IP address is assigned by your internet service provider.
Does flushing DNS speed up internet?
Flushing DNS cache may help improve internet speed and connectivity by removing outdated or corrupted DNS data. However, it is not a guaranteed solution for all internet speed issues.
How do I know if my DNS cache is cleared?
You can check if your DNS cache is cleared by running the command “ipconfig /displaydns” in Command Prompt. If the display shows no entries, then your DNS cache has been cleared.
Is DNS cache permanent?
No, DNS cache is not permanent. It is temporary data stored on your computer or device to speed up website access.
How long does DNS cache last in chrome?
DNS cache duration in Google Chrome depends on the website and the TTL (Time-to-Live) value set by the domain owner. By default, Chrome stores DNS cache for up to 60 seconds.
What is the DNS cache on a router?
DNS cache on a router is similar to DNS cache on a computer or device. It stores DNS information for faster access to frequently visited websites.
Why do I have to keep flushing my DNS?
You may need to flush your DNS cache occasionally to remove outdated or corrupted data that could cause connectivity or website access issues.
No, flushing DNS cache does not clear cookies. Cookies are separate data stored on your computer or device by websites you visit.
How do I force DNS to update?
You can force DNS to update by running the command “ipconfig /flushdns” in Command Prompt, or by restarting your router and device.
Does DNS affect your Wi-Fi?
Yes, DNS can affect your Wi-Fi connectivity and speed. A slow or faulty DNS server can cause delays in accessing websites and affect internet performance.
What happens if you delete all DNS records?
Deleting all DNS records may cause connectivity issues and prevent you from accessing websites or services that rely on DNS.
What happens if you remove DNS?
Removing DNS would prevent your computer or device from resolving website domain names into IP addresses, which would make it impossible to access websites or services on the internet.
Does clearing chrome cache clear DNS cache?
No, clearing Chrome cache does not clear DNS cache. You need to use Command Prompt to clear DNS cache.
Where is DNS cache stored?
DNS cache is stored on your computer or device’s memory, and the location may vary depending on your operating system.
Does unplugging router delete history?
No, unplugging your router does not delete browsing history or other data stored on your computer or device.
What is a corrupt DNS cache?
A corrupt DNS cache contains outdated, corrupted, or incorrect data that can cause connectivity or website access issues.
Does restarting router reset DNS?
Restarting your router does not reset DNS, but it may help clear the DNS cache and resolve some connectivity issues.
Is it safe to restart DNS server?
Restarting a DNS server is generally safe and can help resolve connectivity issues. However, you should always ensure that you have a backup of your DNS configuration and settings before restarting the server.
How do I know if my DNS is bad?
If you are experiencing website access or connectivity issues, it may be due to a bad DNS. You can check if your DNS is bad by running the command “nslookup” in Command Prompt and checking if the server responds with errors or does not respond at all.
How do I get rid of DNS problems?
You can resolve DNS problems by flushing the DNS cache, restarting your router and devices, checking your DNS settings, and contacting your internet service provider if the issue persists.
Does DNS update automatically?
DNS records may update automatically, depending on the TTL (Time-to-Live) value set by the domain owner. However, some changes, such as updating DNS servers or changing domain names, may require manual updates.
What does updating DNS do?
Updating DNS changes the DNS records for a domain name, allowing you to point the domain to a new server or IP address.
What should my DNS settings be?
Your DNS settings should be set to the DNS servers provided by your internet service provider or to reliable public DNS servers, such as Google DNS or OpenDNS.
What’s the fastest DNS server?
The fastest DNS server may vary depending on your location and internet service provider. You can use online tools to test and compare the speed of different DNS servers.
Is DNS linked to IP address?
Yes, DNS translates domain names into IP addresses, allowing your computer or device to connect to websites and services on the internet.
Can DNS steal info?
No, DNS cannot steal personal information. However, a malicious DNS server could redirect your traffic to fake websites or phishing pages.
Does DNS hide history?
No, DNS does not hide your browsing history. DNS only resolves domain names into IP addresses to enable website access.
Does DNS track you?
DNS does not track your browsing activity. However, internet service providers and websites may track your online activity through other means.
Should I delete all DNS records?
No, deleting all DNS records may cause connectivity issues and prevent you from accessing websites or services that rely on DNS.
Can DNS block you?
DNS can be used to block access to specific websites or services by redirecting traffic to a different IP address or blocking specific domains.
How do I flush my IP address?
You cannot flush your IP address. Your IP address is assigned by your internet service provider and cannot be changed unless you request a new one.
Does Chrome have its own DNS cache?
Yes, Google Chrome has its own DNS cache that stores DNS information for faster access to frequently visited websites.
How do I view the DNS cache in Chrome?
You can view the DNS cache in Chrome by typing “chrome://net-internals/#dns” in the address bar and clicking on “Clear host cache” to flush the DNS cache.
Can the Wi-Fi owner see what I search even if I delete it?
If you are using a public Wi-Fi network, the owner or administrator of the network could potentially monitor your online activity, even if you delete your browsing history.
Can a Wi-Fi provider see your deleted history?
If you are using a public Wi-Fi network, the Wi-Fi provider or administrator could potentially access your browsing history and online activity.
You can find hidden devices on your Wi-Fi network by accessing your router’s settings and checking the list of connected devices. You can also use network scanning tools to detect and identify all devices connected to your network.
How do I clean up my DNS?
To clean up your DNS, you can flush your DNS cache, clear your browser’s cache and cookies, check your DNS settings, and ensure that your DNS server is up-to-date.
What is suspicious DNS?
Suspicious DNS refers to DNS activity that is abnormal or potentially malicious, such as DNS queries for known malicious domains or attempts to redirect traffic to fake websites.
Does restarting router clear cache?
Restarting your router may help clear the DNS cache and resolve some connectivity issues, but it may not clear other types of caches, such as your browser’s cache.
How often should you clean your router?
You should clean your router and check its settings periodically to ensure optimal performance and security. However, the frequency may vary depending on your network usage and device configuration.
Conclusion
In conclusion, flushing the DNS cache is a simple yet effective solution to address various network-related issues.
Following the steps outlined in this article, you can easily clear your DNS cache and experience improved internet connectivity and browsing performance.
Remember, a DNS cache stores information about website addresses, allowing your computer to access frequently visited sites quickly.
However, this cache can become outdated or corrupted over time, leading to problems like slow loading times, incorrect website displays, or even the inability to access certain websites altogether.
By flushing the DNS cache, you reset this stored information, enabling your computer to fetch the most up-to-date IP addresses and domain names from the DNS server.
This process can be particularly useful if you’ve recently changed your network settings, switched to a new internet service provider, or encountered connectivity issues.
The step-by-step guide provided earlier ensures you can easily flush your DNS cache, regardless of your operating system.
Whether you’re using Windows, macOS, or Linux, following the instructions allows you to clear the cache within minutes without any advanced technical knowledge.
Regularly performing this simple maintenance task can optimize your DNS cache and maintain a smooth browsing experience. It’s a proactive approach that can save you from unnecessary frustrations caused by network-related hiccups.
So, the next time you encounter sluggish internet speeds or website loading problems, don’t forget to consider flushing your DNS cache as one of the troubleshooting steps.
It’s a quick and reliable solution that can help you get back on track and make the most out of your online activities.
Take control of your DNS cache, refresh your internet connection, and enjoy a faster, more reliable online experience. Start by following the steps in this article and unlock the full potential of your browsing capabilities.
Happy surfing!


