


Outlook and Gmail are quite often considered the most popular mail services or programs. This is why it is important to be able to combine them by setting up Gmail IMAP setting in Outlook.
People generally associate Outlook as a more business-oriented mail service while people see Gmail as a bit more personal (even though that’s changing now).
The benefits of being able to “join” both services together are immense and I’ll be explaining all you need to know about it in the easy-to-follow guide below.
Why Using IMAP Is Preferable To POP
When setting up the Gmail IMAP setting in Outlook, it is preferable to use IMAP to POP because of the difference between these two protocols.
Internet Message Access Protocol (IMAP) basically stores emails on the host servers (Gmail’s servers in this case)
Post Office Protocol (POP) is different. It is basically local. This means when this protocol downloads your mail, it no more exists on the host servers. It only exists on your device.
This key difference will make things hard for folks who use multiple devices and want to have access to mail on all of the devices at various points in time.
If you use POP and access your mail using your laptop, you won’t be able to see that same message again when you access your mail on your mobile phone.
Now you know why I’m going to be setting up Gmail IMAP setting in Outlook.
How To Turn On Gmail IMAP Setting
Before I dive into setting up Gmail in Outlook, there’s something important that you have to do.
You have to first enable the Gmail IMAP setting.
It’s pretty easy, just follow the steps below.
Use the correct credentials to log into your Gmail account.
Then navigate to the top right-hand side of your screen and click on the Settings icon to open the menu.
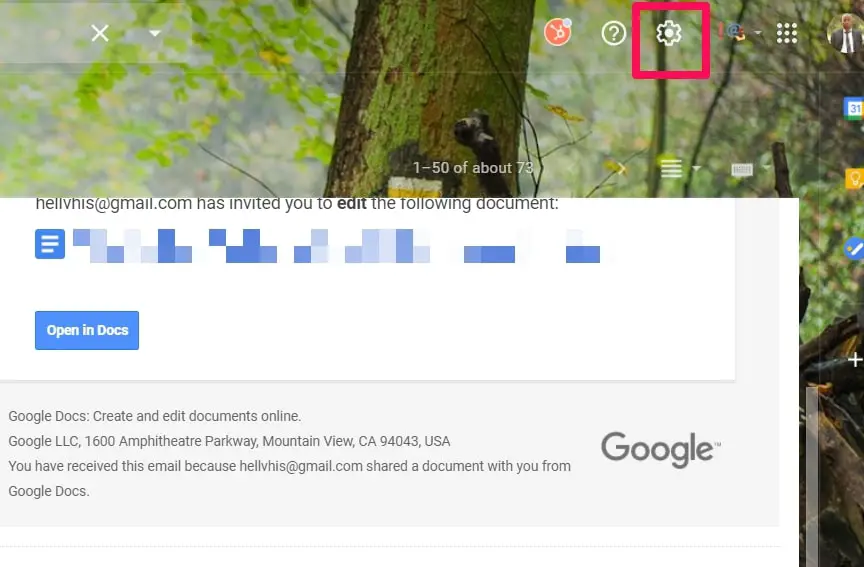
A Quick Settings toolbar should appear. Ignore it, click on See All Settings instead.
![Set-up Gmail IMAP Setting In Outlook [Step-By-Step Guide]](https://technicalustad.com/wp-content/uploads/2020/10/all-settings.jpg)
In the Settings menu, look for and click on Forwarding And POP/IMAP in the tabs close to the top of your screen.
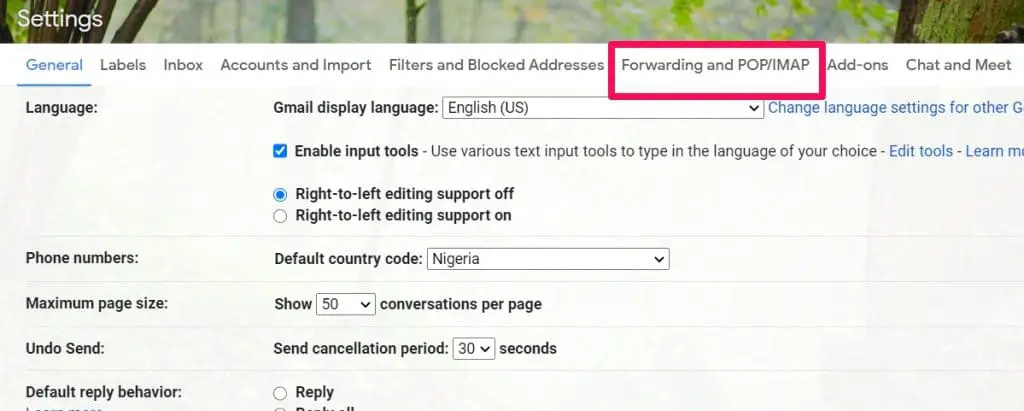
When the tab opens, move down to the IMAP section and check the status. Click on Enable IMAP to enable that option.
![Set-up Gmail IMAP Setting In Outlook [Step-By-Step Guide]](https://technicalustad.com/wp-content/uploads/2020/10/enable.jpg)
After making sure it’s clicked for Enable, go to the bottom right-hand side of your screen and click on Save Changes to confirm the changes made.
That’s done. You’ve now enabled IMAP, we can now move to the actual setting up of the Gmail IMAP setting in Outlook.
Guide On How To Set-up Gmail IMAP Setting In Outlook (Desktop Application)
Normally, this guide would be very long because you’d have to first find the different server settings and manually input them into the right places which made only Microsoft Exchange email accounts easy to add.
But now Outlook has had upgrades that have made it easy for other email accounts to be added. Ensure you don’t skip a step below, this is the most important part of the whole process.
How To Set It Up
The first step is to open the Outlook application on your PC.
I’m assuming you already have an Outlook account. If you do, continue the process below.
Navigate to the top left-hand corner of your screen and click on File.
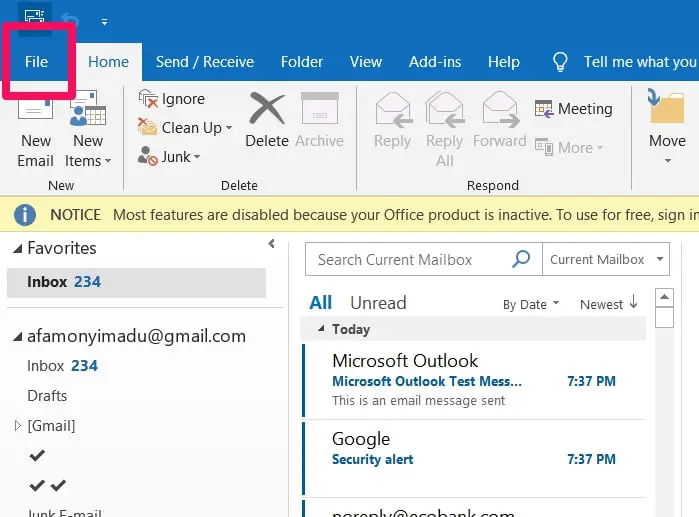
Go to the Account Information menu and select the Add Account option.
![Set-up Gmail IMAP Setting In Outlook [Step-By-Step Guide]](https://technicalustad.com/wp-content/uploads/2020/10/add-account-1.jpg)
You’ll be asked on the screen to input the email address you’re trying to add to Outlook. Here’s where you have to input your correct Gmail address and select the Connect option in blue.
![Set-up Gmail IMAP Setting In Outlook [Step-By-Step Guide]](https://technicalustad.com/wp-content/uploads/2020/10/connect.jpg)
You’ll also be asked to input your Gmail account password. Ensure you input the correct credentials and click on Sign-in also in blue.
The next page you should see, if everything goes well, is a page from Google notifying you about the fact that Outlook (Microsoft apps & services) wants access to your Gmail account.
Allow that access by clicking on the Allow option in blue at the bottom right-hand side of your screen.
After allowing access, you should be redirected to the Outlook window where you’ll be informed that the process was successful and your Gmail account has meshed with Outlook.
Click on Done (still in blue) to finish up the process.
How To Check If The Process Worked
Go back to Outlook normally and check your mailbox area. You should be seeing the option of viewing your Gmail account mails at the left-hand side of your screen.
![Set-up Gmail IMAP Setting In Outlook [Step-By-Step Guide]](https://technicalustad.com/wp-content/uploads/2020/10/gmail.jpg)
If you click on any mail (Gmail) on the left side of your screen, it should appear normally at the right-hand side of your screen as if you’re on Gmail’s app.
What To Do If The Process Didn’t Work
This process is totally dependable but sometimes it might not work out for a few folks.
So if you get this error message “Sorry, We Could Not Sign You Into Google – IMAP“ then you should follow the steps below to resolve the error.
Resolving The Error Message
This error message means that you would have to go into IMAP settings on Outlook.
Remember that we only did that for Gmail before. Now, something similar is needed for Outlook too.
The steps are easy to follow but you have to be careful because you’ll be dealing with a few numbers that have to be exactly as stated or else the error will persist.
Assuming you’ve already opened the Outlook app.
Navigate to the top left-hand corner of your screen and click on File.
Go to the Account Information menu and select the Account Settings option.
![Set-up Gmail IMAP Setting In Outlook [Step-By-Step Guide]](https://technicalustad.com/wp-content/uploads/2020/10/ac-settings.jpg)
In the new menu that opened, find, and click on Server Settings to open another menu.
![Set-up Gmail IMAP Setting In Outlook [Step-By-Step Guide]](https://technicalustad.com/wp-content/uploads/2020/10/server.jpg)
This menu will be explained in two sections so that you understand it properly because the problem mostly occurs from these two sections.
Incoming Mail Settings
When you click on Server Settings, it will take you to an IMAP account settings window. This is where you’ll see the option to make changes to your Incoming Mail Settings.
Make sure the Incoming Mail Settings match exactly what I give below. Anything on your end that doesn’t match what is here should be changed to match the below settings.
- User Name: Your Gmail Address Should Be Here
- Server: imap.gmail.com
- Port: 993
- Encryption Method: SSL/TLS
- Require Logon Using Secure Password Authentication (SPA): Leave The Box Unchecked
![Set-up Gmail IMAP Setting In Outlook [Step-By-Step Guide]](https://technicalustad.com/wp-content/uploads/2020/10/income.jpg)
Be sure to leave the SPA box unchecked. If it was checked before, please uncheck it. It is vital to your process working out.
Once you’re done with the above settings (correctly), expand the outgoing mail settings option, and follow the steps below.
Outgoing Mail Settings
After expanding this section, you will also have to make sure that the settings below in this article matches what’s on your screen.
The same importance I stressed above applies here. Any mismatch should be corrected because it could be what’s stopping the process from working out.
- Server: smtp.gmail.com
- Port: 465
- Encryption Method: SSL/TLS
- Server Timeouts: The Default Setting Is Good.
![Set-up Gmail IMAP Setting In Outlook [Step-By-Step Guide]](https://technicalustad.com/wp-content/uploads/2020/10/outgoing.jpg)
You Might Want To Slide It Down To The Right If You’ve Been Having Timeouts Issues.
- Require Logon Using Secure Password Authentication (SPA): Leave The Box Unchecked
- My Outgoing (SMTP) Server Requires Authentication: Make Sure You Check This Box.
If The Box Was Already Checked, Leave It Checked.
- Use Same Settings As My Incoming Mail Server: Select This Option
- Logon Using Username And Password: Make Sure This Option Isn’t Selected
Click on Next after you’re totally sure you got these two sections right. You’ll then be shown a window that tells you Outlook is updating your settings.
Sign-in Your Google Gmail Account
The next step after the update is to sign-in again.
A Gmail sign-in window should appear with your Gmail address already filled in.
All you have to do is check if the email address is the correct one and tap on Next.
The next window should be the one where you’ll be asked to input your password.
Make sure you input the correct password and check the box that reads Stay Signed In so that you won’t have to always go through this process.
For folks that have Two Factor Authentication security measures enabled on their Gmail account, you will also have to verify through the second security measure you chose.
Check the Don’t Ask Again On This Computer box to ensure that you don’t have to repeat this process when you’re accessing mail on your PC (as long as you’re on your personal computer).
But if you want to always use the Two Factor Authentication, then leave the box unchecked. It is probably better security-wise to leave the box unchecked.
The next window after this should read Account Successfully Updated.
Select Done to finish the process.
Conclusion
Setting up Gmail IMAP setting in Outlook is very important in ensuring you are able to access the two most popular mail services that you could use.
It could help cut downtime in accessing mail since you can get all of your mail in one place. Using IMAP ensures that you can do this across many devices.
Comment below if you have any issues setting up the Gmail IMAP setting and I’ll be able to give you tips on how to resolve the issue.

