MsMpEng.exe is a very useful process on the computer. However, sometimes, MsMpEng.exe may cause high CPU usage in Windows. This high CPU consumption slows down the computer and leads to other problems.
Luckily, there are several ways to go about restoring your computer to normal condition when the MsMpEng.exe high CPU problem occurs. This guide will walk you through some of these tried and tested solutions.
Before we consider how to solve MsMpEng.exe high CPU, we need to answer the question: What is MsMpEng.exe?
What Is MsMpEng.exe? 🤔
There are several processes that run in the background while your computer is on. These processes perform many important routine tasks without the prompting of the user. MsMpEng.exe is one such process.
MsMpEng.exe is the core process of Windows Defender. Its function is to scan files, programs, and apps for viruses and other malware. Its importance can not be overstated, as it helps to identify files and programs that may be dangerous and quarantine or remove them altogether.
Many Windows users have noticed that sometimes MsMpEng.exe uses a large share of the CPU, reaching up to 80% on some occasions. This is far from ideal. This has led to questions of how the problem can be fixed, or if MsMpEng.exe can be removed from the computer.
Before I answer those vital questions, let me explain what the most likely causes of the problem are.
Why Is MsMpEng.exe Using Much CPU Resources?
MsMpEng.exe is not supposed to consume much of the system resources, especially when a scan for viruses and other malware is not taking place. Here are some reasons for this unusual behavior:
- Low hardware resources: When you are running low on storage space and require an upgrade, your computer acts in unusual ways.
- Program is scanning its own directory: Sometimes MsMpEng.exe gets stuck scanning the Windows Defender directory. This leads to high CPU consumption and slows down the computer.
- Old antivirus registry files: If old antivirus were not properly deleted, and some traces of them remain in the registry, it can lead to Windows Defender acting in strange ways.
- Malware in your PC: It is ironic that a program that scans against malware can be handicapped by malware, however, it is one of the possible reasons your computer is acting in a strange, suboptimal way.
How To Fix MsMpEng.exe High CPU Issues
There are several ways to fix the MsMpEng.exe high CPU problem. Even if you’ve tried one of the fixes here and it doesn’t solve the problem, several others are likely to restore MsMpEng.exe to its proper condition, or otherwise get your computer running smoothly.
Below are some tried and tested solutions for MsMpEng.exe high CPU problem, given in no particular order.
1. Prevent Windows Defender From Scanning Its Directory
One of the causes of MsMpEng.exe’s high CPU usage is Windows defender scanning its own directory. If you can get the process to stop scanning its directory, it will consume less of the computer’s resources.
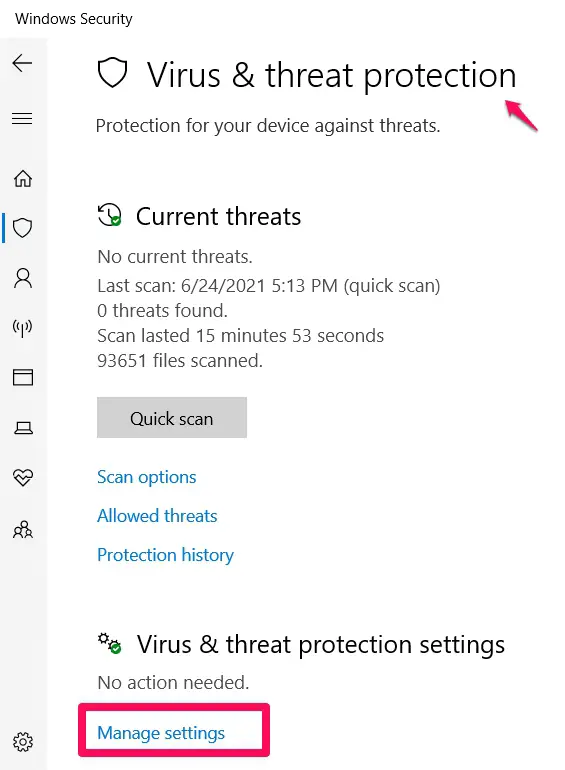
To do this, go to the Windows search bar and type “Windows Security”, click on Windows Security when the result appears. Next, click on Virus and threat protection, and then Manage Settings.
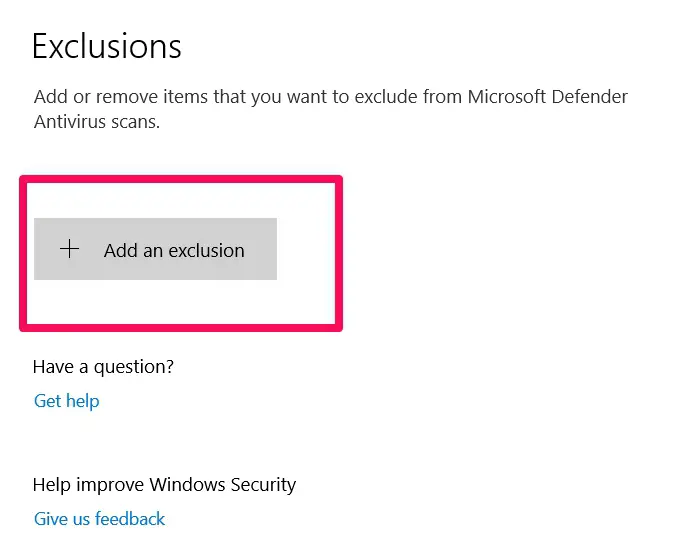
In the manage settings window, scroll down and click on Add or remove exclusions, then select Add exclusions and choose the folder.
Select the following path: C\:program files\windows defender. Finally, confirm the entire process by clicking on Exclude this folder.
2. Limit CPU Usage
You can limit the CPU usage of the MsMpEng.exe process using task manager. Task manager is a program that helps you monitor programs and processes running on your computer and gives you information about them.
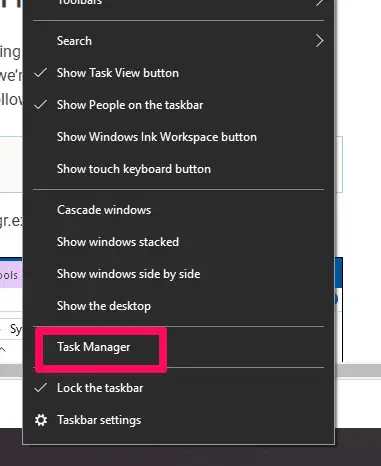
To open task manager, press Ctrl+Shift+Esc, or right-click the start menu then select task manager.
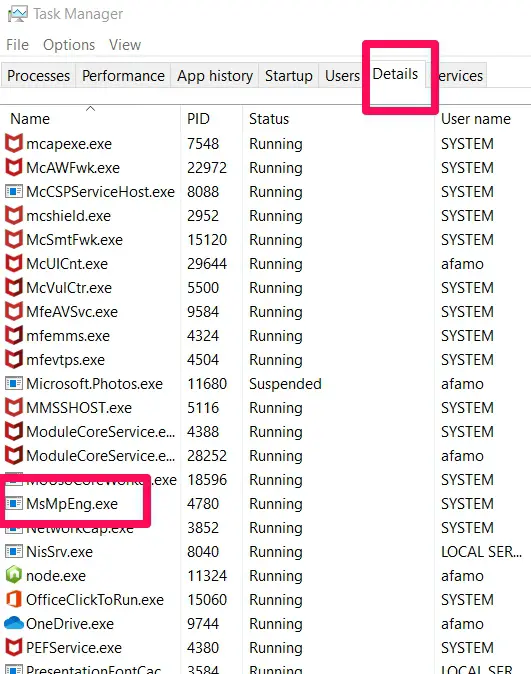
The next step in limiting the CPU usage of the process is to find MsMpEng.exe. it may not be straightforward to find if task manager is minimized. In that case, first, click “More details”, and then find the “Details” tab and click on it. Then you will be able to find MsMpEng.exe and other processes.
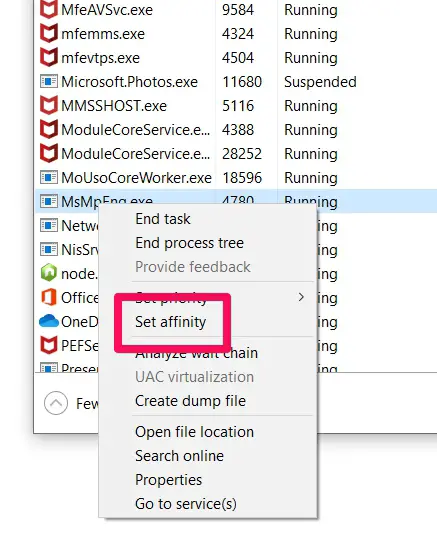
Right-click on the process, then select “Set Affinity” from the menu. Finally, select the CPU limit threshold for the process.
3. Start Computer In Safe Mode
Safe mode is a diagnostic startup mode in windows. In safe mode, the computer has limited access to files and drivers, therefore it is easy to confirm if the default settings and basic drivers of the computer are the sources of the problem.
This is one of the most common troubleshooting methods for Windows.
To boot in safe mode in Windows 10, do the following:
- Go to “Settings”
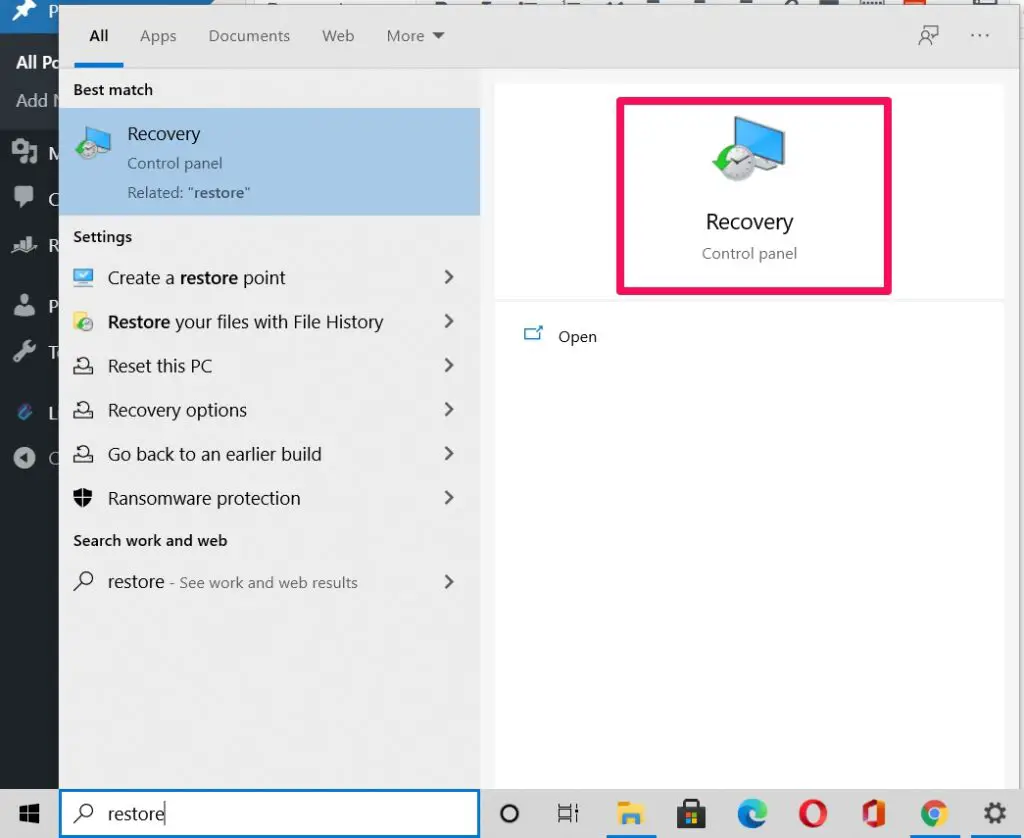
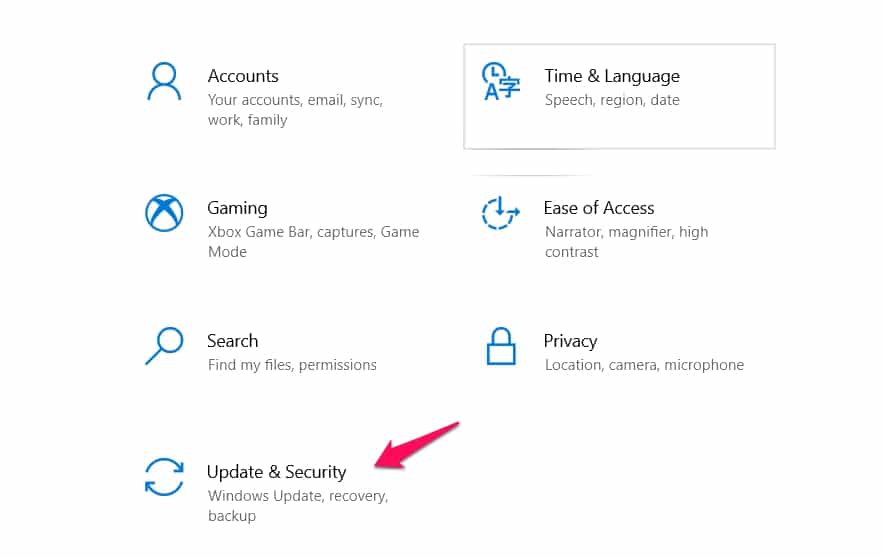
- Select “Update and Security”, then ” Recovery”, or simply search for recovery in the start menu.
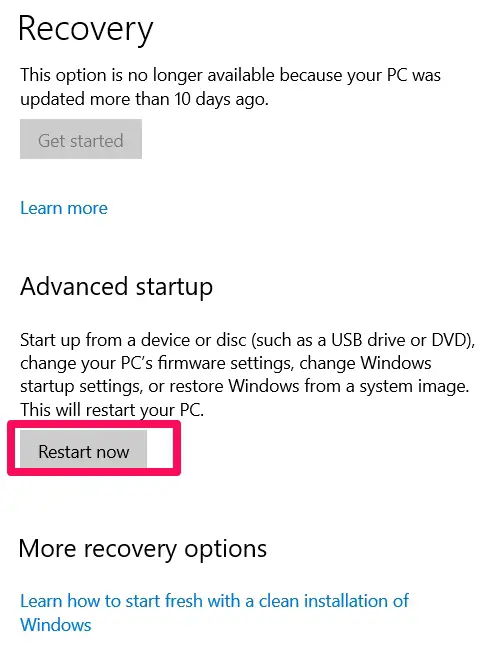
- Select “Restart now” under “Advanced startup”
- When the PC restarts to the “Choose an option” scene, select “troubleshoot”, then ” advanced option”, and then “startup settings”. Click “restart”
- A list of options will be displayed. Press F4 to restart your computer in safe mode.
To boot your computer in safe mode in Windows 7, do the following:
- Reboot computer
- As the computer is restarting, press F8. Do this before the Windows logo appears
- When the “Windows advanced options menu” appears, click on “safe mode with networking”
- Press enter.
4. Disable Sample Submission
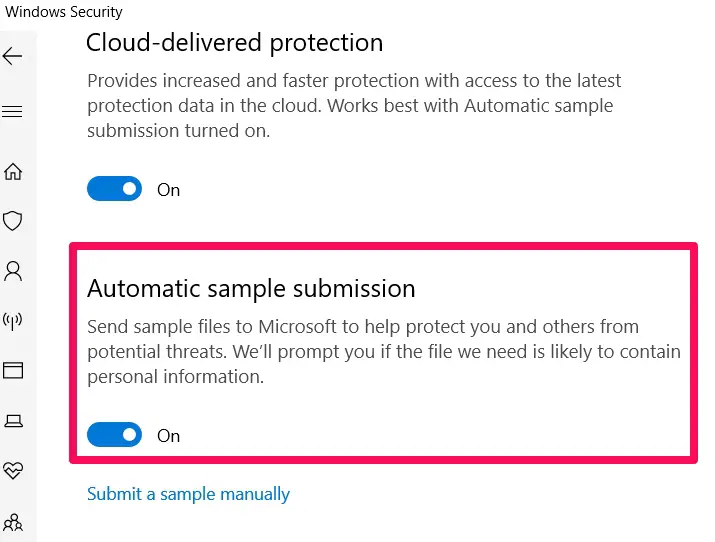
Sample submission is a feature on Windows that sends problematic files to Microsoft for analysis and solutions. This is a useful feature, however, many Windows users have reported that it can also be the cause of the MsMpEng.exe high CPU usage issues.
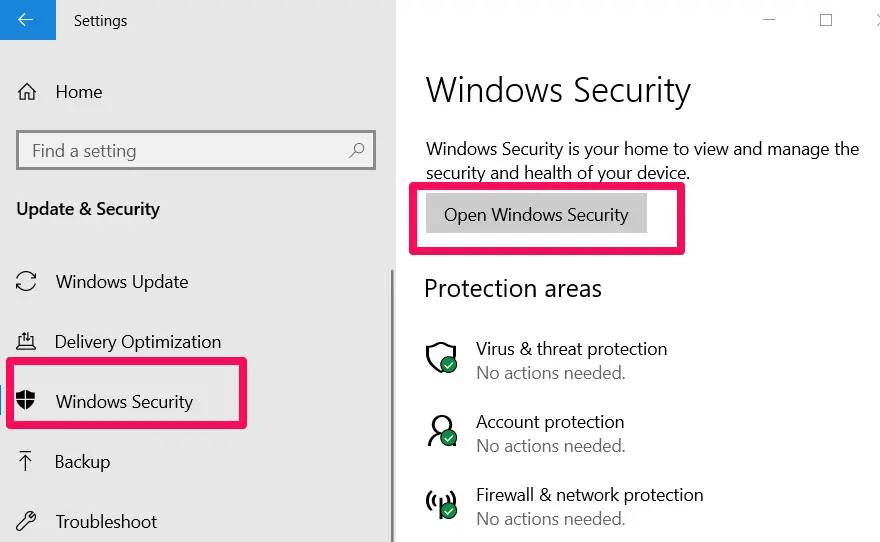
To disable Sample Submission, go to the settings app on Windows, and click on “Update and Security”.
Then, find ” Windows Security” on the menu on the left and click on “Open Windows Security”.
Next, click on “Virus and threat protection”, then on “Manage Settings” under Virus and threat protection settings. Finally, locate “Automatic Sample Submission” and turn it off.
5. Reschedule Windows Defender
Rescheduling Windows Defender is a workaround to the MsMpEng.exe high CPU problem. Though it is an advanced solution, following the steps I will give will make it easy to do.
You should note that this procedure will not eliminate the high CPU issue, it will only help you schedule the scans so that the issues only occur during those scheduled scans.
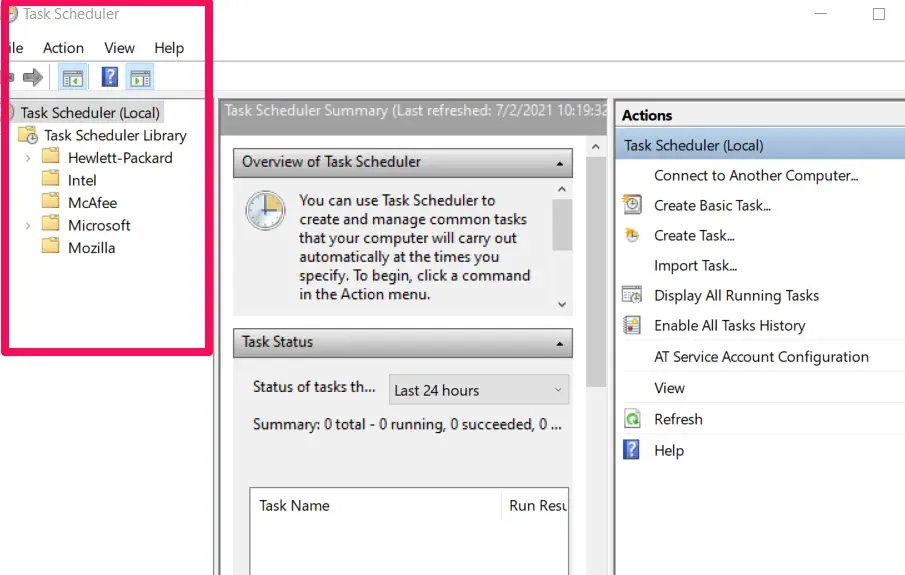
The first step is to open Task Scheduler. Press Windows key + S and select Task Scheduler from the list of results. When Task Scheduler opens, navigate to Task Scheduler Library in the left pane, and then to Windows Defender.
In the right pane of Windows Defender, double click on Windows Defender Scheduled Scan. When it opens, choose weekly or monthly as the schedule period and select the desired properties. Click OK to save changes.
Return to Task Scheduler and make the same changes for the other Windows Defender tasks such as Windows Defender Cache Maintenance, Windows Defender Cleanup, and Windows Defender Verification.
6. Disable Windows Defender
If other solutions have proven ineffective, disabling Windows Defender is your last option. Before you disable Windows Defender, be sure to get a good third-party antivirus to protect your PC.
There are two ways to go about the disabling: (1) Using the Group Policy Editor, and (2) Using the Registry Editor
Method 1: Use Of Group Policy Editor
This feature is only available on Pro and Enterprise versions of Windows. To open the Group Policy Editor, press the Windows key+R, type gpedit.msc, and hit enter.
In the left pane, navigate to “Computer Configuration”, select ” Administrative Templates”, choose “Windows Components” then select the Windows Defender Antivirus.
Find “Turn off Windows Defender Antivirus” in the right pane and double-click on it. When the “Properties” window appears, select “Enabled” then click Apply, and finally Ok to save your changes.
Method 2: Use Of Registry Editor
Open Registry Editor by pressing Windows key +R and enter regedit, then hit Enter or Ok. After the Registry Editor opens, navigate to the following path in the left pane: HKEY_LOCAL_MACHINE\SOFTWARE\Policies\Microsoft\Windows Defender.
In the right pane, find “DisableAntiSpyware DWORD”. If the DWORD is not available, right-click the empty space and choose New and select DWORD (32-bit) value from the menu. Then enter ” DisableAntiSpyware” as the name of the new DWORD, then double click it.
Set the value to 1, and click OK to save changes.
7. Install A Good Antivirus
A lasting solution to the problem of MsMpEng.exe is to install a good, reliable third-party antivirus. Even if you are not experiencing problems with Windows Defender it is still a good idea to install an antivirus.
Final Thoughts On MsMpEng.exe High CPU
The High CPU consumption of Windows Defender tasks issue is one that many windows users report experiencing. A high CPU consumption slows down the computer and causes it to act in inefficient ways.
The good thing is there are several things you can do to solve the problem, and this article tells you what you should do when faced with such a problem.


