


Dual booting is installing two or more operating systems on a single machine and allowing users to choose which one to boot into.
This is helpful if you need to utilize specialized software only available for a single operating system or if you want to test out a new one without deciding to replace your present one.
You may eventually decide that you don’t need or want to keep all of your computer’s operating systems installed, so you’ll probably delete one of them. In this situation, you might wonder how to uninstall Ubuntu from a dual boot configuration.
In this tutorial, I will guide you on “How To Remove Ubuntu From Dual Boot Windows 10,” along with my Youtube video on the same topic.
Most of the time, you want to test the power of Ubuntu, and you install it with Windows 10 PC, but if you don’t know the correct step to remove this, may it cause damage to your current windows also.
However, Ubuntu is a powerful operating system used by many people. I am also a big fan of Ubuntu, and I love using it in my virtual machines and Kali Linux installation.
Note:- Make sure you have a backup of all your crucial data before modifying your computer’s operating system. This applies to all of the files you don’t want to lose, such as pictures, music, and papers.
Step-by-step process to Remove Ubuntu From Dual Boot Windows 10:-
Restart your PC and in the GRUB bootloader menu, select the “Windows 10 (Loader) option to boot in Windows 10.

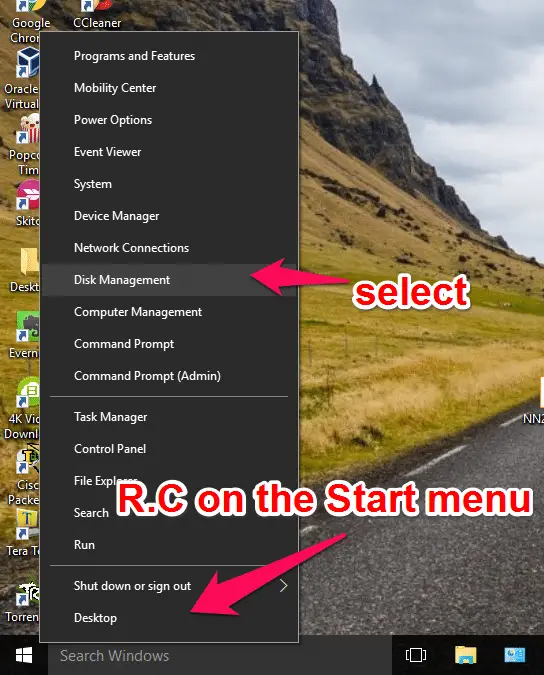
Now Right-click on the start and select the “Disk Managment” option.
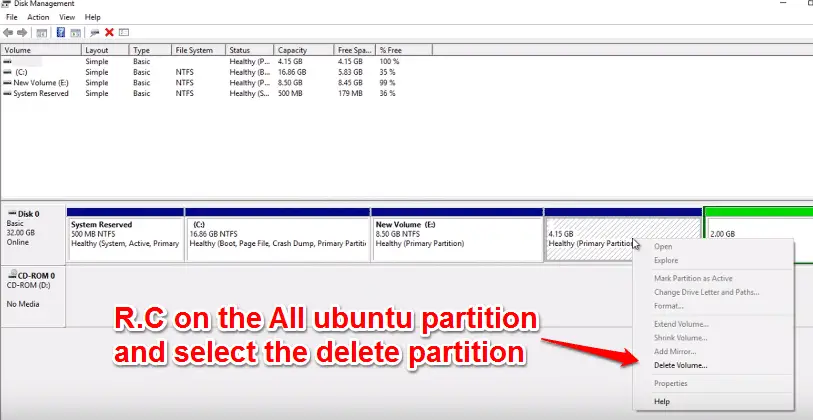
and You need to identify your windows and ubuntu partition, most of the time C drive is for windows OS and another partition is for other OS like Ubuntu.

Now right-click on your all Ubuntu partitions and select the “Delete Partition” option and delete it.
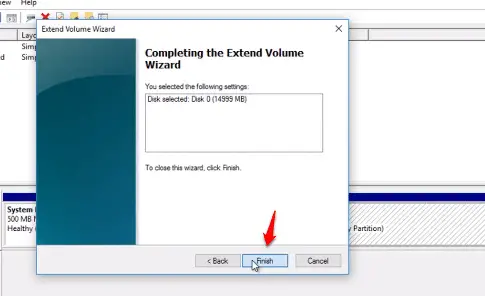
and now Right-Click on your Windows partitions and select the “Extend Volume” option.

and make sure unallocated space is selected and click on the next.

and Click on the Finish option to finish your extended volume wizard.
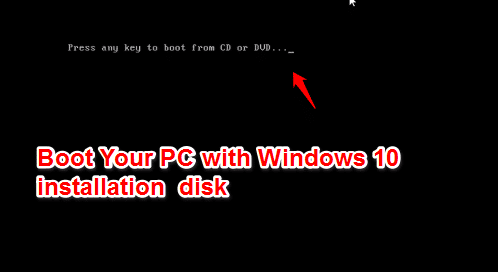
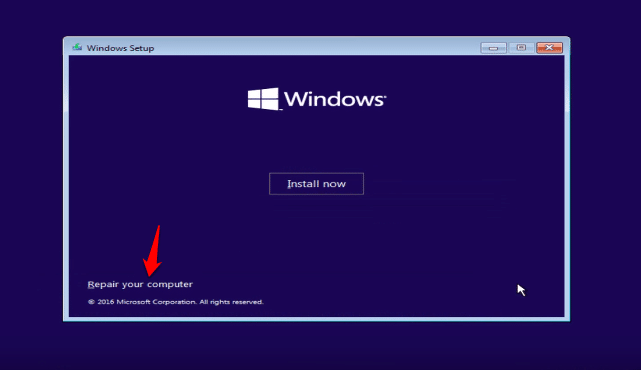
Now boot your PC with Windows 10 Installation DVD/Image and hit enter. if you don’t have windows 10 installation ISO, Download it from here.
after boot select the “Repair your Computer” option.
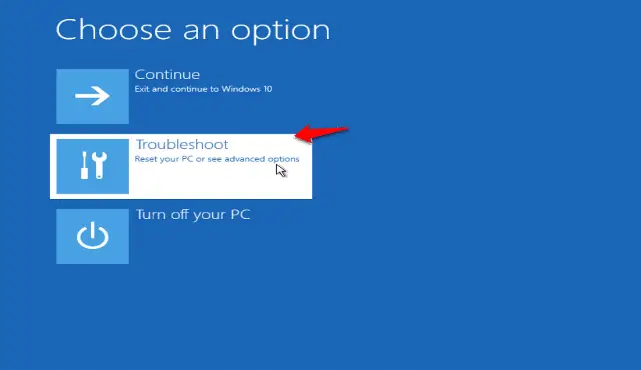
and then select the “Troubleshoot” option.
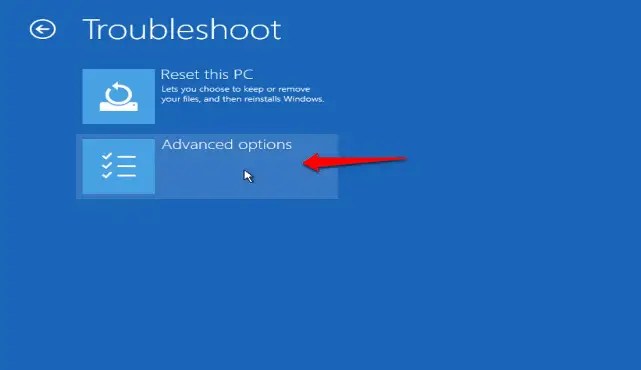
then click on the “Advanced options”
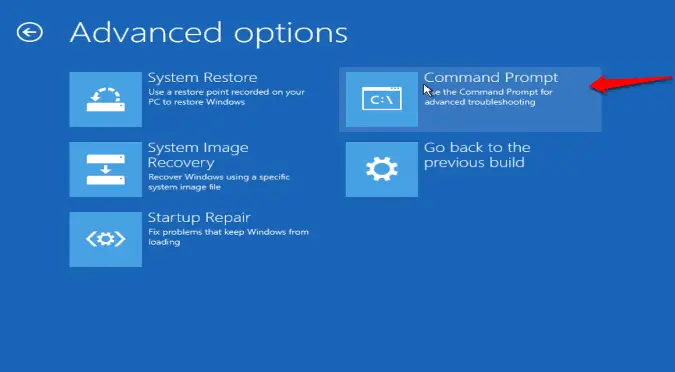
now select the “Command prompt” option.
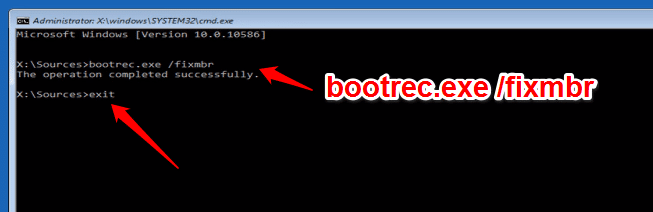
now in the command prompt windows enter the below command
bootrec.exe /fixmbr
and enter the “exit” command to exit from the window. and reboot your PC. That’s it. Now Ubuntu is successfully removed from the Windows 10 dual boot.
Check my Youtube video if you still have confusion on this.

Remove dual boot windows 10 ubuntu without Windows DVD:-
If you don’t have Windows 10 installation media, you can easily remove Ubuntu from dual boot with Easy BCD ( Download Now).
Once you’ve installed the application, you can easily edit, rename, reorder, add entries, and customize just about anything in the bootloader sequence for any number of installed operating systems.
You can access tools that will let you back up, restore, repair your bootloader, and even change your boot drive.
Note:- Below mentioned embedded youtube video is for removing Linux mint from dual boot windows 10, and the same method will be applied for Ubuntu also.

It’s important to note that removing Ubuntu from a dual boot setup can be a difficult procedure, and there is always a chance of data loss or computer harm if you make a mistake.
It might be a good idea to ask a professional or use online resources for assistance if you are uncomfortable with the above-described processes or unsure how to move forward.
Conclusion
In conclusion, uninstalling Ubuntu from a dual boot setup entails backing up your data, starting the operating system you want to keep, disabling Ubuntu from the boot menu, erasing the Ubuntu drive, and enlarging the remaining partition.
It is feasible to remove Ubuntu from a dual boot arrangement safely, even though it can be a difficult task.

