


So, you have received a new update from Microsoft, but when you are trying to install that on your system, you are greeted with an update error 0x8024001e. Not only that, but this error can also pop when you are trying to update just an application.
There are multiple reasons behind this error, which we are going to see later in the article. And we are also going to see methods to fix this.
Why is 0x8024001e error popping up?
There are different reasons for this problem. Apart from some usual suspects such as viruses and malware. There are some other reasons listed below.
- The DDL or Dynamic Link Library file’s absence or corruption can cause the 0x8024001e error.
- If the Registry Key which stores all the database in Windows OS, went missing or is being corrupted then you can see the error 0x8024001e.
- The error 0x8024001e can be caused due to an incomplete download of your update file.
0x8024001e Error on Windows 10: Possible Fixes
As now we know the reason behind this error, we can work around it to fix the problem. Below are the fixes of the error 0x8024001e.
1. Fix the Internet Connection
Bad internet connection is one of the most common reasons behind the error 0x8024001e. It makes sense, as an update requires you to have a proper internet connection.
There can be reasons behind your computer facing an internet crisis. We have covered all the reasons and fixes, here. But, there are some things that you can do in order to resolve the Internet issue.
Troubleshoot the adapter:-
In most cases, the problem can be solved by troubleshooting your network adapter.
Therefore, in this section, we are going to troubleshoot your network. To do that, you need to follow the prescribed steps.
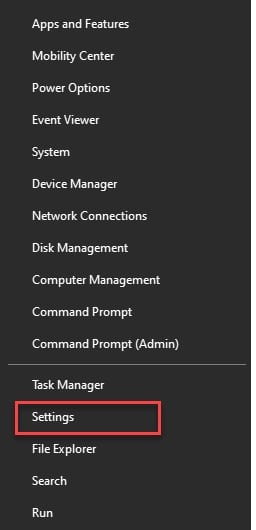
Step 1: Launch the Settings by either searching it out from the start menu or by right-clicking on the start menu and then select “Settings” from the appeared list.
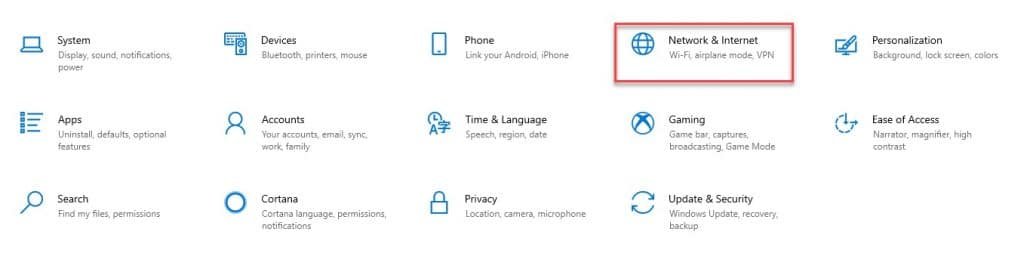
Step 2: Click on the Network & Internet option from the appeared settings window.
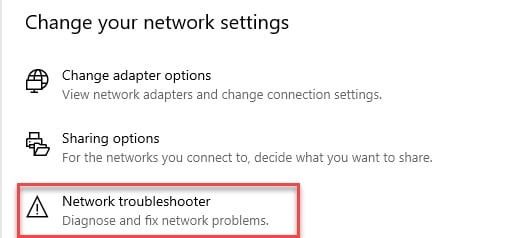
Step 3: Finally, make sure that you are on the status tab and then click on Network Troubleshooting placed under Change your Network settings.
Now, you need to follow the on-screen instruction to troubleshoot the network connection and you are good to go.
Synchronize the clock:-
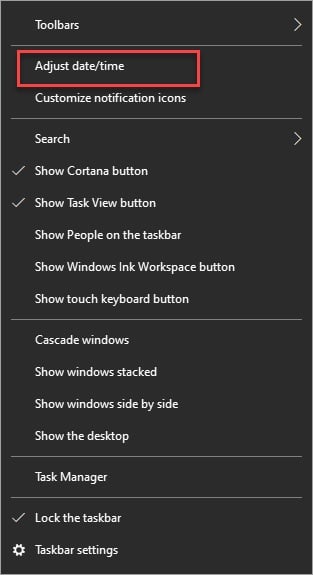
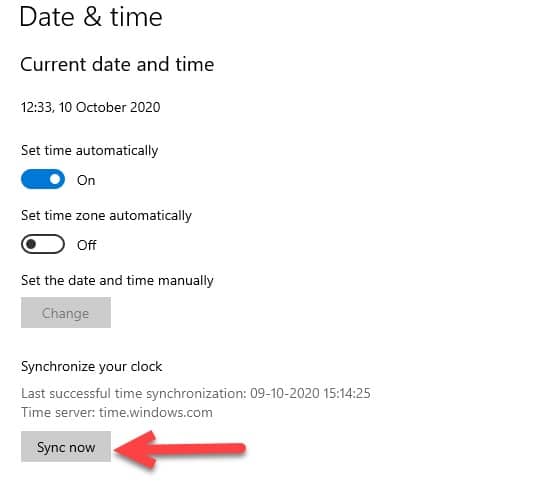
Another thing that might stop your internet from getting connected is the wrong date and time. The fix is pretty simple, just right-click on your current date and time and then select “Adjust date/time” from the appeared list.
Then you will be redirected to a window, where you can just click on the Sync now button placed under the Synchronize clock option.
Renew IP and Reset Winsock API:-
IP and API are two of the most important settings feature in your Computer. IP allows you to communicate with different servers and access the internet and API which is Application Program Interface allows interaction between different applications in your computer.
To do that, you need to follow the prescribed steps:-
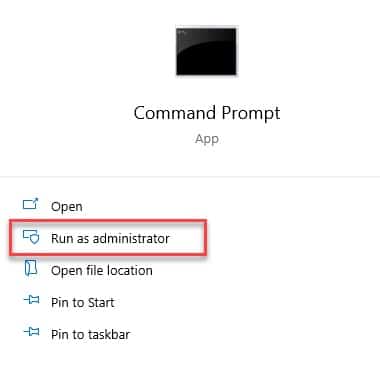
Step 1: Launch the Command Prompt as an admin either by searching it out from the start menu or by RUN(Win + R), type “cmd” and hit ctrl + Shift + Enter.
Step 2: Type the following command and hit enter one by one.
ipconfig/renew
netsh winsock reset catalog
netsh int ipv4 reset reset.log
The first one is to renew the IP and the next two are to reset Winsock API.
Update your Driver:-
The last thing you can do to fix your internet connection is to update your driver. To do that, we are going to use the following steps:-
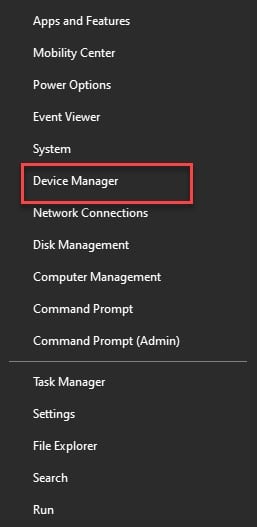
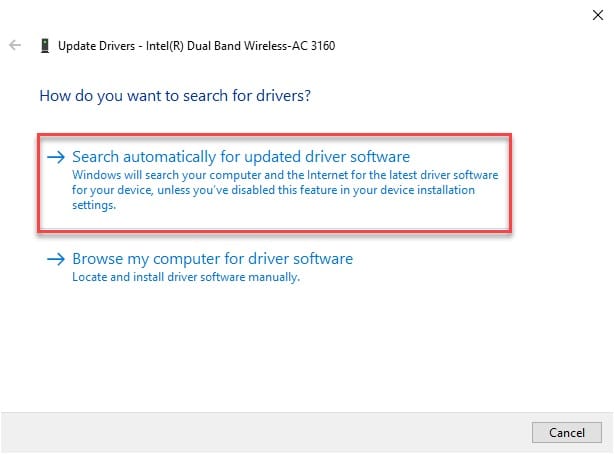
Step 1: Launch the Device Manager either by searching it out from the start menu or by right-clicking on the start menu and then select “Device Manager” from the appeared list.
Step 2: Now, reach the Network Adapter option, expand it, right-click on your Network Adapter, i.e; Intet Network Connection(in most of the devices), and then select Update driver from the appeared list.
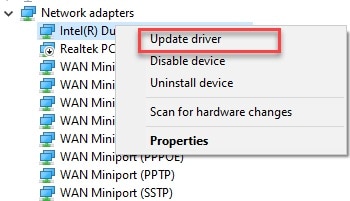
Step 3: From the appeared Window, select “Search Automatically…” and then follow the on-screen instruction to update your driver.
Hopefully, this solves your internet connection and then you can update your system to solve the 0x8024001e error.
If this doesn’t restore your internet or Wifi connection then you should check “Why is my Wifi slow”.
2. Restart your update
As mentioned earlier, the 0x8024001e error comes when you try to update your Windows. But sometimes, the error is not too serious and a simple restart can solve your problem.
To restart the update in Windows 10, you need to follow the prescribed steps:-
Step 1: Launch Services by either searching it out from the start menu or by RUN(Win + R), type “services.msc”, and hit enter.
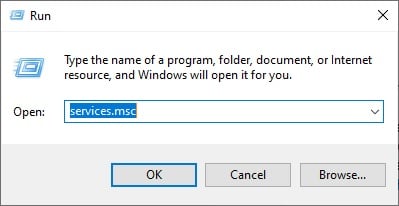
Step 2: From the appeared list of Windows Services, you need to search for Windows Update, right-click on in it, and then select Start from the appeared list.
Now, your update process will start. After downloading the update you need to restart the computer in order to install that update. Therefore, save all the documents that you are working on.
If the whole process completes without you receiving any error message then you will not receive the 0x8024001e error again.
3. Fix the Registry key
Your registry is responsible for the update of your system. And it is corrupt can cause the 0x8024001e error. Therefore, in this section, we will how to fix the Registry key.
We have two methods to do that. One with the help of Advanced Startup and the other with the command prompt.
To fix the registry with the help of Advanced Startup you need to follow the prescribed steps:-
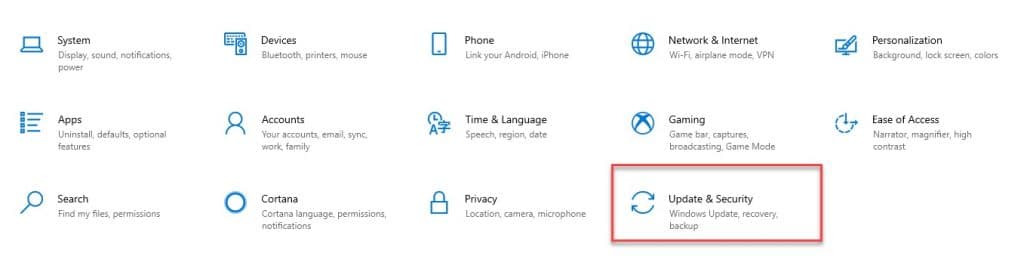
Step 1: Launch the Settings by either searching it out from the start menu or by right-clicking on the start menu and then select “Settings” from the appeared list.
Step 2: Click on the Update & Security button from the appeared window.
Step 3: Now, you need to go to the Recovery tab and click on the Restart Now button from the Advanced Startup section.
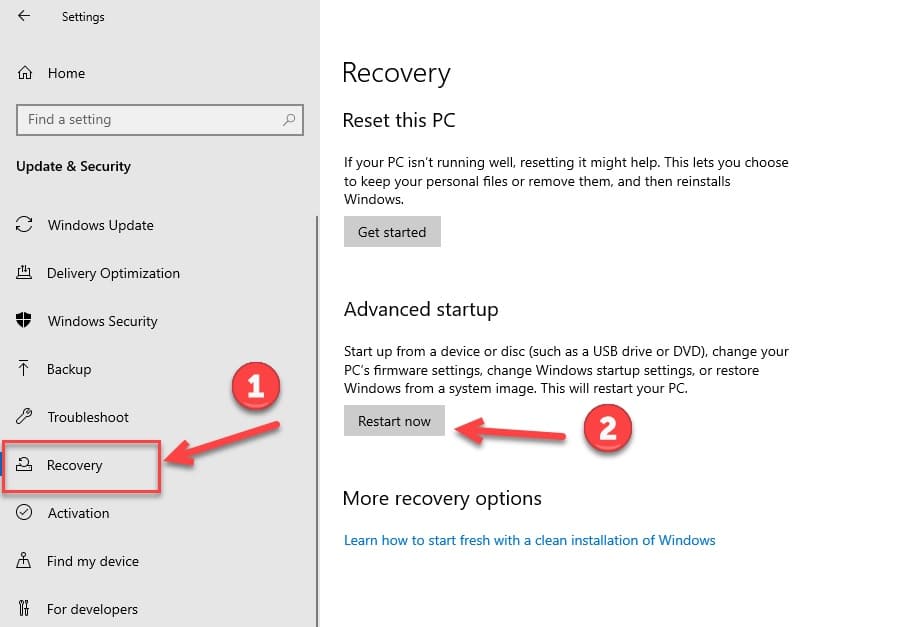
Step 4: Afterward, you will see a window, titled Advanced options, from there you need to select the Automatic Repair button. Finally, choose the admin account and you are good to go.
Now, your system will search your registry and check whether there is a corrupted file or not. If there is, it will fix that and you won’t receive 0x8024001e error message again.
To fix the registry with the help of Command Prompt you need to follow the prescribed steps:-
Step 1: Launch the Command Prompt as an admin either by searching it out from the start menu or by RUN(Win + R), type “cmd” and hit ctrl + Shift + Enter.
Step 2: Type the following command and hit enter.
sfc /scannow or DISM /Online /Cleanup-Image /ScanHealth

This command will automatically
4. Change the name of the Software Distribution folder
In this section, we are going to rename the software distribution folder to fix the error. But before that, we need to do one thing, stop the Windows update.
To stop the Windows Update, you need to follow the prescribed steps:-
Note: only stop the Windows Update if it’s running.
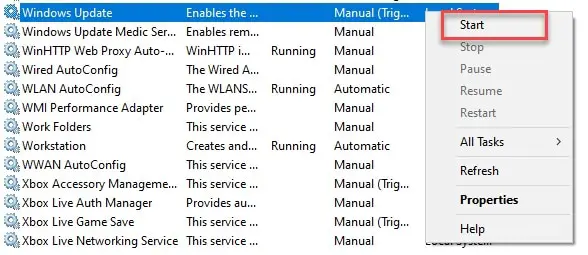
Step 1: Launch Services by either searching it out from the start menu or by RUN(Win + R), type “services.msc”, and hit enter.
Step 2: From the appeared list of Windows Services, you need to search for Windows Update, right-click on in it, and then select Stop from the appeared list.
So, now since we have stopped the Windows update we can move to the next steps of renaming the folder.
Step 3: Now, open the Windows Explorer or this PC by searching it out from the start menu.

Step 4: From the appeared Windows Explorer window, you need to go to Local Disk “C” and then open the Windows folder.
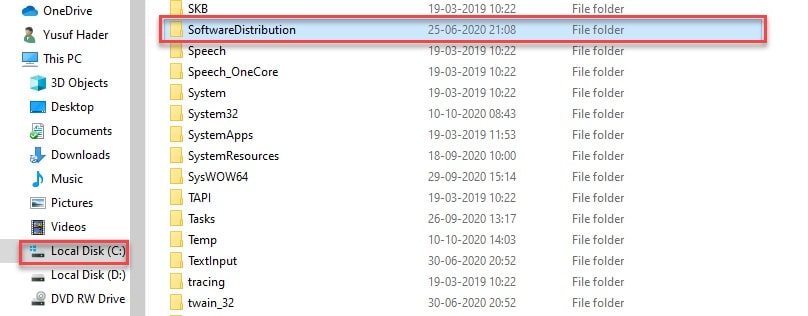
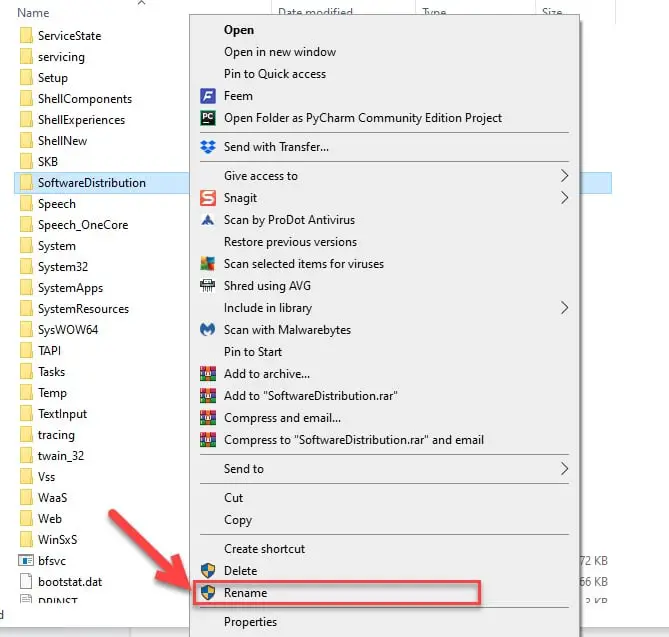
Step 5: Now, right-click the on SoftwareDistribution folder, select rename from the appeared list, and change the name to something that you can remember(for example, SoftwareDistribution0).
Now, we need to restart the update process.
Step 6: Launch Services by either searching it out from the start menu or by RUN(Win + R), type “services.msc”, and hit enter.
Step 7: From the appeared list of Windows Services, you need to search for Windows Update, right-click on in it, and then select Start from the appeared list.
Hopefully, this will resolve the error 0x8024001e.
5. Perform System Restore
This should be your last option and you should only perform this if all the above-mentioned methods fail.
To do that, you need to be obedient to the following steps:-
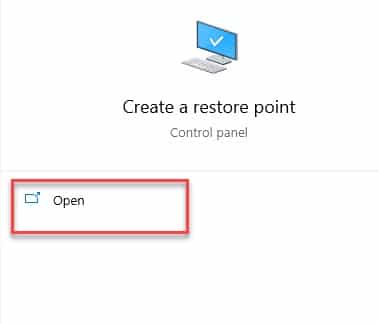
Step 1: First of all you need to create a system restore point. To do that, type Create System Restore in the search bar and then click Open.
Step 2: Now, from the appeared window, click on Create.
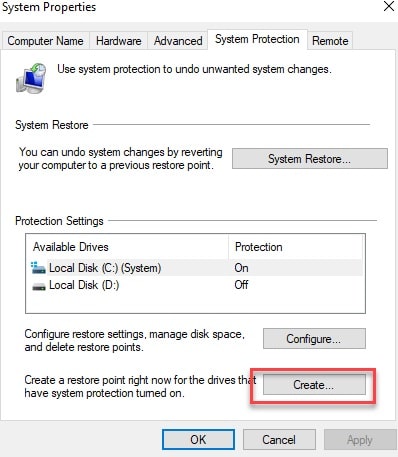
Step 3: Here, you need to give your restore and then click on Create.
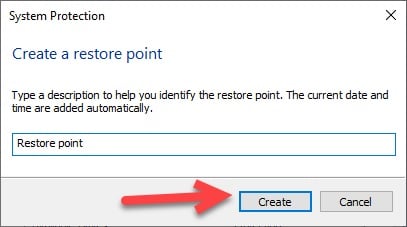
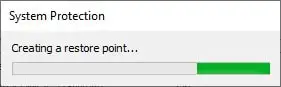
This will take a few minutes and your restore point will be created.
Now, we need to access the created restore point.
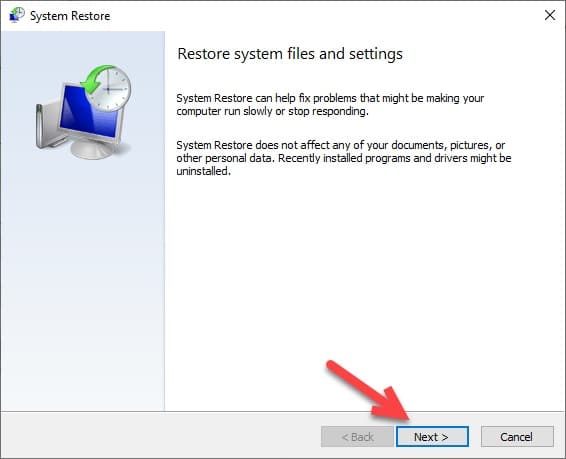
Step 4: Again launch the system restore window and then click on the System Restore.
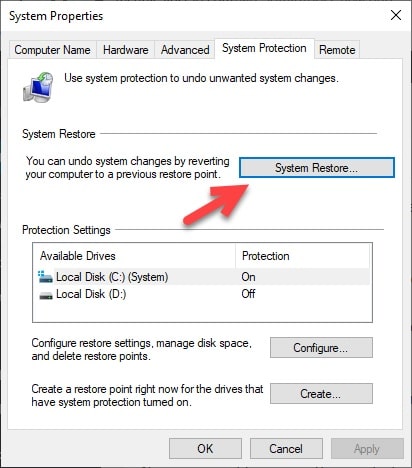
Step 5: Now, you need to do as per instruction shown on the screen.
After the completion of System Restore, you need to restart your computer and hopefully, you will not face the 0x8024001e error.
Summary
The 0x8024001e update error is not caused due to corrupted update files and the absence of DDL and Registry key. In this article, we have seen six fixes of this cause. Let’s have a quick glance at these fixes.
1. Fix the internet connection by troubleshooting the adapter, changing the time and the date, resetting Winsock API(cmd code: netsh winsock reset catalog and netsh int ipv4 reset reset.log), renew IP(cmd code: ipconfig/renew), and update the driver from the device manager.
2. Restart your Windows Update from the Services application.
3. Fix the registry key, by Win + R, type “cmd”, hit Ctrl + Shift + Enter, type “ sfc /scannow or DISM /Online /Cleanup-Image /ScanHealth” and hit enter.
4. Rename the SoftwareDistribution folder, by launching Windows Explorer, navigate to Local Disk C> Windows> SoftwareDistribution, right-click on it, and then rename.
5. If all fail, you can perform a system restore, by searching the system restore from the start menu and then follow the on-screen instructions.


