


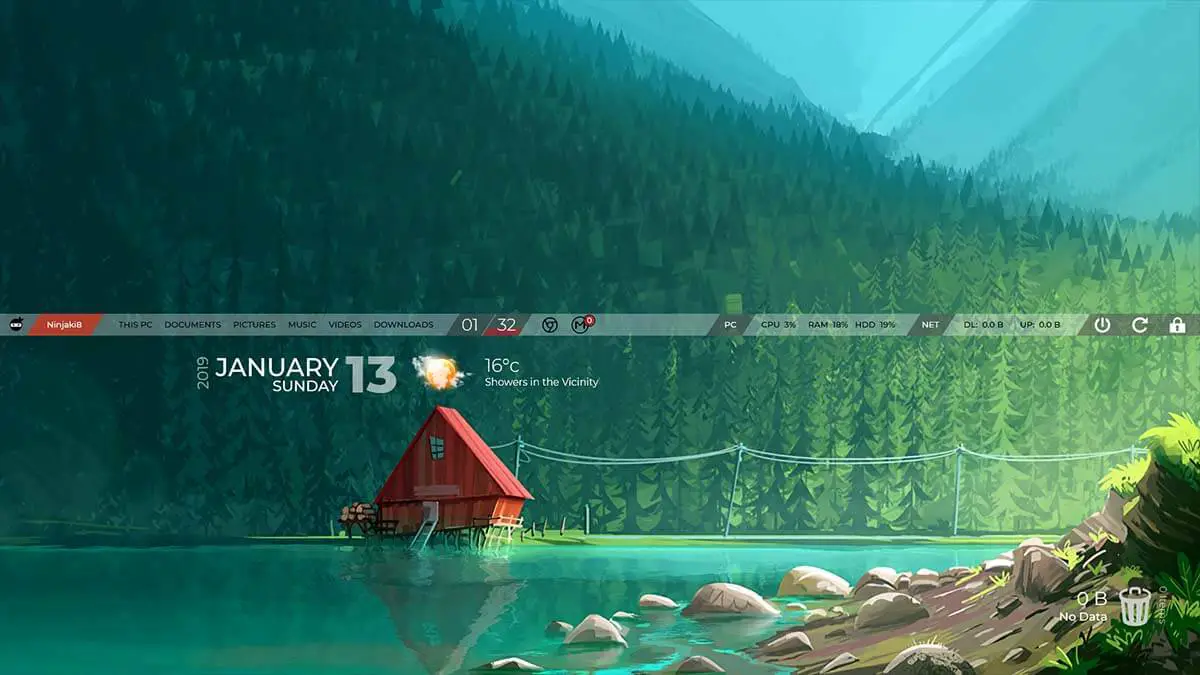
Windows 7 lets you add floating widgets – clocks, calendars, photos, news feeds, and system monitors – to your Desktop but they were dropped from Windows 8 due to “serious vulnerabilities”. Win10 Widgets safely brings them back to Microsoft’s latest operating system version.
Built using the Rainmeter customization tool, which is included in the download, it lets you add customizable widgets to your Desktop.
The widgets are designed to suit any wallpaper and screen resolution, and automatically adapt to your Windows 10 accent color.
Win10 Widgets comes with a good selection of widgets to get you started and there are more planned for the future.
In this tutorial, we will explore the Windows10 widgets option along with other options to add widgets to Windows 10 PC.
How To Add Widgets To Windows 10/11 Desktop
1. Use Win10 Widgets
Win10 Widgets program is the best easy program to add widgets in your PC, just follow the below steps.
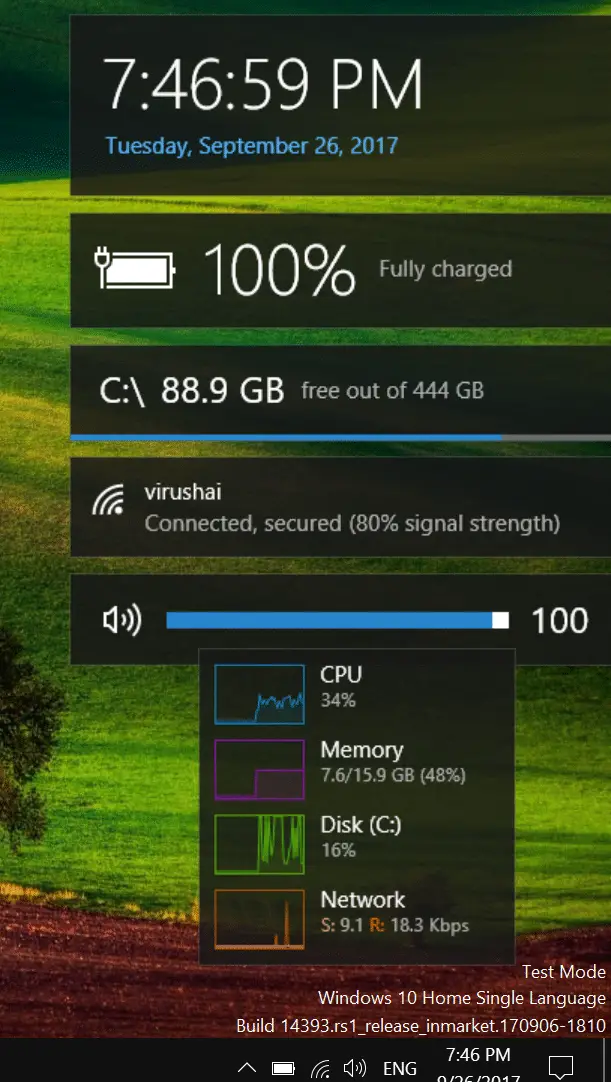
Step 1:- Download and run the program, selecting the Standard Installation option. The default widgets are displayed on your Desktop.
These include a clock, battery meter, drive-space monitor, Wi-Fi, volume control, system monitor, and weather. Click and drag to move them
Click and drag to move them around the screen.
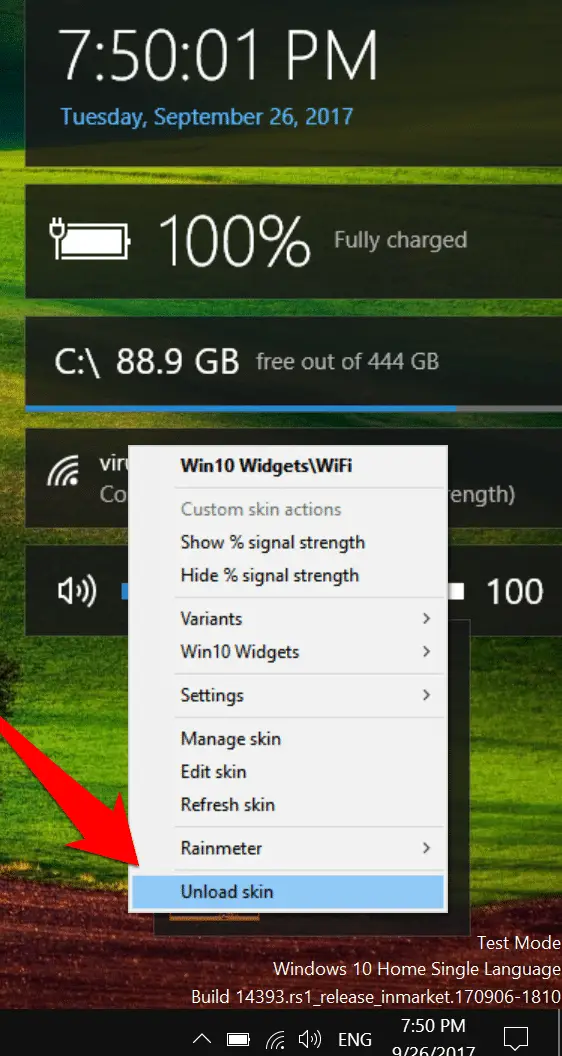
Step2:- Close the Welcome widget by clicking the ‘X’ in the top-right corner. To close any of the other widgets, right-click one and select ‘Unload skin’.
The right-click context menu is used to customize the different widgets and add new ones. You can change a widget’s size under Variants
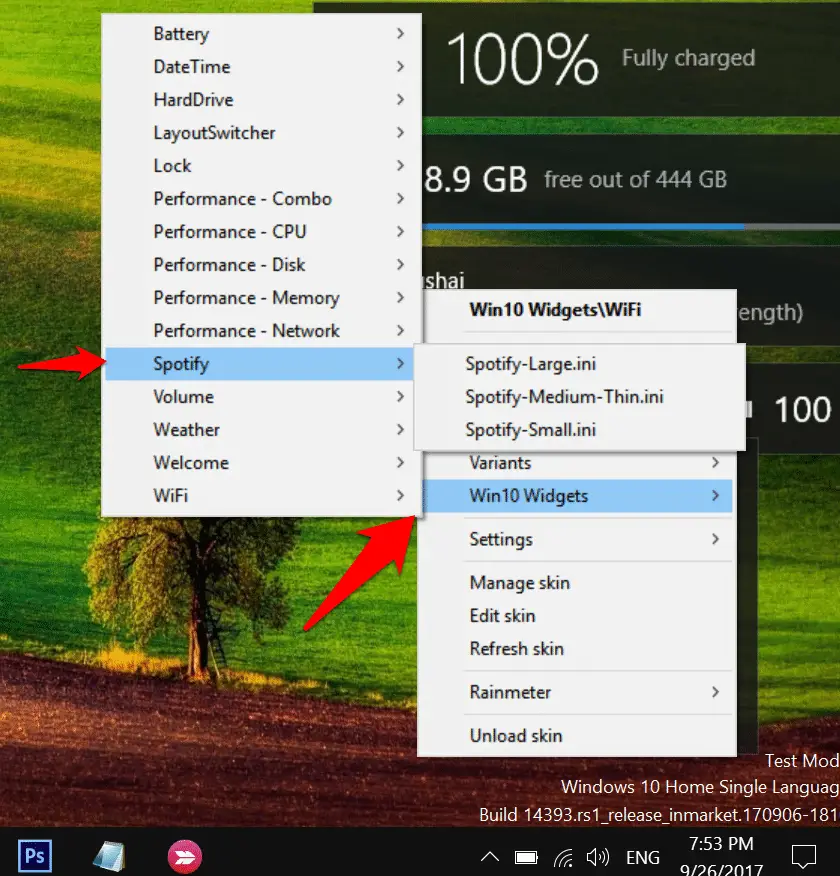
Step3:- To add a new widget, right-click an existing one and go to Win10 Widgets. Choose a widget from the list and select the size you require.
There are some additional widgets that aren’t loaded by default, such as the Spotify one. You need Spotify installed for it to work, though.
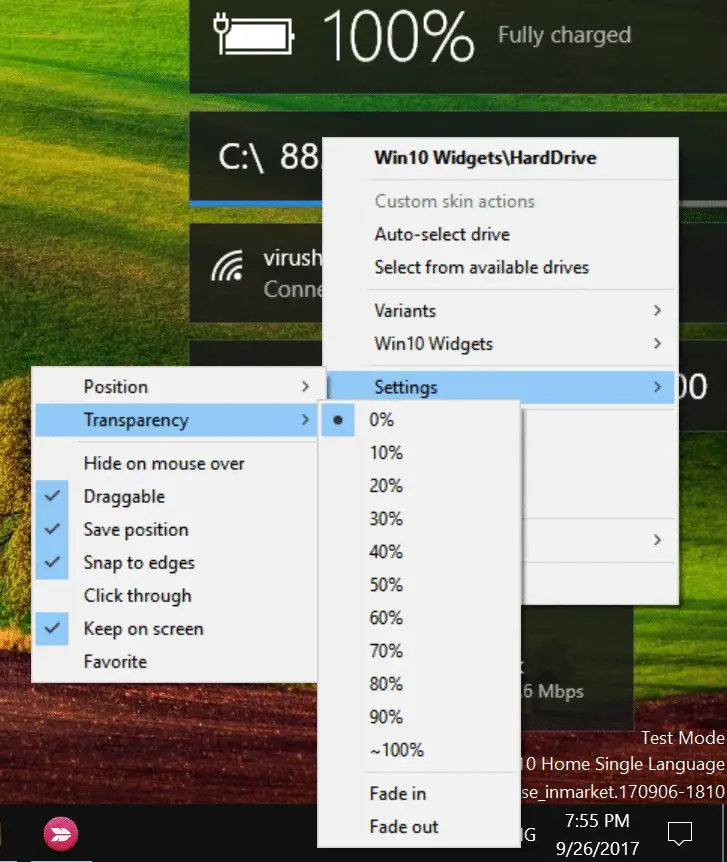
Step4:- The Settings menu lets you customize the look and behavior of the widgets. You can adjust the position and transparency (in 10% steps) and have the widget disappear when you move your mouse over it.
This is handy if you don’t want widgets getting in the way of your Desktop.

2. Add widgets to windows 10 desktop With Rainmeter
Rainmeter is a utility that does the same thing for Windows desktops, offering a choice of widgets – called gadgets – that show useful information and link to actions, such as opening programs.
Download Rainmeter from www.rainmeter.net and run it.
This adds an icon to the notification area, which opens the main Rainmeter window. A selection of desktop gadgets will appear, showing information such as time, drive usage, CPU, RAM, swap file use, network activity and more.
Expand the ‘illustro’ skin, then expand Disk, and you’ll see two variations of the disk information widget: ‘1 Disk.ini’ and ‘2 Disk.ini’. Select one and click the Load button to show it on the desktop.
Expand every section in the theme and select each item, then load or unload items to determine whether or not they appear on the desktop. If you have a choice, try out each option to see which you like best.
Each gadget has a number of settings, such as its coordinates on the screen, what happens when the mouse hovers over it, transparency and so on. Experiment with the settings to see what works best.
Gadgets are bundled into skins. Rainmeter comes with one skin, but there are much more available –
for example, go to https://www.deviantart.com/rainmeter , select the Gallery tab and click Skins on the left. There are 17 categories of skins on offer, such as ‘Time and Date’, Weather, System Monitoring, ‘Notes and Quotes’, VU Meters and many more.
Find a theme you like and click the Download button, then open the Downloads folder and double-click the ‘.rmskin’ the file you downloaded.
This installs and activates the skin, and the desktop gadgets appear. Right-click any gadget to access a menu that lets you unload the skin or customize it without opening the main Rainmeter window.
3. Use Inbuild Widget Program
It may look surprising to you windows 10 have an inbuild widgets program, but many of us don’t know about it, you just need to know how to enable and use it.
There is no direct application available in windows 10 for widgets but additionally, you can use the XBOX game bar for this use.
Just search for the “XBOX Game bar” in the Start menu and open it.

here Click on the 4 Dot Icon screen, it will show you the widgets for the Audio, Capture, Gallery, Performance, and Spotify.
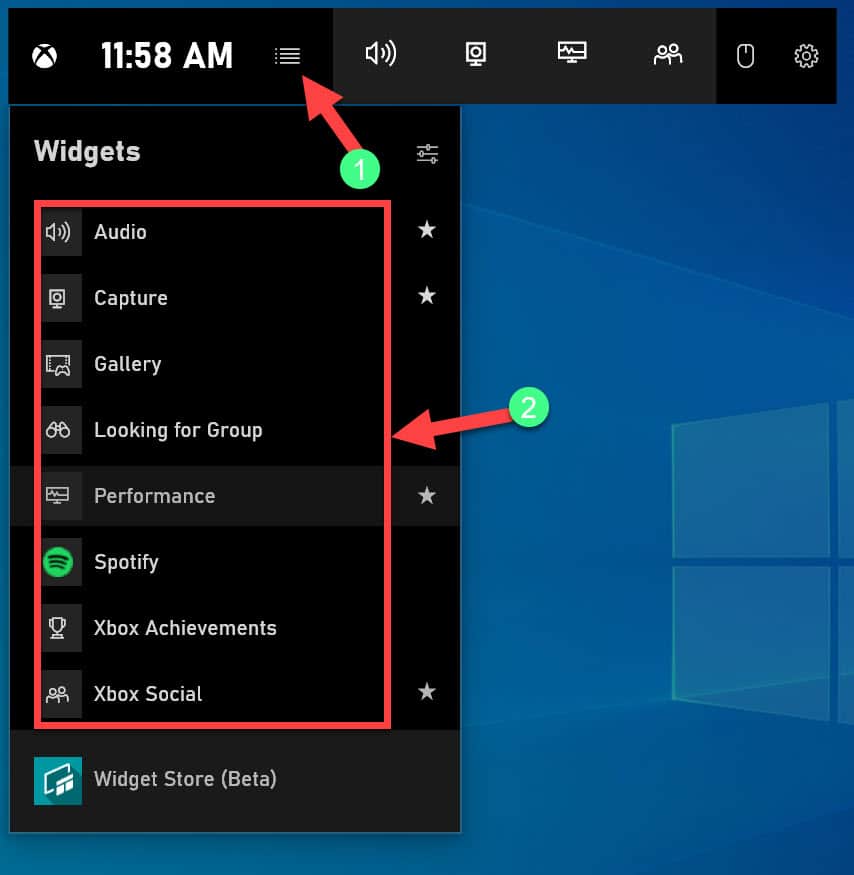
Here just select the widgets that you want to use, Like in my case I want to use the performance monitor so I selected the performance option.
After selecting your option, click on the Three-line option to configure the additional settings related to the widgets.
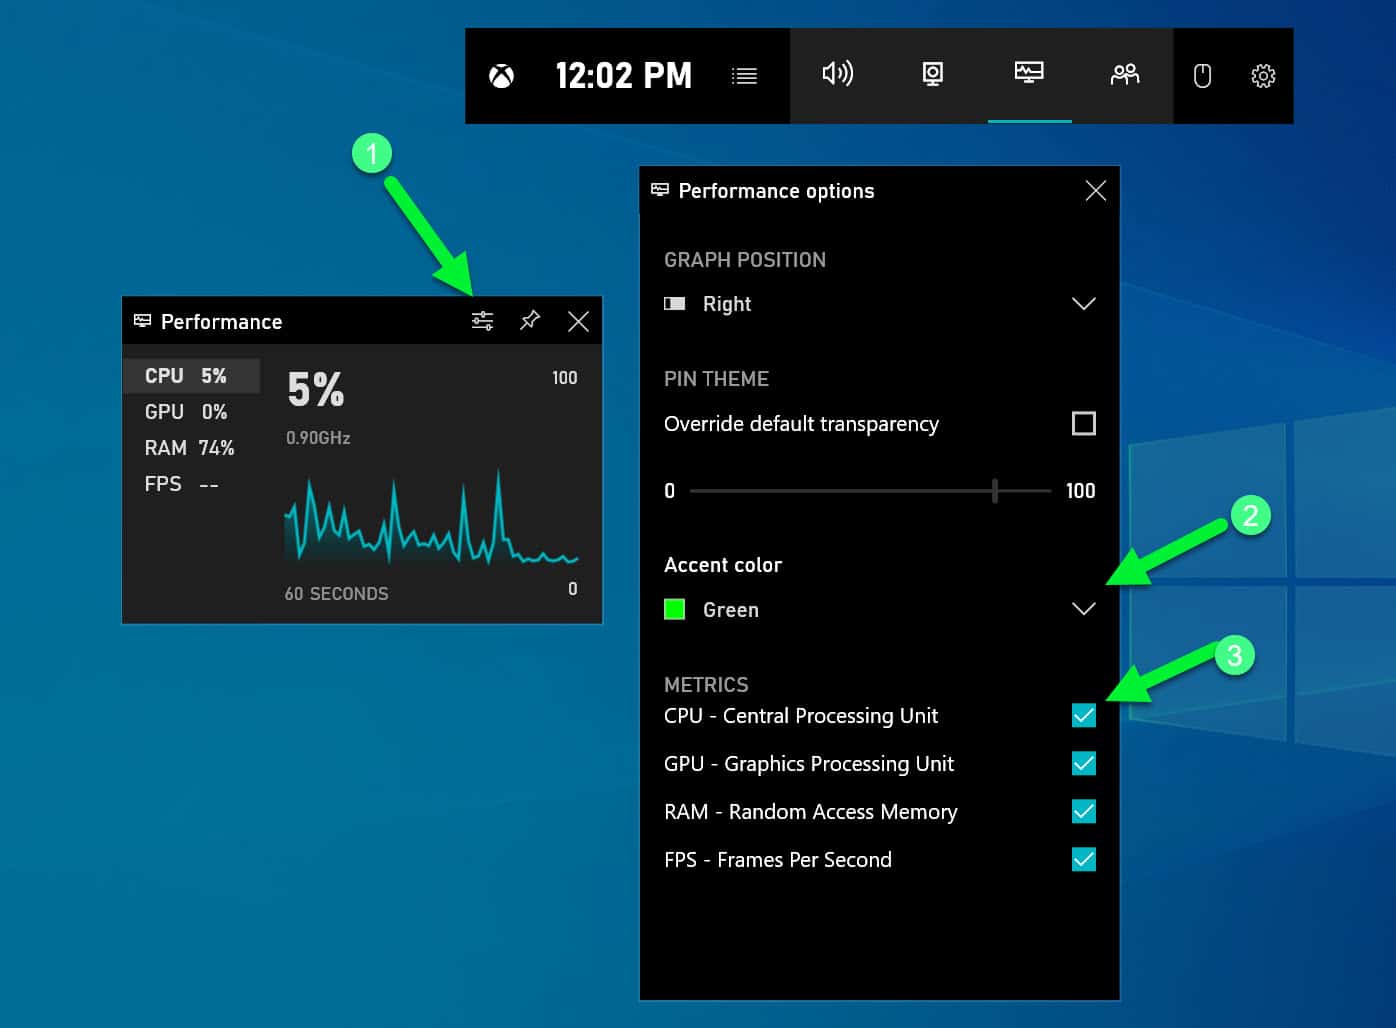
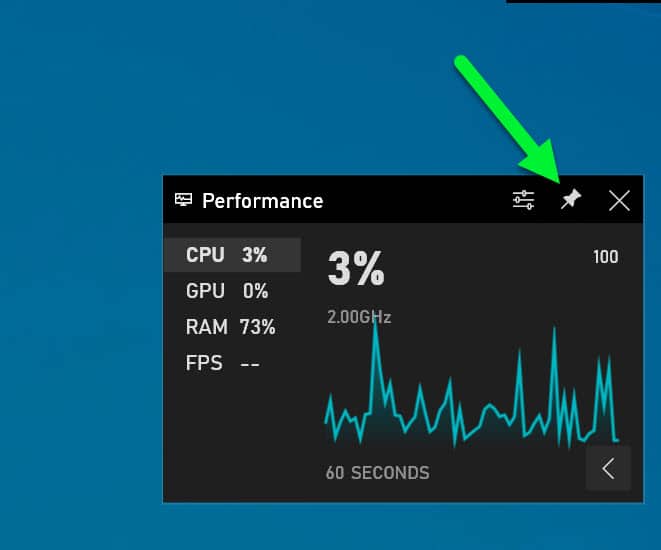
Click on the Pin option, if you want to pin this widget on your desktop.
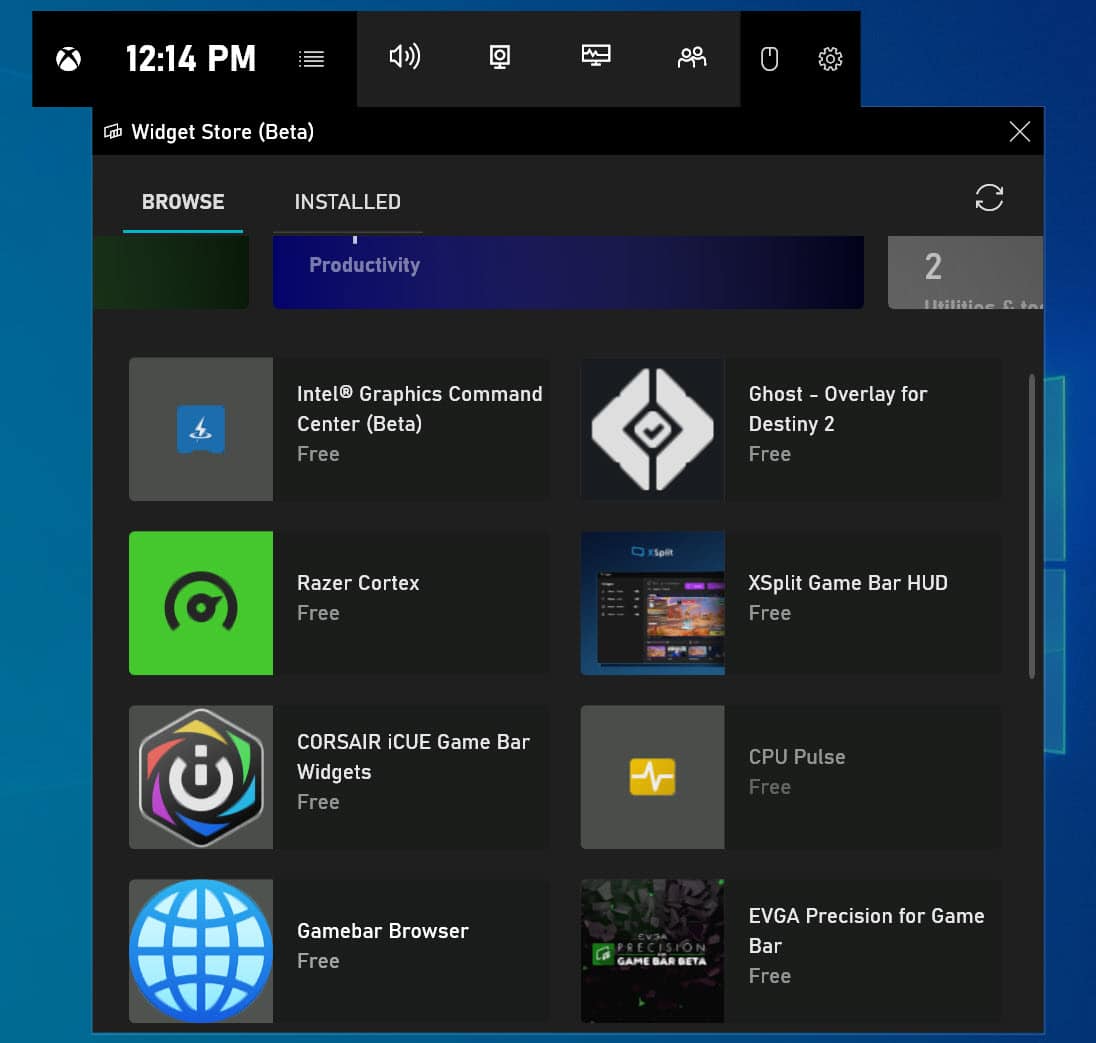
You might notice there is an option of “Widget Store (Beta)” under the XBOX widget menu bar. Click on it
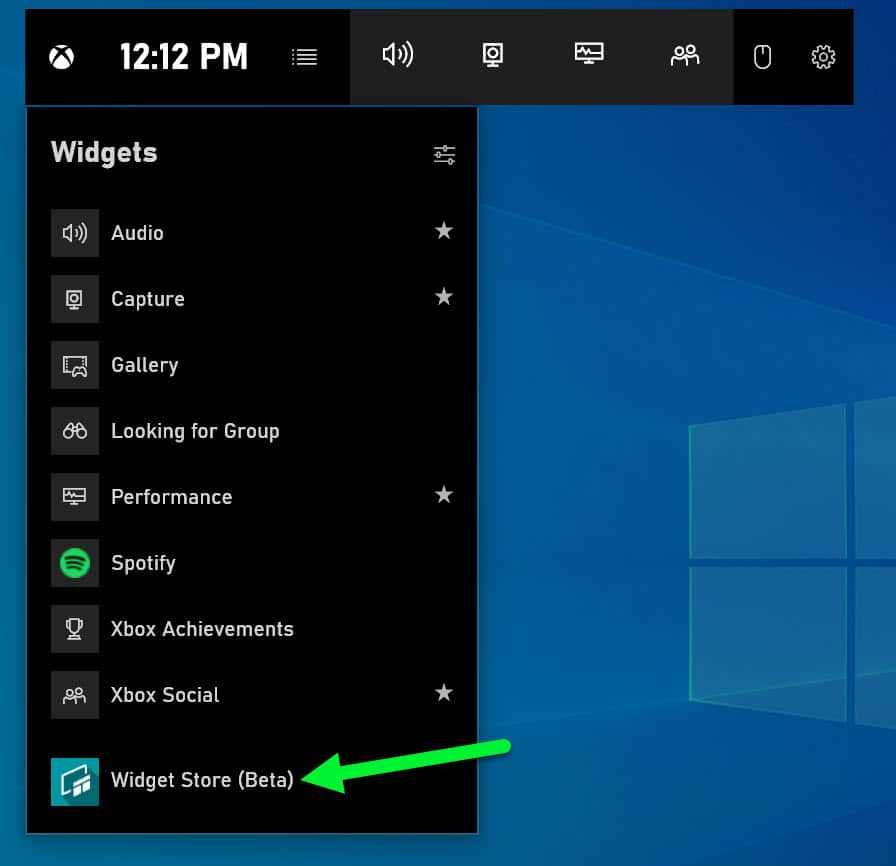
Here you have the option to download multiple widgets, Just select the widgets that you want to install and click on the install option to install it.
Note:- If you pin the widget then only by unpinning it will remove from the desktop.
4. 8GadgetPack
8GadgetPack (Download Here) is another best tool to bring the gadgets option in your windows 10 operating system, actually, this program was released at the time of windows 8 only and now it’s supporting windows 10 also.
Like other widgets program, this program is also completely free. This tool will help you to improve your productivity with the help of Clipboard-Manager, Clock, Setting up the volume widgets.
5. Gadgets Revived
This tool is quite different then other gadgets utility actually it’s helping you to get other widgets. First, download the gadgets reviewed on your desktop
First, you’ll need to download the Desktop Gadgets installer, and then you can pick the gadgets you want to install on your desktop.
6. Gadgetarian
If you are looking for a lightweight application to bring back your windows 7 gadgets to your Windows 10 PC then Gadgetarian (Download Here) is a perfect tool for you.

This program is just enabling the functionality of the widget in your PC to access your favorite program through widgets.
7. Get macOS Type App Dock
Have you ever used or seen the macOS interface, it came with an APP dock in the bottom screen that is helping mac users to access their program quite effectively.
You might be thinking why I am talking about the macOS app dock in the Windows 10 article? 🤔 because there is a small program named Aqua Dock (Download Here) available to bring the app dock feature in your windows 10 OS.
After installation, launch the aqua app and you will see the aqua screen on your taskbar.
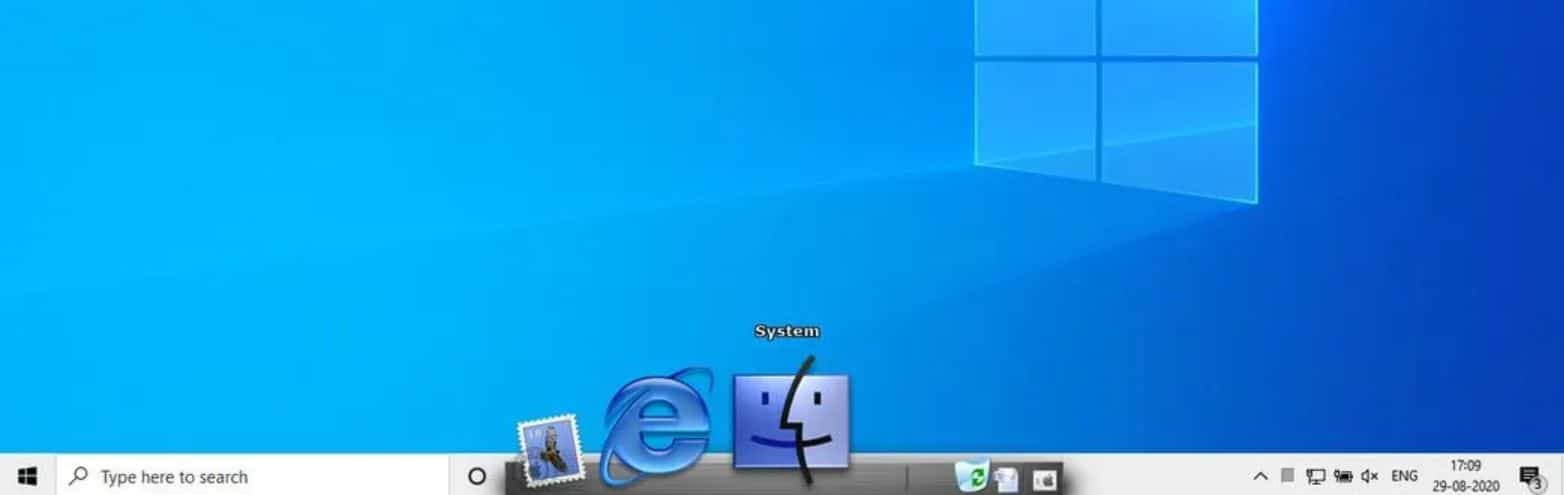
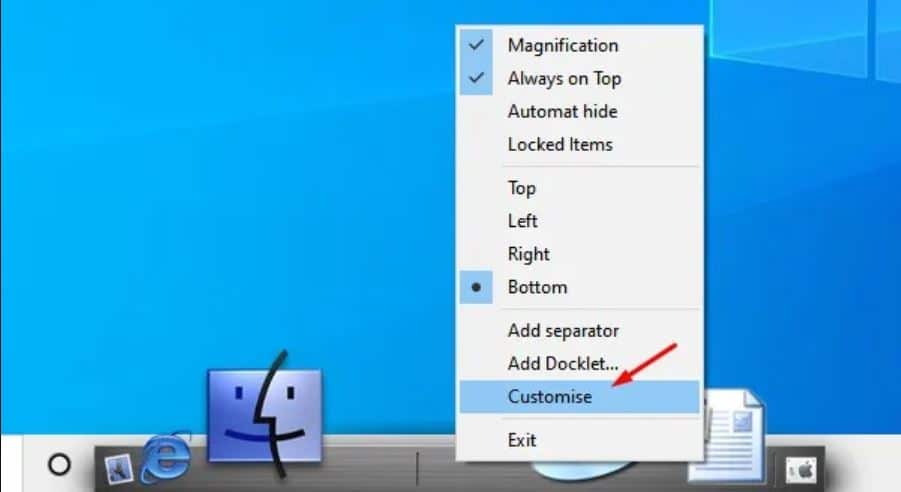
You can easily customize this dock by just-right click on it.
8. Winstep Nexus
You’d be forgiven for dismissing Winstep Nexus (Download Here) as an outdated remnant of Windows 7 when you first launch it.
But don’t be put off by the widgets and the transparent Aero theme, because you can easily change almost everything about Nexus’s appearance to give it a flatter look that’s better suited to Windows 10.
The software places a toolbar, aligned centrally, across the top of the screen. This houses a handful of icons offering shortcuts to the Start menu and Recycle Bin, along with various widgets such as a clock, a weather forecast, and CPU and RAM meters.
The dock can be placed anywhere on the screen, either hugging one of the edges or, if you prefer, floating and available for dragging around with your mouse, so you can position it wherever you like.

Click the Nexus button and you can configure the dock to suit your preferences. As well as changing its appearance, Nexus can be set to replace the taskbar, automatically displaying icons for the programs you’re currently running and even adding the icons from the system tray.
We were impressed with the level of customization available, from the size of the icons to the way the dock is displayed. Nexus also offers a wealth of predesigned themes, which you can further tweak to suit your preferences, and the option to cluster several widgets together to save space.
There’s little that the software can’t do, or be configured to do from its settings, and it’s this powerful versatility that makes to add in our windows 10 widgets list.
There are a few free widgets included but most of them are already installed. You can click a button to get more in the settings but this takes you to the paid-for Pro version, which costs £15. This also buys you more themes, though there are plenty in the free version.
A good dock should be easy to control and configure – you want just the right collection of shortcuts to your most used items, neatly arranged and ready to launch.
Winstep Nexus provides this with flair and flexibility. Programs can be dragged into place from desktop shortcuts and you can configure it to look and work in exactly the way you want it to.
9. Rocket Dock
RocketDock (Download Here) installs at the top of your screen, where hovering over an icon enlarges it, so it looks like it’s leaping out of the dock, ready for action. You can change its appearance by applying different themes, but it’s not as flexible as Winstep Nexus.
Drag a shortcut to the dock to add its icon, or remove it by dragging it off the dock again (it vanishes in a little puff of smoke). This works well with program icons, such as desktop shortcuts you’ve already made, but isn’t as intuitive with built-in Windows apps, such as the Settings app.
To get around this, you can add Settings to the dock in the same way as you’d create a desktop shortcut. However, this replaces the flat Windows 10 icon with a less attractive alternative that can’t be customized as easily as with Winstep Nexus.
RocketDock is a useful way to gather program icons into a handy toolbar, and it does the job well. However, its own icons are horribly old-fashioned, and it doesn’t offer the level of customization and control you get from Winstep Nexus.
10. TaskbarX
TaskbarX (Download Here) isn’t really a dock – it’s a taskbar tweaker with some tools to make your existing Windows 10 taskbar look more like a dock. It’s ideal if you just want to make a few subtle, minimalist changes.
We tested the free portable version of TaskbarX, but you can also download and install it from the Windows Store for 89p, which then updates automatically.
The simple interface lets you perform some clever tweaks, such as making the taskbar transparent to give your icons the appearance of a floating dock and moving elements of the taskbar around multiple screens, if you use more than one monitor.
https://youtu.be/oqA3BDt-GqY
If you’re not bothered about the widgets and other elements of a proper dock, TaskbarX may be all you need.
It lets you perform various tweaks to the existing Windows taskbar, such as centering icons and making the background transparent, to give it a dock-like look.
📗FAQ
Can you add widgets to Windows 11 desktop?
Yes, you can add widgets to the Windows 11 desktop by clicking on the Widgets icon on the Taskbar or by pressing the Windows key + W. This will bring up the Widgets panel, and you can select and add widgets from there.
How do you customize widgets in Windows 11?
To customize widgets in Windows 11, you can click on the three-dot icon on the top right corner of the Widgets panel, and select “Customize.” This will allow you to change the size and position of the widgets, as well as enable/disable some of their features.
How do I add a clock widget in Windows 11?
To add a clock widget in Windows 11, open the Widgets panel and scroll down to the “Clock” section. From there, select the clock widget you want to add and click on the “+” icon to add it to your desktop.
How do I create a custom widget in Windows?
Unfortunately, Windows 11 does not allow users to create custom widgets. You can only select and customize the widgets that are available in the Widgets panel.
Can I put icons on Windows 11 desktop?
Yes, you can put icons on the Windows 11 desktop by either dragging and dropping them from the Start menu or File Explorer, or by right-clicking on the desktop and selecting “New” > “Shortcut.”
What happened to Windows desktop widgets?
Windows desktop widgets were removed in Windows 8 due to security concerns, and they have not been officially supported in Windows 10 or Windows 11. However, Windows 11 introduced a new set of widgets that can be added to the desktop through the Widgets panel.
Why can’t I add widgets on Windows 11?
If you are unable to add widgets on Windows 11, it may be due to a bug or an issue with your system. Try restarting your computer or updating to the latest version of Windows 11. If the issue persists, contact Microsoft support for assistance.
Where is the widgets folder in Windows 11?
There is no widgets folder in Windows 11. Widgets are managed through the Widgets panel, which can be accessed by clicking on the Widgets icon on the Taskbar or by pressing the Windows key + W.
How do I add and remove widgets in Windows 11?
To add widgets in Windows 11, open the Widgets panel and select the widget you want to add. To remove widgets, simply click on the “X” icon on the top right corner of the widget.
Can you add widgets on Windows 11 without a Microsoft account?
Yes, you can add widgets on Windows 11 without a Microsoft account. However, some widgets may require a Microsoft account to access certain features.
How do I add a floating clock in Windows 11?
Unfortunately, Windows 11 does not have a floating clock widget. However, you can use third-party software to add a floating clock to your desktop.
How do I use widgets in Windows 11 without signing in?
You can use some widgets in Windows 11 without signing in to a Microsoft account. However, some widgets may require a Microsoft account to access certain features.
How do I put widgets on my screen?
To put widgets on your screen, open the Widgets panel and select the widget you want to add. Then, drag and drop the widget to the desired location on your desktop.
How do I add my own widget to my home screen?
Unfortunately, Windows 11 does not allow users to create custom widgets. You can only select and customize the widgets that are available in the Widgets panel.
How do I use custom icons in Windows 11?
To use custom icons in Windows 11, right-click on the desktop and select “Personalize.” Then, click on “Themes” and select “Desktop icon settings.” From there, you can choose a custom icon for each type of desktop icon.
How do I make my own icons for Windows 11?
To make your own icons for Windows 11, you can use a graphics editor such as Adobe Photoshop or GIMP. Create a new file with the dimensions of 256×256 pixels and design your icon. Once you have finished designing your icon, save it as a .ico file.
How do I put apps anywhere on my desktop in Windows 11?
To put apps anywhere on your desktop in Windows 11, simply drag and drop them to the desired location on your desktop.
Can I add widgets to Windows 10?
Windows 10 does not officially support widgets. However, there are third-party software and apps available that can add widgets to the desktop.
What is the Windows shortcut for widgets?
The Windows shortcut for widgets in Windows 11 is Windows key + W.
Why did widgets disappear?
Widgets disappeared in Windows 8 due to security concerns. However, Microsoft reintroduced a new set of widgets in Windows 11.
How do I enable full-screen widgets in Windows 11?
To enable full-screen widgets in Windows 11, open the Widgets panel and click on the three-dot icon on the top right corner. From there, select “Open in full screen” to view the widget in full screen mode.
Why are my icons not showing up in Windows 11?
If your icons are not showing up in Windows 11, try restarting your computer or resetting your desktop icon settings.
Which Windows had widgets?
Windows Vista and Windows 7 had desktop widgets, which were later removed in Windows 8.
Where are desktop icons stored in Windows 11?
Desktop icons in Windows 11 are stored in the following location: C:\Users\username\Desktop.
Is Windows widgets necessary?
Windows widgets are not necessary but can be useful for displaying information and accessing frequently used apps.
Why are my Windows 11 widgets empty?
If your Windows 11 widgets are empty, try updating to the latest version of Windows 11 or resetting your widgets settings.
What is Windows widgets Windows 11 disable?
Windows widgets in Windows 11 can be disabled by right-clicking on the desktop and selecting “Show widgets.” From there, toggle off the “Widgets” option.
Why does Windows 11 Home require a Microsoft account?
Windows 11 Home requires a Microsoft account for certain features such as accessing the Microsoft Store and syncing settings across devices.
Can I use the Windows 11 Microsoft Store without a Microsoft account?
No, you cannot use the Windows 11 Microsoft Store without a Microsoft account.
How do I get the aesthetic clock on Windows?
To get the aesthetic clock on Windows, you can download a clock widget from the Widgets panel or install a third-party clock software.
How do I show multiple clocks in the Windows 11 Taskbar?
To show multiple clocks in the Windows 11 Taskbar, right-click on the Taskbar and select “Taskbar settings.” Then, scroll down to the “Multiple clocks” section and select the additional clocks you want to display.
What do widgets do in Windows 11?
Widgets in Windows 11 can display information such as weather, news, and calendar events, and can also provide quick access to frequently used apps.
Are Windows 11 widgets useful?
Windows 11 widgets can be useful for displaying information and accessing frequently used apps, but their usefulness may vary depending on the user’s preferences and needs.
What keyboard shortcut opens the widgets pane in Windows 11?
The keyboard shortcut to open the widgets pane in Windows 11 is Windows key + W.
What are screen widgets?
Screen widgets are small applications that are designed to display information or provide quick access to frequently used apps on the device’s screen.
Where can I find widgets in my settings?
You can find widgets in Windows 11 by clicking on the Widgets icon on the Taskbar or by pressing the Windows key + W. They are not located in the Settings app.
What is the difference between an app and a widget?
An app is a software program that can be launched and run on a device, while a widget is a small application that is designed to display information or provide quick access to frequently used apps on the device’s screen.
How do I customize my home screen?
To customize your home screen in Windows 11, right-click on the desktop and select “Personalize.” Then, click on “Themes” and select “Background” to change the wallpaper, or select “Colors” to change the accent color and transparency effects.
How do I customize my desktop icons?
To customize your desktop icons in Windows 11, right-click on the desktop and select “Personalize.” Then, click on “Themes” and select “Desktop icon settings.” From there, you can choose a custom icon for each type of desktop icon.
How do I customize Windows 11 like a pro?
To customize Windows 11 like a pro, you can use third-party customization tools such as Rainmeter, WindowBlinds, and Winaero Tweaker.
How do I turn a PNG into an icon?
To turn a PNG into an icon, you can use a graphics editor such as Adobe Photoshop or GIMP. Create a new file with the dimensions of 256×256 pixels and paste your PNG image into it. Then, save the file as a .ico file.
Why can’t I drag and drop icons on my desktop in Windows 11?
If you are unable to drag and drop icons on your desktop in Windows 11, try restarting your computer or resetting your desktop icon settings.
How do I put apps on my desktop home screen?
To put apps on your desktop home screen in Windows 11, right-click on the app in the Start menu and select “Pin to Start.” The app icon will then appear on your desktop home screen.
How do I put a Word icon on my desktop in Windows 11?
To put a Word icon on your desktop in Windows 11, click on the Start menu and search for “Microsoft Word.” Right-click on the app and select “Pin to Start.” The Word icon will then appear on your desktop home screen.
How do I decorate my desktop in Windows 10?
To decorate your desktop in Windows 10, you can change the wallpaper, customize the desktop icons, and add widgets using third-party software and apps.
How do I add apps to my main screen in Windows 10?
To add apps to your main screen in Windows 10, right-click on the app in the Start menu and select “Pin to Start.” The app icon will then appear on your main screen.
How do I add a note widget to my desktop in Windows 10?
Windows 10 does not have a built-in note widget. However, you can download and install third-party note-taking apps that offer desktop widgets.
Conclusion
We know after reading this post, you are not missing your windows 7 widgets in your windows 10 PC. As we explained the seven best ways to use widgets in your windows 10 PC, it’s completely up to you which one is looking perfect for you.
But one point I want to add here is widgets are sometimes causing slowness in your PC.
Editor’s Note: This post was originally published in September 2017 and has been since completely revamped and updated for freshness, accuracy, and comprehensiveness.


