


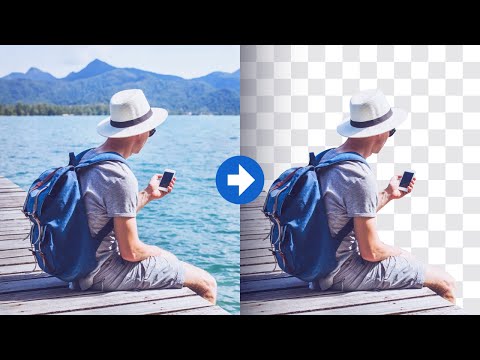
For photographers or enthusiasts, making a background transparent is quite important for so many reasons. This article will take you through several ways of making that happen but we will start with perhaps one of the easiest ways; how to make an image background transparent using Gimp.
With Gimp, you can make the image’s background transparent or the image itself.
Making Images Background Transparent with Gimp
Follow these easy steps.
The first step is downloading the tool Gimp if you don’t already have it. If you do, then move on to opening it. Gimp usually takes a few moments to get started up especially if you just downloaded it or you’ve not used it in a long while.
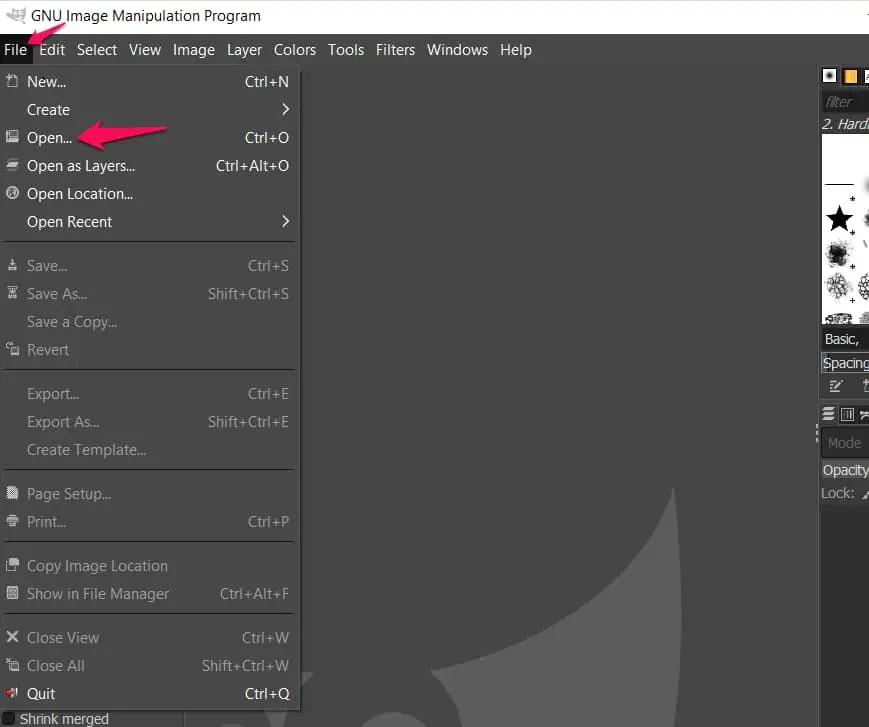
Open the image you want to work within Gimp by clicking “File” in the top left corner of the window, click on “Open” in the drop-down menu that follows and select the image.
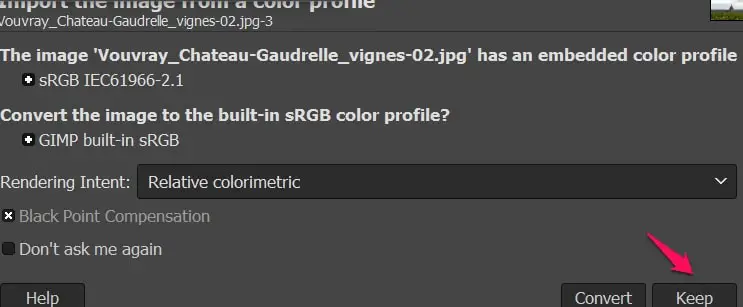
NB:- If asked to convert the image while selecting it, keep the default settings as shown in the image below.
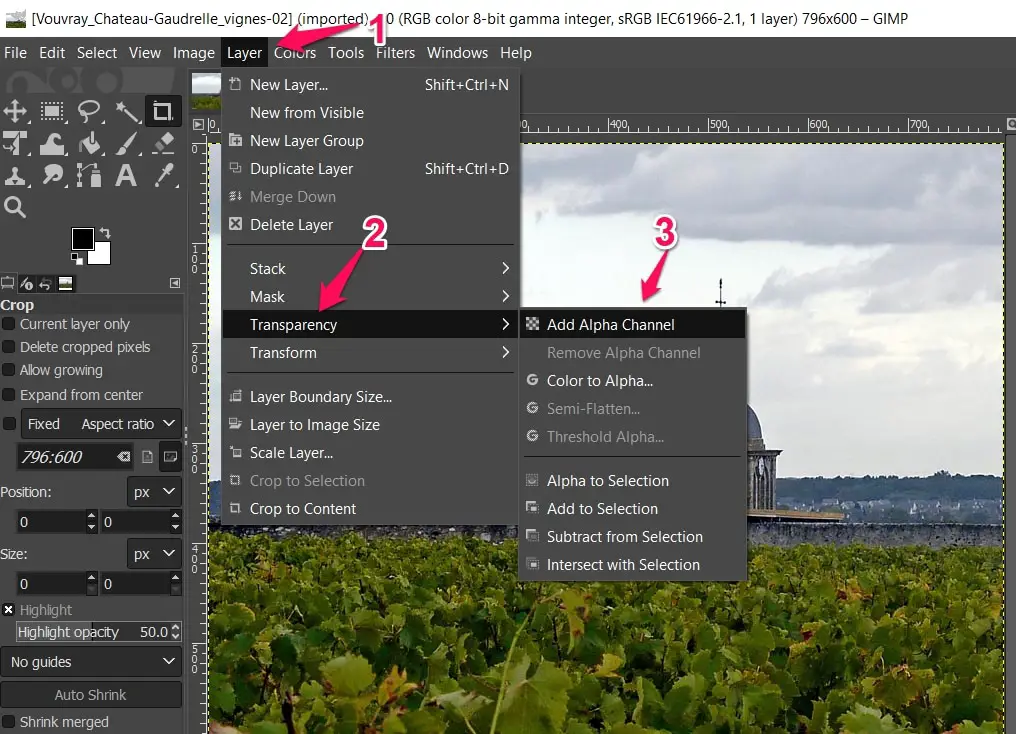
The next step after the image is on your screen is to click “Layer“, a Gimp menu item usually found at the top of the Gimp app.
Here’s where it gets a little bit tricky because there will be quite a bit of drop-down menus to go but if you follow the steps one by one then you should be just fine.
When you locate the “Layer” menu and you click on it, a drop-down menu will appear. Look for “Transparency” which after clicking on it also will reveal a drop-down menu.
When the drop-down menu appears, look for “Add Alpha Channel” and click on it. After that, go back to the top of the screen where Gimp icons are situated and look for the “Tools” option.
We will go through another drop-down menu session but much shorter than before.
Clicking on “Tools” will reveal a drop-down menu, look for “Selection Tools” on the drop-down menu, and click on it. This will also take you to another drop-down menu where you’ll look for “Fuzzy Select“.
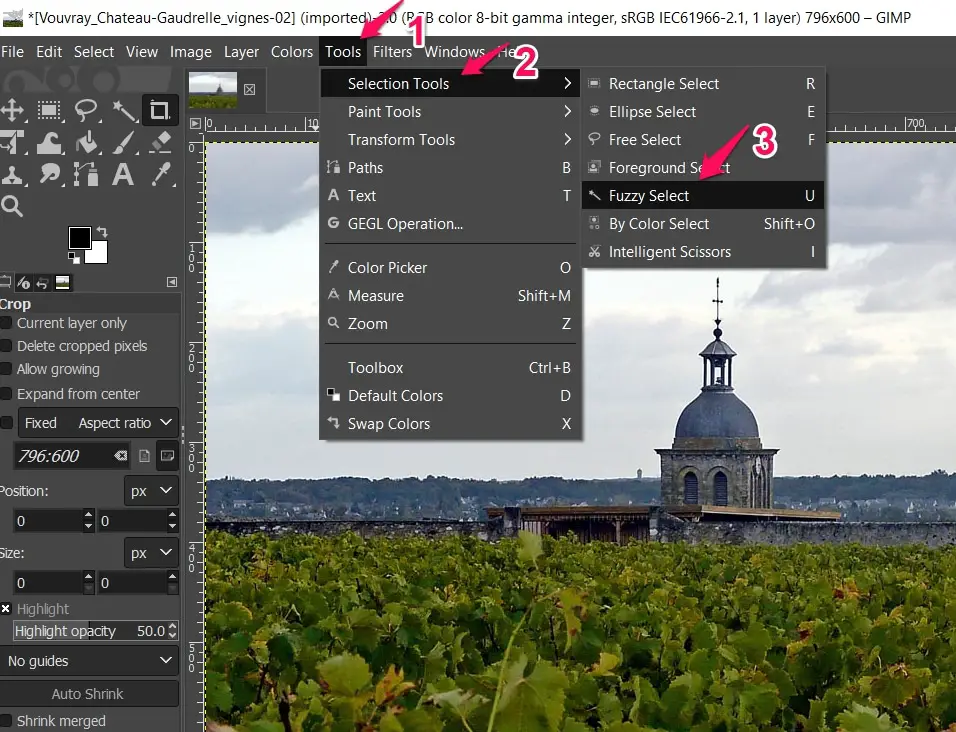
When you’ve clicked on “Fuzzy Select“, you’re ready to now work on the image.
There are two options here. The easy option is for users working with images with a background that has just one color.
With a background of just one solid color, all you have to do is select a part of the background and all of the backgrounds will be selected as long as it’s the same color.
A dotted line will appear around the selected parts and when you press the “Del” the entire background selected will become transparent.
Quite easy right? Well, yes in theory it is, as long as you follow the procedure.
For backgrounds with different colors, it is a bit more tedious than a background with just one color.
Users will have to select the different colors one by one, making sure to avoid the image itself and other different background colors.
Follow the process of pressing “Del” when you’ve managed to select a sizable part of the background color and repeat the same process until all the background colors are transparent.

You will usually need to zoom in to make minor edits especially with backgrounds of different colors. At the right pane of the Gimp window, you’ll find the zoom icon. Use that to zoom in real close to be able to effectively render the whole background or a selected part transparent.
Something to note is that in “Mac“, instead of pressing ” Del” users will click on “Edit” and then from the menu that appears click on “Cut” to remove background colors and render it transparent.
The last thing you’ll need to do to ensure your image has a transparent background is saving the file as a PNG file instead of a JPG file which is the default save settings.
You usually will have to do this by using the export option rather than the save option.
Without changing the file type, your image won’t retain its transparency status so this is very important.
Here’s how to change the file type.
Click on “File” and a drop-down menu will show, look for ” Export As” then click on it, you’ll find the file’s name on the top of the window.
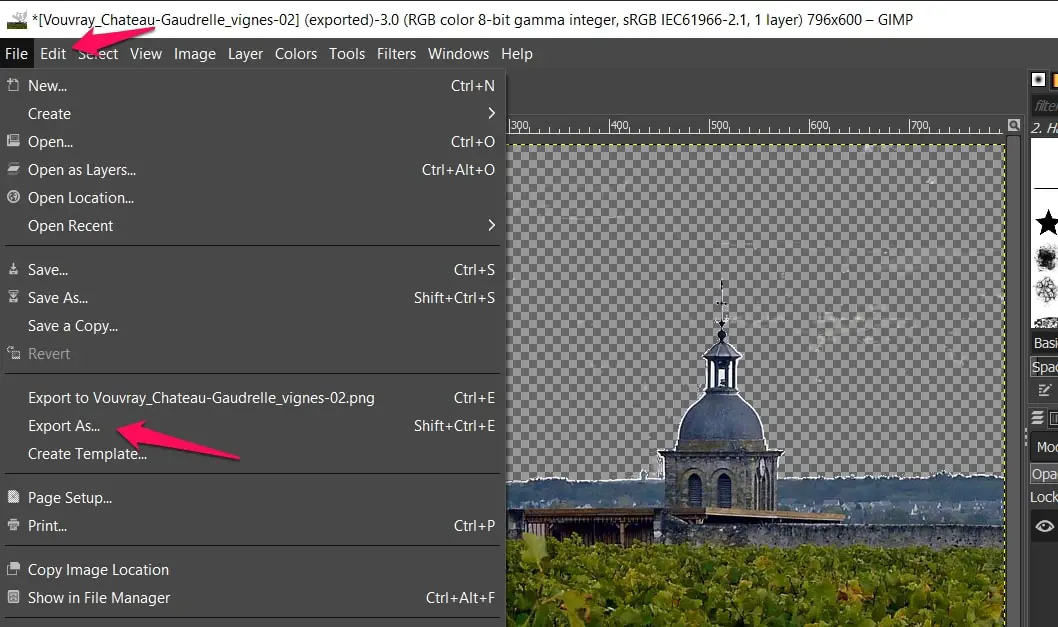
Change the file type to png. An example is if the image is saved as image.jpg you will edit the last part to be image.png.
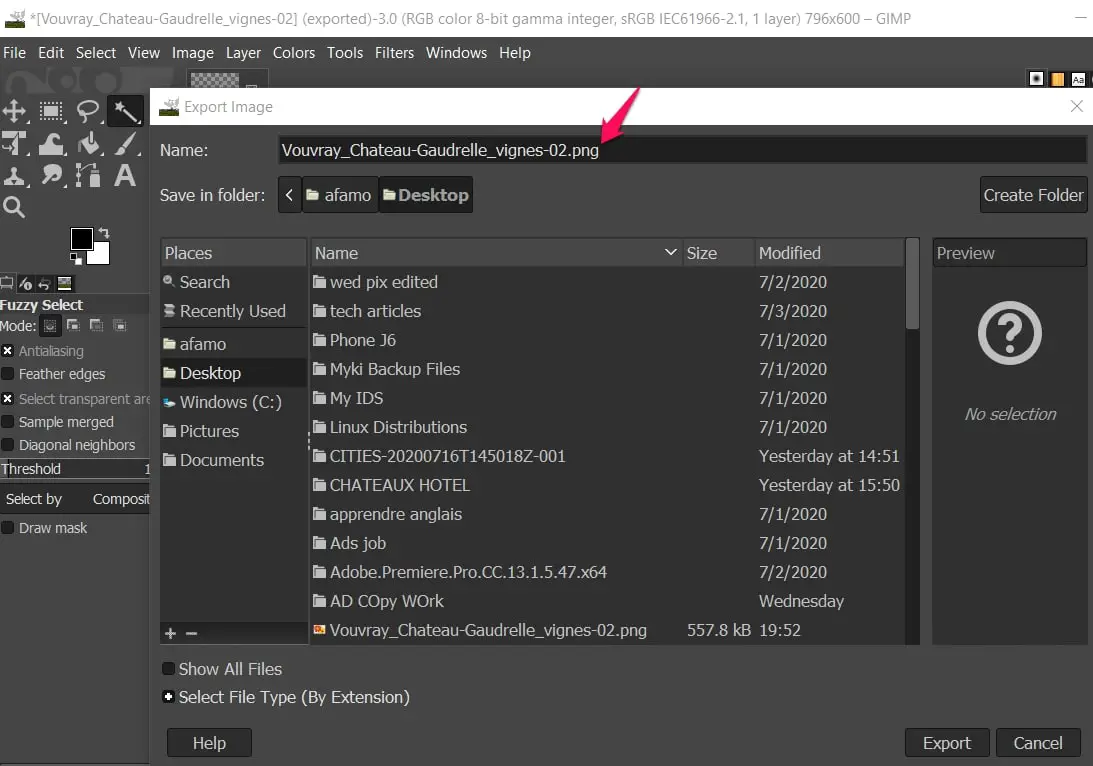
Click Export at the bottom of the window then click again when a prompt appears.
Congrats, you’ve just made the image’s background transparent using Gimp but that’s not all the app can do. It can also make a whole image transparent.
Let’s move on to how we can Make A Whole Image Transparent using Gimp.
Making A whole Image Transparent
This process is quite different from the one we explained previously. But it is also relatively straightforward to follow.
Assuming you already have the Gimp app ready to go, click on “File” and then select “Open” to select the image you want to work with.
In this process, you can work with two images at once and you select both by first following the selection process above for the first image and then opening a second “File” window, click on “Open” and selecting the second image then use the shortcut key (Ctrl+C) or its Mac equivalent to copy the second image and go back to the first window or the first image and use another shortcut key combination (Ctrl+V) to drop the second image on the first.
Please note that this is only if you want to work with two images by placing the second over the first (assuming you’ve already made the second image transparent).
(Remember though that even if you’re working with two images and you want to layer a transparent image over a non-transparent one, you’ll have to render the image transparent before layering it on the non-transparent image)
If you’re only working with one image, just select an image and continue with the steps.
To start the process after choosing an image, click on “Windows” and a drop-down menu will appear. Search for “Dockable Dialogs” on the drop-down menu and click on layers.
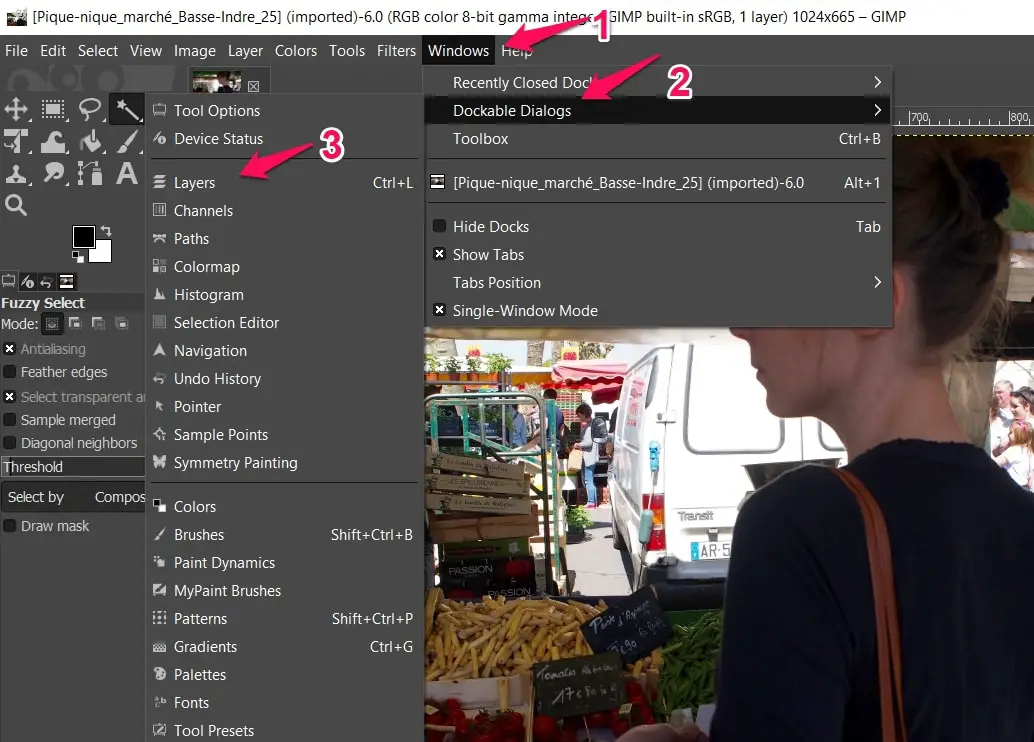
A small “Layers” option will open immediately on the right pane. Click the name of the image you want to work on in the “Layers” window.
When it shows, look for the Opacity scroll to adjust the opaqueness of the image. Reducing it to less than 50% should make the image transparent but you can stop at any level you feel is good enough for you to work with.
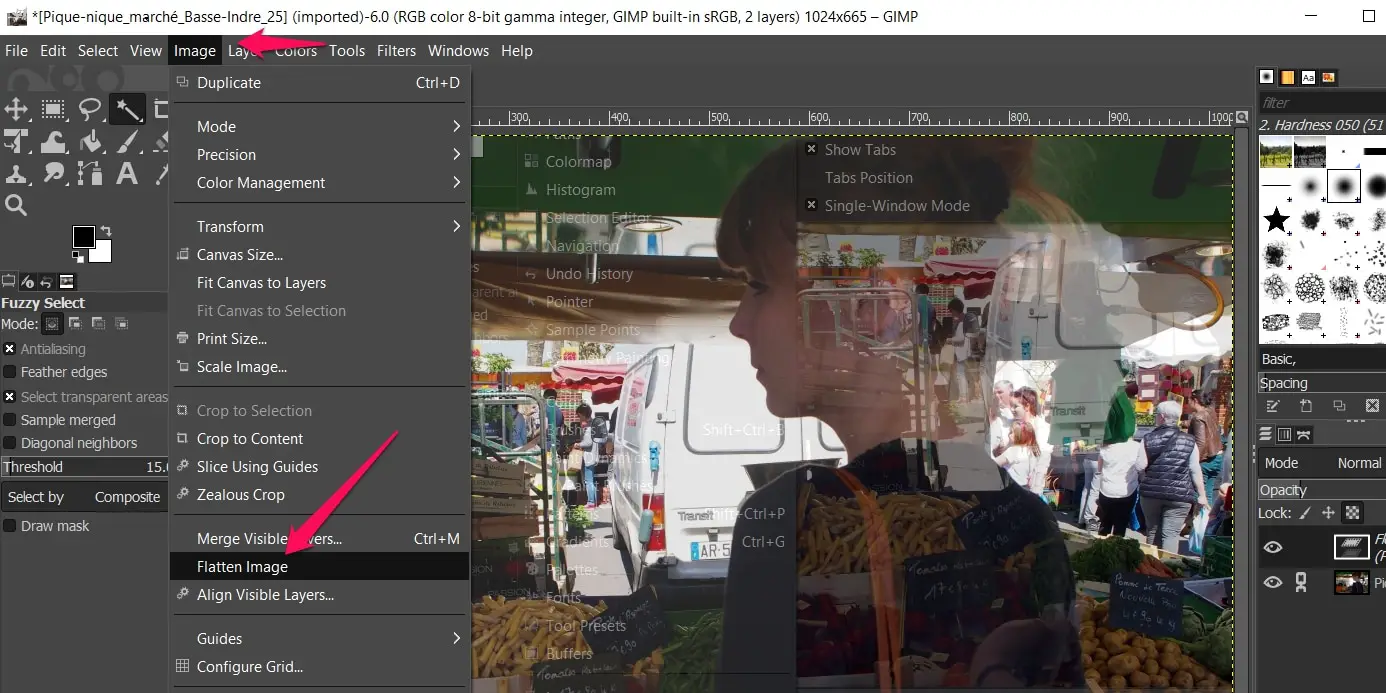
Click on “Image” usually found at the top menu bar of the “Gimp” interface. A drop-down menu, as usual, will appear. Scroll down to look for the “Flatten Image” option and click on it.
Once again, export the file using this same steps:
Click on “File“, and a drop-down menu will show, then look for “Export As” and click on it, you will find the file’s name on the top of the window. Change the file type to png. An example is if the image is saved as image.jpg you will have to edit the last part to be image.png to make sure the transparency is saved.
Click export on the bottom of the window and then click again when a prompt appears.
Replicating Gimp Transparent Background on Paint
While Gimp is a nice tool to perform this function, users on Windows 10 have other options.
Paint comes pre-installed with Windows 10 so there’s a good chance that you already have it on your system. This will make your work faster by cutting out the time to download, install, and figure out another tool.
There are two easy ways to make a transparent background in Microsoft Paint. These steps will be explained easily below.
The first step works by cutting out a foreground area in an image so that the rest of its background is transparent. The next move is to then paste the foreground over another image.
Here’s a step by step explanation of how it’s actually done.
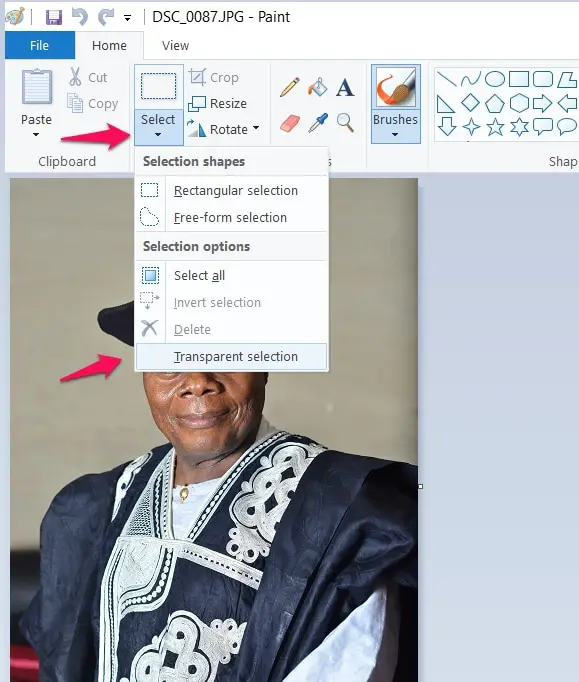
Open the Paint app, click on “File” and then “Open” to get the image you want to work on. Look for the “Select” option at the top left corner of the Paint app window and click on it.
A drop-down menu will show and when you scroll down, find and click on the “Transparent Selection” option.
When you’re done, click on the “Free Form selection” option which you’ll find on the same “Select” option you just used.

The “Free Form selection” option is used to trace the foreground area you want to preserve.
Trace it by holding down the left mouse key and after you’re done, you’ll notice as you traced dotted lines surrounding the foreground area. Right-click inside the dotted lines and select “Cut” from the context menu to remove the foreground you traced from the picture.

Open an entirely new page with the background image you’ve chosen on Paint and paste the saved foreground using the Ctrl+V hotkeys. Adjust the foreground you pasted to your satisfaction and you’ve got yourself an image with a transparent background.
The second step involves recalling some aspects of the first method. Remember that when we cut out the foreground, there was a huge white space where the foreground used to be in the first image. This method can be used to fill the space with an image as a background layer.
We’ll start by assuming we have a blank space in the middle of an image and we want to fill it with a background layer.
The first step is to save the image with the transparent space as a “2D PNG” file which is possible when you click on “Menu” then “Save as“.
After saving the image, open a fresh window, and select the image you want to use as a background layer for the transparent image you saved earlier.
You could use a copy and paste to paste the transparent image. The transparent image will open on top of the background layer you opened previously.

The background layer will automatically fill the area transparent space in the image you just imposed on it. You can edit, resize, move, adjust to suit your specifications by holding the left mouse button, and dragging the mouse.
There are other possible editing options like rotating the transparent image but this is basically how Windows Paint helps you add transparent backgrounds to images.
Let’s move on to the next tool, Using Photoshop To Make An Image’s Background Transparent.
While both are very effective ways of manipulating images, Gimp has some really cool benefits.
Benefits of Gimp
The most stand out benefit of Gimp is its rich image editing set of features, its many-fold customization options, and the fact that it is free. It is a great application that can help you create professional images. Here are the specifics:
Original artwork, Photo enhancement, Graphic design elements, Customizable interface. File format. Scribus, Digital retouching, Inkscape, Hardware support, Swatchbooker./
Conclusion
Editing images is a bit easy with the right tools, as long as you follow the steps you’ll get it right. Tools like Gimp and Photoshop are really useful for editing images and though Paint is basic, it is still useful if you know how to use it.
We would like to know your favorite tool in editing images and making backgrounds transparent. Use the comments section to let us know.
With that said, I would love to know what editing software you enjoy using, and if you have tied Gimp, let me

