


Arduino has been helping to build projects easily and make them look more attractive. Programming a liquid crystal display with a touch screen option may sound complicated, but Arduino’s libraries and screens make it easy.
In this project, we will use our 2.4 “Arduino TFT LCD to build our own Arduino touch screen calculator, which performs all basic calculations like addition, subtraction, division, and multiplication.

Collect Hardware
Detail of LCD
Before we dive into this project, it is important to understand how this 2.4 “TFT LCD module works and its type. Let’s take a look at the pins of this 2.4” TFT LCD module.
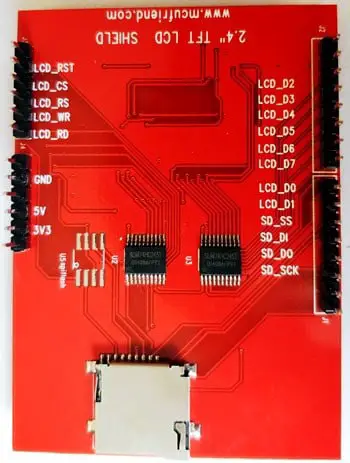
As you can see, 28 pins fit perfectly into any Arduino Uno / Arduino Mega Board. The following table shows the small classifications of these pins.
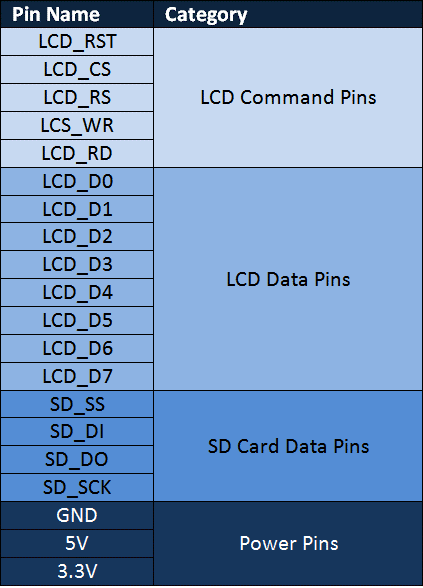
As you can see the pins can be divided into four main categories such as LCD command pins, LCD data pins, SD card pins and power pins, and we do not need to know the details of these pins as they Will take care of our Arduino library.
You can also find an SD card slot at the bottom of the module shown above that you can use to load an SD card with a BMP image file that can be displayed on our TFT LCD screen using the Arduino program.
Calibrate the touch with LCD
If you plan to use the touchscreen function of the TFT LCD module, you must calibrate it to make it work properly. An uncelebrated LCD screen may not be likely to work, for example, you may touch in one place and the TFT may touch elsewhere. These calibration results are not similar for all boards, so you can only do this yourself.
The best way to calibrate is to use the calibration sample program (with libraries) or use a serial monitor to detect your errors. But for this project, calibration should not be a big issue due to the large size of the button, and I’ll explain how to calibrate your screen in the programming section below.
Plug LCD to Arduino
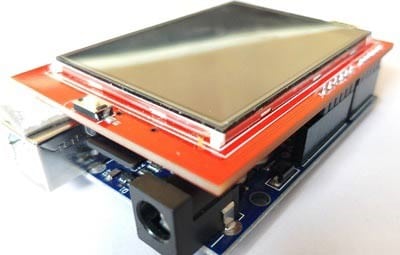
The 2.4 “TFT LCD is a perfect shield for Arduino. You can push the LCD directly to the top of the Arduino Uno and fit exactly with the pins and slide it in. However, to be on the safe side, Arduino UNO programming terminals must use small Insulation tape just in case the terminal touches your TFT LCD screen The LCD assembled on the UNO will look like this.
Library for LCD
I am using the SPFD5408 library to get the job of this Arduino calculator code. This is a modified Adafruit library that works seamlessly with our LCD TFT modules.
Upload Source Code
If you are beginner in Arduino, then I will suggest you to please have a look on my previous Arduino tutorial about Learn Arduino for Beginners
/______Import Libraries_______/
#include <SPFD5408_Adafruit_GFX.h> // Core graphics library
#include <SPFD5408_Adafruit_TFTLCD.h> // Hardware-specific library
#include <SPFD5408_TouchScreen.h>
/______End of Libraries_______/
/______Define LCD pins (I have asigned the default values)_______/
#define YP A1 // must be an analog pin, use “An” notation!
#define XM A2 // must be an analog pin, use “An” notation!
#define YM 7 // can be a digital pin
#define XP 6 // can be a digital pin
#define LCD_CS A3
#define LCD_CD A2
#define LCD_WR A1
#define LCD_RD A0
#define LCD_RESET A4
/_______End of defanitions______/
/______Assign names to colors and pressure_______/
#define WHITE 0x0000 //Black->White
#define YELLOW 0x001F //Blue->Yellow
#define CYAN 0xF800 //Red->Cyan
#define PINK 0x07E0 //Green-> Pink
#define RED 0x07FF //Cyan -> Red
#define GREEN 0xF81F //Pink -> Green
#define BLUE 0xFFE0 //Yellow->Blue
#define BLACK 0xFFFF //White-> Black
#define MINPRESSURE 10
#define MAXPRESSURE 1000
/_______Assigned______/
/____Calibrate TFT LCD_____/
#define TS_MINX 125
#define TS_MINY 85
#define TS_MAXX 965
#define TS_MAXY 905
/______End of Calibration______/
TouchScreen ts = TouchScreen(XP, YP, XM, YM, 300); //300 is the sensitivity
Adafruit_TFTLCD tft(LCD_CS, LCD_CD, LCD_WR, LCD_RD, LCD_RESET); //Start communication with LCD
String symbol[4][4] = {
{ “7”, “8”, “9”, “/” },
{ “4”, “5”, “6”, “*” },
{ “1”, “2”, “3”, “-” },
{ “C”, “0”, “=”, “+” }
};
int X,Y;
long Num1,Num2,Number;
char action;
boolean result = false;
void setup() {
Serial.begin(9600); //Use serial monitor for debugging
tft.reset(); //Always reset at start
tft.begin(0x9341); // My LCD uses LIL9341 Interface driver IC
tft.setRotation(2); // I just roated so that the power jack faces up – optional
tft.fillScreen(WHITE);
IntroScreen();
draw_BoxNButtons();
}
void loop() {
TSPoint p = waitTouch();
X = p.y; Y = p.x;
// Serial.print(X); Serial.print(‘,’); Serial.println(Y);// + ” ” + Y);
DetectButtons();
if (result==true)
CalculateResult();
DisplayResult();
delay(300);
}
TSPoint waitTouch() {
TSPoint p;
do {
p = ts.getPoint();
pinMode(XM, OUTPUT);
pinMode(YP, OUTPUT);
} while((p.z < MINPRESSURE )|| (p.z > MAXPRESSURE));
p.x = map(p.x, TS_MINX, TS_MAXX, 0, 320);
p.y = map(p.y, TS_MINY, TS_MAXY, 0, 240);;
return p;
}
void DetectButtons()
{
if (X<50 && X>0) //Detecting Buttons on Column 1
{
if (Y>0 && Y<85) //If cancel Button is pressed
{Serial.println (“Button Cancel”); Number=Num1=Num2=0; result=false;}
if (Y>85 && Y<140) //If Button 1 is pressed
{Serial.println (“Button 1”);
if (Number==0)
Number=1;
else
Number = (Number*10) + 1; //Pressed twice
}
if (Y>140 && Y<192) //If Button 4 is pressed
{Serial.println (“Button 4”);
if (Number==0)
Number=4;
else
Number = (Number*10) + 4; //Pressed twice
}
if (Y>192 && Y<245) //If Button 7 is pressed
{Serial.println (“Button 7”);
if (Number==0)
Number=7;
else
Number = (Number*10) + 7; //Pressed twice
}
}
if (X<105 && X>50) //Detecting Buttons on Column 2
{
if (Y>0 && Y<85)
{Serial.println (“Button 0”); //Button 0 is Pressed
if (Number==0)
Number=0;
else
Number = (Number*10) + 0; //Pressed twice
}
if (Y>85 && Y<140)
{Serial.println (“Button 2”);
if (Number==0)
Number=2;
else
Number = (Number*10) + 2; //Pressed twice
}
if (Y>140 && Y<192)
{Serial.println (“Button 5”);
if (Number==0)
Number=5;
else
Number = (Number*10) + 5; //Pressed twic
}
if (Y>192 && Y<245)
{Serial.println (“Button 8”);
if (Number==0)
Number=8;
else
Number = (Number*10) + 8; //Pressed twic
}
}
if (X<165 && X>105) //Detecting Buttons on Column 3
{
if (Y>0 && Y<85)
{Serial.println (“Button Equal”);
Num2=Number;
result = true;
}
if (Y>85 && Y<140)
{Serial.println (“Button 3”);
if (Number==0)
Number=3;
else
Number = (Number*10) + 3; //Pressed twice
}
if (Y>140 && Y<192)
{Serial.println (“Button 6”);
if (Number==0)
Number=6;
else
Number = (Number*10) + 6; //Pressed twice
}
if (Y>192 && Y<245)
{Serial.println (“Button 9”);
if (Number==0)
Number=9;
else
Number = (Number*10) + 9; //Pressed twice
}
}
if (X<213 && X>165) //Detecting Buttons on Column 3
{
Num1 = Number;
Number =0;
tft.setCursor(200, 20);
tft.setTextColor(RED);
if (Y>0 && Y<85)
{Serial.println (“Addition”); action = 1; tft.println(‘+’);}
if (Y>85 && Y<140)
{Serial.println (“Subtraction”); action = 2; tft.println(‘-‘);}
if (Y>140 && Y<192)
{Serial.println (“Multiplication”); action = 3; tft.println(‘*’);}
if (Y>192 && Y<245)
{Serial.println (“Devesion”); action = 4; tft.println(‘/’);}
delay(300);
}
}
void CalculateResult()
{
if (action==1)
Number = Num1+Num2;
if (action==2)
Number = Num1-Num2;
if (action==3)
Number = Num1*Num2;
if (action==4)
Number = Num1/Num2;
}
void DisplayResult()
{
tft.fillRect(0, 0, 240, 80, CYAN); //clear result box
tft.setCursor(10, 20);
tft.setTextSize(4);
tft.setTextColor(BLACK);
tft.println(Number); //update new value
}
void IntroScreen()
{
tft.setCursor (55, 120);
tft.setTextSize (3);
tft.setTextColor(RED);
tft.println(“ARDUINO”);
tft.setCursor (30, 160);
tft.println(“CALCULATOR”);
tft.setCursor (30, 220);
tft.setTextSize (2);
tft.setTextColor(BLUE);
tft.println(“-Circut Digest”);
delay(1800);
}
void draw_BoxNButtons()
{
//Draw the Result Box
tft.fillRect(0, 0, 240, 80, CYAN);
//Draw First Column
tft.fillRect (0,260,60,60,RED);
tft.fillRect (0,200,60,60,BLACK);
tft.fillRect (0,140,60,60,BLACK);
tft.fillRect (0,80,60,60,BLACK);
//Draw Third Column
tft.fillRect (120,260,60,60,GREEN);
tft.fillRect (120,200,60,60,BLACK);
tft.fillRect (120,140,60,60,BLACK);
tft.fillRect (120,80,60,60,BLACK);
//Draw Secound & Fourth Column
for (int b=260; b>=80; b-=60)
{ tft.fillRect (180,b,60,60,BLUE);
tft.fillRect (60,b,60,60,BLACK);}
//Draw Horizontal Lines
for (int h=80; h<=320; h+=60)
tft.drawFastHLine(0, h, 240, WHITE);
//Draw Vertical Lines
for (int v=0; v<=240; v+=60)
tft.drawFastVLine(v, 80, 240, WHITE);
//Display keypad lables
for (int j=0;j<4;j++) {
for (int i=0;i<4;i++) {
tft.setCursor(22 + (60i), 100 + (60j));
tft.setTextSize(3);
tft.setTextColor(WHITE);
tft.println(symbol[j][i]);
}
}
}
Done!


