


Have you ever wondered why your emails are not reaching clients’ inboxes or your website traffic suddenly drops? One possible reason could be that your IP address has a poor reputation.
Your IP address is like your digital identity on the internet. The number identifies your device or network when connecting to the web.
However, if your IP address has been associated with spamming, phishing, or other malicious activities, it can hurt your online reputation and affect your business.
Fortunately, there are IP reputation check services that can help you monitor and improve your IP reputation.
These services can scan various databases and blacklists to determine if your IP address has been flagged for spam or abuse and recommend fixing the issue.
In this article, we’ll explore the benefits of using IP reputation check services, how they work, and what to look for when choosing a provider.
By the end, you’ll better understand how to protect your online reputation and ensure your messages and content reach their intended audience.
Let’s Dive In!
IP Reputation Services To Check The IP Reputation
1. Cisco Talos
Cybersecurity firm Cisco Talos offers various security services and products, such as threat intelligence, vulnerability research, and incident response.
A division of Cisco Systems, a major global provider of networking and communication goods and services, is Talos.
Talos is renowned for its thorough investigation and analysis of security risks, including finding and evaluating fresh vulnerabilities and monitoring online criminal activities.
Additionally, it offers incident response services and threat intelligence feeds to assist enterprises in defending themselves against online threats.
Talos employs a sizable staff of security researchers and analysts who try to recognize and assess security problems and make suggestions for reducing them.
The business collaborates closely with law enforcement authorities and other groups to fight cybercrime and defend against online dangers.
Navigate to https://talosintelligence.com/ and enter your IP address to lookup.

It will show you an IP address’s SPAM Blacklisting and email reputation.

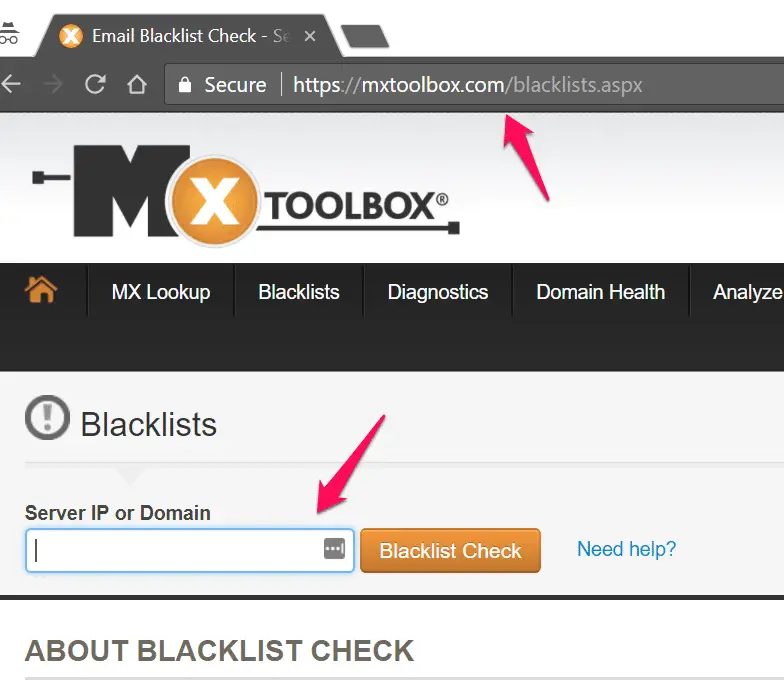
2. MX toolbox
MX Toolbox is another reputation lookup tool to check IP address reputation, SPAM lookup, Domain health, etc.
Navigate to https://mxtoolbox.com/blacklists.aspx and enter your IP-address that you want to check the reputation.
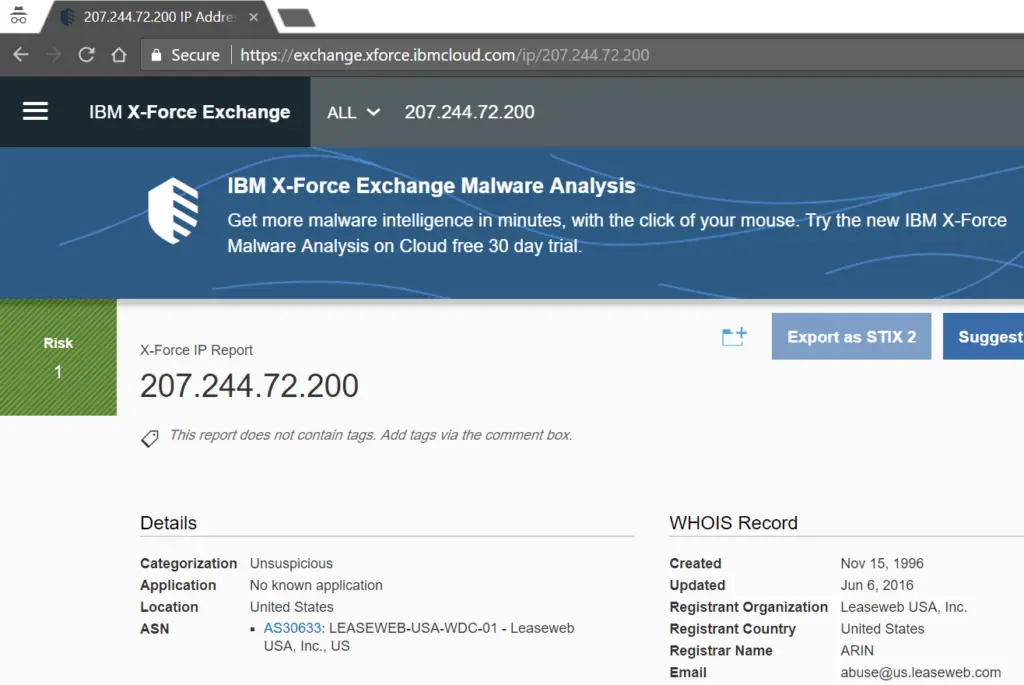
3. IBM X-Force Threat Intelligence
IBM X-Force Research is one of the world’s most renowned commercial security research teams.
These security professionals monitor and analyze security issues from various sources, providing threat intelligence content as the foundation of the IBM Security portfolio.
IBM® X-Force® produces many thought leadership security research assets to help customers, fellow researchers, and the public better understand the latest security risks and stay ahead of emerging threats.
Navigate to https://exchange.xforce.ibmcloud.com/ and enter your IP address to view the IP-address reputation
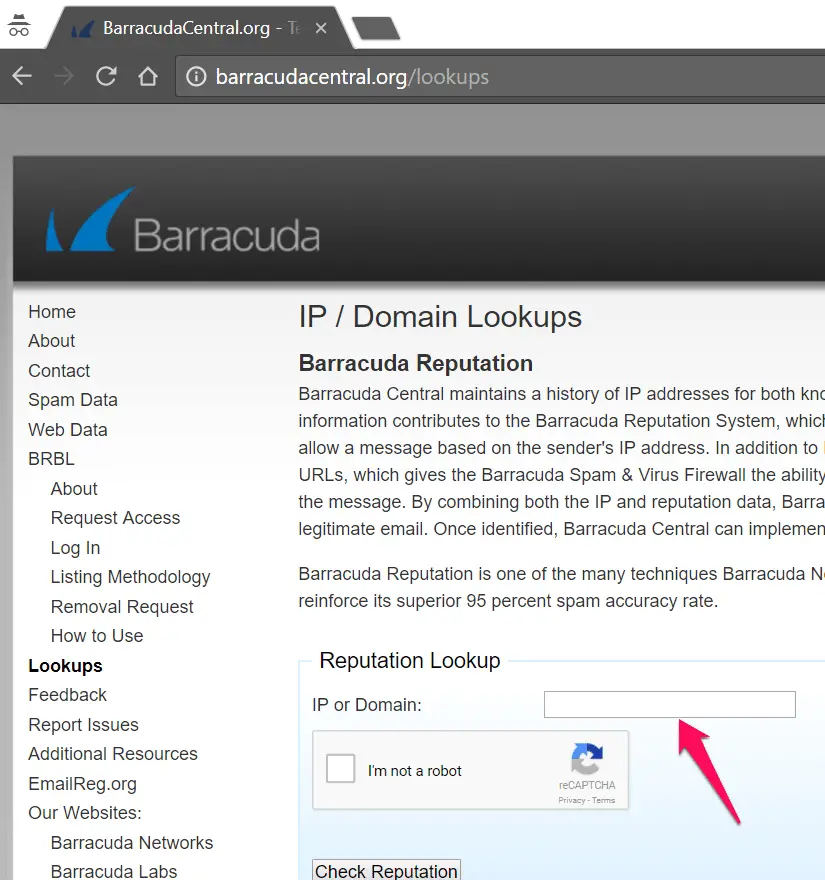
4. Barracuda Central
Barracuda Central maintains a history of IP addresses for known spammers and senders with good email practices.
This information contributes to the Barracuda Reputation System, which allows the Barracuda Spam & Virus Firewall to block or allow a message based on the sender’s IP address.
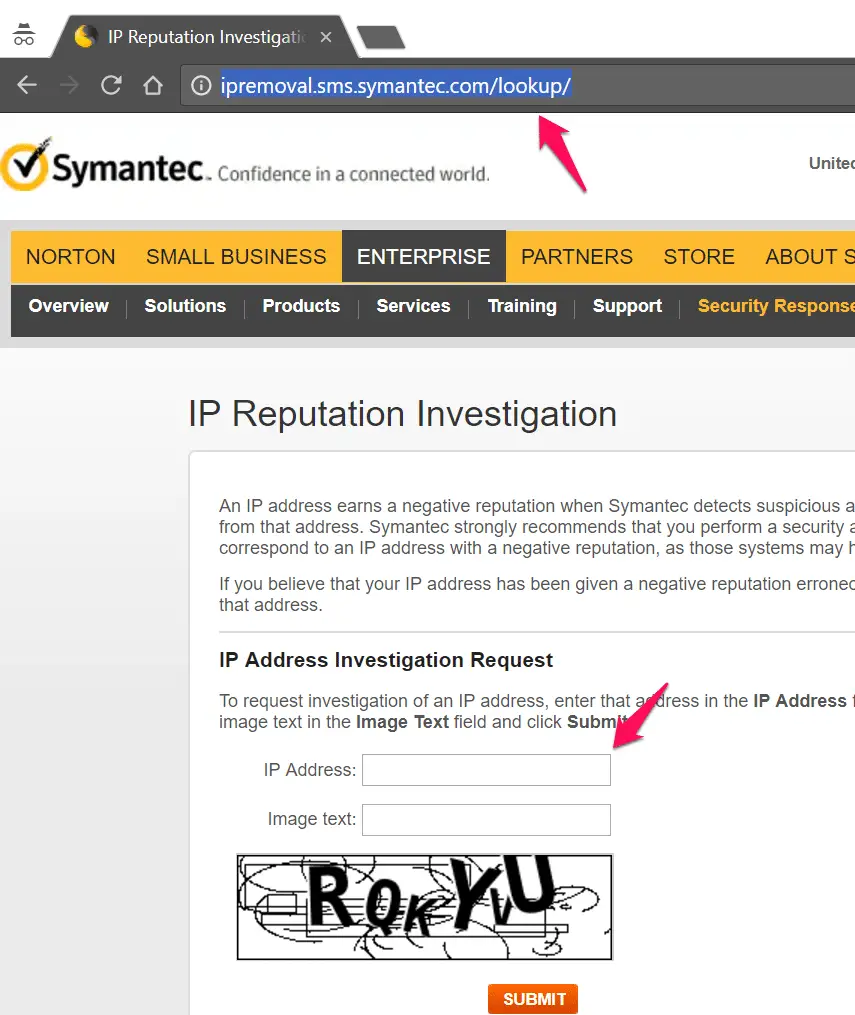
5. Symantec IP Reputation Investigation
An IP address earns a negative reputation when Symantec detects suspicious activity, such as spam or viruses originating from that address.
Symantec strongly recommends that you perform a security audit on any of your systems that correspond to an IP address with a negative reputation, as those systems may have been compromised.
Navigate to https://ipremoval.sms.symantec.com/ and enter the IP address you want to check the reputation of an IP address.
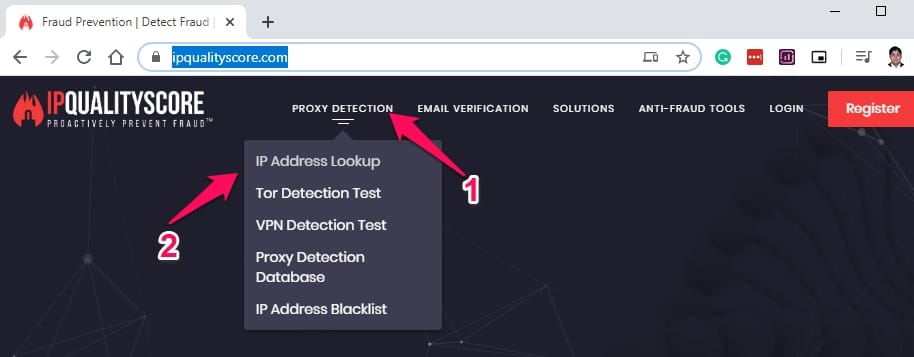
6. IPQualityScore
IPQualityScore is another good tool to check the reputation of an IP address. This tool is not only a bad ip reputation-checking website.
It provides a complete set of detection tools for Proxy detection, TOR detection, VPN detection, Email spam scoring Email Spam testing, etc.
To check the reputation of an IP address, visit the https://www.ipqualityscore.com/, click on the Proxy Detection tab, and select the “IP- address Lookup” Service.
And enter your IP-address that you want to test. it will show you the country name along with the ISP, organization, latitude, Longitude, Fraud score, and Proxy/VPN detection information.
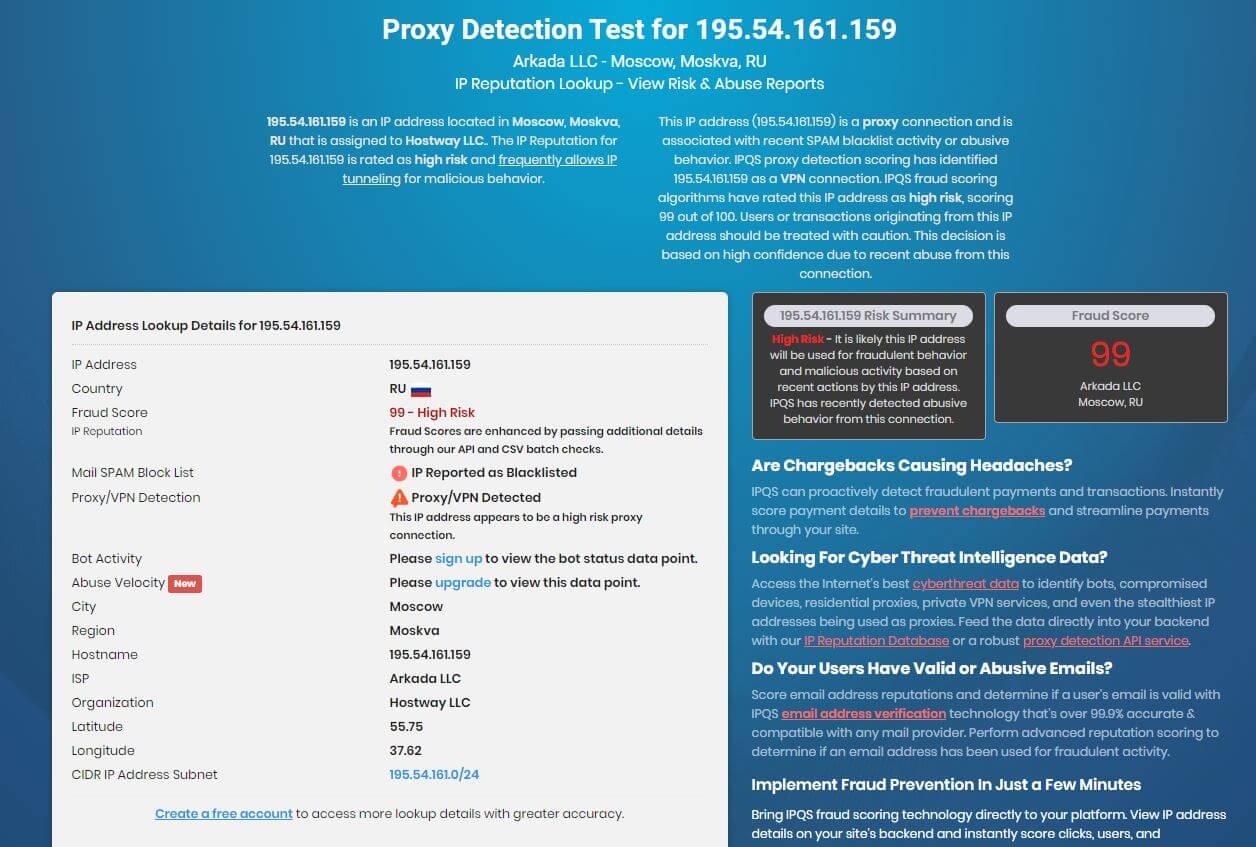
if you want to get more lookup details, create a free account.
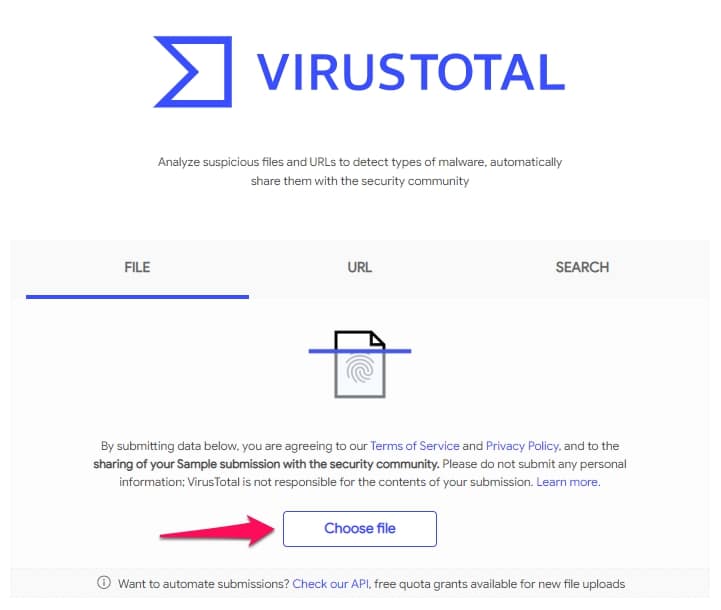
7. VirusTotal
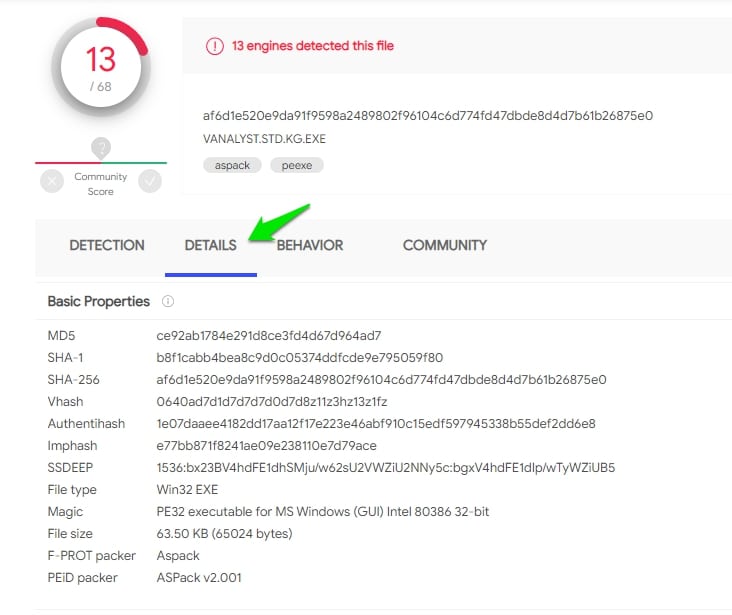
if you are in the field of IT-Security or you are working in a Security operation center then the virustotal.com is your best friend to check if any file is malicious or no, URL is malicious or no, the particular domain is malicious or not.
If you suspect any file that has a virus in it then just upload it on the virus total.
It will scan the file with 70 available antivirus engines and show you the result.
For this post, I uploaded a file on the virus total, and if you see the result, 13 antivirus engines detected this file as malicious.
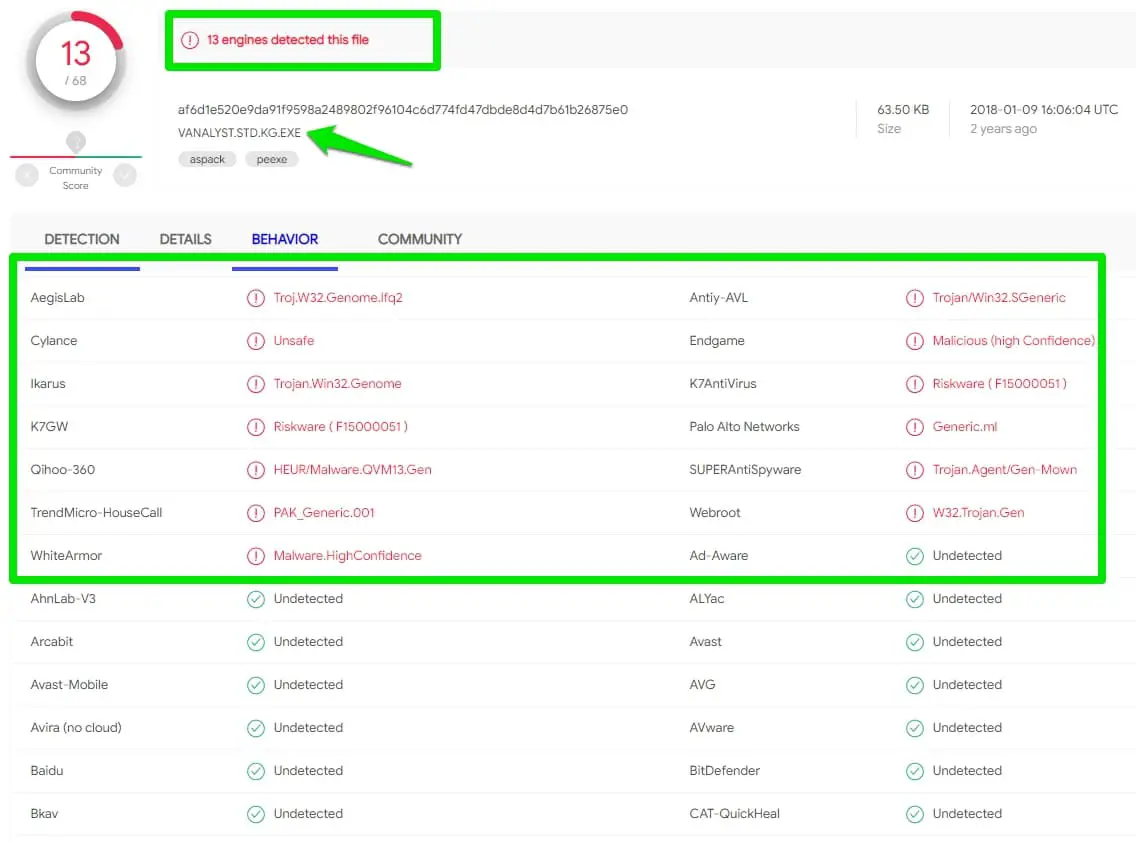
Click on the “Details” option, you will get file information like MD5, SHA-1,SHA-256, and File Type information.
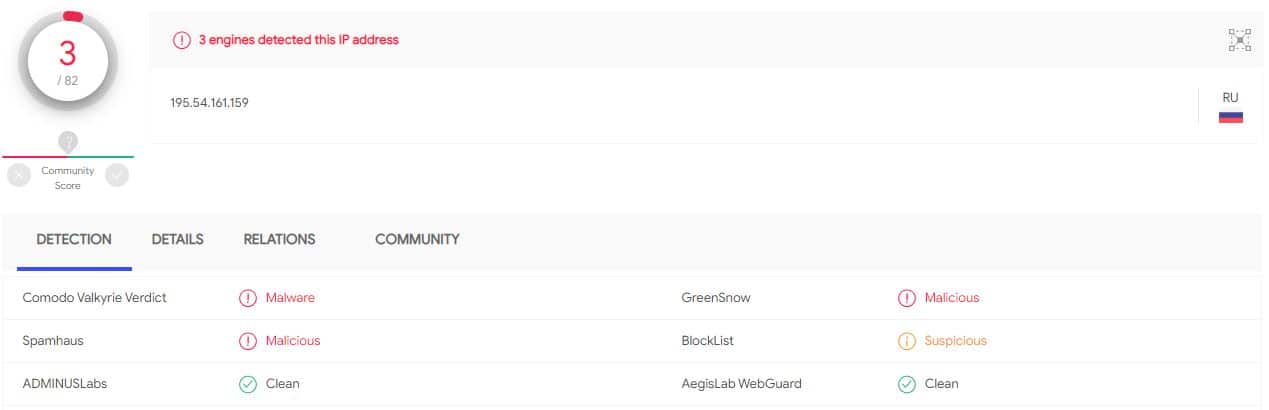
Now let’s see the option to check the IP-reputation, Click on the Search option.
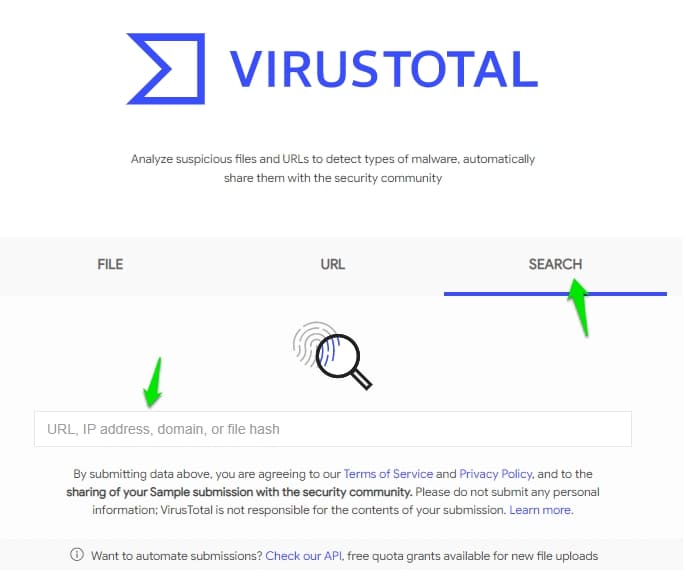
and the IP address and hit enter. It will show you the reputation of an IP address. In the case of the IP-reputation check, it’s primarily checking with the Spamhaus database for Spam and Blocklist to see the status.
Other Best tools that you can try is https://www.ipalyzer.com/

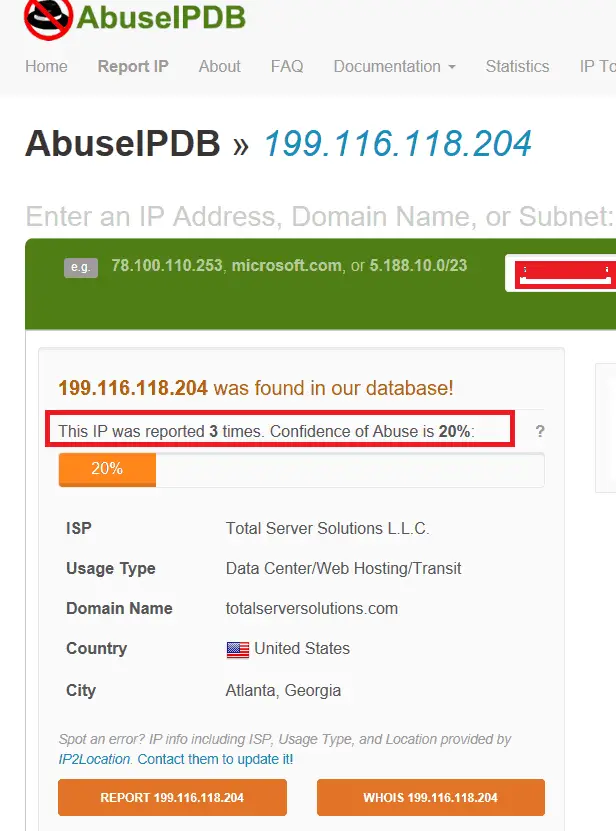
I love to use https://www.abuseipdb.com/ which is providing a much accurate reputation.
Fortiguard IP reputation service:-
Fortinet, a provider of various security goods and services, offers FortiGuard IP services.
Using the FortiGuard IP service, businesses can recognize and stop threats and malicious activity coming from known malicious IP addresses.
The service tracks the reputation of IP addresses and groups them according to their level of reliability.
While IP addresses known to be used by trustworthy businesses and people are given a high reputation score, IP addresses known to be used by malicious actors or that have previously been associated with malicious conduct are given a low reputation score.
The FortiGuard Reputation service allows businesses to block traffic from IP addresses with a poor reputation score, thereby assisting in defending their networks and computer systems against online threats.
The service frequently works with other security tools like firewalls and intrusion detection systems to offer a complete security solution.
How To Stop IP Reputation Attacks
There are several ways to mitigate IP reputation attacks, including hackers or bots attempting to compromise your network’s security by targeting your IP address.
Here’s a table outlining some strategies for preventing IP reputation attacks:-
| Strategy | Description |
|---|---|
| Use a reputable email service provider | A reputable email service provider will have measures to prevent IP reputation attacks, such as email authentication protocols like SPF, DKIM, and DMARC. |
| Monitor your IP reputation. | Regularly check your IP reputation to ensure it hasn’t been blacklisted or flagged as spam. Various online tools are available for this, such as Sender Score or MXToolbox. |
| Maintain a good sender reputation. | Ensure that your emails are engaging and relevant to your recipients and that you are not sending excessive emails. Avoid using spam trigger words and phrases in your emails. |
| Implement email authentication protocols. | Implement email authentication protocols like SPF, DKIM, and DMARC to prevent unauthorized use of your domain and protect your sender’s reputation. |
| Keep your mailing list clean. | Regularly remove inactive or bounced email addresses from your mailing list to avoid sending emails to invalid addresses, which can negatively impact your sender’s reputation. |
| Provide a clear opt-out option. | Make it easy for recipients to opt out of your emails if they no longer wish to receive them. This can help prevent complaints and spam reports, which can damage your sender’s reputation. |
| Respond promptly to abuse complaints. | If you receive abuse complaints, respond to them promptly and take appropriate action to resolve the issue. Ignoring complaints can lead to blacklisting and damage to your sender’s reputation. |
| Use a dedicated IP address. | Consider using a dedicated IP address for your email marketing campaigns to avoid being affected by the reputation of other senders. This can also give you more control over your sender’s reputation. |
How Organizations are Using the IP-Reputation
Most organizations concerned about securing their published applications use the IP-reputation feature to mitigate the risk of traffic from poor IP reputation/malicious IPs.
Once you have enabled the IP-reputation feature in your particular security products, it will check the IP address reputation before checking the attack signatures.
Once you already know this traffic is bad, there is no meaning in checking that traffic against the attack signatures.
Now I will show you how to use these IP-Reputation features in your Network security devices.
1. F5 ASM
The first product on our list is F5 ASM (Application Security Manager), which most top organizations use to protect their published applications against top OWASAP attacks like SQL Injection, Cross-Site Scripting injection attacks.
F5 ASM comes with an IP-reputation feature, but you need an additional license; once you have a license, you can use it to protect your VIPs with IP reputation.
Open your F5 dashboard, click on the “Security” tab, and click on the Network firewall option; here, you will find the IP-intelligence option.
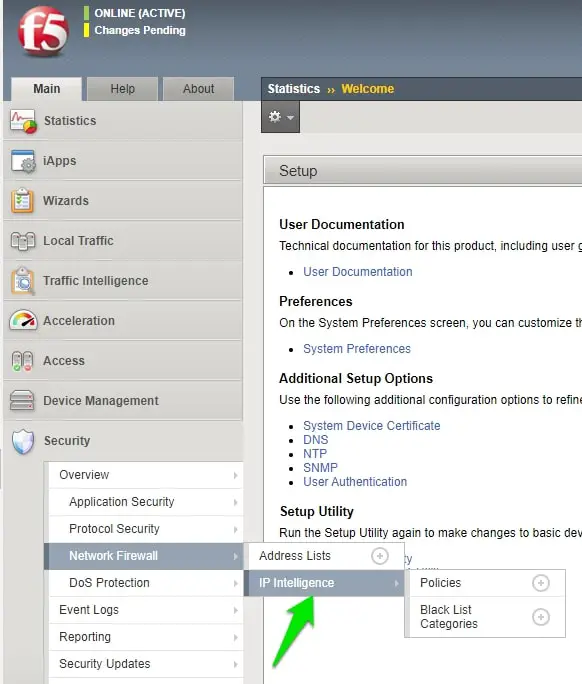
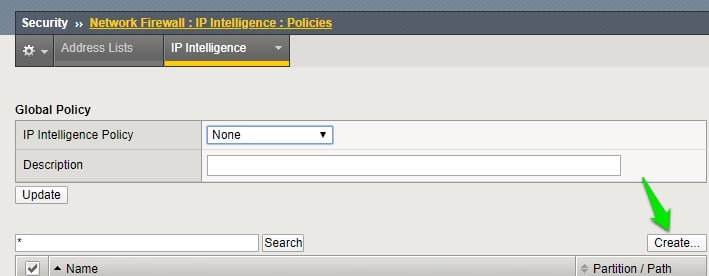
Now click on the Policies and click on the Create option to create a New IP-intelligence policy.
Now enter the name of the policy; the default action is Block.
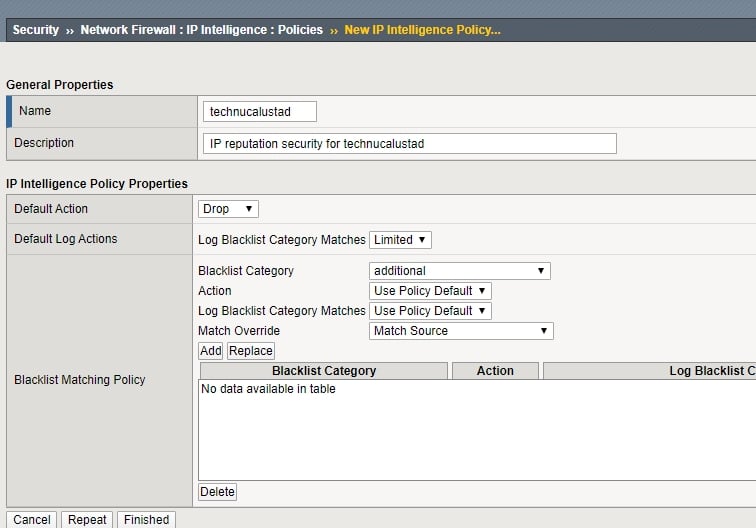
If you want to configure a specific blacklist-matching policy, click on the “blacklist Category” option and configure the policy per your organization’s requirements.
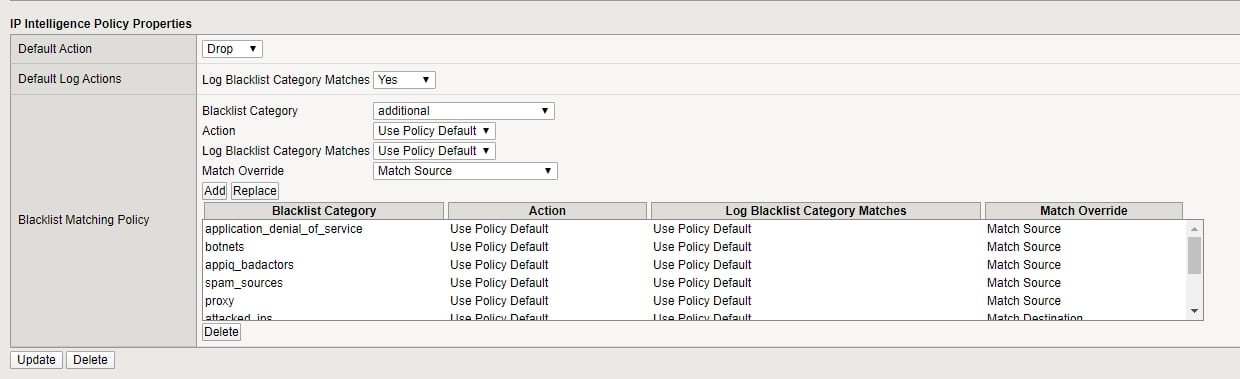
Your policy will look like the below policy.
Now, apply this policy to the VIP you want to protect.
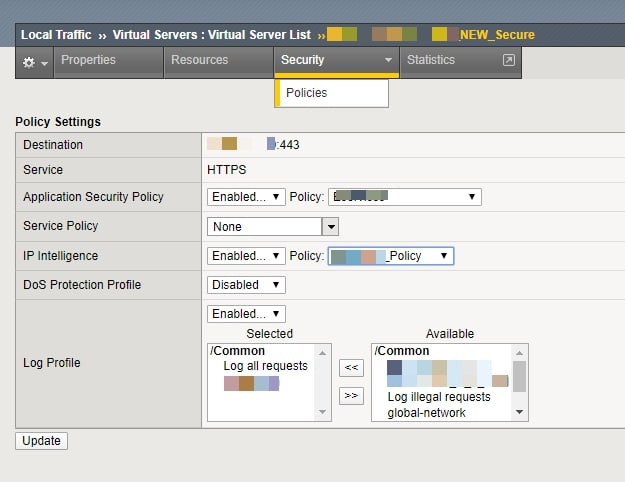
Click on the “Local Traffic” tab, select your VIP, and click on it to open it.
Click on the Security tab under your VIP; here, you will see the IP intelligence tab, click on it, enable the policy, and attach the policy you recently created.
2. PaloAlto Firewall
Palo Alto is one of the most well-known firewalls organizations use to protect their published applications on their DMZ segment.
Palo Alto also provides an IP protection feature, but you need to call it in your rule.
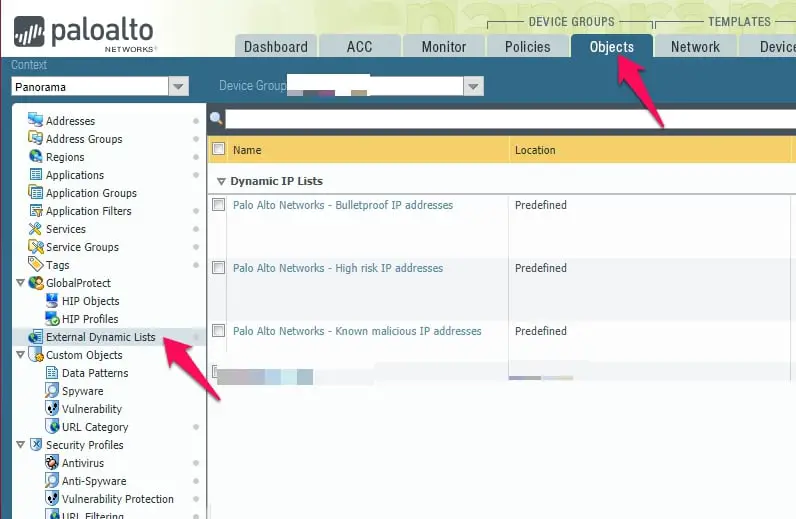
Open your Palo Alto firewall, click on the Objects tab, and click on the “External Dynamic Lists” option.
Here you have three predefined lists with Bulletproof, High Risk, and Know malicious IP address groups.
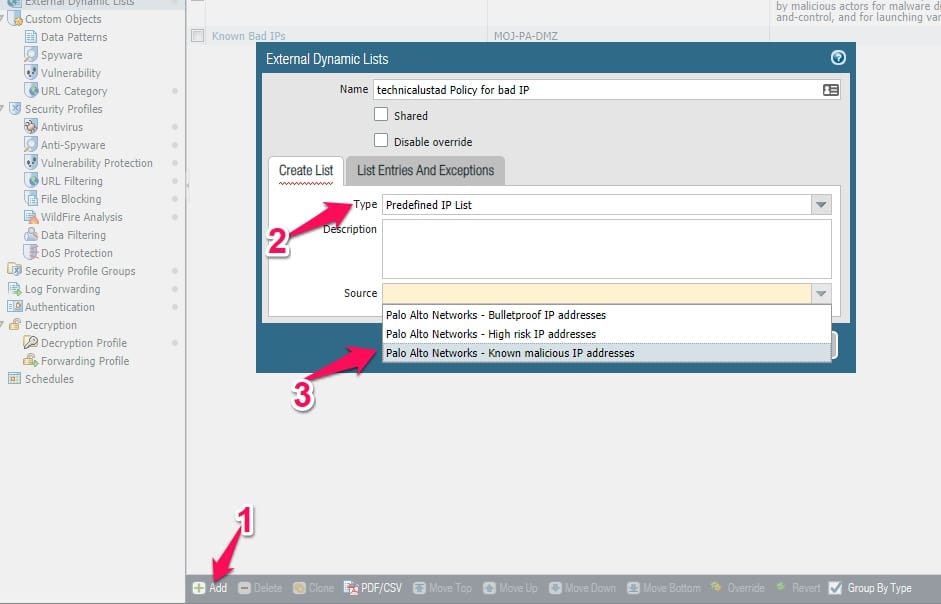
Click on the “Add” option, enter the policy’s name, select the Type as a “Predefined IP List” under the create list option, and select the source here.
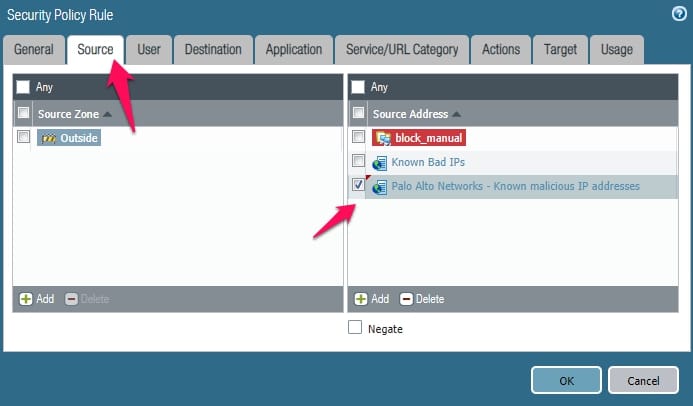
Now you need to call this object in your rule or you can directly call these external block objects in your rule.
Note:- Make your rule like source ( your external dynamic list objects), select your Zone as outside or DMZ, and then under destination, put any and action as deny.

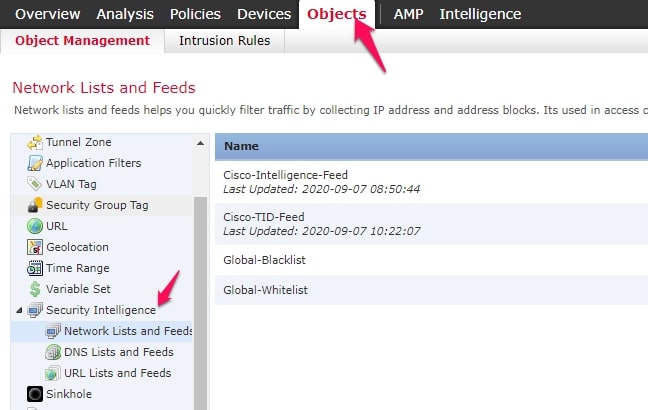
3. Cisco FirePower Firewall
Cisco Firepower is another firewall that organizations use to secure their published applications. Open your firepower dashboard if your organization also uses the Cisco firepower firewall.
Click on the objects tab and click on the Object management tab here. Here you will see the “Security Intelligence” tab and the three feeds for Network, DNS, and URL list.
Just create the object from here and call those objects in the rule.
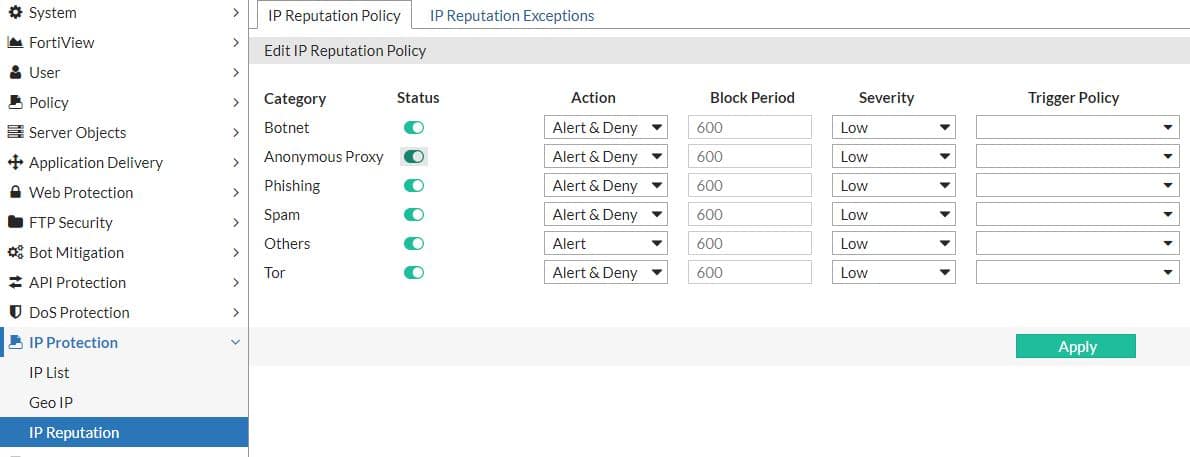
4. Forti WAF
FortiWAF is another top WAF firewall that organizations use to protect their published applications, especially in the cloud environment.
If you also use Fortiwaf in your organization, ensure the IP reputation option is enabled on your policy.
Note:- Like F5 ASM, you don’t need an additional license for fortiwaf to use the IP-reputation features.
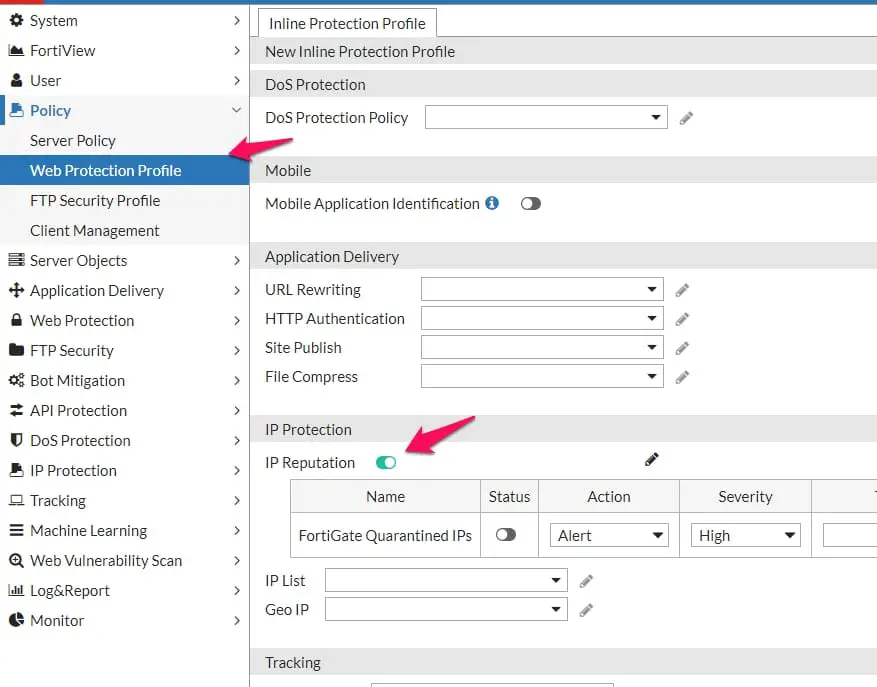
With IP-reputation fortifnet is protecting your published application against Botnet, Anonymous proxy, Phishing, Spam, and Tor.
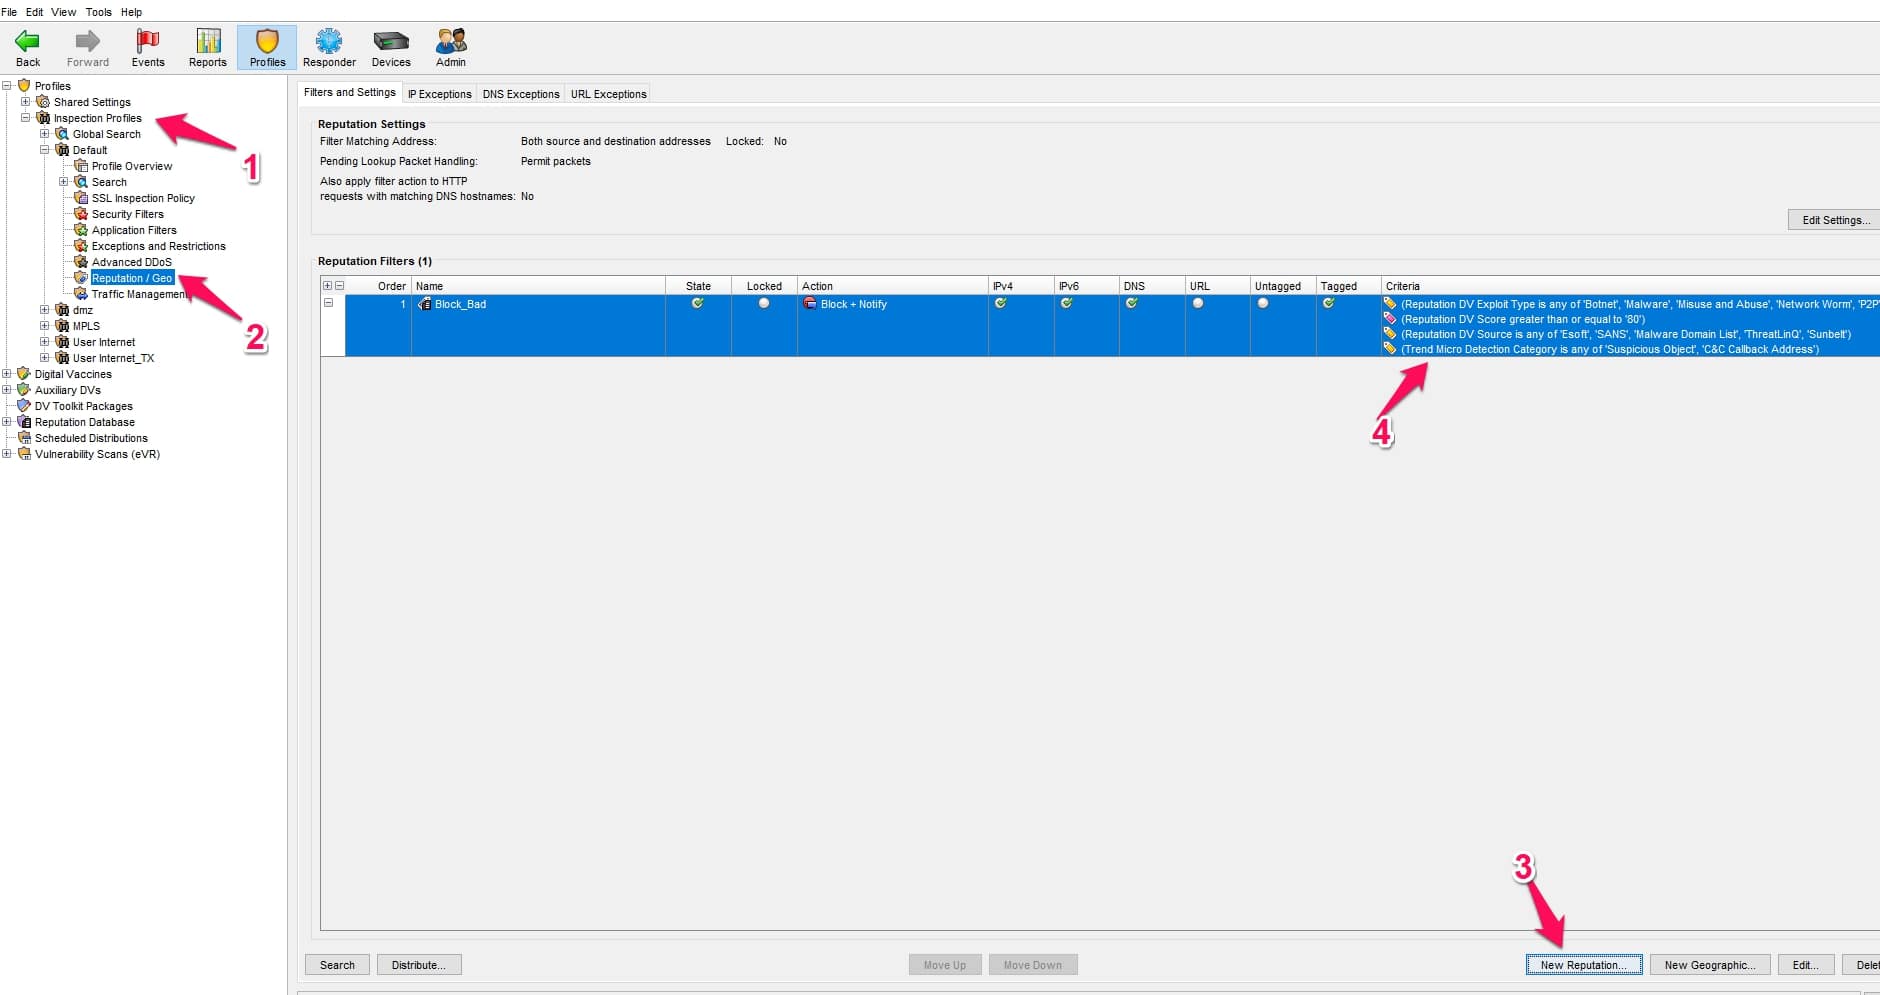
5. Tripping Point IPS
Tripping Point IPS is another powerful IPS that organizations are using to secure their infrastructure. Is also provides a protection feature of ip and domain reputation that you need to enable for your security profile.
Open your SMS application, click on Profiles> Inspection Profiles> select your profile, and click on the “Reputation/Geo” option.
Click on the “New Reputation” option and select your criteria based on your organization’s requirements and finally, click on the distribute option to distribute your IP-reputation policy on your profile.
How To Improve IP Reputation:-
Here are some steps you can take to improve the reputation of an IP address:
Use a reputable email service provider:- Use a reliable email service provider with a solid track record of providing legitimate emails if you send emails from an IP address. The reputation of the IP address will benefit from this.
Follow best practices for sending emails:- Follow best practices for email sending, such as getting recipients’ permission before sending them emails, using clear, concise subject lines, and avoiding utilizing spam trigger words or phrases, to prevent your emails from being classified as spam.
Monitor the IP and domain reputation:- Utilize a program like SenderScore or Return Path’s Repute Monitor to examine the IP address’s reputation frequently. This will enable you to spot problems and take appropriate action before your reputation is seriously harmed.
Use a dedicated IP address:- If you send many emails, you might want to use a dedicated IP address rather than a shared one. By doing this, you’ll be able to manage better and regulate the IP address’s reputation.
Use email authentication protocols:- By making it more difficult for attackers to send spam or phishing emails from your domain, email authentication protocols like SPF, DKIM, and DMARC can enhance the reputation of an IP address.
here’s a table on “How to Improve IP Reputation”:-
| Action | Description |
|---|---|
| Monitor your IP reputation | Regularly check your IP reputation score to identify any issues early on. Use tools like Sender Score, Barracuda Reputation Block List, or Cisco Talos Intelligence. |
| Authenticate your emails | Use SPF, DKIM, and DMARC authentication protocols to ensure your emails are legitimate and not spoofed. This will help prevent your emails from being marked as spam or phishing. |
| Remove inactive or invalid email addresses. | Remove any inactive or invalid email addresses from your mailing list. Sending emails to such addresses can increase bounce rates and negatively impact your IP reputation. |
| Build your email list organically. | Avoid purchasing or renting email lists containing spam traps or inactive email addresses. Instead, focus on building your email list organically by offering valuable content or incentives to your subscribers. |
| Segment your email list. | Segment your email list based on subscriber behavior, preferences, or demographics. This will allow you to send targeted and relevant emails to your subscribers, which can improve engagement and reduce complaints. |
| Monitor and respond to complaints. | Monitor feedback loops and complaint reports from ISPs or email providers. Respond promptly to any complaints and take action to address the root cause of the complaint. |
| Monitor your email frequency and content. | Avoid sending too many emails quickly, leading to complaints or unsubscribes. Also, ensure your email content is relevant, valuable, and not misleading or deceptive. |
| Use a reputable email service provider. | Use a reputable email service provider that follows best practices for email delivery and has good relationships with ISPs and email providers. |
| Use a dedicated IP address. | If you send a high volume of emails, consider using a dedicated IP address instead of a shared one. This can help you maintain a good reputation and avoid being affected by other senders on the same IP address. |
| Monitor blacklists | Regularly monitor blacklists to ensure that your IP address has not been listed. If you find that your IP address has been listed, take action to identify and address the underlying issue. |
📚FAQ
What is the IP reputation?
IP reputation measures an IP address’s trustworthiness and reliability based on its past behavior. This reputation score is determined by various factors, such as spamming frequency or malicious activity originating from that IP address.
How do I find my IP reputation?
You can check your IP reputation using various online tools, such as checkers or blacklists. These tools will provide you with information about the reputation of your IP address based on its history of malicious activity.
What is an example of IP reputation?
An example of a bad IP reputation is an IP address used for spamming, phishing, or other malicious activity. This type of IP address is likely to be blacklisted by email servers or search engines, resulting in emails being blocked or websites being flagged as unsafe.
What is the risk of IP reputation?
The risk of having a bad IP reputation is that it can result in emails being marked as spam or blocked by email servers, websites being flagged as unsafe, and a decrease in online visibility. This can negatively impact your online reputation and business.
What is IP reputation blacklisted?
IP reputation blacklisted is when an IP address is identified as a source of spamming, phishing, or other malicious activity and is added to a blacklist. This can result in blocked emails, websites being flagged as unsafe, and decreased online visibility.
How do I stop IP reputation attacks?
You can stop IP reputation attacks by ensuring that your website or email server is secure, regularly monitoring your IP address for any suspicious activity, and promptly responding to any reports of malicious activity.
How do I trace someone through an IP address?
You can trace someone through an IP address by using various online tools or working with law enforcement agencies. However, it’s important to note that IP addresses can be easily masked or changed, so tracing someone solely based on their IP address may not always be accurate.
IP reputation is shared among email providers, search engines, and other online platforms to help identify sources of spamming or malicious activity. This information is typically shared through blacklists or reputation databases.
What is the most common IP infringement?
The most common IP infringement is copyright infringement, which involves the unauthorized use of copyrighted material, such as images, videos, or written content.
How can I improve my IP address reputation?
You can improve your IP address reputation by ensuring your website or email server is secure, avoiding spamming or malicious activity, and promptly addressing suspicious activity reports.
What IP is commonly violated by most people?
The most commonly violated IP is the copyright, which can occur when individuals use copyrighted material without permission, such as images or music.
How long does it take to remove IP from blacklist?
The time it takes to remove an IP from a blacklist can vary depending on the severity of the offense and the policies of the blacklisting organization. It can take anywhere from a few hours to several weeks.
How do I know if Google blacklists my IP?
You can check if Google blacklists your IP by using various online tools, such as Google’s Safe Browsing Transparency Report or third-party blacklists.
What happens if someone attacks your IP?
If someone attacks your IP, they can potentially disrupt your website or email service, steal sensitive information, or use your IP address to engage in spamming or other malicious activity.
How do I get around a banned IP address?
Using a virtual private network (VPN) or proxy server, you can get around a banned IP address. However, it’s important to note that attempting to bypass a ban can result in further consequences.
Can IP address reveal identity?
An IP address can reveal some information about the user’s geographic location and internet service provider (ISP), but it typically cannot reveal their exact identity.
However, in certain circumstances, such as during a criminal investigation, law enforcement agencies may be able to use an IP address to identify a specific individual.
Can IP address track a person?
Yes, a person can be tracked by their IP address, but the tracking accuracy depends on various factors, such as the type of internet connection used and the user’s location.
It’s important to note that tracking someone solely based on their IP address may not always be accurate.
Can police track someone by IP?
Yes, in certain circumstances, such as during a criminal investigation, law enforcement agencies can track someone by their IP address. However, they typically require a warrant or other legal authorization.
What can someone access from an IP address?
Someone can access some information about the geographic location and ISP of the user, as well as the history of the IP address. However, they typically cannot access personal information, such as the user’s name or contact information.
What are the four types of IP infringement?
The four types of IP infringement are copyright, trademark, patent, and trade secret.
What is the most famous IP address?
The most famous IP address is likely 127.0.0.1, commonly called the “loopback” address and used for testing and troubleshooting network issues.
How long does it take to improve IP reputation?
The time it takes to improve an IP reputation can vary depending on the severity of the offenses and the steps taken to improve the reputation. It can take anywhere from a few days to several weeks or months.
What makes an IP address suspicious?
An IP address may be considered suspicious if it has a history of spamming, phishing, or other malicious activity, or if it is associated with a high volume of traffic or unusual patterns of activity.
What is an IP that should never change?
An IP address that should never change is a static IP address assigned to a specific device and does not change over time. This contrasts to a dynamic IP address assigned by the ISP and can change periodically.
How long does an IP ban last?
The length of an IP ban can vary depending on the severity of the offense and the policies of the banning organization. It can range from a few hours to a permanent ban.
How long does an IP keep history for?
The length of time that an IP address keeps history varies depending on the policies of the ISP or other organization that manages the IP address. Typically, it can range from a few months to a few years.
Has my IP been exposed?
Your IP may have been exposed, especially if you have used public Wi-Fi or visited unsecured websites. You can check your IP address history and take steps to secure your internet connection to reduce the risk of exposure.
Who can see my private IP?
Your private IP address is typically only visible to devices on your local network and is not visible to websites or external devices on the internet. However, it’s important to secure your network to reduce the risk of unauthorized access.
What are IP reputation attacks?
Attacks on an IP address’s reputation are attempts to harm that address’ standing, frequently to obstruct the delivery of reliable emails or network traffic.
There are several ways that an attacker may try to do this:-
Spamming:- Sending a significant amount of spam emails from a particular IP address is a frequent approach to harm its reputation.
As a result, email service providers or spam filters may block or filter traffic from the IP address after flagging it as a source of spam.
Phishing:- Sending phishing emails from an IP is another way attackers may try to harm its reputation. Malicious links or attachments may jeopardize the recipients’ systems’ security in these emails.
These emails can harm an IP’s reputation if they are frequently sent from that IP, which could be identified as a source of phishing assaults.
Distributed denial of service (DDoS) attacks:- By conducting a DDoS assault against an IP, an attacker may attempt to harm the IP’s reputation.
This entails flooding the IP with a lot of traffic, which can make it unavailable or slow it down. As a result, the IP may be marked as a source of malicious traffic, harming its reputation.
Spoofing:- By faking the IP address in emails or network traffic, an attacker may occasionally try to harm the reputation of an IP.
To accomplish this, traffic must be made to look to originate from the target IP even while it originates from another location.
Despite not being the traffic source, the target IP may be marked as a source of spam or other harmful activities if the attacker is successful.
How can I check the reputation of an IP?
There are several ways you can check the reputation of an IP address:-
Check with your Internet Service Provider (ISP):- If your IP address has a bad reputation, is frequently tagged for spam, or has been associated with harmful activities, your ISP should be able to let you know.
Use a reputation checker tool:- Your IP address’ reputation can be checked using various online reputation checker programs. MX Toolbox, SenderScore, and IPQualityScore are a few of the most well-known ones. Based on the reputation of your IP address, these programs will often display a score or rating for you.
Check with email providers:- If you send emails using your IP address, you can check with the email provider to see if there are any problems with the reputation of your IP. You can check the Google Postmaster Tools, for instance, if you use Gmail, to see if there are any problems with the reputation of your IP.
Remembering that an IP address’s reputation can vary over time is crucial, so it’s a good idea to routinely check to ensure that your IP address is still in good standing.
What is an IP reputation security risk?
An IP address’s chance of being utilized for hostile or illicit activities is known as its reputation security risk.
Poorly regarded IP addresses are more likely to be used to host harmful websites, send spam or phishing emails, or participate in other forms of online fraud.
Additionally, legitimate emails or websites linked to that IP address may have a harder time being delivered or accessed if their IP reputation is bad.
For instance, a website hosted on a bad IP address can be prohibited by some browsers or security software. Emails received from a bad IP address might also be marked as spam or rejected by email servers.
It’s critical to check that your IP address isn’t being used for any nefarious activity and to routinely check its reputation to guard against security threats associated with IP reputation.
If you think your IP address might have a bad reputation, consult your ISP or a reputation checker tool to determine the problem and take appropriate action to resolve it.
What is an IP reputation checker?
You may check the reputation of a certain IP address using an IP reputation checker. Based on the reputation of the IP address and any issues or warnings connected, these programs often offer a score or rating.
IP reputation checkers might be helpful for spotting any security hazards or problems with an IP address.
For instance, you can use an IP reputation checker to ensure that an IP address you are using to send emails is not being reported as a spam or phishing email source.
Like the last example, if you are hosting a website on an IP address, you can use an IP reputation checker to ensure that the IP is not being blacklisted by security software or browsers owing to a bad reputation.
MX Toolbox, SenderScore, and IPQualityScore are well-known IP reputation checker software. By entering an IP address into a search area on their website, these tools enable you to check the reputation of an IP address.
Conclusion
In conclusion, safeguarding your online presence is essential in today’s digital landscape, and one way to achieve this is by utilizing IP reputation check services.
By monitoring the reputation of your IP addresses, you can proactively identify and address any potential issues that may harm your online reputation or disrupt your business operations.
IP reputation check services help you stay on top of potential threats and provide valuable insights into the health of your IP addresses. They can assist in improving your email deliverability rates.
With the many benefits of utilizing IP reputation check services, it’s a no-brainer to incorporate them into your overall online security strategy.
Safeguarding your online reputation is critical to the success of your business, and utilizing IP reputation check services is a valuable tool in achieving this goal.
Don’t wait until it’s too late – take proactive steps today to protect your online presence and ensure your business remains secure and thriving.


