There are several reasons why you might be looking into info on how to delete Microsoft accounts.
It may be because you’re no longer going to be using it or maybe you’re worried about the fact that the account contains quite a lot of personal information.
Whatever your reasons may be, the steps outlined below will not only just show you how to delete. I will also explain other important things about the deletion process.
How To Delete Microsoft Account
To delete a Microsoft account, I will recommend you first do all of the following processes to ensure you get a clean sweep especially if you’re concerned about personal info falling into the wrong hands.
I have divided up the process into sections to ensure there are no confusions. So, follow the process step by step and you should be able to delete Microsoft accounts.
1. Removing The Microsoft Account From Your System
The first step I recommend in trying to delete Microsoft account is to get rid of the account on your PC first.
While this is not a total deletion of the account, it also helps in ensuring all info about your account is removed from your system.
The actual deletion process gets rid of all the info with Microsoft, this one gets rid of all the info with you on your system.
Before trying to remove/delete the Microsoft account, you have to log into your system with a different account from the one you’re trying to delete.
This automatically means you’ll have to create an offline or local account. Don’t worry, I’ll first explain how to do that before going on to explain how to remove your Microsoft account from your PC.
Creating A Local/Offline Account
Navigate to and select Start and then click on Settings.
Then in the Settings menu, click on Accounts.
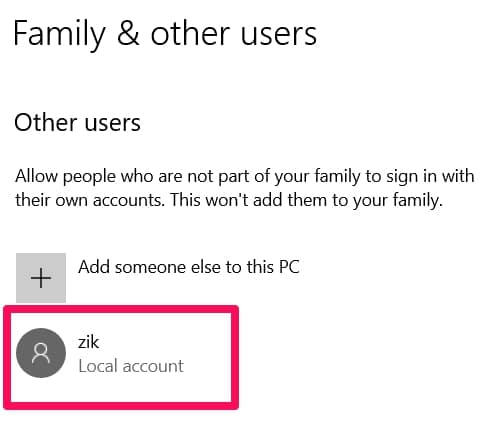
Find the Family & Other Users option and click on it. You might find Other Users only in some versions. Still, click on it.
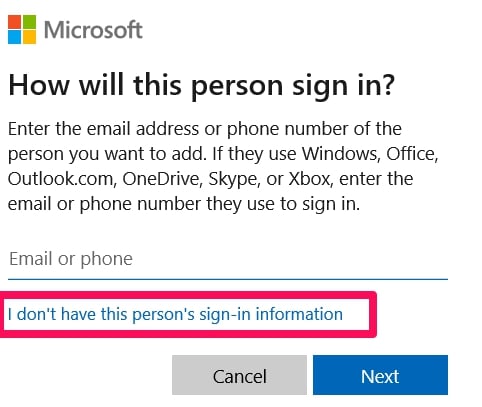
Click the Add Someone Else To This PC option.
Then choose I Don’t Have This Person’s Sign-in Information.
You’ll be given the opportunity to Add A User Without A Microsoft Account in the next menu. Do so and continue the process.
The next menu is where you’ll be asked to input important info like username, password, and security questions for resetting passwords if you forget. You’ll also be able to add password hints.
Once you’re done and you click on Next. The process of creating a local account is done.
You might want to grant that account Administrator privileges.
Granting Administrator Privileges
Follow the steps outlined above already to get to Family & Other Users.
Then click the account name you just created.
Click on Change Account Type, select the Administrator option, and click on OK to confirm the changes.
Now that you’ve created the local account, sign out and sign in again using the new local account. Then follow the steps below.
How To Remove
Navigate to Settings on your PC, find and click on Accounts. When the Accounts menu opens up, look for and click on the Your Account tab.
In the tab you’ve just opened, you’ll find the option to remove your Microsoft account.
Choose that option and follow up on the process to ensure the account is removed from your system.
Now that you’ve removed all traces of the account from your system, we can now go on to what I like to call the second part of an efficient way to delete Microsoft account.
Delete Microsoft Account Online
The section before this dwelt on removing the account and all the associated info from your system, this part is now about removing it from Microsoft’s clutches.
There are things you should do before totally deleting the account. These things ensure you don’t lose sensitive information or even money (the digital wallet).
I will explain them below after the deletion process so you might want to check it out first before deleting your account.
How To Delete
To make it easier, find the Microsoft page that deals in closing accounts by following this Microsoft link.
You’ll be asked to log in when the link above loads. Make sure you get your login details inputted correctly and then continue.
Verifying
On the next page, you’ll be asked to verify if this is actually your account. This is in place to ensure folks with our login details can’t just delete our accounts.
There are a few options for verification. You could use your phone number as long as it has been linked to the account.
You could also use your backup mail. Use your mail only if you’re sure you know the login details and it’s still in use too.
The last part of the verification process is to enter in a security code that will be sent to either your backup mail or your linked phone number.
The place it is sent depends on what option you chose in the step above.
Most times folks choose their mail. If you do, wait a bit and then check that email address. You should see a message that contains the security code you need to complete the verification process.
The idea is pretty much the same if you chose to use a linked phone number. You’ll also be sent a security code. As long as the number is still in use by you, then you’re good to go.
Marking Your Account For Closure
While we may say we’re trying to “delete Microsoft account”, Microsoft refers to it as closing the account and that page is where you’ll be taken to next after the successful completion of the verification process.
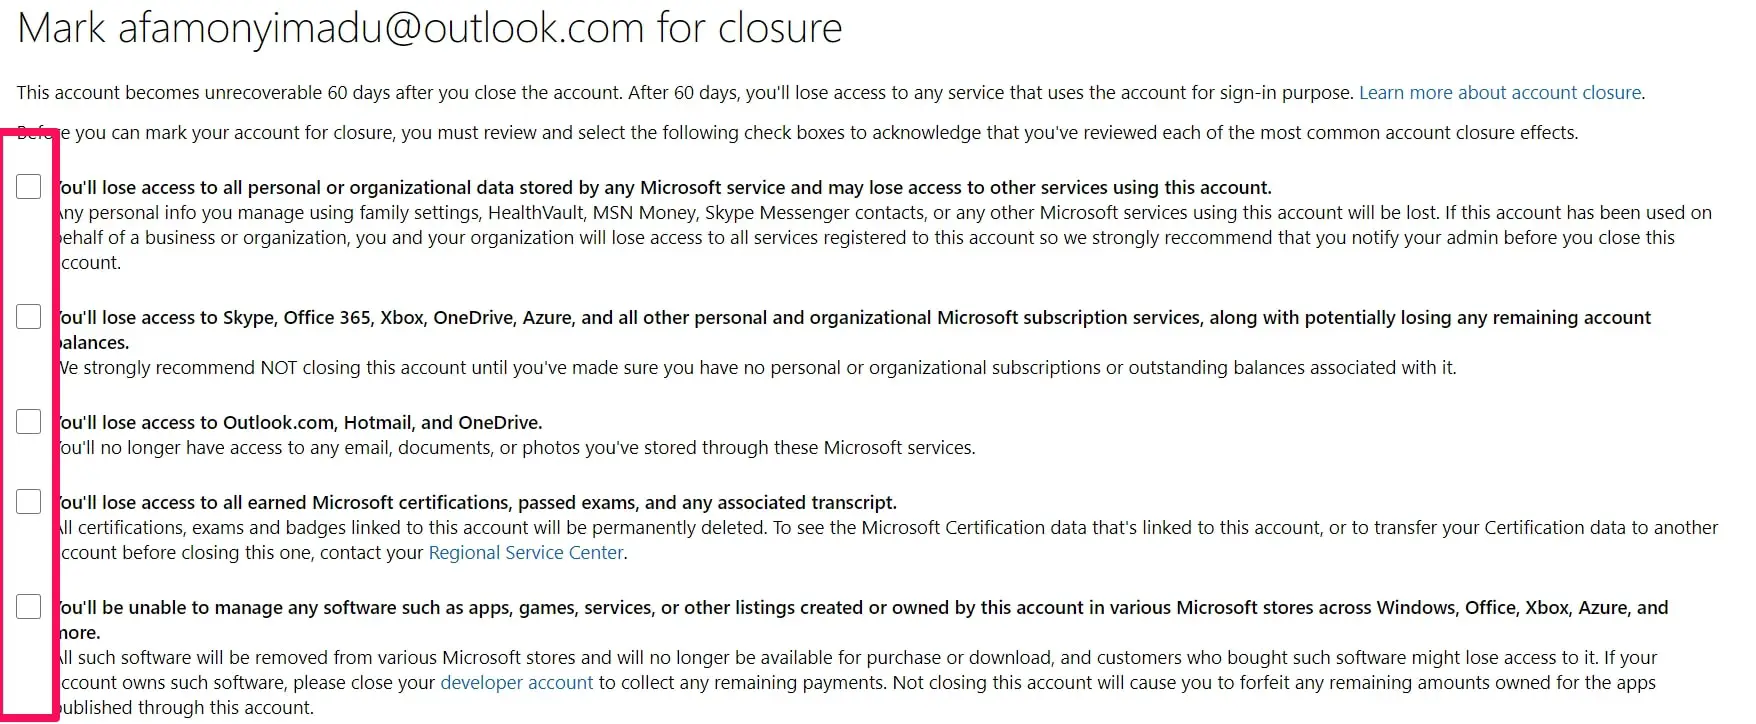
On this page, you’ll be asked to mark a lot of boxes that show you understand what happens when you close the account.
If you’re sure you’re comfortable with losing access to your account amongst other things, then check all the boxes and follow the process.
Note: For folks who want to find out what might be lost when accounts are deleted or closed, I have explained it below and it might be worth checking out first.
Assuming you marked all the boxes and you’re sure you want to delete Microsoft account, you’ll be asked why you want to delete your account.
There will be some preset options, choose any that you want.
Then you’ll find the Mark Account For Closure option at the bottom of the page or at times at the top.
Click on that option and you’ve totally made sure Microsoft will close or delete your account.
When The Account Will Be Actually Closed/Deleted (Plus How To Stop The Deletion Process)
Microsoft waits for 60 days before your account is totally wiped off. You’ll be given the date when the deletion or closure will take effect after marking your account for closure.
The official reason why Microsoft isn’t closing the account immediately is that you might just change your mind and want your account back.
When you do, and as long as it is within the 60 day grace period, all you have to do is log in with your normal details and the deletion/closure of your account will be stopped.
It is important to note that if the 60 day grace period elapses, your account info will be totally cleared off Microsoft’s servers and if you followed the first part I explained, it’ll also be cleared from your system.
What Will Be Lost When You Delete Your Account
Access to emails that end in
- Live.com
- Hotmail.com
- Outlook.com
- Msn.com
Access to other sub-accounts will be lost.
Things To Do Before Deleting Your Microsoft Account
There are few steps to take when you’re considering deleting your account. This is especially important if it’s an account you really use.
You might want to take the steps below to ensure vital or valuable things are not totally lost.
1. Emptying Your Digital Wallet
If you’re the type that used your account to pay for paid apps a lot and there’s still some amount left, I’ll encourage you to use it for purchases.
Just try and empty it out on any app at all. You’ll definitely find something to spend it on.
This is because when you delete Microsoft accounts (after the 60 day grace period), you’ll lose your remaining digital balance.
2. Backing Up Information
It is always important you back up especially when you’re making changes such as the deletion of your Microsoft account.
This is probably already solved by getting a local account and granting that local account Administrator privileges.
So you might want to do that first, I already explained how to do the above.
2. Canceling Subscriptions Linked To The Account
This is also something important you need to do.
The need to cancel subscriptions usually is needed for folks who have used and linked the account they now want to delete with other processes.
You should look into creating an automated process that forwards your emails to a new address.
Conclusion
Knowing how to delete Microsoft accounts can be very useful sometimes, especially for privacy purposes.
If you ever feel uneasy about all the private info available on your Microsoft account, you might want to use the steps above to ensure you totally clear all traces of your account.
You should follow the process step by step to ensure it totally works. Thanks for reading.


