


Windows 10 key is one of the oldest and the most useful key in Windows OS; it has been serving users since 1994 and will continue to do.
The best thing about this key apart from it being the quickest way to launch the Start Menu, the shortcuts that allow you to do things quickly.
It is very easy to disable the Windows key; in this article, we will do just that.
Methods To Disable Windows key in Windows 10/11
There are a plethora of methods by which you can easily disable the Windows Key. According to many professional gamers, they don’t want any accidental presses, and if the windows key is enabled then the chances of accidental presses increases.
Let’s just use methods to disable the Windows Key.
1. Disable Windows Key by Registry
The registry is one of the best ways to alter settings in your computer is by Registry. In this section, we will use Registry to disable the Windows Key.
Note: Be careful while doing anything with the registry as it can damage some other settings as well.
To disable Windows Key with the help of Registry, you need to follow the prescribed steps:-
Step 1: Launch the Registry Editor by searching it out from the start menu or by RUN(Win + R), type “regedit” and hit enter.
Step 2: Now, we will create a backup as it can be helpful if things go wrong by File> Export.

Step 3: From the Export Range section select All, file name: Backup, and click Save.

This will create a backup and will help you in the future if things go wrong.
Now you need to alter the settings with the help of the following steps:-
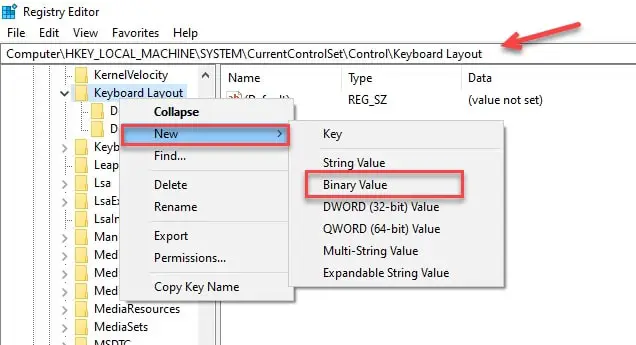
Step 4: Now, either navigate to the Keyboard layout with the help of the given route by clicking on the drop arrow from the left panel or by copying the given route and pasting it in the search bar.
Computer\HKEY_LOCAL_MACHINE\SYSTEM\CurrentControlSet\Control\KeyboardLayout
Step 5: Now, right-click on the Keyboard Layout then New> Binary Value and rename the newly created entity to ScancodeMap.
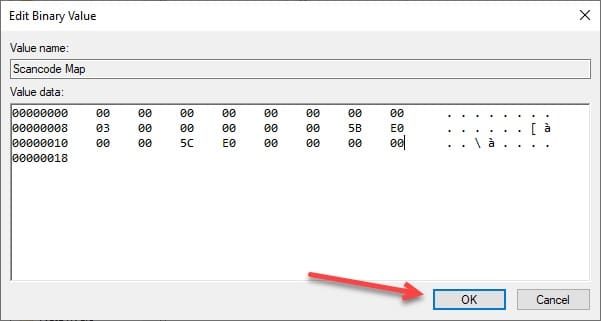
Step 6: Launch the ScancodeMap by double-clicking on it and insert the following value.
Note: You can’t just copy and paste the value, you have to manually enter it.
00000000000000000300000000005BE000005CE000000000
Then click Apply and OK to confirm the alteration.
Finally, restart your PC and you are good to go.
The best thing about this method is that whenever you feel like you need to enable the Windows Key, just go to the registry and delete the created entity ScancodeMap.
2. Disable Windows Keys by SharpKeys
SharpKeys is a third-party application that allows you to remap the keyboard keys. In this section, we are going to use it to disable the Windows Keys. To do that, you need to follow the prescribed steps:-
Step 1: Download the SharpKey and launch it.
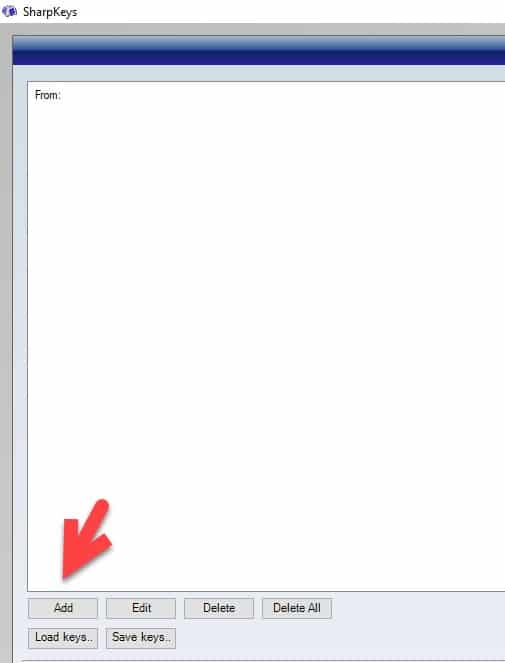
Step 2: On the appeared screen, click on the Add button.
Step 3: Now, from the appeared screen, click on the Type Key of the left panel.
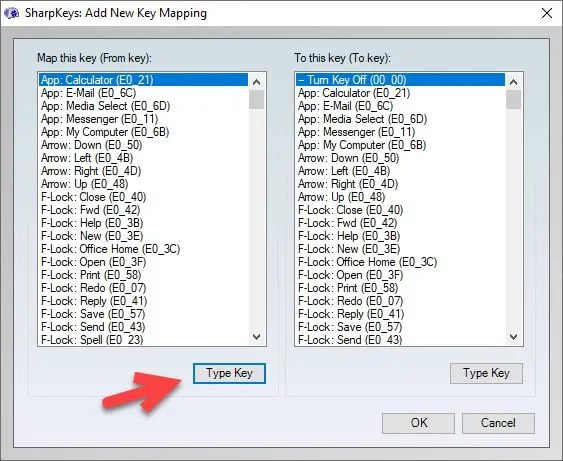
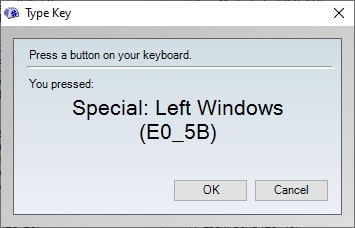
Step 4: On the appeared screen, press the Win key and click OK.
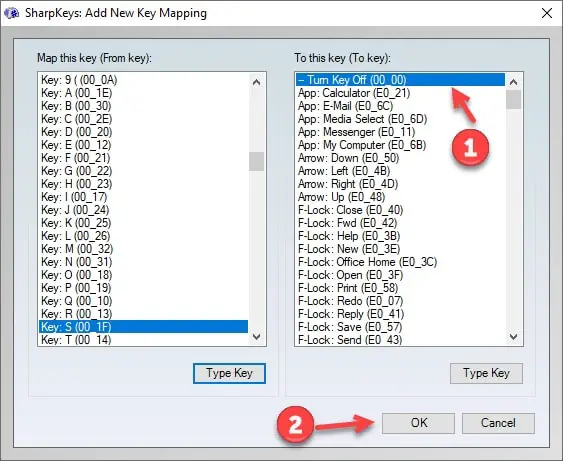
Step 5: Now from the left panel of the Window, choose Turn Key Off and click OK.
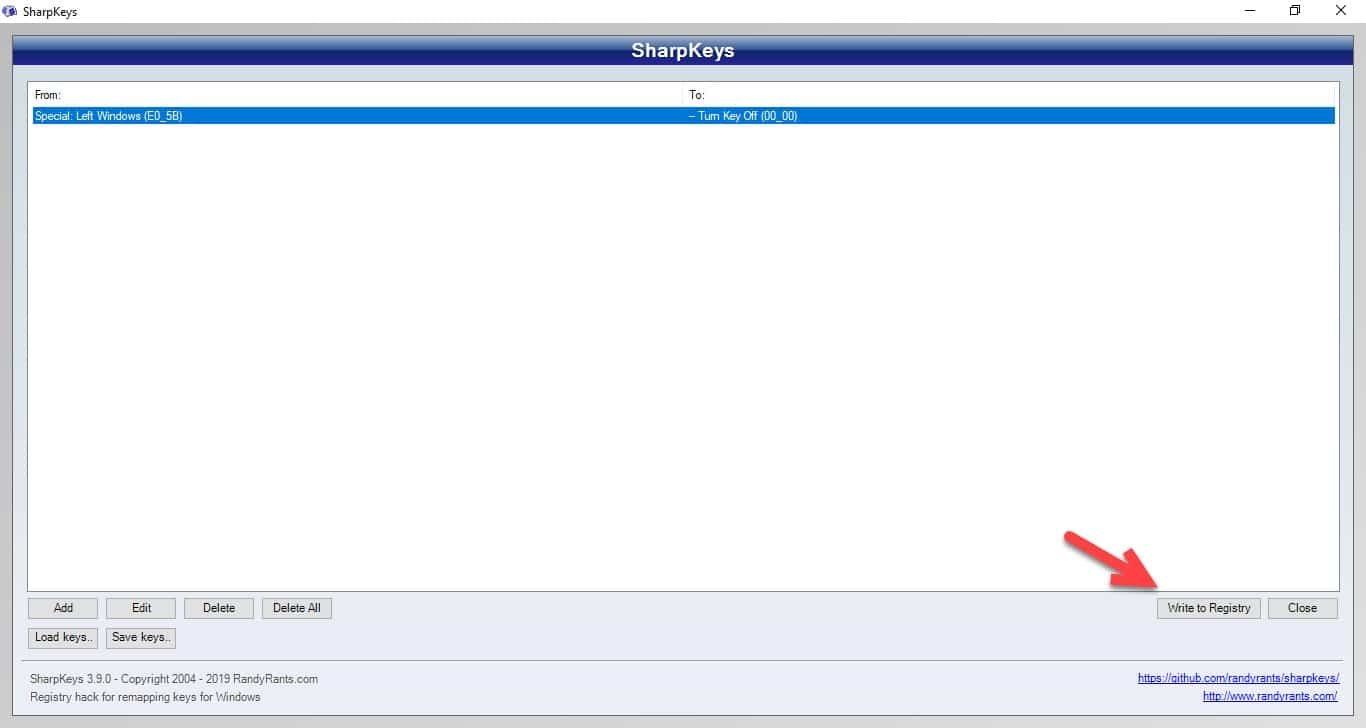
Step 6: Finally, click on the Write to Registry option to end the task.
This will turn the Windows Keys off, to get things right you need to restart your computer and hopefully, you will be able to enjoy a seamless gaming experience.
If you want to revert the settings and allow the Windows Key then do as follows:-
Step 1: Launch the application.
Step 2: Select the created entity and then click on the Delete button.
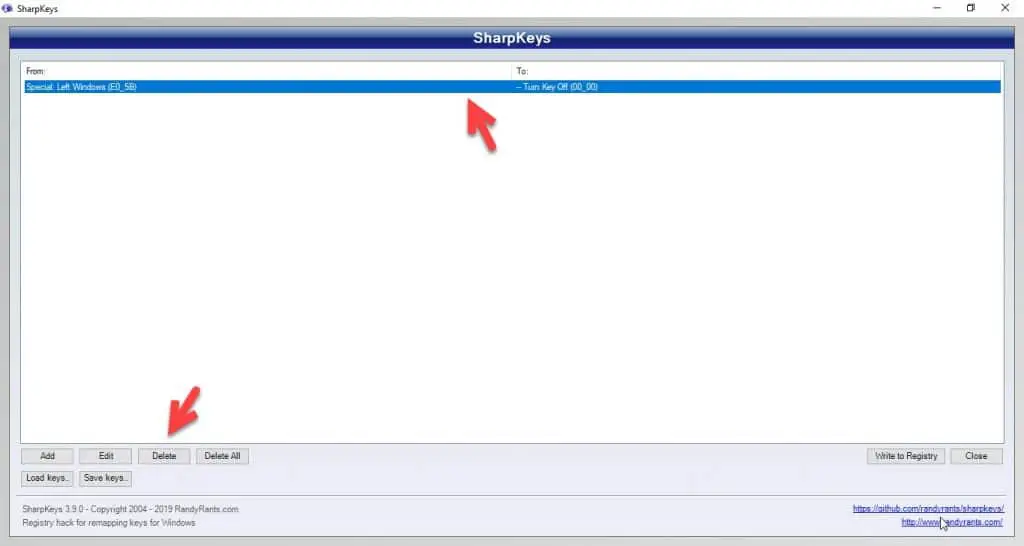
Step 3: Click on the Write to Registry button and you are good to go.

This will enable the Windows Key but you still should restart your computer once, in order to get things in the right place.
3. Disable Windows Key by using a Gaming Mode
If you are someone looking to disable the Windows Key then the chances of you being a gamer are high. If you are interested in gaming and have a Gaming Keyboard then you can use its gaming mode to disable the Windows Keys.
Many gaming keyboards have either a physical manual or a virtual one. In that manual, you can see the shortcuts by which you can enter the Gaming mode which usually disabled the Windows Key.
One thing you should know, this option is temporary and best for gamers as you don’t want to disable the Windows Keys permanently because of its plethora of features.
4. Disable Windows Keys from the Keyboard Applications
This one goes hand in hand with the former method. As we have already mentioned, gaming keyboards allow you to disable the Windows Key with the help of an application provided to you by the manufacturer or the one you downloaded from the manufacturer’s official website.
Many applications allow you to disable the Windows Key, you can either ask your vendor to provide you the software or visit the official website to download the software.
5. Disable Windows Keys by AutoHotKey Script
Now, let’s write some script and disable the AutoHotKey. AutoHotKey is an open-source software on which you can write short scripts and then run it to perform a specific task.
But before going any further you need to download the AutoHotKey. After downloading follow the prescribed steps to disable the Windows Key.
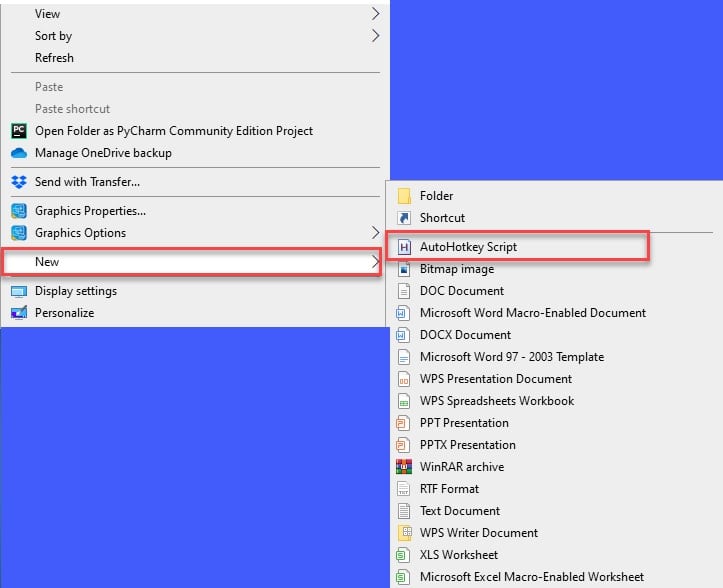
Step 1: Right-click on the desktop screen, New> AutoHotKey Script.
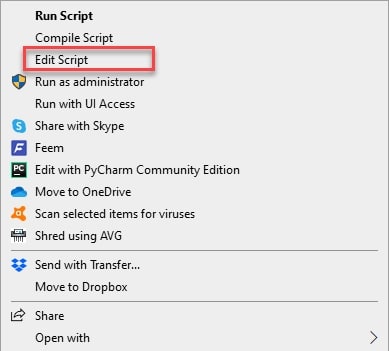
Step 2: A new blank AutoHotkey file will be formed, right-click on it, and then select Edit Script.
Step 3: This will redirect you to the AutoHotKey coding panel, there, you need to type the following commands.
~LWin Up::return
~RWin Up::return
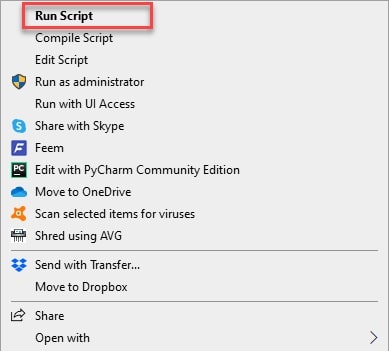
Save the script, right-click on the AutoHotKey file, and select Run Script from the appeared list.
Now, every time you need to disable the Windows Key just RUN the formed script. And you are good to go.
There is a lot more cool stuff that you can do with AutoHotKey other than disabling the Windows Key. read our guide on Best AutoHotKey Script To Make Your Life Easier.
6. Disable Windows Keys by blocking HotKeys with register
In this section, we are going to use the registry editor to block Windows Key hotkeys. To do that, you need to be obedient to the following steps:-
Step 1: Launch the Registry Editor by either searching it out from the start menu or by RUN(Win + R), type “regedit” and hit enter.
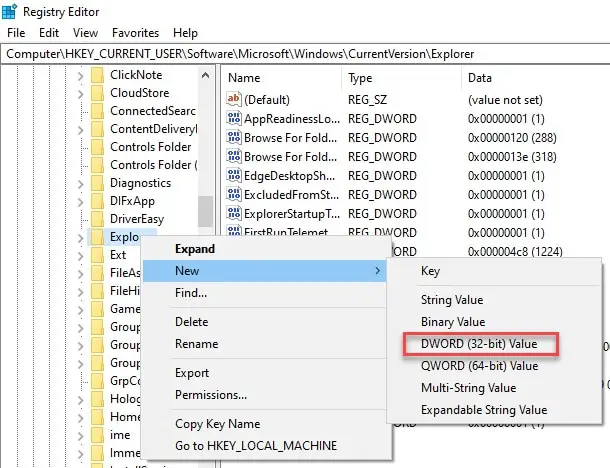
Step 2: Now reach the Explorer by either expanding the folders in the following order or just by copying and pasting the following route.
HKEY_CURRENT_USER\Software\Microsoft\Windows\CurrentVersion\Policies\Explorer
Step 3: Now, right-click on Explorer from the left panel and then New> DWORD(32-bit) value.
Step 4: Name the newly created value, like NoWinKey.
Step 5: Launch the newly created registry, change the values to 1, and hit enter.
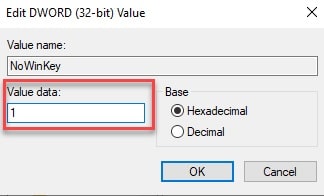
This will disable the Windows Key. Restart your computer to get things on track and you are good to go.
Now, you can enjoy them without thinking about the accidental presses.
7. Disable Windows Keys by Group Policy Editor
Group Policy Editor allows you to alter the settings of your Windows OS and enable or disable features like PowerShell or command prompt. In this section, we are going to disable the Windows Keys with the help of the Group Policy Editor.
To do that, you need to follow the prescribed steps:-
Step 1: Launch the Group Policy Editor either by searching it out from the start menu or by RUN(Win + R), type “gpedit.msc” and hit enter.

Step 2: Now, we need to reach File Explorer from the given path by expanding the folders from the left panel of the screen.
User Configuration> Administrative Templates> Windows Component> File Explorer
Step 3: After reaching the File Explorer double click on “Turn off Windows Key hotkeys” from the right side of the screen.

Step 4: Now, from the appeared screen, select Enabled and click OK.
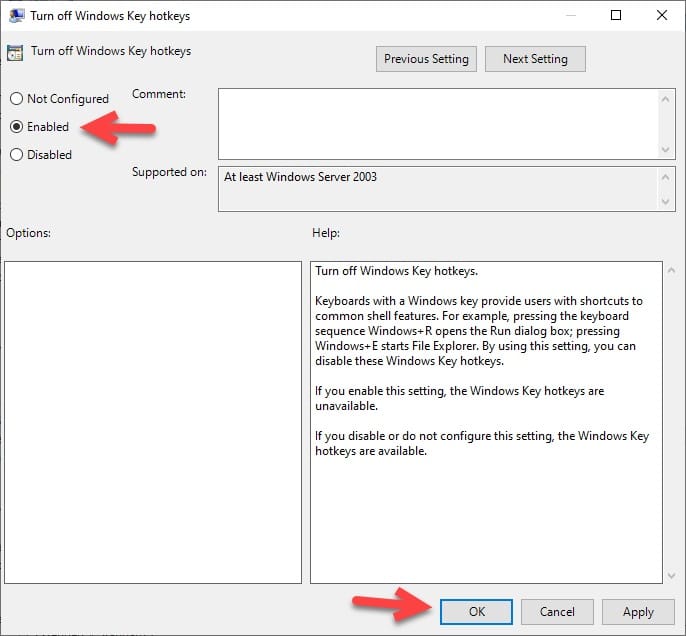
Finally, restart your computer and you longer will be able to use the Windows Key.
If you want to enable it, go to the same location, launch the “Turn off Windows Key hotkeys” and select disabled.
8. Disable Windows Keys by third-party apps
There are tons of applications out there in the market by which you can easily turn off the Windows Key. They may or may not be specifically for this purpose but they get the job done.
Winkill:-
Winkill is one of those applications specifically built to disable the Windows Key and shortcuts associated with it. The best thing about Winkill is that you don’t need to restart your computer as you did in all the previous methods.
You just need to download and launch and Windows Key and shortcuts associated with it will be blocked.
This software was primarily built for gamers in order to save them from accidental presses. Any version of Windows(XP or after) is supported by this application. Therefore download it and use this small and simple tool to disable the Windows Key.
Simple disable Key:-
Simple Disable Key is another of those third-party applications that will allow you to disable the Windows Key. The best part about this application is that you can disable any key on your keyboard with its help.
To disable Windows Key with the help of Simple Disable Key you need to follow the prescribed steps:
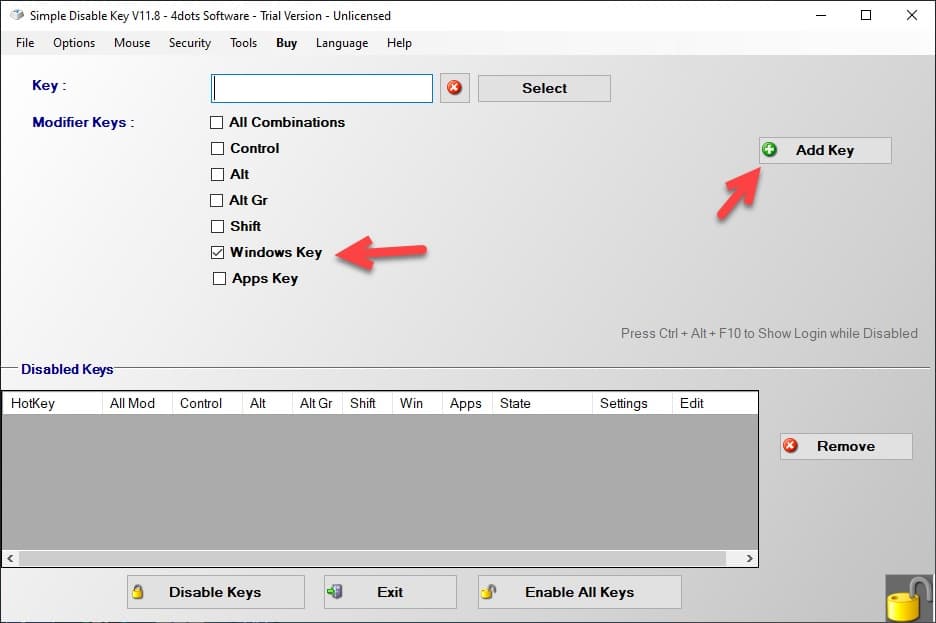
Step 1: Download and launch the Simple Disable Key application.
Step 2: Now from the appeared screen, select Windows Key and then click Add key.
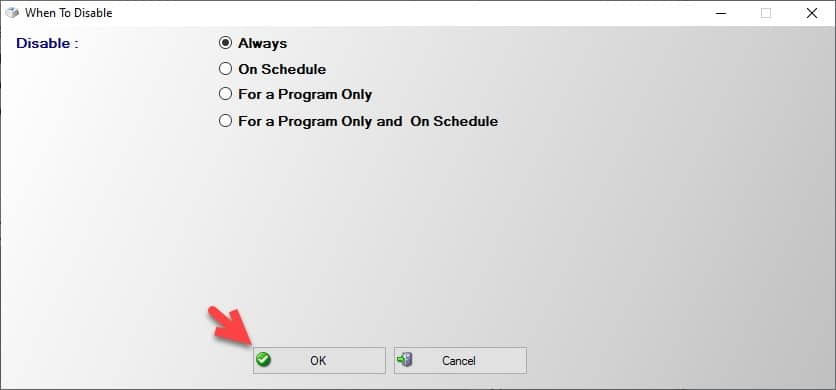
Step 3: This will redirect you to the “When to disable Windows”, there you need to select according to your need and then click OK to end the process.
📗FAQ
How do I disable a key on my keyboard in Windows 10?
To disable a key on your keyboard in Windows 10, you can use a third-party application like SharpKeys. It allows you to remap keys, including disabling specific keys on your keyboard.
Once you have installed SharpKeys, you can select the key you want to disable and remap it to “Turn Key Off” or another key that you don’t use.
To lock the Windows button on your keyboard, you can use a registry tweak in Windows.
First, press “Windows key + R” to open the Run dialog box, type “regedit” and press Enter. Navigate to “HKEY_LOCAL_MACHINE\SYSTEM\CurrentControlSet\Control\Keyboard Layout” and create a new binary value named “Scancode Map”.
Set the value data to “00 00 00 00 00 00 00 00 03 00 00 00 00 00 5B E0 00 00 5C E0 00 00 00 00” to remap the Windows key to the null character.
How do I turn off Windows key hotkeys?
To turn off Windows key hotkeys, you can use the Group Policy Editor in Windows. Press “Windows key + R” to open the Run dialog box, type “gpedit.msc” and press Enter.
Navigate to “User Configuration\Administrative Templates\Windows Components\File Explorer” and enable the “Turn off Windows Key hotkeys” policy. Once enabled, Windows key hotkeys will be disabled.
How do I turn off special keys on my keyboard?
To turn off special keys on your keyboard, you can use the Ease of Access settings in Windows.
Go to Settings > Ease of Access > Keyboard and toggle off the “Sticky Keys”, “Toggle Keys”, and “Filter Keys” options. This will disable special keys like Caps Lock, Num Lock, and Scroll Lock.
Why is my keyboard locked on Windows key?
If your keyboard is locked on the Windows key, it might be due to a malfunctioning keyboard driver or a physical issue with the keyboard.
You can try updating the keyboard driver or plugging the keyboard into a different USB port to see if that resolves the issue.
If your Windows button is locked, it might be due to a registry tweak or a third-party application that remapped the Windows key to another function. Check if you have any registry tweaks or third-party applications that might have caused this issue.
Is there a key lock on keyboard?
Yes, some keyboards come with a key lock feature that allows you to lock specific keys like Caps Lock, Num Lock, and Scroll Lock to prevent accidental keystrokes. Look for a “Lock” or “Fn” key on your keyboard to activate the key lock feature.
How do I change Windows key hotkeys?
To change Windows key hotkeys, you can use the Registry Editor in Windows. Press “Windows key + R” to open the Run dialog box, type “regedit” and press Enter.
Navigate to “HKEY_CURRENT_USER\Software\Microsoft\Windows\CurrentVersion\Explorer\Advanced” and create a new DWORD value named “DisabledHotkeys”.
Set the value data to the hotkey you want to disable, like “3” for “Windows key + E” or “15” for “Windows key + L”.
Can I disable a key on my keyboard?
Yes, you can disable a key on your keyboard using third-party applications like SharpKeys or through the Windows Registry Editor.
Be careful when modifying the Windows Registry as it can cause system issues if not done correctly.
How do I change my keyboard back to normal keys?
If you have accidentally changed your keyboard settings, you can change it back to normal keys by going to Settings > Time & Language > Language. Select your language and click on “Options”.
Click on “Add a keyboard” and select your keyboard layout. Remove any other keyboard layouts that you don’t use.
How do I unlock my Windows key on my HP keyboard?
To unlock the Windows key on your HP keyboard, try pressing “Fn + Windows key”. This should toggle the Windows key on and off. If this doesn’t work, check if you have any third-party software that might have remapped the Windows key.
Why is my Windows key not working Windows 11?
If your Windows key is not working on Windows 11, it might be due to a system issue or a hardware issue with your keyboard. Try updating your system to the latest version or connecting a different keyboard to see if the issue persists.
To remove a window button lock, you can use a registry tweak in Windows. Press “Windows key + R” to open the Run dialog box, type “regedit” and press Enter.
Navigate to “HKEY_LOCAL_MACHINE\SYSTEM\CurrentControlSet\Control\Keyboard Layout” and delete the binary value named “Scancode Map”. This will remove the remapping of the Windows key.
How do I enable Windows key in Windows 11?
To enable the Windows key in Windows 11, check if you have any third-party software that might have disabled the Windows key.
If not, try pressing “Fn + Windows key” to toggle the Windows key on and off. If this doesn’t work, try updating your system or connecting a different keyboard to see if the issue persists.
How do you unlock keyboard keys?
To unlock keyboard keys, try pressing the key again to see if it toggles on and off. If this doesn’t work, try pressing “Fn + the key” or “Ctrl + Alt + the key”.
If the key is still locked, check if you have any third-party software that might have caused the issue.
What function key locks the keyboard?
The function key that locks the keyboard depends on your keyboard model. Look for a “Lock” or “Fn” key on your keyboard and press it to activate the key lock feature.
What is Sticky Keys Windows 10?
Sticky Keys is an accessibility feature in Windows 10 that allows you to press one key at a time for keyboard shortcuts instead of pressing multiple keys at once. It can be useful for people with physical disabilities who find it difficult to press multiple keys simultaneously.
How do I change my function key settings?
To change your function key settings, go to Settings > Devices > Keyboard. Toggle on “Use F1-F12 as standard function keys” to use the function keys as standard keys. Toggle it off to use special functions like volume and brightness control.
Wrap-up:-
In this article, we have seen different methods by which you can disable the Windows key and a few third-party applications that you can use.
All of them work well, and you can choose one for you.
Let’s just quickly go over them:-
- By registry: Launch the registry editor, navigate via Computer\HKEY_LOCAL_MACHINE\SYSTEM\CurrentControlSet\Control\KeyboardLayout then right-click on the Keyboard Layout then New> Binary Value, double-click on the newly created entity, enter 00000000000000000300000000005BE000005CE000000000 and click OK
- By SharpKey: Add> Type Key> press win key> OK from the left panel Turn Key Off> OK> Write to registry.
- Using Gaming: Check your keyboard’s official website or provided manual.
- By Keyboard Application.
- By AutoHotKey Script: Right-click on desktop> New> AutoHotKey, right-click on AutoHotKey file> Edit Script> type “~LWin Up::return ~RWin Up::return” > Save, right-click on AutoHotKey file> Run Script.
- By Registry: Launch the registry editor, navigate via
HKEY_CURRENT_USER\Software\Microsoft\Windows\CurrentVersion\Policies\Explorer
Then right-click on Explorer> New> DWORD(32-bit) value, launch the newly created entity, and change the value to 1.
- By Group Policy: Launch the Group Policy Editor, navigate to File Explorer by User Configuration> Administrative Templates> Windows Component> File Explorer and then double click on “Turn off Windows Key hotkeys”, select Enabled, and click OK.
- By Third-party app: Winkill and Simple Disable Key.


