A lot of us are not aware of the fact that when we delete a file, it gets stored in Recycle Bin. This can make our PC sluggish at times. Therefore, to make your PC as quick as possible, it is recommended to clear your Recycle Bin time and time again.
We got you covered in this article, we are going to discuss six ways in which you can easily empty your Recycle Bin.
In this article, we will discuss both manual and automatic methods.
Manually Empty Recycle Bin in Windows 10
One can easily clear his/her Recycle Bin in five methods. These are:-
1. Use Desktop Icon to clear Recycle Bin:-
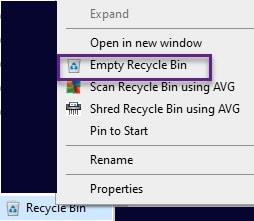
This is one of the most obvious ways of clearing stuff from Recycle Bin. All of you might have a Recycle Bin icon on your desktop.
You are going to right-click on the icon and click on “Empty Recycle Bin” from the list, and you are done. As simple as that.
This will delete all the files in the recycle bin in one go. So, checking the Bin thoroughly and then using this technique is advisable.
2. Use File Explorer to clear Recycle Bin
Emptying Recycle Bin from File Explorer is similar to the technique used previously. In this, you have to open the File Explorer and then right-click on the Recycle Bin option and click “Empty Recycle Bin” from the list.
But what if your file explorer doesn’t have a Recycle Bin icon? So, to place a Recycle Bin in your file explorer, you need to be obedient to the prescribed steps, and you are good to go.
Step 1: search out the “File Explorer option” from the search menu placed on the taskbar.
Step 2: Under the view tab, you will see “Show all the folders,” tick that and then click on apply and OK
Now you can proceed with the process discussed above.
3. Use Disk Cleanup to Empty Recycle Bin
Disk Cleanup is used to clear files on the disk, and Recycle Bin is nothing but a disk, therefore, it can be cleaned using the same tool.
To empty Recycle Bin with the help of Disk Cleanup, you must be obedient to the prescribed steps.
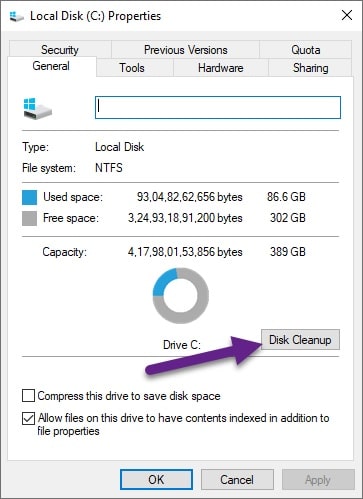
Step 1: Launch Disk Cleanup Utility by right-clicking on the “C” drive or the “This PC” icon and then going to the properties.
Step 2: From the appeared Window click on General Tab, under which you need to click on the Disk Cleanup option.
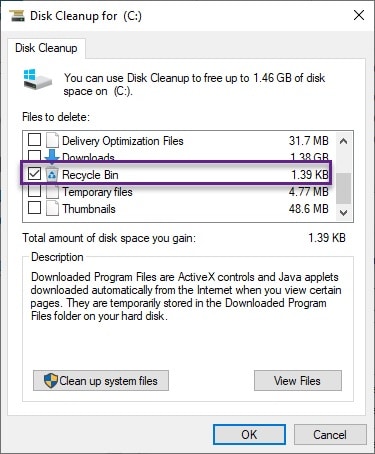
Step 3: Now you need to untick every option other than Recycle Bin carefully.
Step 4: Finally, click OK and then Delete Files.
4. Use Command Prompt to Empty Recycle Bin
Common Prompt is like Noah’s Wand for Windows users. And yet again, it is there for Windows users to clear the Recycle Bin.
To do that, you need to follow the following steps:
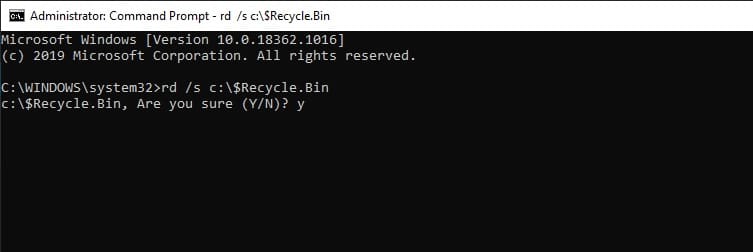
Step 1: Open Command Prompt by searching it out from the start menu or the RUN(Win + R), then type “cmd” there and hit enter.
Step 2: Type “rd /s c:\$Recycle.Bin.” and hit enter. Afterward, you will be asked to confirm the deletion, type “Y” there, and hit enter.
This will include all the Recycle Bin files you might have stored.
5. Use PowerShell to Empty Recycle Bin
Microsoft is trying to push a PowerShell command interpreter, which is nothing more than a more glamorous version of our beloved Command Prompt.
Using it to clean Recycle Bin is pretty simple; just follow these steps, and you are good to go.
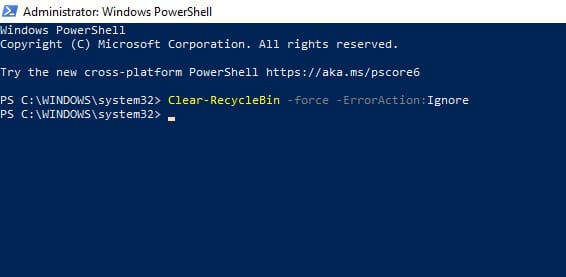
Step 1: Open PowerShell as an admin by searching it out from the Start Menu.
Step 2: Now, type “Clear-RecycleBin -force -ErrorAction:Ignore” and hit enter.
Now you can check your Recycle Bin to confirm the legitimacy of the process.
Automatically Empty Recycle Bin in Windows 10
As mentioned earlier, junk files stored in the Recycle Bin can make your computer sluggish. The procedure mentioned above allows you to clean Recycle Bin whenever the user wants, but we are human we tend to forget that.
So, how good would it be if our computer deletes the files automatically?
1. Free Disk Space Automatically with Windows 10 Storage Sense
Chances are that your computer is slower now than when you first got it. This is partly because your hard drive fills up with unwanted clutter, including temporary files, cached web pages, old installers, and general junk.
If left to accumulate, this build-up can slow down your PC even more or cause it to crash completely.
If you’re running the Windows 10 Creators Update, you can use Storage Sense to get back on top.
Storage Sense isn’t new – it’s been available in Windows 10 since the operating system launched in 2015 (and was included in Windows Phone 8.1 before that).
Still, the Creators Update has revamped it, making it more useful. If you haven’t tried it, now is the time to see what it can do for you.
1. You can customize the way Storage Sense works to tailor it to your specific needs, or you can enable the tool and trust the default settings.
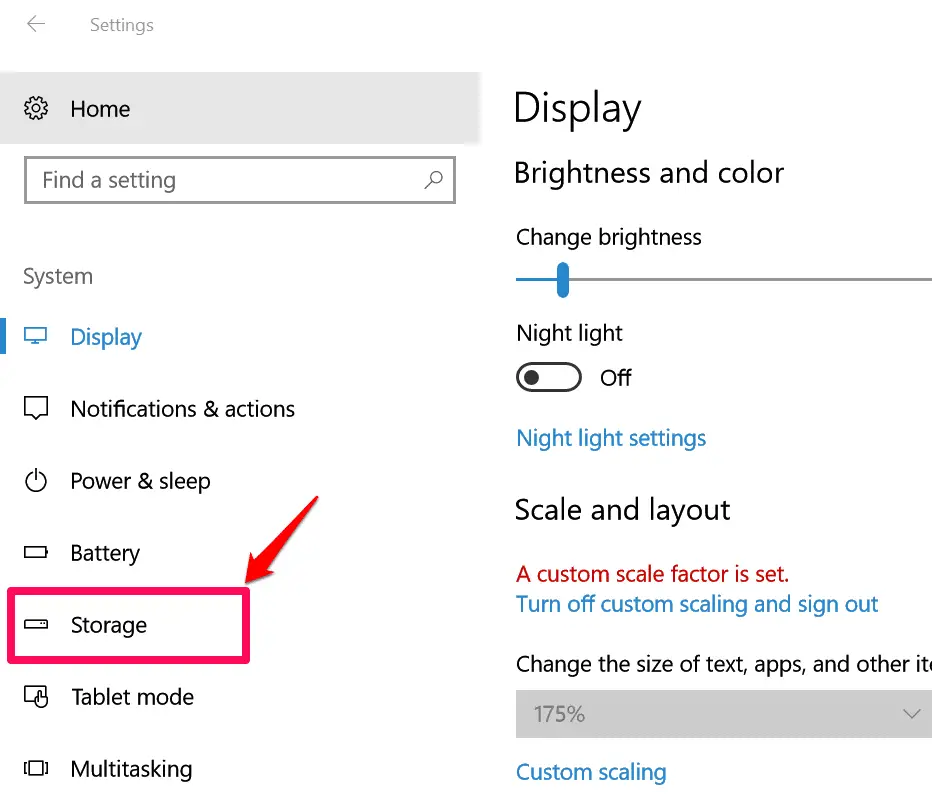
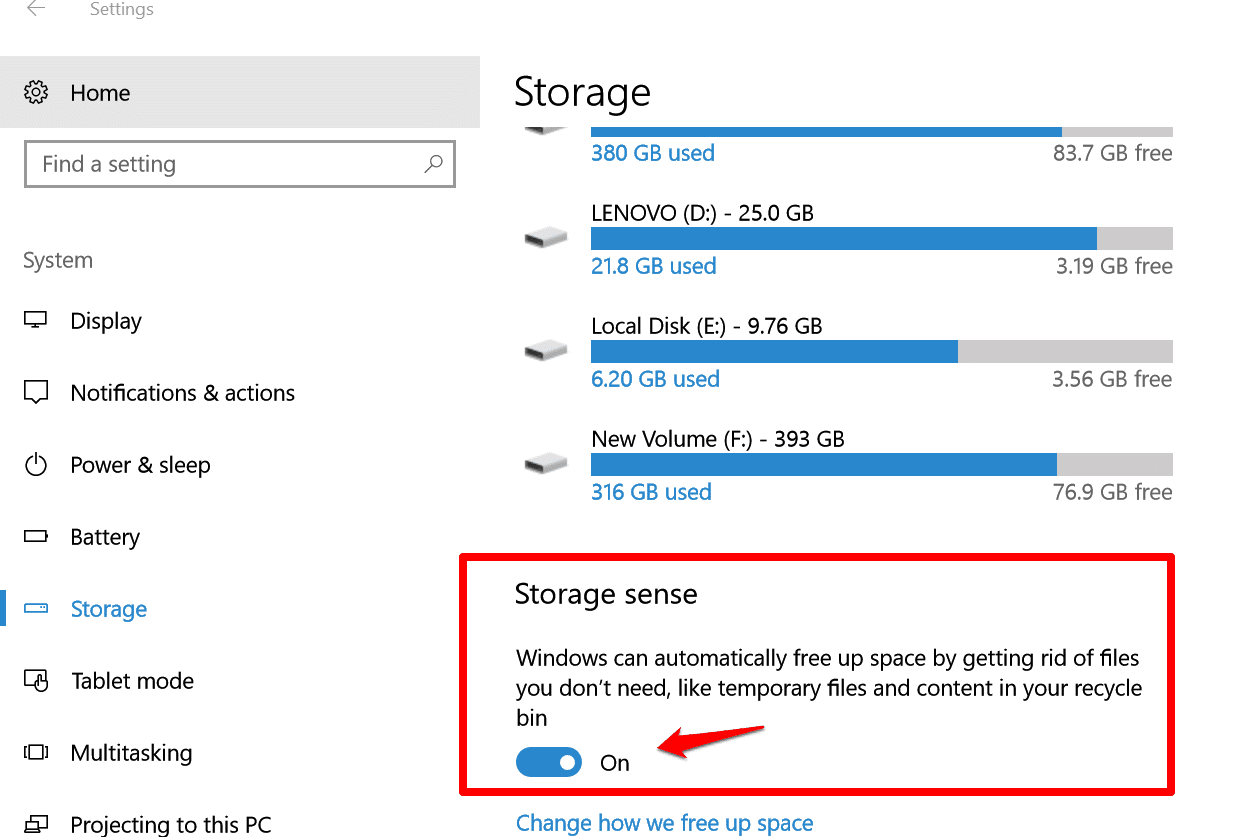
To switch it on, go to Start, Settings, click System, and choose Storage from the list on the left-hand side. Remember that you need to have the Creators Update installed.
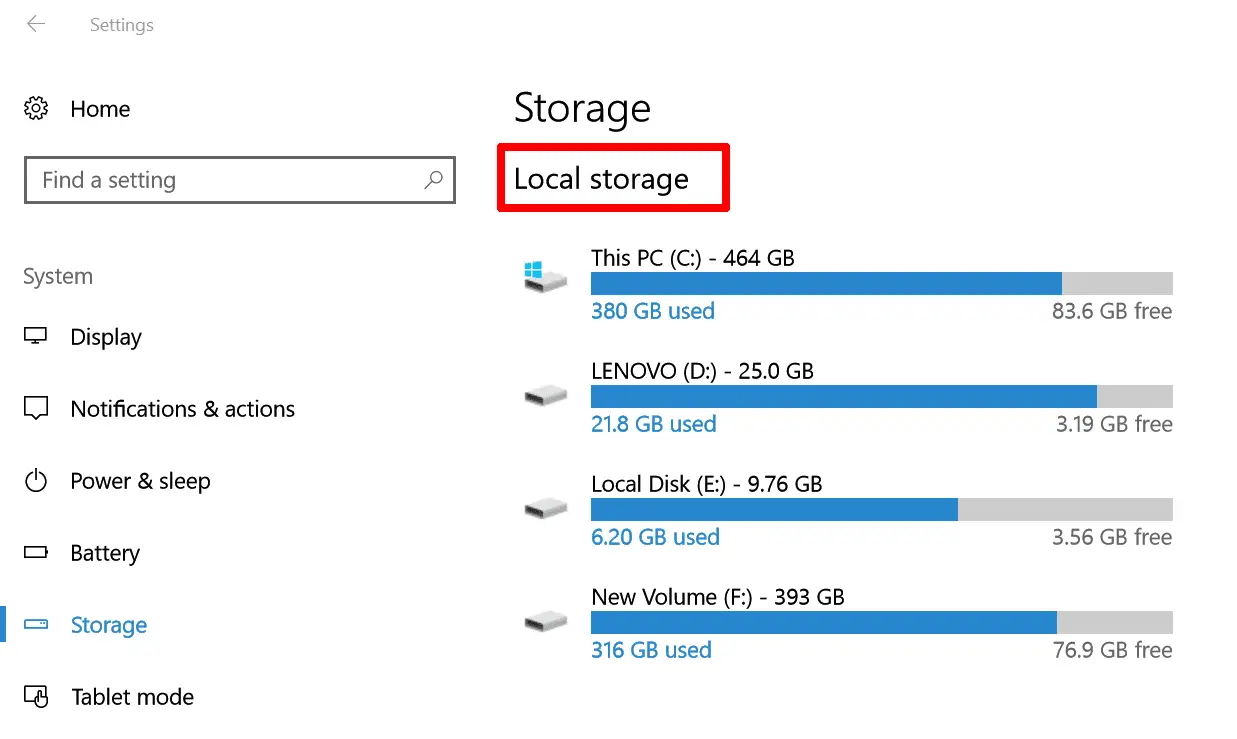
2. All your hard drives are listed under ‘Local storage’, and you can see how much free and used space each has.
Click any of the drives to see a breakdown of how much space is occupied by temporary files, videos, pictures, music, documents, ‘System and reserved’ data, and more.
3. Click an entry, such as Videos, to see which folders those items are stored in. When you click the name of a folder, it opens in File Explorer, and you can delete its contents manually.
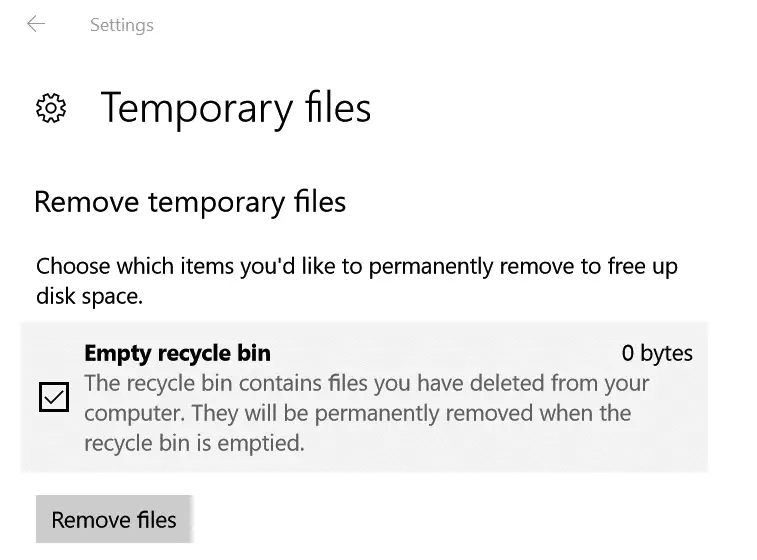
Choosing the ‘Temporary files’ entry lets you remove junk and empty the Recycle Bin. Click ‘Remove files.’
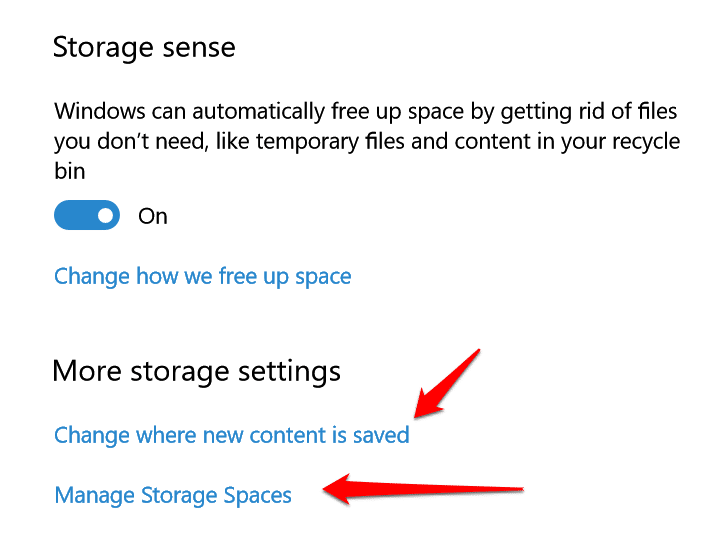
4. You’ll see the ‘Storage sense’ option under the list of drives. This is switched off by default.
Flick the switch to On, and Windows will automatically delete any junk files from your PC, including temporary files, leftover junk from apps you’ve removed, and anything in the Recycle Bin that’s over 30 days old.
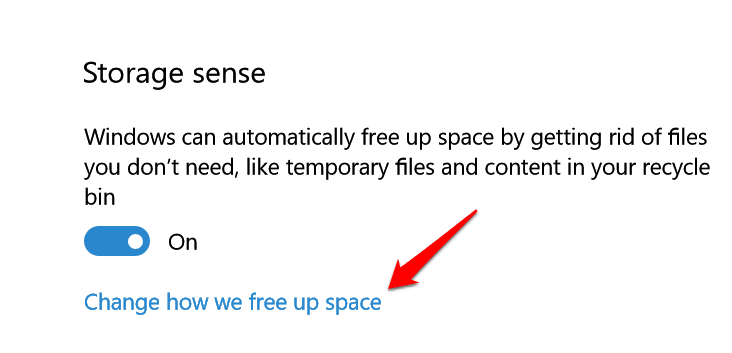
5. You can now leave Storage Sense to manage your hard-drive space automatically. However, if you want more control over how the tool works and what it removes, click the link to ‘Change how we free up space’ under the toggle switch.
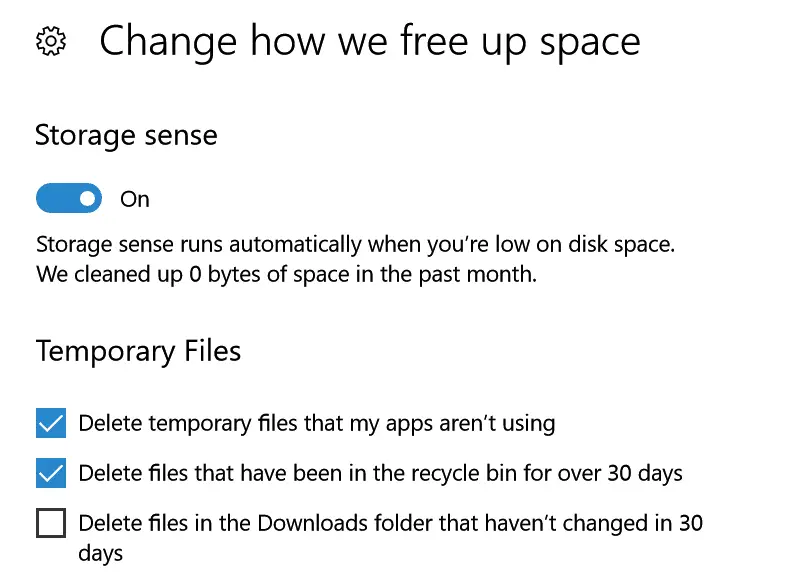
6. From here, you can choose whether or not to ‘Delete temporary files that my apps aren’t using’ and ‘Delete files that have been in the recycle bin for over 30 days’. Keeping both options switched on will free up significant amounts of space over time.
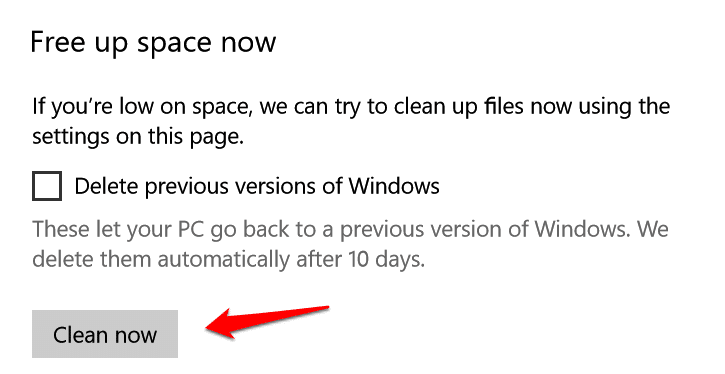
7. The same screen allows you to ‘Free up space now’. Click the ‘Clean now’ button, and Storage Sense will get to work, providing information on how much drive space it has cleaned up.
A running total showing how much space the tool has reclaimed over the past month appears at the top of the page.
8. Click the Back button to return to the main storage page (or go to Start, Settings, System, and Storage). Under ‘More storage settings’, you’ll see two links – ‘Change where new content is saved’ and ‘Manage Storage Spaces’.
Both are worth investigating. Click the first option to manage where Windows saves new content.
A Complete Guide to Windows 10 Registry Tweaks
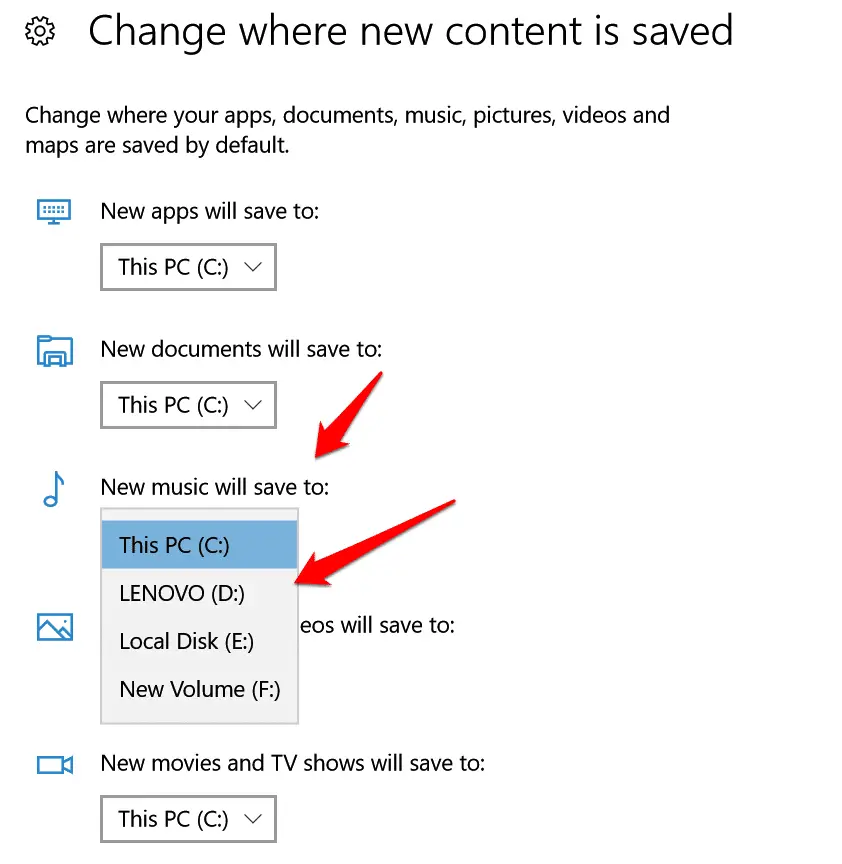
9. On the ‘Change where new content is saved’ screen, you can choose which drive your PC saves different types of content too.
For example, if you want to store all your photos and videos on one drive and films and TV programs on another, you can set this up here. Click the drop-down box and choose a new location from the list.
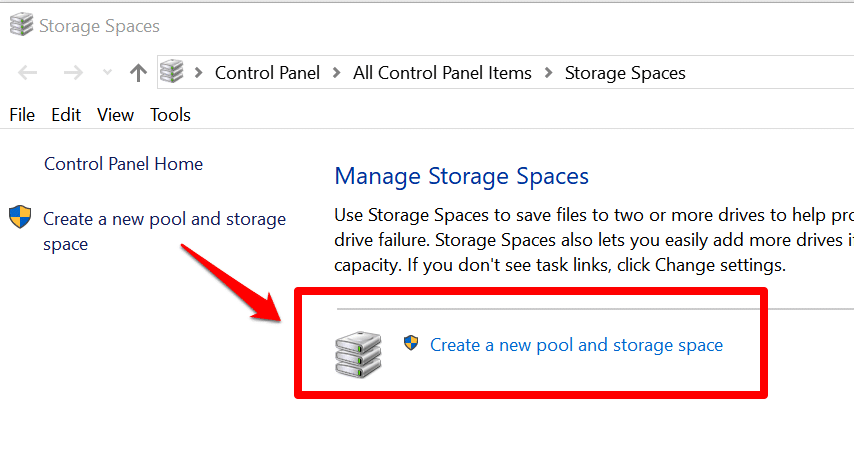
10. Storage Spaces protects your data from hard-drive failure by saving your files to two or more drives. This is a great solution if you have a spare hard drive.
To set it up, click the ‘Manage Storage Spaces’ link. In the new open window, click the ‘Create a new pool and storage space’ link, and follow the instructions.
2. From Task Scheduler
Windows provides users with a utility to schedule assigned tasks easily. This section will use Task Scheduler to empty your recycle bin automatically.
To do that, just be obedient to the prescribed steps.
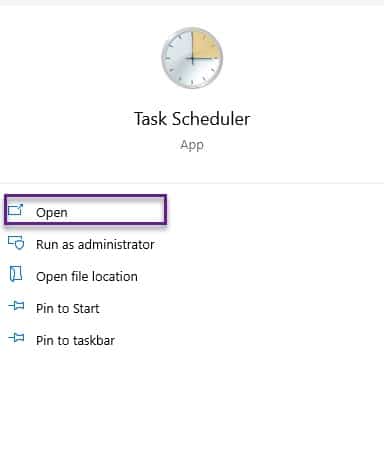
Step 1: Search out the Task scheduler from the start menu by typing the name in the search menu placed in the taskbar.
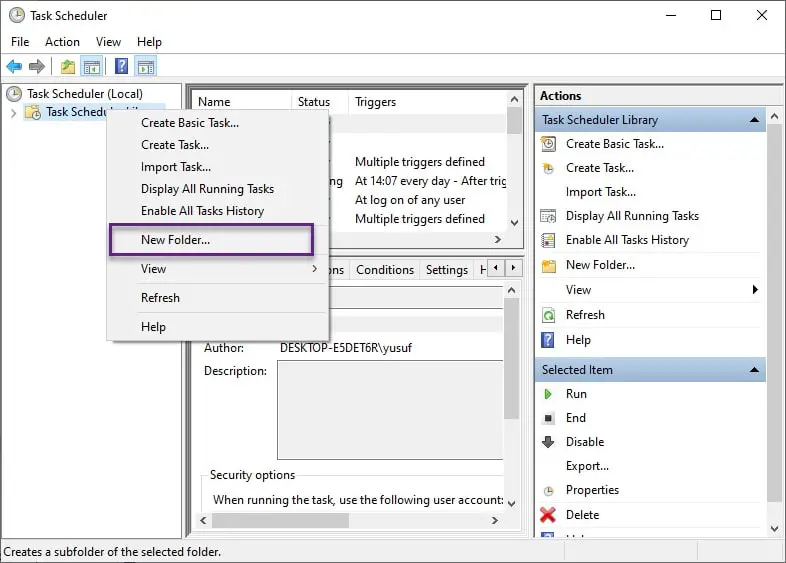
Step 2: From the appeared screen, right-click on the Task Scheduler Library icon placed on the list located on the left side of the screen and click on the “Create New Folder” button and then name that folder accordingly.
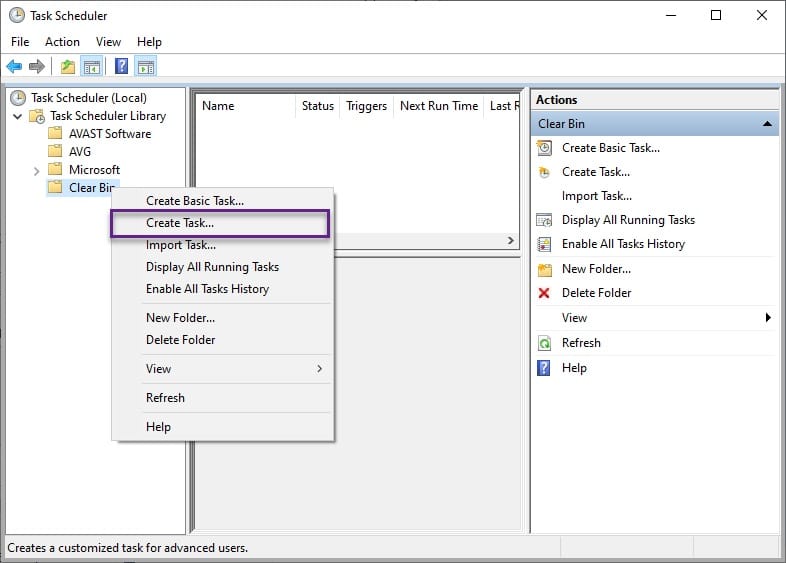
Step 3: You can see the name of your folder under the Task Scheduler Library. First, Right-click on that and then click on Create Task from the appeared list.
Step 4: From the appeared window, name your task, such as Clear Recycle Bin, under the General Tab.
Step 5: After naming, go to the trigger tab and create a task by clicking on the “New” option at the bottom left corner of your screen. This will redirect you to a screen where you have to assign the task.
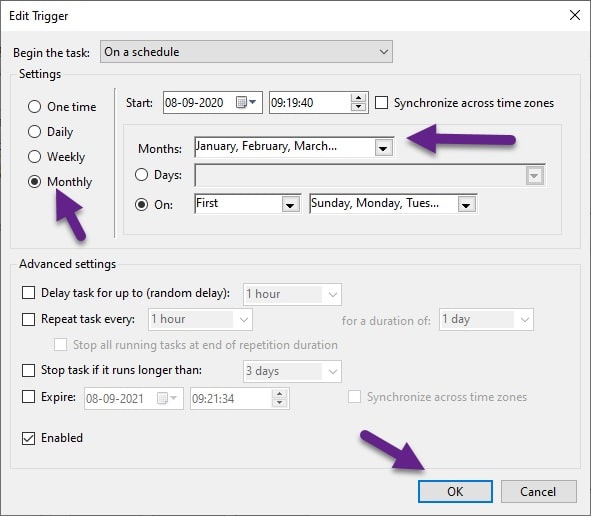
Step 6: In the appeared trigger edit window, you need to explain the schedule. You need to select the time between two successive deletions. I have chosen 30 days.
But it is a personal preference. If you are someone who restores his deleted items, then you need to extend the time window. After the completion, click on “OK.”
Step 7: Now go to the action tab and click a new action by clicking on the “New” button.
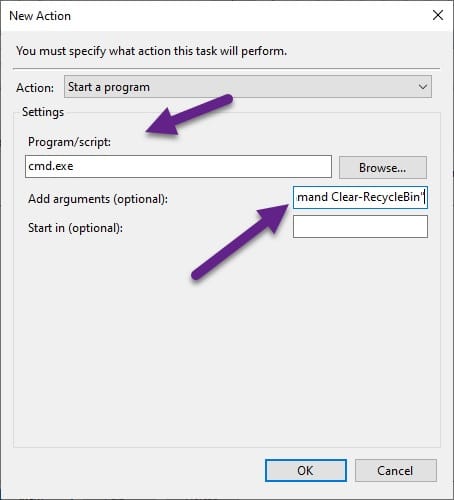
Step 8: From the appeared window, under the Programs/Script, type cmd.exe to click your program with the command line interpreter. Afterward, in front of the add argument type
/c “echo Y|PowerShell.exe -NoProfile -Command Clear-RecycleBin” this command.
Step 9: Press OK to schedule your Recycle Bin empty task.
Now that you have automated the cleaning of Recycle Bin, your computer will delete the files without noticing you.
So, one thing that you should always keep in mind is that the once-deleted file can not be restored. Therefore, think twice before proceeding.
Delete the file in Windows 10 without sending it to the Recycle Bin:-
If you are someone who never restores his files and wants to delete the file from his computer without sending it to the Recycle Bin, then delete it from there. This is for you if you don’t want to take the long route.
Disable Recycle Bin to delete the file permanently:-
In the normal deletion process, when you delete a file, that file is transferred to Recycle Bin, and then you can delete that file from there.
This means recycle Bin is an intermediate between your file and permanent deletion. Therefore, if you want to delete the file permanently, you can skip the process by disabling the Recycle Bin.
To disable Recycle Bin, follow the prescribed steps:-
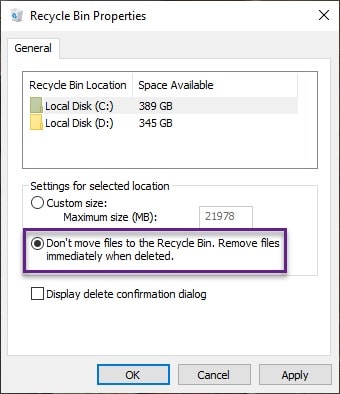
Step 1: Right-click on the Recycle Bin icon and click on “Properties”
Step 2: From the appeared screen, click “Don’t move files to the Recycle Bin. Remove files immediately when deleted” to enable permanent deletion, and then click Apply and OK.
This allows the user to delete files temporarily from a particular disk. If you want to apply this setting on all the drives, you need to select other drives.
Delete a file immediately:-
If you don’t want to disable Recycle Bin and rather want to switch between temporarily and permanently deleting a file. To do that, you need to follow the prescribed steps:-
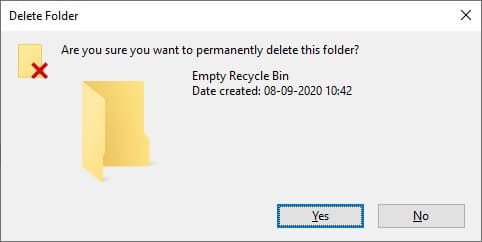
Step 1: Select the file from the file explorer and either press “Shift + Delete” or click “Right-click + Shift(hold)” and then select the delete option from the appeared list.
Step 2: A dialogue box will appear where you click OK to confirm the process.
Auto cleanup of the recycle bin with Auto Recycle Bin Tool
The Windows Recycle Bin provides a useful safety net because it lets you view – and restore – any recently deleted files.
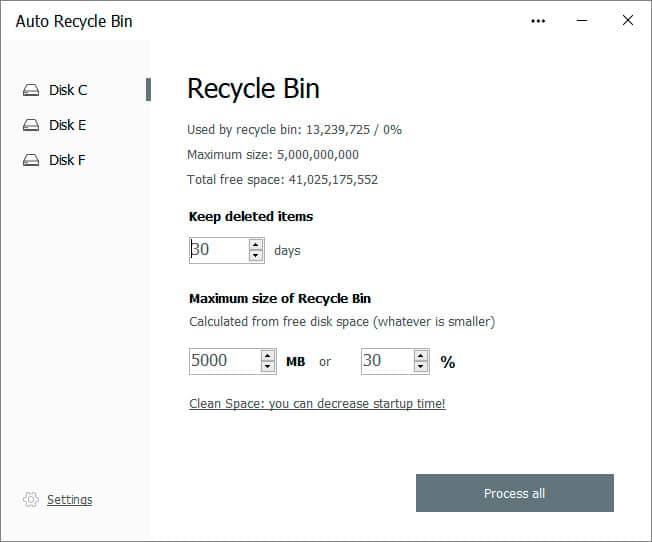
This tiny program (Download Here) gives you additional control over the bin and lets you choose when and how it empties.
You can set it to keep smaller files longer and remove larger ones more quickly or have Windows empty the bin every time you shut down your PC. You can even set individual rules for different file types.
Is Formatting a drive wipe the data from it? 🤔
Myth:- If you want to dispose of a hard drive filled with personal data – either by selling it, donating it, or sending it to the local tip – formatting the drive is the best way to wipe all the data it contains securely.
Truth:- If you delete files or folders on your PC, all you do is remove the reference to them on the hard drive, not erase the content itself.
Anyone can easily restore this deleted data. Formatting a drive isn’t much better, and recovering its contained data is similarly straightforward.
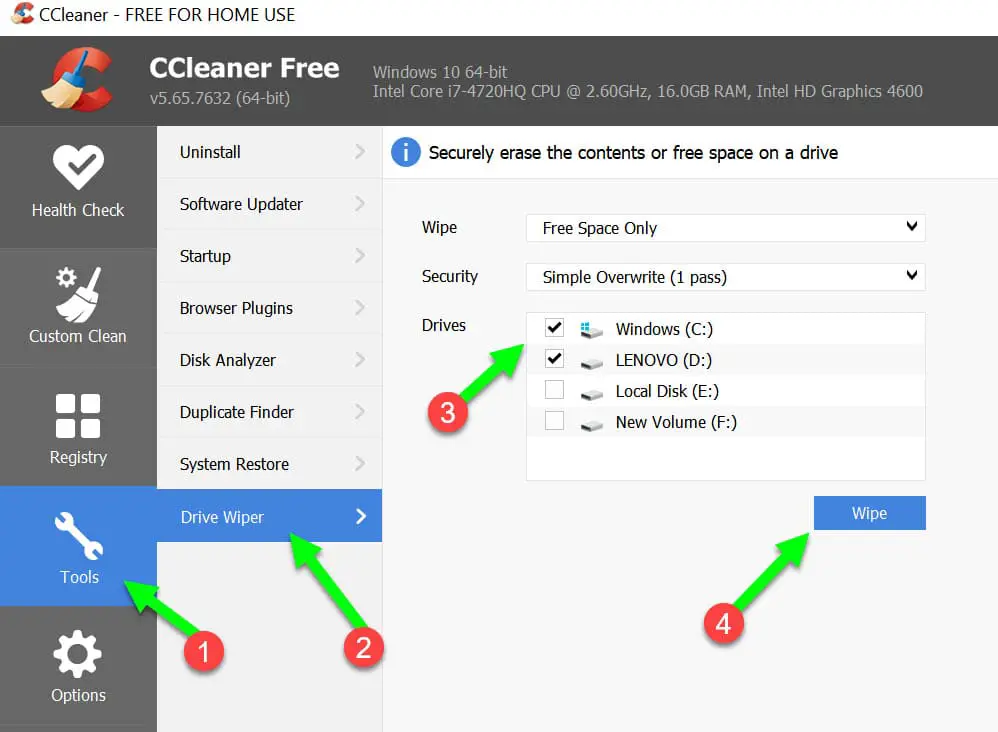
To erase a drive properly, you need a tool that overwrites the drive multiple times. In CCleaner (www.ccleaner.com), for example, go to Tools, select Drive Wiper, and change the Wipe type to Entire Drive.
Please select the number of overwrites (the more, the better), then click the drive to erase it. Be sure to choose the right one!
Wrapup:-
We have discussed all three possible scenarios one might face while deleting a file permanently. You can choose the one according to your needs and wants.
You should always remember that the files can’t be restored without third-party software once deleted.


