


Are you looking for windows 10/11 registry tweaks in one place, this post is completely for you.
The Windows Registry is where the operating system stores all the settings that are required for Windows and installed software to function properly. Every time you install a program, data about it gets written to this database.
Because the Registry is such an integral part of the whole Windows set-up, it’s important to take care when making any changes to it. Any slip-up could potentially cause major problems with the operating system.
For this reason, you should always back up the Registry before making any changes to it, to be on the safe side.
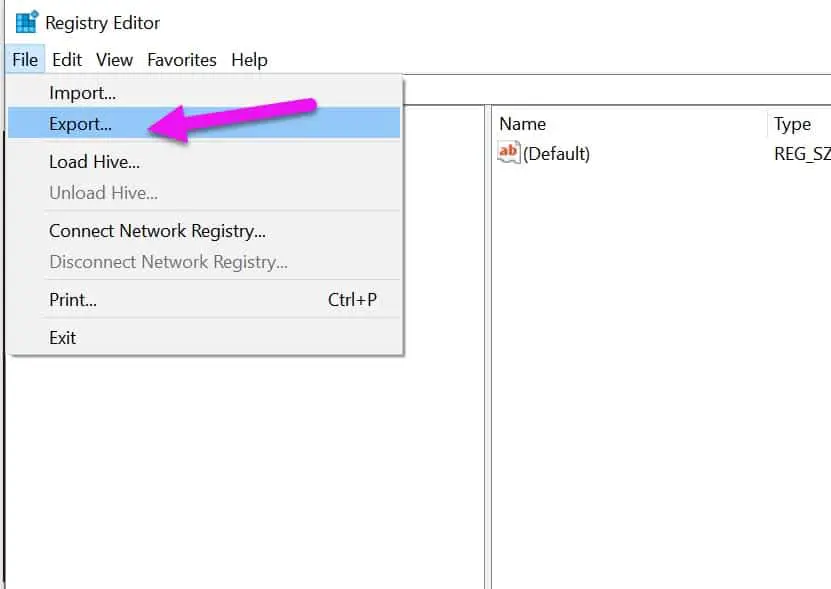
To Open Windows Registry, Open the Run menu and enter the command “regedit” without quotes. You can easily backup your Registry settings by File > Export.
Many PC users deliberately avoid fiddling with the Registry, preferring to leave system tweaks to software such as CCleaner.
But provided you’re careful and know how to undo any changes you make, there are plenty of benefits to delving under the bonnet of your computer, such as customizing Windows to make it look and behave the way you want, speeding up your PC and turning off features you don’t need.
Messing with the Registry can be risky but can yield impressive results.
A Complete Guide to Windows 10/11 Registry Tweaks
1. SPEED UP WINDOWS 10
There’s a noticeable pause when you open the Start menu or select a program in Windows. This is true regardless of whether you’re using Windows 7 or 10, or 11.
You can remove these delays and make the menu feel faster by navigating to the following:
HKEY_CURRENT_USER\Control Panel\Desktop
Locate the entry ‘MenuShowDelay’ on the right. This is the speed at which the menu opens. Right-click it, select Modify and reduce the value data from 400 to around 100.

The Start menu should open significantly more quickly when you restart your PC.
1.2 Instantly switch to the last active window
When you hover over a taskbar button in Windows 7, 8, 10 or 11, you’ll see thumbnails for all the open windows relating to it.
You can then select the one you require, but if you’d rather save time by just opening the last active window instead, a simple Registry tweak will change the default behavior of the taskbar buttons.
Go to:
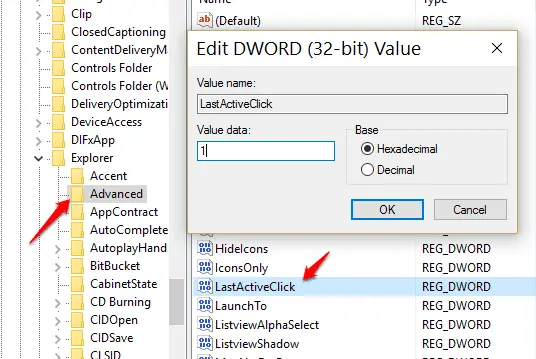
HKEY_CURRENT_USER\Software\Microsoft\Windows\CurrentVersion\Explorer\Advanced
Create a new DWORD (32-bit) on the right-hand side, and name it ‘LastActiveClick’. Set the value to 1
active window
1.3 Remove problem entries from the Windows uninstaller
If you’ve had a problem uninstalling a program – for example if the uninstall has gone wrong or you’ve simply deleted it – you may still see it listed in the ‘Uninstall or change a program’ list in the Control Panel.
One solution is to try reinstalling and then uninstalling the software, but if that doesn’t work, navigate to:
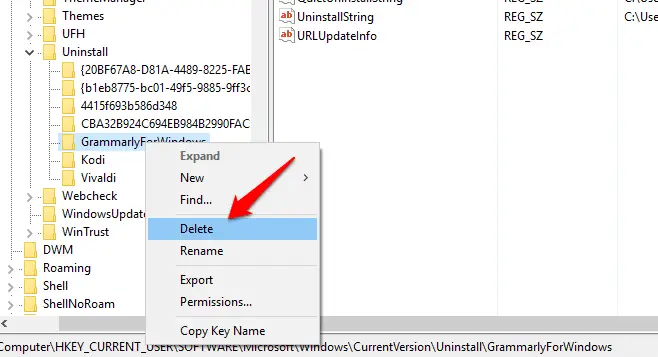
HKEY_LOCAL_MACHINE\SOFTWARE\Microsoft\Windows\ CurrentVersion\Uninstall
in the Uninstall list
Find the program entry you want to remove and delete it. This won’t uninstall the program, but it will remove the offending entry. It works in Windows 7 and upwards.
1.4 Speed up your shutdown
Windows waits for running applications and processes to end before it shuts down, but these sometimes hang and take ages to close. You can reduce the amount of time Windows waits by tweaking the Registry. Go to:
HKEY_CURRENT_USER\Control Panel\Desktop
double-click HungAppTimeout and change the default value from 5000 to 1000.
Do the same for the entry WaitToKillAppTimeout. Navigate to: HKEY_LOCAL_MACHINE\SYSTEM\ CurrentControlSet\Control
and double-click the entry WaitToKillServiceTimeout, then change the value data to 1000.
You can also force Windows to automatically close any non-responding programs by going to:
HKEY_CURRENT_USER\Control Panel\Desktop
Double-click AutoEndTasks and change the value from 0 to 1.

2. CHANGE HOW WINDOWS 10 LOOKS
By default, Microsoft’s new operating system uses a light theme, but you can unlock a dark alternative by using a simple Registry tweak. Navigate to
HKEY_CURRENT_USER\Software\ Microsoft\Windows\CurrentVersion\ Themes\Personalize
then right-click in the right-hand pane and select New, DWORD (32-bit). Name
it ‘AppsUseLightTheme’. Right-click it and select Modify. Make sure the Value Data is set to 0.
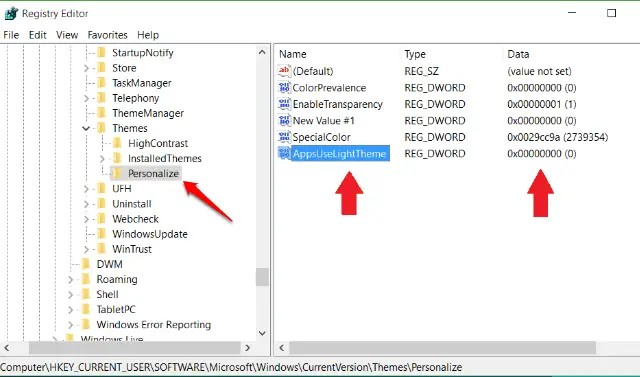
Restart your PC, or log off and log on again, and the dark theme will be applied. Change the value to 1, or delete the DWORD to go back to the default light theme.
2.2 Change the Windows 10 logon screen to a solid color
If you’d prefer to have the Windows 10 logon screen display a color rather than an image, which may make it load slightly faster, navigate to
HKEY_LOCAL_MACHINE\SOFTWARE\ Policies\Microsoft\Windows\System
and right-click in the right-hand pane. Select New, DWORD (32-bit) and name
it ‘DisableLogonBackgroundImage’, then give it a value of 1. Windows 10 will use the same color as your Desktop wallpaper. You can change this under Settings, Personalisation, Colours.

2.3 Get back the old volume control in Windows 10
Windows 10 introduces a new, horizontal volume control. If you prefer the old up-and-down vertical style, get it back by going to
HKEY_LOCAL_MACHINE\SOFTWARE\Microsoft\Windows NT\ CurrentVersion
Right-click CurrentVersion and select New Key. Name it ‘MTCUVC’ and, in the right-hand pane, right-click and create a new DWORD (32-bit).
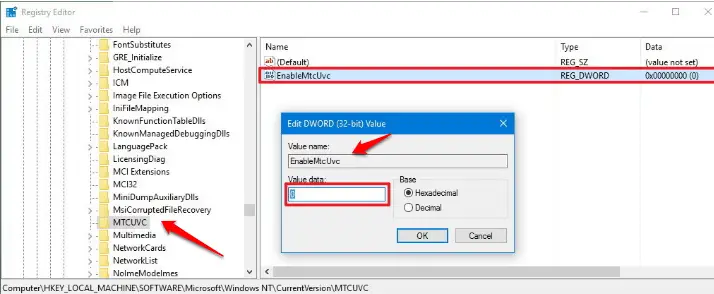
volume slider vertical again
Call this ‘EnableMTCUVC’. Double-click it and make sure the value is 0. You don’t need to reboot your PC to see the change.
2.4 Restore the old clock and calendar in Windows 10
Clicking the time in your System Tray in Windows 10 opens a transparent clock and calendar panel. We quite like it, but the ‘modern’ look won’t be to everyone’s taste. If you preferred the old design, you can get it back by navigating to:
HKEY_LOCAL_MACHINE\SOFTWARE\Microsoft\Windows\CurrentVersion\ImmersiveShell
Right-click in the pane on the right and select New, DWORD (32-bit). Name it
‘UseWin32TrayClockExperience’.
Right-click the entry, select Modify and set the value to 1. Now, when you click the time, it will open a panel with the classic clock and calendar interface.
2.5 Change icon spacing on the Desktop
If you’re running Windows 8 or 10, you can adjust the horizontal and vertical spacing around icons on the Desktop by tweaking the Registry (Windows 7 offers controls
to do this). Navigate to:
HKEY_CURRENT_USER\Control Panel\Desktop\WindowMetrics
and look for the ‘IconSpacing’ and ‘IconVerticalSpacing’ keys. Increase the number for each to pad out the spacing between icons. The values are in twips (twentieth of a point). Roughly, -17 is equal to 1 pixel and -28 equals 2 pixels.
2.6 Customise window borders and scrollbars
In Windows 7, you can make the size of window borders and scrollbars super-thin. Go to:
HKEY_CURRENT_USER\Control Panel\Desktop\WindowMetrics
and set ‘PaddedBorderWidth’ to -0, and both ‘ScrollWidth’ and ‘ScrollHeight’ to -200. As with icon spacing, these values are in twips. If you want super-fat borders, change
the figure to -750, or anything less than that figure.
2.7 Add the Recycle Bin to Computer or This PC
To save you returning to the Desktop to check the Recycle Bin for your deleted files, you can add a shortcut to Computer (or This PC in Windows 10) by navigating to:
HKEY_LOCAL_MACHINE\ SOFTWARE\Microsoft\Windows\ CurrentVersion\Explorer\ MyComputer\NameSpace
Right-click in the pane on the right and select New, Key. Name it
{645FF040-5081-101B-9F08-00AA002F954E}.
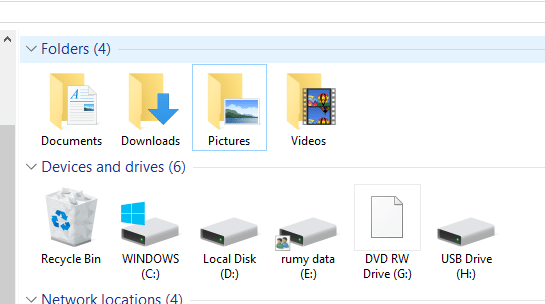
for easier access
Now, when you go into Computer, you should see the Recycle Bin. This works in all
versions of Microsoft’s OS, from Windows 7 to 10.
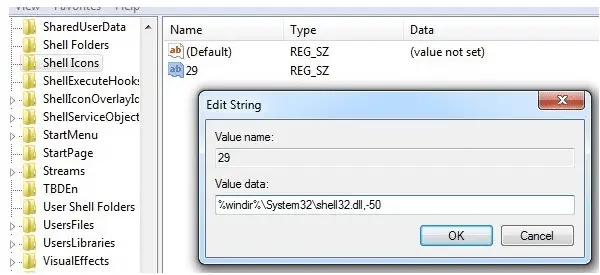
2.8 Remove the arrows from shortcuts
When you create a shortcut (or a program creates one for you), the icon appears with a small arrow in the bottom-left corner. Removing this will make shortcut icons look tidier.
To do this, navigate to:
HKEY_LOCAL_MACHINE\ SOFTWARE\Microsoft\Windows\CurrentVersion\Explorer\Shell Icons
(if you don’t see Shell Icons, you’ll need to create this key). Right-click the right-hand pane to create a new String Value. Name it ‘29’. Double-click it and change the Value Data to ‘C:\Windows\System32\shell32.dll,50’.
Close the Registry editor, click Start and type CMD. Hit enter.
In the Command Prompt window, type:
taskkill /IM explorer.exe /F
and hit Enter. This will close Windows Explorer, so don’t be alarmed when the
taskbar vanishes. Next, type the following three commands, hitting Enter after each one:
cd /d %userprofile%\AppData\
Local
del IconCache.db /a
shutdown /r
This final command will restart your PC. When it reboots, the shortcut arrows will be gone. To restore them, simply delete the 29-string value. This trick works in all recent versions of Windows.
2.9 Add a custom message to your login screen
You can add a message of your choice to the Windows 10 login screen that will be the first thing you see when it boots up. To do this, navigate to:
HKEY_LOCAL_MACHINE\SOFTWARE\Microsoft\Windows\ Current Version\Policies\System
Double-click ‘legalnoticecaption’ and enter a title for your message in the Value Data box. Click OK. Double-click ‘legalnoticetext’ and enter your message.
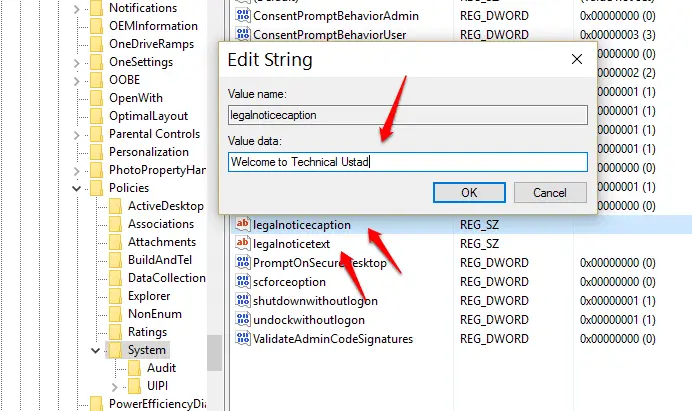
Log out, and the message will appear when you log back in. To clear it each time, click OK.
3. IMPROVE HOW WINDOWS 10 WORKS
3.1 Remove the Action Center from Windows 10
The Action Center is a new feature in Windows 10 that displays notifications from apps and your system. If you don’t need it (and most people don’t), you can remove it by going to:
HKEY_CURRENT_USER\Software\Policies\Microsoft\Windows\Explorer.
Right-click in the right-hand pane and select New, DWORD (32-bit) Call it ‘DisableNotificationCenter’. Double-click it and change the Value Data to 1.

Windows 10 notifications
Click OK and exit the Registry Editor. The Action Center will vanish from the taskbar when you next restart your PC.
The right-click ‘context’ menu gives you instant access to various options that change depending on where you are in Windows and what software you have installed. The menu can become cluttered over time and fill up with entries you don’t use.
To manage the context menu entries using the Registry, navigate to
HKEY_CLASSES_ROOT*\shellex\ ContextMenuHandlers
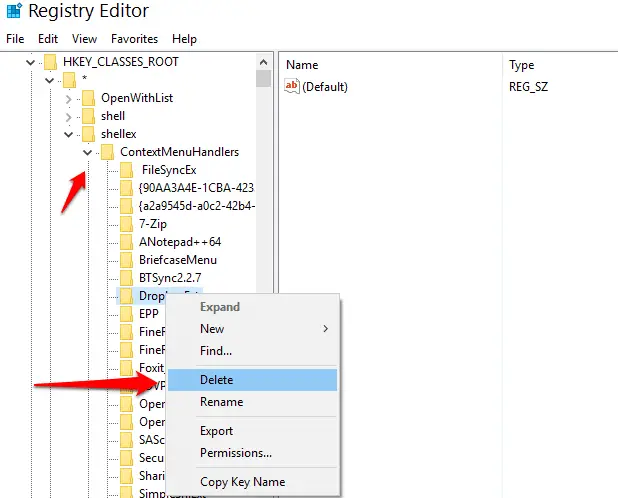
removing unwanted entries
A list of programs that have added themselves to the context menu will be displayed. To remove an entry, just select and delete it, but make sure you know what it is before you get rid of it. This works in all versions of Windows.
3.3 Disable Security Center notifications
Windows runs regular checks to make sure important security functions – such as your antivirus, firewall and Windows Updates – are running, and alerts you if there’s a problem. If you’ve deliberately turned off these security features, being alerted to the change can soon become annoying.
To disable these alerts, go to:
HKEY_LOCAL_MACHINE\ SOFTWARE \Microsoft\Security Center\Svc
In ‘AntiVirusDisableNotify’, ‘FirewallDisableNotify’ and/or ‘UpdatesDisableNotify’, change the values from 0 to 1. This works in Windows 7 and 8.1, but not in 10.
3.4 Force Disk Cleanup to delete newer files
If you use the built-in Windows Disk Cleanup tool to remove junk files from your PC, you may have noticed that it leaves newer files behind. You can force it to clean up these more recent junk files in any version of Windows by navigating to:
HKEY_LOCAL_MACHINE\ SOFTWARE\Microsoft\Windows\ CurrentVersion\Explorer\VolumeCaches\Temporary Files
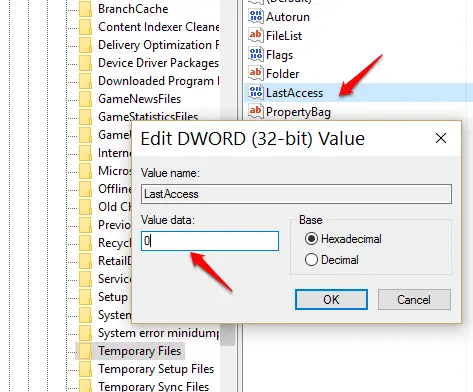
Double-click ‘LastAccess’ and change its value from 7 (days) to 0 to delete all newer files.
3.5 Stop Windows Update restarting your PC
Being forced to restart your PC to install updates when you’re in the middle of something can be annoying and time-consuming, but Windows Update is very persistent. You can stop it from bothering you in Windows 7 and Vista (later versions don’t have this problem)
by tweaking the Registry. Go to:
HKEY_LOCAL_MACHINE\SOFTWARE\Policies\Microsoft\Windows\WindowsUpdate\AU
then right-click in the right-hand pane and choose New, DWORD (32-bit) Value. Name the value ‘NoAutoRebootWithLoggedOnUsers’, then double-click it, enter a value data
of 1 and click OK.
If the WindowsUpdate\AU entry doesn’t exist, right-click Windows, choose New, Key and name the key WindowsUpdate. Now right-click this key, choose New, Key and name it AU.
3.6 Disable or delay taskbar previews
When you hover your mouse over an open program or folder in the taskbar, Windows displays a thumbnail preview. This happens in Windows 7, 8+ and 10. If you find
this feature annoying rather than helpful, you can disable it by
navigating to:
HKEY_CURRENT_USER\Software\Microsoft\Windows\CurrentVersion\Explorer\Advanced
Locate ‘ExtendedUIHoverTime’ on the right (create it if it isn’t there) and double-click it. Change the value to something like 10000. This is the time, in milliseconds, before
the preview appears, so a large number will stop it popping up.
3.7 Remove OneDrive from File Explorer in Windows 10
Microsoft’s cloud storage service is built into Windows 10. If you don’t use it, you can prevent it from being included in File Explorer (this tweak won’t actually uninstall the service). Navigate to:
HKEY_CLASSES_ROOT\CLSID{018D5C66-4533-4307-9B53- 224DE2ED1FE6}
then double-click the value name ‘System.IsPinnedToNameSpaceTree’ and change the value to 0. Restart your PC to make the change.
3.8 Remove the Quick Access entry from File Explorer
If you’d prefer not to have your most recently opened files and folders appear in File Explorer, you can remove Quick Access and keep that information private.
First, hide the feature by going to View, Options. Under the General tab, change ‘Open File Explorer to’ from ‘Quick access’ to ‘This PC’.
Next, open Regedit and navigate to:
HKEY_CLASSES_ROOT\CLSID{679f85cb-0220-4080-b29b5540cc05aab6}
Expand it and right-click ‘ShellFolder’. Select Permissions, then click the Advanced button.
In the ‘Advanced Security Settings for ShellFolder’ box, click the ‘Change’ link, then click ‘Advanced’, click the ‘Find Now’ button and, in the ‘Search results’ box, select ‘Administrators’. Click OK twice, then Apply, and hit OK until the box closes.
In ‘ShellFolder’, double-click ‘Attributes’, and change data value to ‘a0600000’,
then click OK. Restart your PC.
3.9 Remove low drive-space alerts
Windows will notify you when you’re running out of space on your hard drive, which is
helpful, but can become irritating – it’s more common on laptops than desktop PCs. You can disable this prompt in Windows 7 onwards by navigating to:
HKEY_CURRENT_USER\Software\Microsoft\Windows\CurrentVersion\Policies
Right-click ‘Policies’ and select New, Key. Call this new key ‘Explorer’, then right-click it and select New, DWORD (32-bit). Call the value ‘NoLowDiskSpaceChecks’. Double-click
it and changes the value to 1.
3.10 Disable the Caps Lock key in Windows 10
It’s very easy to knock the Caps Lock key accidentally so that you end up
TYPING WHOLE SENTENCES IN CAPITALS. It’s not vital to have Caps Lock enabled because you can just hold down Shift when you need to type upper-case letters.
To disable the Caps Lock key, navigate to:
HKEY_LOCAL_MACHINE\SYSTEM\CurrentControlSet\Control\Keyboard Layout
Right-click anywhere in the right-hand pane and choose New, Binary Value. Name the value ‘Scancode Map’ and double-click it. Now comes the tricky part. On the first line, enter the value data: 0000 00 00 00 00 00 00 00 00 (the first four zeros will be filled in
automatically, then it’s another eight pairs). On the second line 0008 will be filled in automatically for you; after this, type 02 00 00 00 00 00 3A 00.
Finally, after the 0010 on the third line, type 00 00 00 00. Click OK to save the data,
restart your PC and Caps Lock will be disabled. To turn it back on again, just delete the Scancode Map value and restart your PC.
Switch off annoying ads
Since Windows 10, Microsoft is continuously testing out how it can annoy users with self-advertising in Explorer and in the Start menu. Luckily, these ads can be disabled in two ways.
In Explorer, go to ”View | Options | Change Folder and Search Options”. In the ”View”
disable the ”Notifications of the Synchronisation host” option.
In the registry, you can find the DWORD value ”ShowSyncProviderNotification” using the path HKEY_CURRENT_USER | Software | Microsoft | Windows |CurrentVersion |
Explorer | Advanced”. Set it to ”0”
Disabling Microsoft shenanigans
Since Windows 10, a folder for ”3D objects” is located in the standard list. It is expected to be saved with the other files of the Microsoft App 3D Builder, which only a few users use.
In order to hide this folder, go to ”HKEY_LOCAL_MACHINE | SOFTWARE | Microsoft | Windows |CurrentVersion | Explorer | MyComputer | Namespace” in regedit and
delete the ”0DB7E03F-FC29-4DC6-9020-FF41B59E513A” folder.
Carry out the same operation for 64-Bit in the ”Namespace” folder of the ”Wow6432Node” branch as well. For those who do not use Microsoft’s cloud service, the bothersome OneDrive entry between ”Quick Access” and the PC drives can also be hidden using regedit.
Navigate to the ”HKEY_CLASSES_ROOT\CLSID” folder and look for the ”018D5C66” string. Open the corresponding folder and change the ”System. IsPinnedToNameSpaceTree” value from ”1” to ”0” by double-clicking.
Hide drives
With a small registry entry, one can make entire drives disappear since Windows will no longer show it. That can happen also in the registry using the ”HKEY_LOCAL_MACHINE | Software | Microsoft | Windows | Current Version | Policies | Explorer” path.
Here, click on the right window and create the entry ”NoDrives” using the context
menu ”New | DWORD value (32 bit)”. Open it by double-clicking and change its ”Basis” to ”Decimal”. The ”Value” that you enter depends on the drive letter that you want to hide.
The partition ”D:”, for example, has the value ”8”. It continues further, ”E:” has ”10”, ”F:” has ”20”, ”G:” ”40” and ”H:” can be hidden using ”80”. After a renewed login, the drive designated by you will disappear.
Immobilise Cortana
Cortana is and remains the most controversial because the assistant sends regularly sends language data to Microsoft for analysis. Since the Creators Update, Cortana can be disabled only from the registry.
First, go to ”HKEY_LOCAL_MACHINE | SOFTWARE | Policies | Microsoft | Windows” in regedit and create (if not already available) the folder ”Windows Search” in the right window using the context menu ”New | Key”. Here, you can generate an entry using ”New | DWORD value (32-Bit) | AllowCortana” and assign the value ”0” to it. Implement the operation as usual on a 64-bit Windows under ”WOW6432Node”.
Hide Action Center
One can manage very well without the new Action Center, which lurks in the right edge of the screen and occasionally throws a pop-up window your way. The displayed messages are often insignificant, for example, the daily notification that the virus scanner has not found any threat.
To disable the Center, go to ” HKEY_CURRENT_USER | SOFTWARE | Policies | Microsoft | Windows” in the registry. If it is not available yet, create a folder here with the name ”New | Key | Explorer” and in that ”New | DWORD value (32-Bit) | DisableNotificationCentre”. Open it with a double-click and assign the value ”1” to it.
Automatically Delete Pagefile.sys at Shutdown
Pagefile.sys acts as a virtual RAM which Windows uses as RAM to store programs that are not in use, thus putting less pressure on the actual RAM. Although it is not recommended to disable it, you can delete it to save space and also avoid any vulnerabilities.
The page file size is mostly near the size of your actual RAM, so it can take up a lot of space depending on your RAM. When it is set to delete with a shutdown, you will save space but at the expense of prolonging shutdown time. In the registry editor go to:
HKEY_LOCAL_MACHINE \ SYSTEM\ CurrentControlSet\ ControlSession \ ManagerMemory Management
Click on “Memory Management,” and then double-click on “ClearPageFileAtShutDown” in the panel on the right. Set its value to “1,” and restart the PC. Every time you shut down your PC, the pagefile will be deleted. Don’t worry – it will be created again when needed.
Adjust the distance of the desktop icons, mimicking the previous Windows 7 look
In Windows 10, the space between the desktop icons is considerably larger as compared to the earlier versions.
But that can be reversed. Open the “Run” window using the shortcut [Windows] + [R], enter “regedit” and press “OK”.
In the registry, navigate to the path
“HKEY_CURRENT_USER\ControlPanel\Desktop\WindowMetrics”
You will see a value “-1710” next to the “Icon-VerticalSpacing” file in the window to the right. After double-clicking on the file name, you can change the value to “-1125” in the “Edit string” window just like in Windows 7 and in 8.
In order to adjust the horizontal value, open the “Icon spacing” file, enter “-1125” and click on “OK”. Then close the registry and restart your computer. When you load back in, your desktop will have a different feel to it.
Registry tools
For those who often edit the registry, the Spartan regedit is not sufficient. Other tools offer significantly more functions:
RegCool is a powerful registry editor with many additional functions, which allows you to
also edit registry entries that are protected by the system.
RegScanner has a comfortable search function to display only the recently changed entries, for instance.
Registry Finder has a multiple window view to compare entries with each other in a
better manner.
Display seconds in the system tray clock
The clock at the bottom-right lets you see the current hours and minutes, but if you want to know exactly how long is left to go in the current minute, you can add the seconds to the clock by going to
HKEY_CURRENT_USER\SOFTWARE\Microsoft\Windows\CurrentVersion\
Explorer\Advanced
Right-click in the right-hand pane and select New, DWORD (32-bit) Value. Call this
ShowSecondsInSystemClock. Doubleclick the new entry and change its value to 1, then click OK and restart your PC.
Add the Windows version to your desktop
If you run an Insider version of Windows 10, you’ll see a watermark on the bottom
the right-hand side of the desktop showing the version of Windows you’re running and the build number. This watermark gets removed from the finished version (and from Insider builds rolled out close to the release date), but you can easily add it back, so you can check at a glance which version of Windows you’re running.
To do this, open the Registry Editor and navigate to
HKEY_CURRENT_USER\Control Panel\Desktop
Locate PaintDesktopVersion under the Desktop key, double-click it and change its value from 0 to 1. Restart Windows and you’ll see the version and build number on the desktop.
Disable automatic driver updates in Windows 10
Windows 10 downloads and installs the latest versions of drivers automatically to keep your system up to date. Sometimes, though, it might install problematic drivers, and there’s no longer a way to stop the operating system doing this through Settings.
Luckily, you can take back control through the Registry. Open regedit and navigate to
HKEY_LOCAL_MACHINE\SOFTWARE\Policies\Microsoft\ Windows
Right-click the Windows key and select New, Key. Call this WindowsUpdate. Right-click the
new key, select New, DWORD (32-bit) Value and name this key ExcludeWUDriversInQualityUpdate.
Double-click it and change its value from 0 to 1, then click OK. To start receiving driver updates again, right-click ExcludeWUDriversInQualityUpdate and select Delete.
Hide the ‘Hi’ greeting in Windows 10
When you install Windows 10 or upgrade to a new version, one of the first things you’ll see is a welcome screen that starts with a ‘Hi’ greeting.
You can disable this rather cheesy message using a Registry tweak. Doing so won’t actually speed up the configuration process, but will make it seem quicker.
Open regedit, and navigate to
HKEY_LOCAL_MACHINE\SOFTWARE\Microsoft\Windows\
CurrentVersion\Policies\System.
Right-click in the right-hand pane and select New, DWORD (32-bit Value).
Name this key EnableFirstLogonAnimation, double-click it and ensure its value is set to 0.
The animation will now be hidden and instead, you’ll see a spinning circle and a ‘Preparing Windows’ message.
Disable App Launch Tracking
Windows 10 tracks the apps you launch and uses this information to customize your experience, tailor the Start menu to suit you and make other tweaks you never asked for.
If you don’t find this helpful, or if you’re concerned about your privacy, you can disable this tracking through Privacy Settings or via a Registry tweak.
For the latter option, open regedit and navigate to
HKEY_CURRENT_USER\SOFTWARE\Microsoft\Windows\CurrentVersion\ Explorer\Advanced
Right-click in the right-hand pane and go to New, DWORD (32-bit) Value. Call this
Start_TrackProgs. Set its value to 0 to disable app-launch tracking, and 1 to re-enable it. Restart your PC to action the change
CREATE YOUR OWN REGISTRY HACKS
Once you’ve applied a Registry tweak to one PC, you may want to repeat it on another
computer. Instead of going through the whole process again, you can output your tweak as a Registry hack that can be run elsewhere (this will merge the changes with the target device’s Registry).
All you need to do is select the key you made the change to, right-click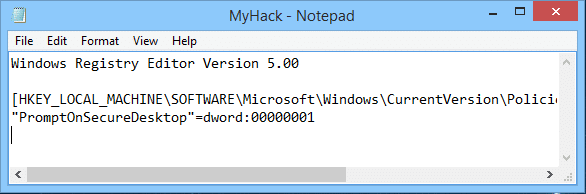 it, choose Export and give it a name. If your tweak involves more than one key, save each one, then right-click your first saved REG file and select Edit. Open the second key and paste the main [Hkey] part below the first.
You will need to have ‘Windows Registry Editor Version 5.00’ entered at the top of the page. This should only appear once in the REG file.
How to Stop programs leaving junk in your Registry
When you install a program on your PC, it makes changes to the Windows Registry. These changes should all be reversed when you uninstall the software, but that’s not always the case.
You can correct this yourself by using the Registry Editor (or a number of even
better tools, but it’s tricky work and you need to know what you’re doing.
We recommend that you always create a restore point and back up your Registry before you start tinkering with its settings.
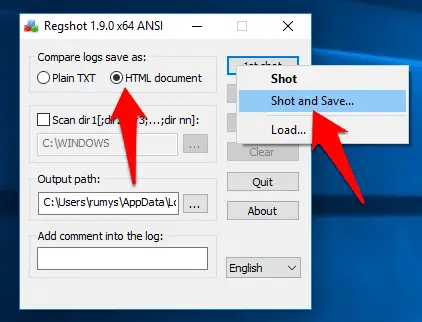
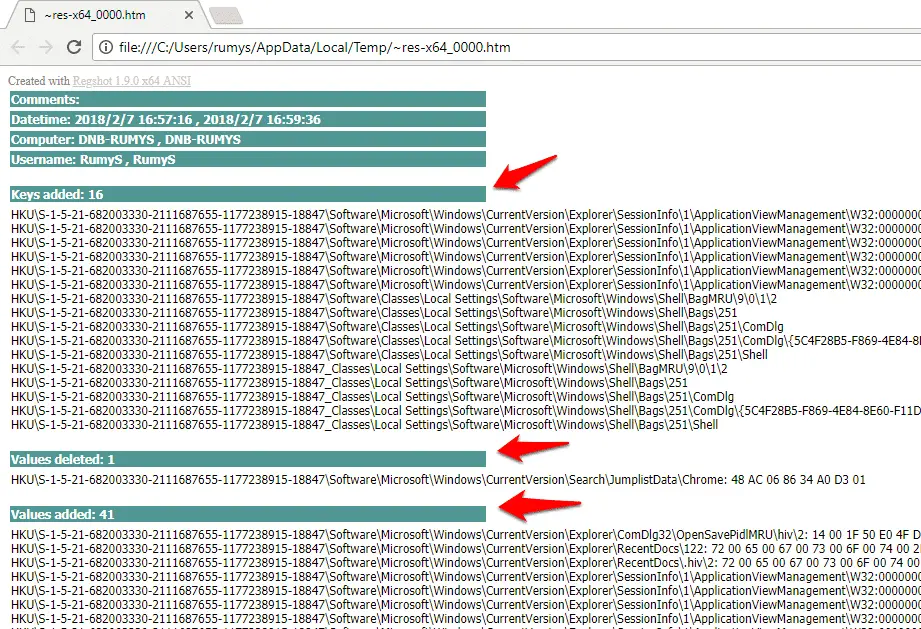
Regshot lets you take a snapshot of your Windows Registry before and after you install software, so you can spot any changes.
You can then take more snapshots when uninstalling the software, and check that those changes have been rectified. Regshot’s files are in the compressed 7Z format.
If you don’t already have a tool that will open them, download and use 7-Zip (www.7-zip.org).
Step1:- The software is portable so you don’t need to install it, just unpack the files. There are four executable files.
If you’re using a 64-bit version of Windows, double-click Regshotx64-ANSI.32-bit users should use Regshot-x86-ANSI.
The Unicode versions are for PCs using international characters.

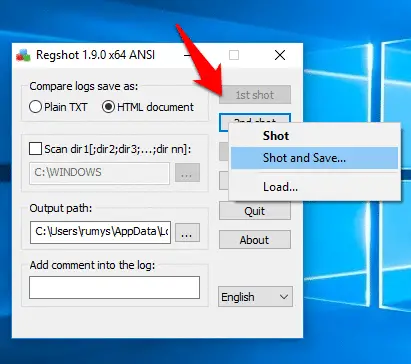
Step2:- Choose the HTML option. The text version is quicker to load but the HTML version doesn’t take much longer and it looks nicer, too.
Click the ‘1st shot’ button and choose ‘Shot and Save’. After a couple of minutes, a Save As box opens so you can choose where to save it.
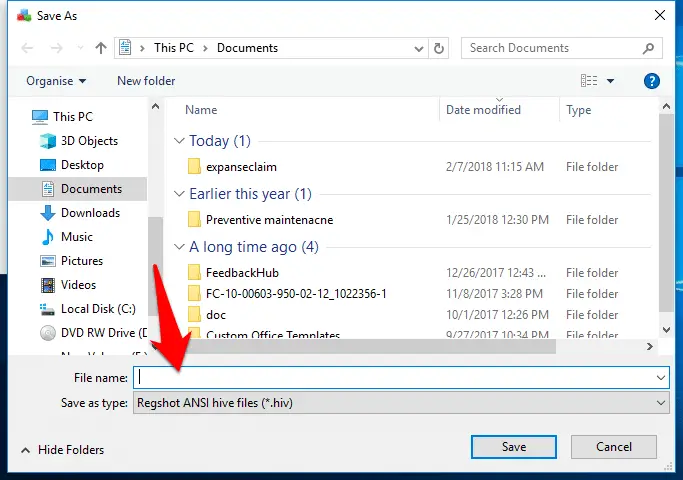
Step3:- It’s worth thinking about how you save your snapshots so it’s easy to find and identify them later.
Create a folder specifically for this kind of file somewhere sensible, such as in your Documents folder.
Also, name the files descriptively, so you can see what they are at a glance.
Step4:- Having taken your first snapshot, you can now install the program you want to monitor.
Try to do this as soon as possible after the first snapshot, to minimize the amount of interference from anything else that’s going on in the background on your computer.
Step5:- When the software has finished installing, click ‘2nd shot’. From the options, choose ‘Shot and Save’.
If you closed Regshot between snapshots, you may need to reload the first snapshot before comparing them.
Click the appropriate snapshot button, choose Load 2 and select the file to restore it.

Step6:- Click the Compare button. If you selected the HTML option, your browser will now open displaying the results.
There will be a lot of Registry changes listed, many of which specifically mention the software you’ve installed.
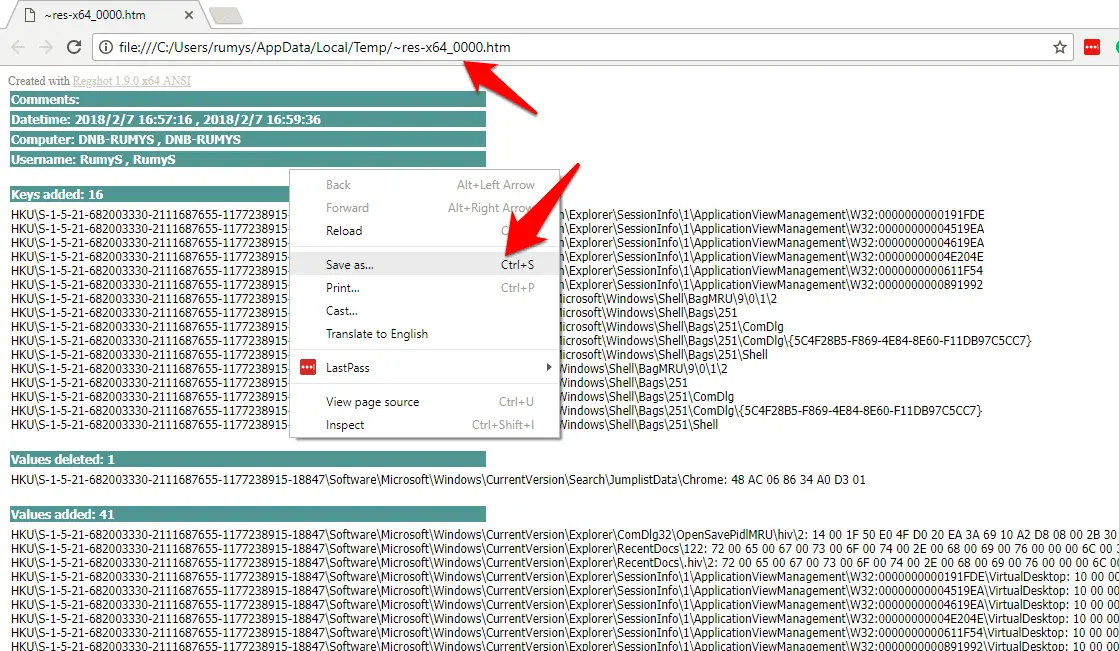
Step7:- The log files will be saved to the folder specified under ‘Output path’ and automatically named.
To better organize them, right-click a blank area of the page, select ‘Save as’ and save the file to the folder where you’re keeping your other Regshot files.
Give them a name that makes sense to you.
Step8:- Go through the process again when you uninstall the software, taking one snapshot before you start and another when it’s finished.
Compare the two files and create an HTML document.
Hopefully, it will list many of the changes that also appeared in your first HTML document.
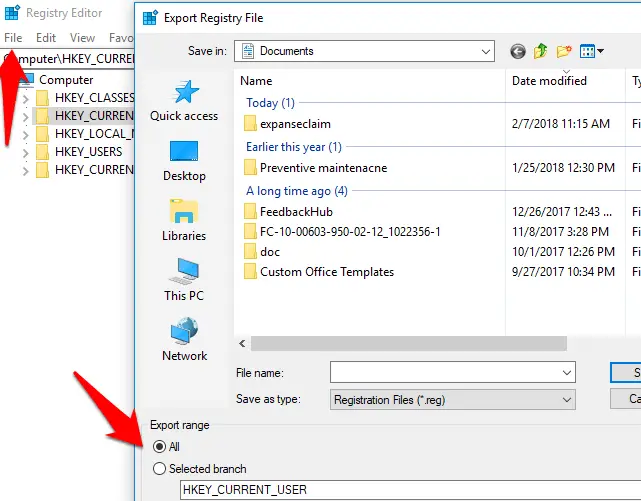
Step9:- If you find references to the program you installed in the first HTML document that aren’t in the second, press Windows+R, type regedit and press Enter.
Back up the
Registry by opening the File menu and choosing Export. Under ‘Export range’, ensure that the All option is selected.
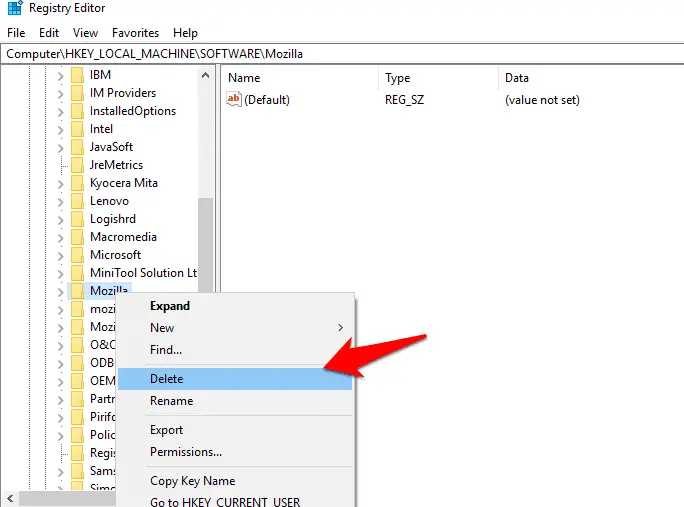
Step10:- Use the folder tree in the left-hand panel to navigate your way to any leftover Registry entries. Right-click the item and choose Delete.
If the changes you make cause problems on your PC, you can restore your Registry backup using Import from the File menu.
Registry settings for Windows update
Several registry settings can affect the behavior of Windows Update in Windows operating systems. Here are some of the most common ones:
HKEY_LOCAL_MACHINE\SOFTWARE\Policies\Microsoft\Windows\WindowsUpdate:- This key contains various settings related to Windows Update, such as the frequency of updates and the ability to receive updates from other computers on the network.
HKEY_LOCAL_MACHINE\SOFTWARE\Microsoft\Windows\CurrentVersion\WindowsUpdate\Auto Update:- This key contains settings related to automatic updates, including the ability to enable or disable them.
HKEY_LOCAL_MACHINE\SOFTWARE\Microsoft\Windows\CurrentVersion\WindowsUpdate\AU:- This key contains additional settings related to automatic updates, such as the ability to specify a deadline for installation and the ability to require user interaction before installation.
HKEY_LOCAL_MACHINE\SOFTWARE\Policies\Microsoft\Windows\WindowsUpdate\AU:- This key contains group policy settings related to automatic updates.
Registry tweaks for gaming
Several registry tweaks can be applied to improve gaming performance in Windows.
Here are some of the most common ones:-
1. Increase the priority of the game process
You can increase the priority to allocate more system resources to the game, improving its performance. To do this, navigate to HKEY_LOCAL_MACHINE\SOFTWARE\Microsoft\Windows NT\CurrentVersion\Image File Execution Options, create a new key with the name of the game executable, and add a new DWORD value called “Priority” with a value of “4” (which corresponds to “high”).
2. Disable Nagle’s Algorithm
Nagle’s algorithm can cause network lag and delay, particularly in online games. You can disable it by navigating to HKEY_LOCAL_MACHINE\SYSTEM\CurrentControlSet\Services\Tcpip\Parameters\Interfaces[Adapter ID], creating a new DWORD value called “TcpAckFrequency” with a value of “1”, and creating another DWORD value called “TCPNoDelay” with a value of “1”.
3. Disable fullscreen optimization
In some cases, Windows 10’s fullscreen optimization feature can cause game stuttering and performance issues. You can disable it by right-clicking on the game executable, selecting “Properties”, going to the “Compatibility” tab, and checking the “Disable fullscreen optimizations” option.
4. Adjust the GPU scheduling algorithm
Windows 10 includes a GPU scheduling algorithm that can cause stuttering in some games. You can adjust it by navigating to HKEY_LOCAL_MACHINE\SYSTEM\CurrentControlSet\Control\GraphicsDrivers, creating a new DWORD value called “SchedulingAlgorithm” with a value of “1” (which corresponds to “traditional”).
Registry ntp settings
The Windows operating system uses the Network Time Protocol (NTP) to synchronize the system clock with a time server on the internet. Here are the registry settings related to NTP in Windows:
HKEY_LOCAL_MACHINE\SYSTEM\CurrentControlSet\Services\W32Time\Parameters: This key contains various settings related to the Windows Time service, including the NTP server to use, the polling interval, and the time correction settings.
HKEY_LOCAL_MACHINE\SYSTEM\CurrentControlSet\Services\W32Time\TimeProviders\NtpClient: This key contains settings specific to the NTP client, such as the NTP server(s) to use, the polling interval, and the maximum allowed time correction.
Here are some specific registry values related to NTP:
- NtpServer: Specifies the NTP server(s) to use for time synchronization. This can be a single server, a list of servers separated by commas, or a space-delimited list of server DNS names or IP addresses.
- SpecialPollInterval: Specifies the time interval (in seconds) at which the system will check for updates from the NTP server(s).
- MaxPosPhaseCorrection and MaxNegPhaseCorrection: These values specify the maximum allowed time correction (in seconds) that the system can make to the local clock. By default, this is set to 48 hours.
- NtpClient:Enabled: Specifies whether the NTP client is enabled or disabled.
- NtpServerType: Specifies the type of NTP server to use, such as DNS or IP address.
- ResolvePeerBackoffMinutes: Specifies the backoff period (in minutes) for resolving peer IP addresses. This value prevents network congestion caused by multiple systems attempting to resolve the same IP addresses simultaneously.
Registry rdp settings
To modify the Remote Desktop Protocol (RDP) settings in the Windows Registry, follow these steps:
- Press the Windows key + R on your keyboard to open the Run dialog box.
- Type “regedit” and press Enter to open the Registry Editor.
- Navigate to the following key: HKEY_LOCAL_MACHINE\SYSTEM\CurrentControlSet\Control\Terminal Server\WinStations\RDP-Tcp
- Find the following values and modify them as needed:
- “fAllowConnection” (DWORD) – Set to 1 to allow RDP connections, or 0 to disable RDP connections.
- “fDenyTSConnections” (DWORD) – Set to 0 to allow RDP connections, or 1 to disable RDP connections.
- “UserAuthentication” (DWORD) – Set to 1 to require network-level authentication, or 0 to allow connections without authentication.
- “SecurityLayer” (DWORD) – Set to 0 for no encryption, 1 for SSL encryption, or 2 for SSL encryption with client authentication.
- Close the Registry Editor.
Registry printer settings
To modify printer settings in the Windows Registry, follow these steps:
- Press the Windows key + R on your keyboard to open the Run dialog box.
- Type “regedit” and press Enter to open the Registry Editor.
- Navigate to the following key: HKEY_LOCAL_MACHINE\SYSTEM\CurrentControlSet\Control\Print\Printers
- Find the printer you want to modify and click on its folder.
- Find the following values and modify them as needed:
- “DefaultSpoolDirectory” (REG_EXPAND_SZ) – Sets the default spool directory for the printer.
- “BeepEnabled” (REG_DWORD) – Set to 0 to disable beeps, or 1 to enable beeps when there is an error.
- “RawOnly” (REG_DWORD) – Set to 0 to allow both RAW and EMF data types, or 1 to allow only RAW data type.
- “PrintQuality” (REG_DWORD) – Set to the desired print quality value, typically 300 or 600.
- Close the Registry Editor.
📗FAQ
Is modifying registry safe?
Modifying the registry can be risky if you’re not careful, as it’s a critical component of the Windows operating system that contains configuration data for software, hardware, user preferences, and more.
Making changes to the registry without proper knowledge or tools can result in system instability, crashes, or even data loss. It’s recommended to back up the registry before making any changes, use reputable software or tools, and be cautious when editing values.
How can I improve my registry performance?
To improve registry performance, you can try cleaning up unnecessary or outdated entries, defragmenting the registry, and reducing the number of programs that load at startup.
Additionally, avoiding excessive software installations and uninstallations can help prevent unnecessary clutter in the registry. You can also consider using registry optimization software or tools to help automate the process.
What are registry tweaks?
Registry tweaks refer to modifications made to the Windows registry to alter system settings or behavior beyond the default options available in the graphical user interface.
Tweaks can help improve performance, enhance functionality, or customize the look and feel of the system. However, it’s important to note that making registry tweaks requires a good understanding of the Windows registry and its effects on the system.
What is the warning about editing registry?
The warning about editing the registry stems from the fact that the registry contains critical system information and settings that, if changed incorrectly, can cause system instability or data loss.
Microsoft recommends that users only make changes to the registry if they have a good understanding of what they’re doing or with the assistance of a qualified technician. Users should always back up the registry before making any changes and proceed cautiously.
Is it OK to clean registry?
It’s generally considered safe to clean the registry, as long as you use reputable software or tools and follow best practices.
Cleaning the registry can help remove unnecessary or outdated entries that may slow down the system or causing errors.
However, it’s important to note that cleaning the registry won’t necessarily result in a significant improvement in system performance, and excessive cleaning or deletion of critical entries can lead to system instability or other issues.
What is the major disadvantage of using registry in Windows?
The major disadvantage of using the registry in Windows is that it can be a source of system instability or data loss if not used correctly.
Because the registry contains critical system information, even minor changes can significantly impact the system’s performance or behavior. Additionally, the registry can become cluttered over time, leading to slower system performance, errors, or crashes.
Can registry slow down PC?
Yes, a cluttered or corrupted registry can slow down a PC by causing longer boot times, slower program loading, and decreased overall system performance. Excessive software installations and uninstallations can also lead to registry clutter and slower system performance.
What causes corrupt registry files?
Several things can cause corrupt registry files, including improper shutdowns, malware or virus infections, software installation or uninstallation errors, hardware issues, and system crashes.
When the registry becomes corrupt, it can cause system instability, errors, or even prevent the system from booting up.
Should you defrag your registry?
Defragmenting the registry can help improve system performance by reducing the time it takes to access registry data.
However, some experts argue that defragging the registry may not provide significant performance gains and can cause system instability. As such, it’s recommended to use reputable software or tools and proceed with caution when defragging the registry.
How do I defrag my registry?
You can use a registry optimization tool or software that includes defragmentation capabilities to defrag your registry. The process typically involves scanning the registry for fragmented data, reorganizing the data for faster access, and optimizing the registry structure.
It’s important to note that defragmenting the registry can be risky if not done correctly, so it’s recommended to use reputable software or tools and back up the registry before defragging.
Should I use CCleaner to clean registry?
CCleaner is a popular system optimization tool that includes registry cleaning capabilities. While CCleaner can help clean unnecessary or outdated registry entries, it’s important to note that cleaning the registry won’t necessarily result in significant performance gains and can even cause system instability if critical entries are deleted.
It’s recommended to use CCleaner or any other registry cleaning tool with caution and to back up the registry before cleaning.
Does CCleaner fix registry issues?
CCleaner can help fix some registry issues by cleaning unnecessary or outdated entries, but it’s not a guaranteed solution for all registry problems.
CCleaner can also cause issues if critical entries are deleted, so it’s recommended to use the tool cautiously and back up the registry before cleaning.
Does Windows have a free registry cleaner?
Windows includes a built-in registry cleaner tool called “Registry Editor, ” allowing users to edit or delete registry entries. However, using the Registry Editor can be risky if not done correctly, and using reputable third-party tools or software for registry cleaning is recommended.
Should I fix registry issues?
It’s generally recommended to fix registry issues if they’re causing system instability, errors, or crashes. However, using reputable tools or software and being cautious when fixing registry issues is important.
Deleting critical entries or making incorrect changes can cause more harm than good.
How can the Windows registry be used maliciously?
The Windows registry can be used maliciously by malware or viruses to modify critical system settings or behavior, steal sensitive information, or gain unauthorized access to the system.
Attackers can also use the registry to hide their activities or malware from detection, making it difficult for antivirus or security software to detect or remove them.
What happens if you edit registry?
If you edit the registry incorrectly, it can cause system instability, errors, or crashes. Editing the registry can also lead to data loss or prevent the system from booting up. It’s recommended to back up the registry before making any changes and proceed cautiously when editing values.
Should I delete leftover registry items?
Leftover registry items can take up space and potentially slow down the system, so deleting them using reputable registry cleaning software or tools is generally safe.
How often should you clean your registry?
There’s no set rule for how often to clean the registry, as it largely depends on individual usage patterns and the amount of clutter.
It’s generally recommended to clean the registry periodically or when performance issues arise, but excessive cleaning or deletion of critical entries can cause system instability or other issues.
Is it safe to use CCleaner?
CCleaner is generally safe if downloaded from a reputable source and used according to best practices.
However, there have been instances in the past where hackers have compromised the software, so it’s important to download and use the latest version and to exercise caution when using the tool.
What are the risks of manually editing a registry?
Manually editing the registry can be risky and potentially cause system instability, errors, or crashes if not done correctly. Additionally, manually editing the registry requires a good understanding of the Windows registry and its effects on the system, so it’s recommended only to make changes with the assistance of a qualified technician or using reputable third-party tools.
What are the drawbacks of registry?
The registry has several drawbacks, including its susceptibility to corruption, the potential for registry clutter, and the risk of system instability or data loss if edited incorrectly.
Additionally, the registry can be difficult to manage and clean, leading to slower system performance. While the registry is a critical component of the Windows operating system, it’s important to use it cautiously and regularly back up the registry to prevent issues.
What is one major risk of editing the registry?
One major risk of editing the registry is the potential for system instability, errors, or crashes if critical entries are deleted or modified incorrectly.
Additionally, editing the registry can cause data loss or prevent the system from booting up. It’s recommended to back up the registry before making any changes and proceed cautiously when editing values.
Does resetting PC clean registry?
Resetting a PC can clean the registry and restore the system to its original state. However, it’s important to note that resetting a PC will delete all personal data and installed software, so it should only be done as a last resort or after backing up all important data.
Do broken registries matter?
Broken registries can matter as they can cause system instability, errors, or crashes if critical entries are missing or corrupted.
Additionally, broken registries can slow down system performance or prevent the system from functioning properly. It’s recommended to fix broken registries using reputable tools or software and to regularly back up the registry to prevent issues.
What are the signs of corrupted Windows?
Some signs of corrupted Windows can include slow system performance, crashes or errors when using certain programs, missing or corrupted files, and problems booting up the system.
It’s recommended to run antivirus or malware scans, clean up the registry, and check for software or hardware issues if you suspect your Windows system is corrupted.
What are the symptoms of a broken registry?
Some symptoms of a broken registry can include slow system performance, programs crashing or freezing, system errors or crashes, and problems booting up the system.
Additionally, broken registries can cause missing or corrupted files, hardware or software issues, and other system problems. It’s recommended to fix broken registries using reputable tools or software and to regularly back up the registry to prevent issues.
How do I stop Windows from corrupting files?
To prevent Windows from corrupting files, you can try several things like keeping the system updated with the latest patches and drivers, running antivirus or malware scans regularly, avoiding excessive software installations or uninstallations, and using reputable third-party tools or software to clean up the registry.
How many times should I defrag?
The frequency of defragging depends on individual usage patterns and the amount of fragmentation in the system. It’s generally recommended to defrag the system every few months or when fragmentation levels exceed 10 percent.
However, excessive defragging can cause unnecessary wear and tear on the hard drive, so it’s important to balance the benefits of defragging with the potential risks.
Can you defrag too much?
Yes, defragging too much can cause unnecessary wear and tear on the hard drive and potentially reduce its lifespan. It’s recommended to defrag the system only when necessary and to use reputable defragmentation software or tools.
Do you need to defrag registry with SSD?
No, defragmenting the registry is not necessary with an SSD (Solid State Drive) as SSDs don’t store data in the same way as traditional hard drives. Defragmenting an SSD can even cause unnecessary wear and tear on the drive, so it’s not recommended.
What is safe to delete with CCleaner?
CCleaner can safely delete unnecessary or outdated files, temporary files, internet cache, and other junk files to free up space and improve system performance.
However, it’s important to review the files to be deleted carefully and to back up important data before cleaning to prevent accidental data loss. Additionally, CCleaner should not be used to delete critical system files or registry entries.
How to repair all registry Windows 10?
To repair the registry in Windows 10, you can use the built-in System File Checker (SFC) tool or the Deployment Image Servicing and Management (DISM) tool.
These tools can scan for and repair corrupt or missing system files, including registry files. It’s important to run these tools with administrative privileges and to follow any on-screen instructions carefully.
How to clean all the registries and corrupted files from your computer?
You can use reputable registry cleaning software or tools to clean all registries and corrupted files from your computer. These tools can help scan for and remove unnecessary or outdated registry entries, fix broken registries, and optimize the registry for better performance.
It’s important to use these tools cautiously and back up the registry before cleaning to prevent accidental data loss or system instability.
How do I clean my registry with CCleaner?
To clean the registry with CCleaner, open the software and select the “Registry” option. Then click on “Scan for Issues” to scan for unnecessary or outdated registry entries.
Once the scan is complete, review the issues found and select the entries you want to delete. Finally, click on “Fix Selected Issues” to clean the registry. It’s important to review the issues found carefully and to back up the registry before cleaning to prevent accidental data loss or system instability.
How do I manually clean the registry in Windows 10?
To manually clean the registry in Windows 10, you can use the built-in Registry Editor tool. Open the Registry Editor by typing “regedit” in the Start menu search box and pressing Enter.
Then navigate to the registry key you want to edit or delete, right-click on it, and select “Delete” or “Modify”.
It’s important only to edit or delete registry entries if you understand what you’re doing well and back up the registry before making any changes to prevent accidental data loss or system instability.
Can viruses hide in registry?
Yes, viruses or malware can hide in the registry by modifying critical system settings or behavior to evade detection by antivirus or security software. Attackers can also use the registry to execute malicious code or steal sensitive information.
It’s important to use reputable antivirus or security software and to scan for and remove any viruses or malware found regularly.
Can malware hide in registry?
Yes, malware can hide in the registry by modifying critical system settings or behavior to evade antivirus or security software detection. Malware can also use the registry to execute malicious code or steal sensitive information. It’s important to use reputable antivirus or security software and to regularly scan for and remove any malware found.
Does Windows Defender scan the registry?
Yes, Windows Defender can scan the registry for malware or virus infections by using its built-in scanning engine. Windows Defender can also clean up registry entries that are known to be associated with malware or virus infections.
However, it’s recommended to use additional third-party tools or software for a more comprehensive scan and clean.
What is one of the disadvantages to incorrectly editing the Windows registry?
One of the disadvantages of incorrectly editing the Windows registry is the potential for system instability, errors, or crashes if critical entries are deleted or modified.
Additionally, incorrectly editing the registry can cause data loss or prevent the system from booting up. It’s recommended to back up the registry before making any changes and proceed cautiously when editing values.
Is it safe to reset registry?
Resetting the registry can be safe if done correctly and as a last resort after all other options have been exhausted. However, resetting the registry will delete all settings and configuration information and can potentially cause system instability or data loss.
It’s recommended to back up the registry before resetting and proceed with caution when resetting it.
What should you do before editing the registry?
Before editing the registry, it’s important to back up the registry to prevent accidental data loss or system instability. Additionally, it’s recommended to research the changes to be made and their potential effects on the system, to only make changes to entries you understand, and to proceed with caution when editing values.
How do I clean up unnecessary registry files?
You can use reputable registry cleaning software or tools to clean up unnecessary registry files. These tools can scan for and remove unnecessary or outdated registry entries, fix broken registries, and optimize the registry for better performance.
Should I worry about broken registry items?
Broken registry items can cause system instability or errors if critical entries are missing or corrupted. It’s recommended to fix broken registry items using reputable tools or software and to regularly back up the registry to prevent issues.
Do registry errors slow down computer?
Registry errors can potentially slow down the computer if they cause system instability or errors. Additionally, registry clutter can potentially slow down the computer by causing longer startup times and slower system performance.
It’s recommended to clean up the registry periodically using reputable tools or software to prevent registry errors and improve system performance.
Why shouldn’t you mess the registry editor?
You shouldn’t mess with the registry editor if you’re not familiar with the Windows registry and its effects on the system. Editing or deleting critical entries can cause system instability, errors, or crashes, and can potentially lead to data loss or prevent the system from booting up. It’s recommended to back up the registry before making any changes and to proceed with caution when editing values.
Why is the Windows registry such a mess?
The Windows registry can be messy due to the large number of entries and keys it contains, and the lack of a unified structure or organization. Additionally, registry entries can accumulate over time, leading to clutter and potential performance issues.


