This is the ultimate guide to Google Chrome Flags which will help You to improve your browsing experience with Google Chrome.
In this post, you are going to learn everything on this awesome topic.
Note:- I will recommend you to take a cup of coffee 🧫 before start reading, as this one is going to be a long read. 📚
Without any further delay, let’s explore this awesome topic. 📗📗
Do you like discovering treasure? If you do, I’m sure you’ll also be interested in knowing more about chrome flags. What do chrome flags and treasure have in common?
They both are hidden from plain sight, you need to know exactly where to look, and what you’re searching for to find them. 👓
Chrome flags are features which are not yet added by default in the browser, that you have the opportunity to enable in your browser. Because many of the flags are still in development they are subject to a lot of change.
They are experimental features that you have the opportunity of using and enjoying though they are not set as the default in the Chrome browser. There are many cool features that you can enable in Chrome flags, features that can improve the functionality of your browser.
These features and settings allow you to boost the performance of your browser, use the newest in-development features and incorporate advanced features such as hardware and GPU acceleration.
These features are particularly useful for developer testing. If you are a developer or someone who loves to discover new interesting features learning more about chrome flags is exactly what you should do.
This article will explain how to activate and deactivate chrome flags, it will also explain some of the most exciting and useful chrome flags you should consider using, and some that you should avoid. With security being a major issue to today’s internet user, many of these flags are designed to increase browsing privacy & security.
Google Chrome flags: Background Information
Before we dive into our review of Chrome flags, its important to give some background information about Google Chrome itself. Since its initial release in 2008, Google Chrome has grown in leaps and bounds. It was first developed for Windows but has since had versions for Linux, iOS, macOS and Android released.
Almost every internet user has heard of Chrome. You probably are a Chrome user, or someone you know uses the Chrome browser. In fact, the popularity of the Chrome browser has grown to such a great degree that over half of all web traffic on browsers is accounted for by Chrome.
Without a doubt, one of the factors that contribute to Chrome’s growth is the enormous resources Google is able to put into it.
Google can afford to invite hackers to test for vulnerabilities in the browser on a fairly regular basis, they employ the best engineers to constantly work on improving the performance and functionality of the browser.
Evidence for this can be seen in the frequent minor updates which occur every two or three weeks and the major releases that take place every six weeks.
A significant disadvantage that comes with having as large a user base as Chrome is that it is impossible to have a major release without offending a segment of the user base. For every new innovation, there are bound to be some who prefer it the old way. Having so many users makes it difficult to cater to niche needs.
Other browsers can easily target specific audiences. Vivaldi, for instance, can easily target tech-savvy users who really enjoy having several customization features. Brave can target people who prioritize privacy over everything else. Chrome has to make products and releases that appeal to the widest range of users.
Chrome flags: Why We Need
As has been stated earlier Chrome’s ever-increasing user base may be a disadvantage in rolling out new innovations, hence Chrome flags are very useful. With Chrome flags, users are in control of what novel features to enable and disable.

Also, because many of the features on chrome flags are at the experimental stage, the developers can easily access the effect of those features when users enable them and make necessary improvements.
Perhaps it’s for this reason that flags were once called labs. When users enable new features it becomes easy to observe their real-world applications, and if there are major adjustments to be made.
Chrome flags is a way for Chrome to decide based on observation what features will be most beneficial for most users, and if they can be added as default features or customizable options on the main browser.
An added benefit of Chrome flags is that the usage of many of them boosts your browser performance. Using flags can make your browser faster and better. There is a wide range of performance-related benefits associated with Chrome flags such as faster downloads, images loading faster, better page rendering.
Chrome flags also bring many features that you can enjoy that are not part of the stable Chrome version. You get to enjoy benefits that the average Chrome user may not be aware of.
An example of this is the download resumption feature which makes your downloads continue from the stage it was when there is a disruption in your internet connection.
Also, developers will greatly enjoy using Chrome flags because it affords them the opportunity to test their apps under varying conditions before release. This is to make sure their products work equally well under varying conditions.
It should be noted that not all the chrome flags will be beneficial to every user. Because they are at the experimental stage, there is a risk of losing your data or making your browser more vulnerable to threats to security or privacy if things go wrong.
How To Enable or disable Chrome Flags
When you’ve made the decision to use a certain chrome flag, you might be wondering how to enable it. Or when you have enabled a certain feature on chrome flags and it isn’t functioning the way you expected, you will want to know how to disable it. Below are the easy steps to enable or disable a feature on chrome flags.
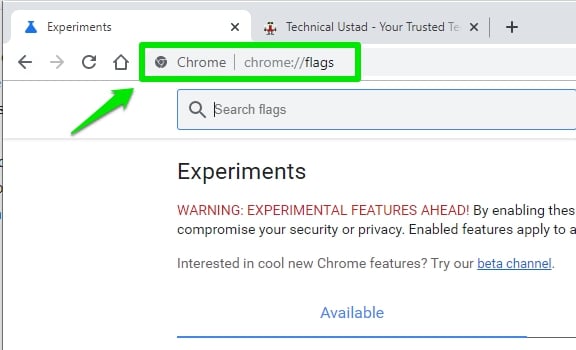
1. Type “chrome://flags” or “about://flags” in the Omnibox (address box/ search box) and click on the enter key. This will not work without an internet connection.
2. Though this is not technically a step, it is still important. Read the warning. When you open chrome flags you’ll notice at the top: careful, these experiments may bite” below that you’ll see a warning that states: ” these experimental features may change, break or disappear at any time.
We make absolutely no guarantees about what may happen if you turn one of these experiments on, and your browser may even spontaneously combust. Jokes aside, your browser may delete all your data, or your security and privacy may be compromised in unexpected ways.
Any experiments you enable will be enabled for all users of this browser. Please proceed with caution”. I guess that’s Google’s way of saying you’re responsible for any effects you notice as a result of the changes. 😸
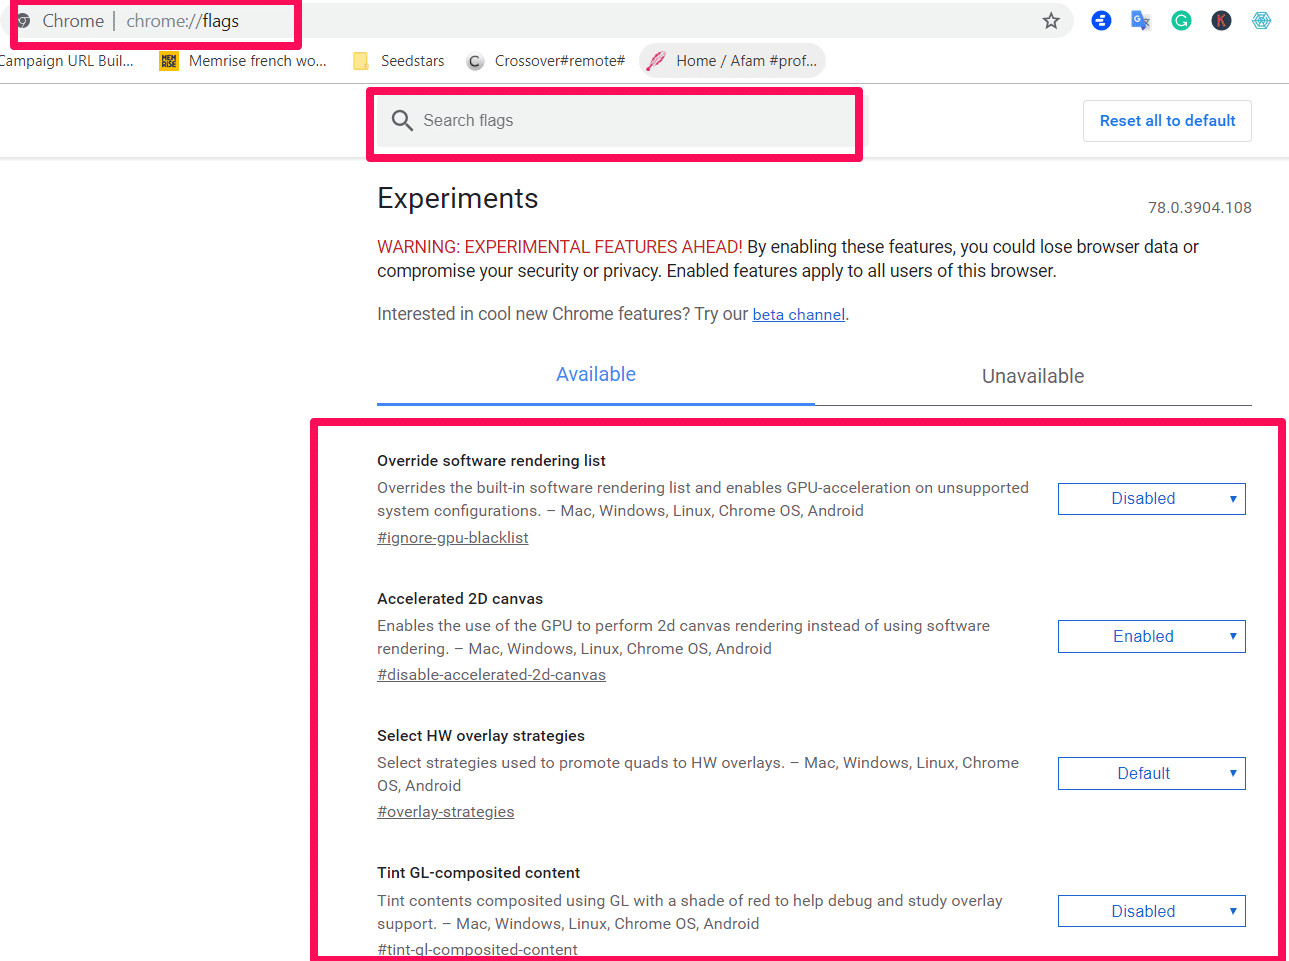
3. Hopefully, you’ve not been scared away after reading the warning. Once chrome flags are open you’ll see a long list of features you can enable, disable or set as default. Alternatively, you can search for specific features using the search box.
4. Read the description below whatever advanced feature you want to enable/ disable. All advanced features have a description below it along with the platforms they are available on.
You can enable your preferred feature by hitting the “enable” button, alternatively, you could change the settings from default to “enable” or “disable“
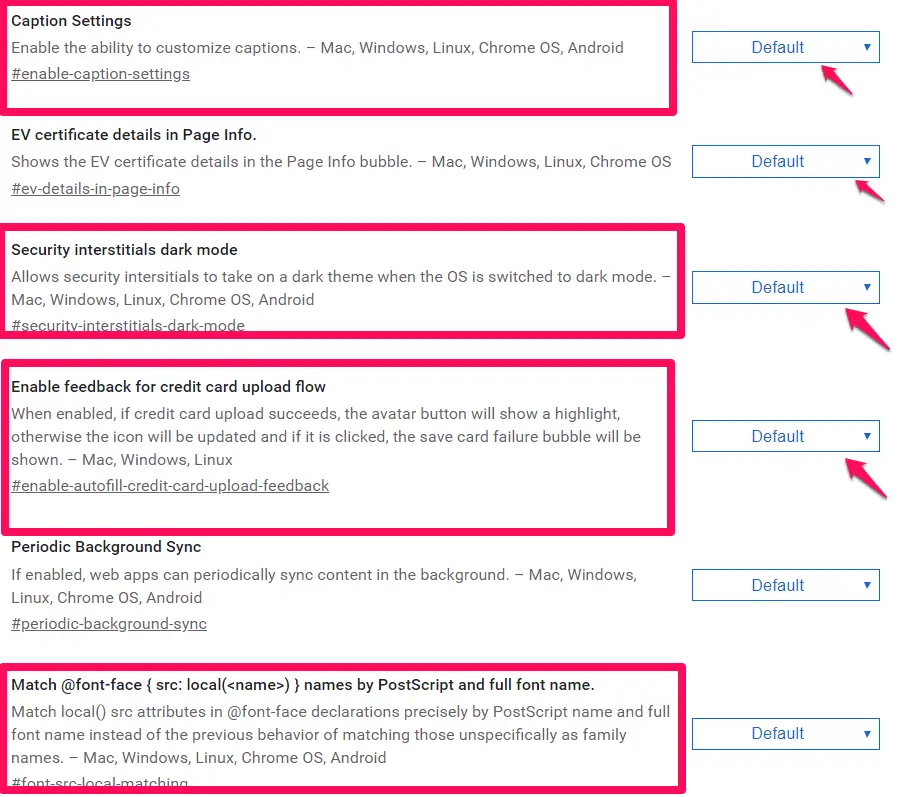
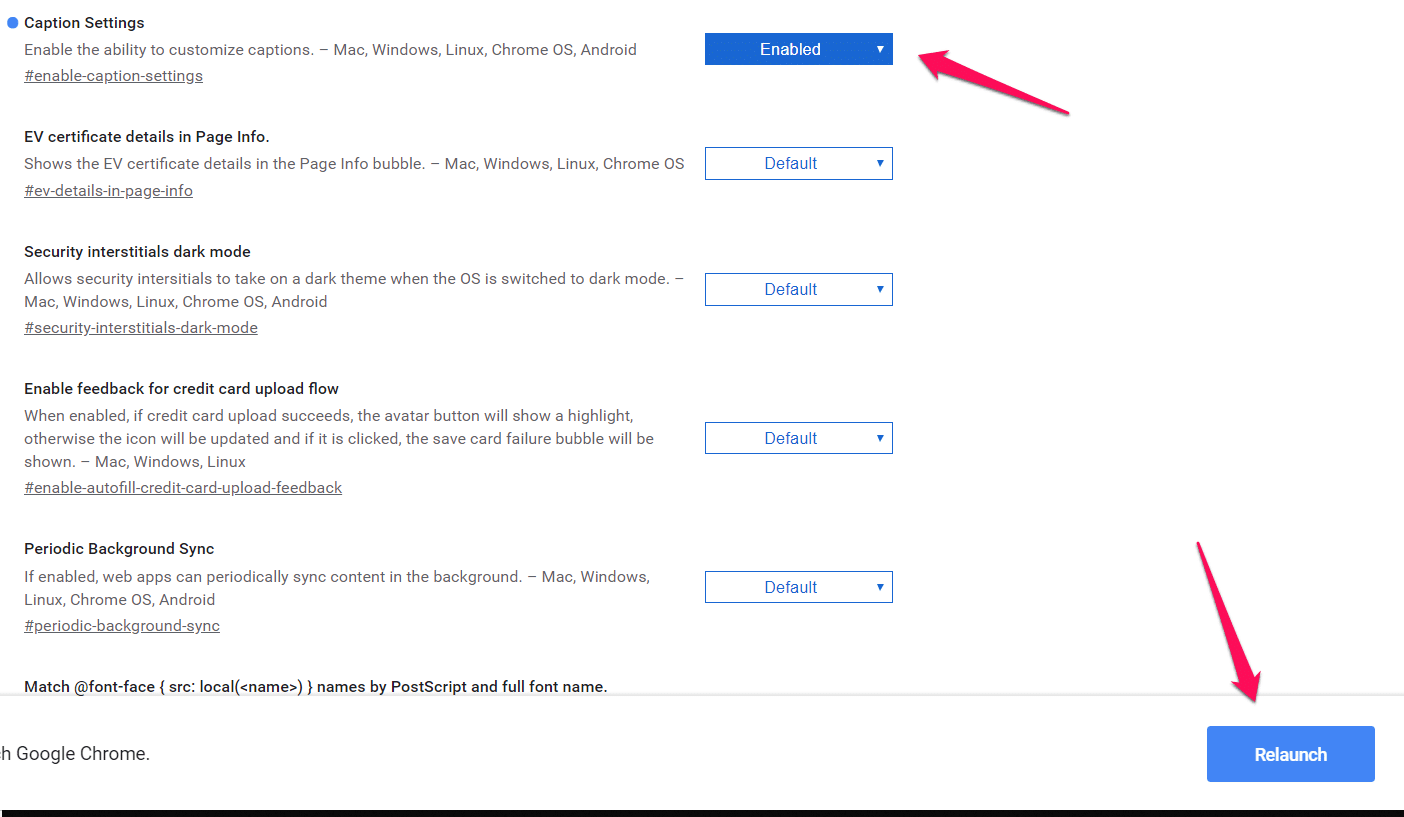
It is advisable you do not enable many features at the same time so you can keep track of what features have been beneficial and what features have not worked as you expected.
If you are not sure what chrome flag is causing your browser to act in unexpected ways you can use the “reset all to default” button. For users on mobile, you can also clear all data on the browser app which has the same effect as resetting to default.

Best Chrome Flags To Use 🕵️♀️
There are several chrome flags and sometimes it might seem confusing what setting will actually improve your browsing experience. We have here a comprehensive list of chrome flags you can use.
Some of these settings are not available on every platform. Some of these settings are more developer-centric and will come in handy for developers who want to enjoy the newest experimental features Chrome has to offer, on the other hand, some of the features are perfect fits for consumers who want to enjoy browsing without major problems.
Note that these features are experimental so they can be removed at any time or they could be added to the main browser. Now let’s dive fully into the list of chrome flag features you can enable.
Also, today in the internet world, privacy and security are very important. Big corporations track user behavior and use this data for many purposes.
Many of the flags discussed may have security implications, and users should only experiment with flags if they have a total understanding of it and are comfortable to use the tag.
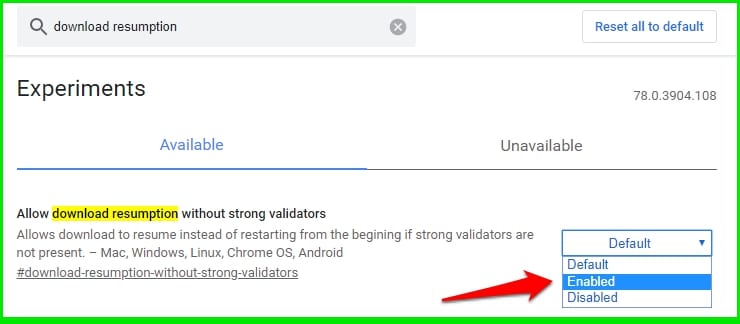
1. Enable download resumption
Have you ever been downloading a video or audio file, or a new application, and your download gets interrupted at 99%? 🧒 There are a number of things that could cause interruptions in your download, perhaps your internet signal suddenly became weak.
You probably have issues with the functionality of the inbuilt download manager. It doesn’t allow you to resume downloads after interruptions always, now you don’t have to worry about that.
Search for “download Resumption” in the search box and enable it.
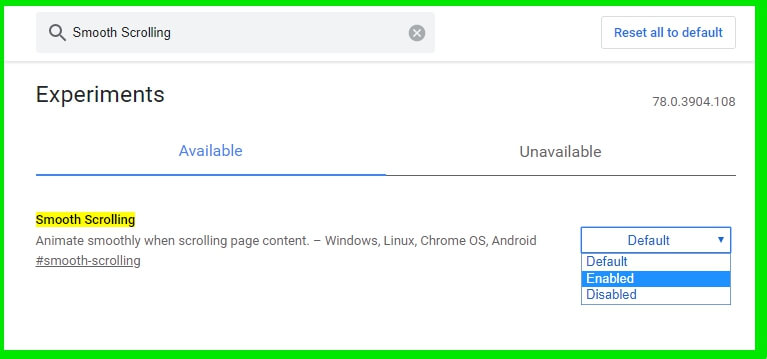
2. Smooth scrolling
As the name implies, it makes your working on the browser easier, smoother and more seamless. The flag is available only for Windows and Linux users.
Search for”Smooth Scrolling” and enable it.
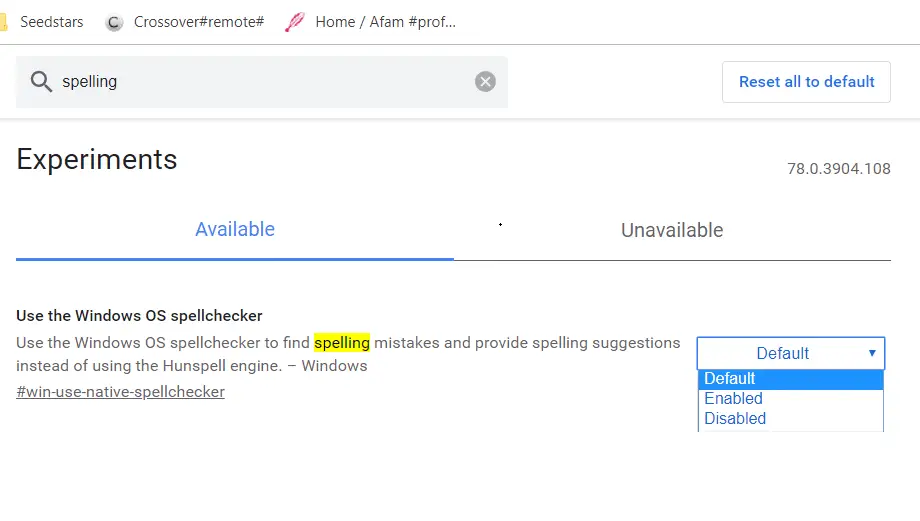
3. Use the Windows OS spellchecker
Obviously, as the name implies, this flag will work just on windows. This Windows OS spellchecker works like the spellcheck on Microsoft Word. It will find misspelled words and offer correction suggestions to them.
The hashtag #win-use-native-spellchecker takes you straight to this flag and you then choose to enable or disable the flag.
Unfortunately, for Androids, IoS, and other operating systems, this flag at this time is not yet available.
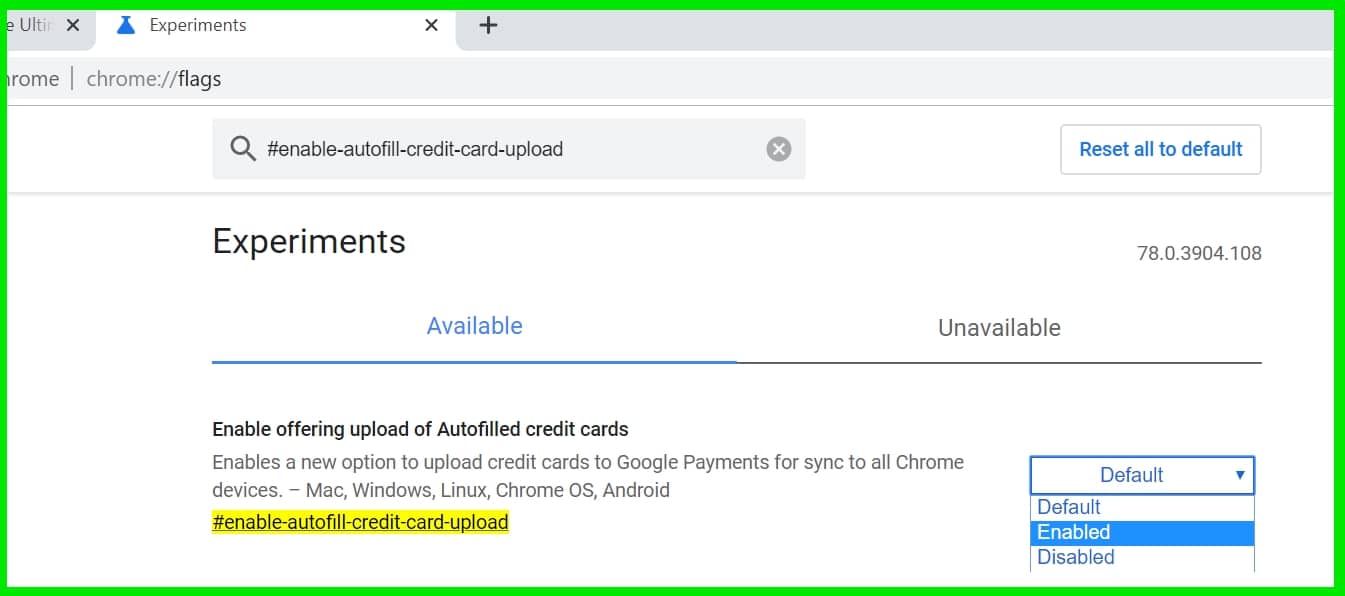
4. Enable offering upload of Autofilled credit cards
If you do a lot of online transactions, this is a flag you will consider enabling. Entering credit card details in different devices you use is such a drag.
With this tag, for sync to all devices, you enable an option to upload on Google payments your credit card details. This tag is available for the major operating systems; Mac, Windows, Linux, Chrome OS, and Android.
Here is the tag that takes you straight to this flag #enable-autofill-credit-card-upload
Credit card autofill ablation experiment –
Security is a big concern in today’s online world, unfortunately, there is a big need for user-friendliness and this sometimes comes at the expense of browser security.
This tag gives you back some security with regards to your credit card details. It ensures that suggestions for these details never come up as autofill. Here is the shortcut for this flag #enable-autofill-credit-card-upload
Make cardholder name editable in dialog during credit card upload –
And yet another important flag for credit card users. This flag may not work if you already have the “Credit card autofill ablation experiment” flag enabled.
It simply allows more flexibility for credit card details on submission forms. Once enabled, at a certain time during credit card uploads on Google Payments, it permits name details to be editable in the offer-to-save dialog.
Here is the shortcut to this tag; #enable-autofill-credit-card-upload-editable-cardholder-name
5. Username first flow
There are some pages that require a user to enter a user name and then it moves to a different page for password entry. For webpages that function like that, this flag may come in handy.
When enabled, the browser will offer support for username saving and filling on username first flow. This means you will not have to enter your username on such pages.
Here is the shortcut for the flag: #username-first-flow
6. Google Password Manager UI
For users that are very security conscious, passwords are always a big deal. Google has a service for password maintenance; the Google Password Manager. Here a user can see all the passwords for every service they use. A user can change passwords and view messages on important tweaks needed for passwords.
With this flag enabled, right from your Chrome browser, you have access to your Google Password Manager.
Here is the shortcut to enable the flag. #google-password-manager. The flag works on Mac, Windows, Linux, Chrome OS, and Android.
I will recommend you to watch our “How to Download Your Passwords in Google Chrome” for safekeeping of your passwords locally.
7. Password Leak Detection
Here is another security-related flag. It is quite straightforward. This flag detects when you have a password leak. This flag verifies your usernames and passwords against a database of compromised credentials. If any of the credentials you use is on that list, it notifies you and you could change it.
This flag can be accessed using the shortcut #password-leak-detection and is available for Chrome users on Mac, Windows, Linux, Chrome OS, and Android
8. Material Design
Material design (codenamed Quantum Paper) is an innovation by Google. This design language was created by Google in 2014. It aims to emphasize texture and depth through the use of lighting and shadows.
By using a grid-based layout, combined with beautiful animations and responsive transitions it aims to make user’s creativity come alive on screen.
There is a chrome flag that enables a new “chrome://downloads” page which features Material designs. Though apart from the colorful top there are not many changes this download feature will be useful to people who are interested in materials design.
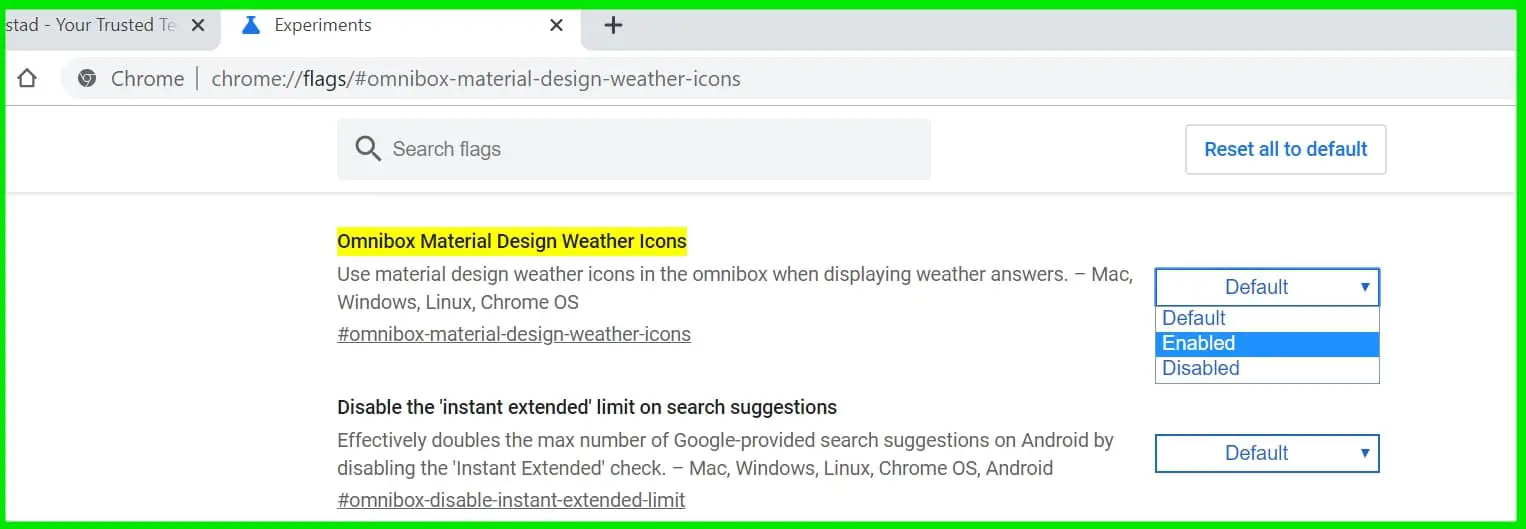
You can give a material design TouchUp to the top part of Chrome. Here is a shortcut to this flag: #omnibox-material-design-weather-icons
9. Scroll prediction
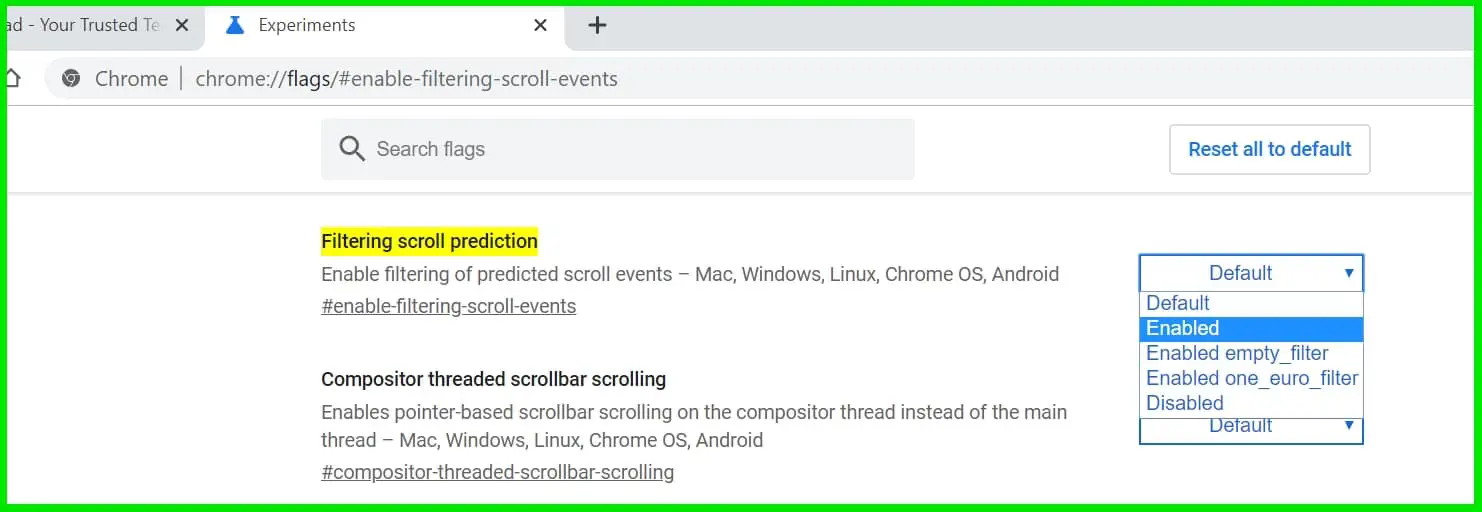
When enabled this feature will be able to anticipate where you will scroll next in a web page and loads that portion in advance. This makes scrolling smoother.
Think about how much easier and more using your browser could be if it can anticipate what you’ll scroll towards or click on before you do. This feature is however not available for Android smartphones or tablets.
Here is a shortcut to this flag #enable-filtering-scroll-events and it is available for Mac, Windows, Linux, Chrome OS, and Android.
10. Show autofill signatures
Most users have gotten into the habit of using autofill signatures. While this may not be the most advisable, it is definitely a user-friendly feature of browsers.
This flag enabled will annotate web forms with Autofill signatures in the form of HTML attributes. It will also mark all the fields that are suitable for password generation.
You can access this flag on #enable-show-autofill-signatures and it is available for Mac, Windows, Linux, Chrome OS, and Android users.
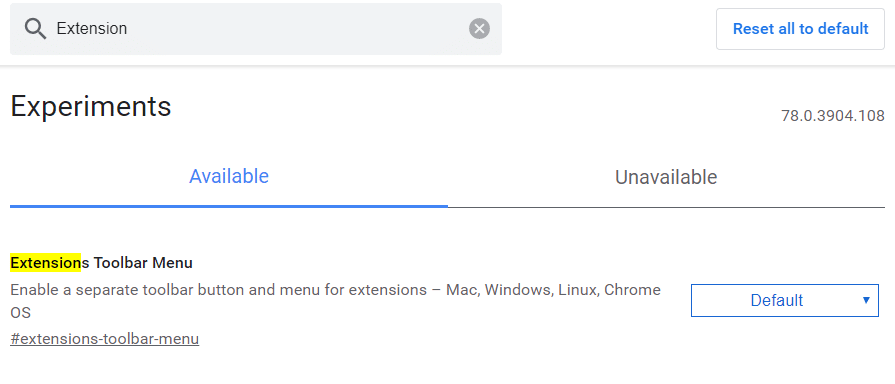
Do you have too many extensions cluttering up your toolbar? Do you feel you need a better way to manage your extensions? There is a new way of having your extensions orderly in the same place. You can do this with a chrome flag.
To search for this specific flag, enter “chrome://extensions/#extensions-toolbar-menu” into the Omnibox. You can then enable it and relaunch chrome.
When the browser restarts you’ll notice a puzzle piece shaped extension icon to the right of the Omnibox. Clicking on this icon will lead you to where all your extensions are.
This flag also provides data on what extensions can access data on the current website you are on. You can even control whether an extension can access your data. You can restrict an extension to only certain sites or let it run only when you need it to.
This flag helps you to declutter your browser and have greater control over the functionality of the extensions you have installed.
12. Extensions on chrome:// URLs
This used to be an unstable flag with a number of issues recorded on support platforms. However, over the years it has become much more stable and will enter this list of stable flags to try.
The flag will enable running extensions on chrome:// URLs, anywhere there is an extension explicit request for the permission. It works on Chrome browsers running on Mac, Windows, Linux, Chrome OS, and Android.
13. Enable reader mode
Most sites make their money through ads. As a result, it may sometimes feel like you’re constantly being bombarded with adverts. You open a site, you’ll find several ads sometimes even interrupting the important work you’re doing.
You try and read an article and there are ads everywhere. Some people have often wondered what could be a possible solution. You don’t have to worry again, there is a flag that allows you to read articles without interruptions by ads.
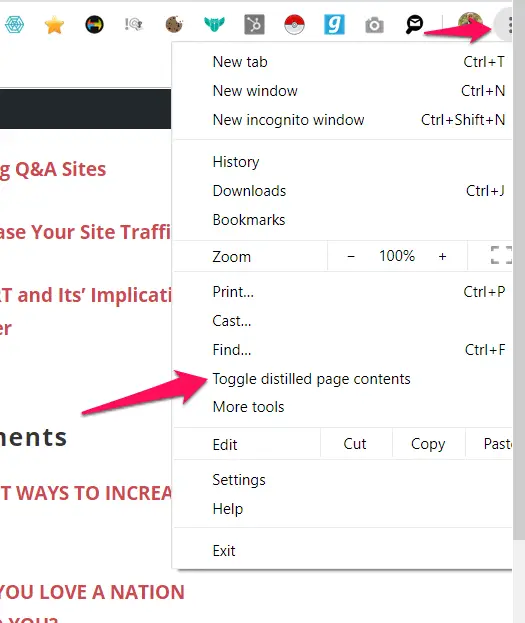
To use the reader mode, when you open the website or page of your choice, click on the customize and control icon (the three vertical dots) at the top right-hand corner of the browser, select ” distill page” and your page transforms to a simple, less cluttered form.
When you want to return to the normal view, just click on the back button. This mode can be enabled on macOS, Windows, Linux, and Chrome OS.
14. Focus mode
As the name implies, it helps you have a greater focus on the page you are currently on when enabled. You right-click on a tab to get the contextual menu to appear, to the right in the menu you’ll see the “focus this tab” option.
Choosing that option will make your tab reopen in a tables window with no Omnibox. Click on the customize and control icon and select “open in Chrome” to return to the original page.
Enable this flag using the shortcut #focus-mode. It is available for users on Mac, Windows, Linux, and Chrome OS.
At the time of our research on “chrome flags to enable”, we found a video about “15 Ways to Search Google 96% of People Don’t Know About” which is worth watching.
15. Enable parallel download
The parallel download feature makes the large file you intend on downloading get broken into smaller chunks and get downloaded simultaneously. This has the effect of reducing download time. The large file will download at a fraction of the time it normally will take it to download.

16. File system API in incognito
Incognito is Chrome’s privacy mode. If you want to maintain greater privacy in your browsing, or you don’t want websites to track and identify you, consider using incognito.
It usually blocks cookies and other elements that allow websites to identify and track you. Many websites notice this and as a result, block some portion of their pages from loading fully.
This flag prevents websites from detecting a change to incognito. It achieves this by creating a virtual file system API which makes it difficult to track the location or any meaningful information of the user. You can enjoy your privacy without a drop in the quality of content you view.
17. Force Dark Mode for Web Contents
Using a browser can take its toll on your device’s battery. Chrome offers a “dark mode” for desktop and mobile devices that helps reduce your battery consumption amongst other uses.
Choosing dark mode means you’re exposed to less blue light, which is beneficial for your health and improves the quality of sleep, so you might consider using dark mode at night. In addition, dark mode has its own aesthetic appeal.
Some sites have their own version of dark mode which is activated automatically when you enable this flag. For sites that do not have dark mode Chrome tends to force them into dark mode by inverting certain colors.
You can do this by entering into the Omnibox “chrome://flags/#enable-force-dark” and enabling it.
This is a very important flag because it has far-ranging benefits, including its role in saving your device battery. Enabling it on your Android also automatically enables Chrome duet. Note also that there is a possibility you have to restart your browser twice for it to be fully operational.
The website will be now in the dark mode like below.
18. QUIC Protocol
The QUIC protocol is a faster way for web browsers to communicate and send information to each other. QUIC is a general-purpose transport layer network protocol designed by Google’s Jim Roskind.
QUIC accounts for more than half of all connections from the Chrome browser to Google’s servers. This is a feature not enjoyed by most other web browsers.QUIC improves the performance of your web applications.
When enabled this feature can boost the speed and performance of your browser. To enable it enter into your Omnibox “chrome://flags/#enable-quic“.
19. Mark non-secure origins as non-secure
You probably know that Chrome displays secure sites (sites using https) with a green padlock icon and insecure sites (sites using http) without any colors. For many people, this distinction flies completely under the radar.
When you search ” #enable-mark-http-as” and you enable the flag, your browser will give you warnings when you are about to enter sites with low-security.
When enabled Chrome displays the not secure text on red. This warning is important in preventing you from entering insecure connections or from leaving any personal information in such sites.
20. Lazy image loading
There is a Chrome flag for making images load faster, there is also a flag that makes them load lazily. You may be wondering if there are any benefits to enabling this feature.
There are. It saves your data, as well as your device memory. Loading all the images on a page consumes more data and memory.
When you enable this flag, images will not all load automatically when you open a new page, however when you scroll towards an image it loads.
To activate it search for #enable-lazy-image-loading.
21. Override software rendering list
This flag ensures that GPU and hardware acceleration are used rather than the default software rendering. The software rendering lists are bypassed to improve the performance and speed of your browser.
By enabling this flag the system forces the use of GPU resources while overriding software rendering. Though this flag is available to everyone it is particularly useful to developers who prefer to test there apps or websites with GPU acceleration rather than software rendering.
Enable this flag using the shortcut #ignore-gpu-blacklist. Also, it is available for users on Mac, Windows, Linux, Chrome OS, and Android
22. GPU Rasterization
Rasterization refers to that process that converts an image in a vector image format to a raster image. A raster image combines pixels, dots, and lines to create an image that is represented via shapes.
Compared to other rendering techniques rasterization is very fast. By working with the device’s graphics card, performance when loading pages is improved.
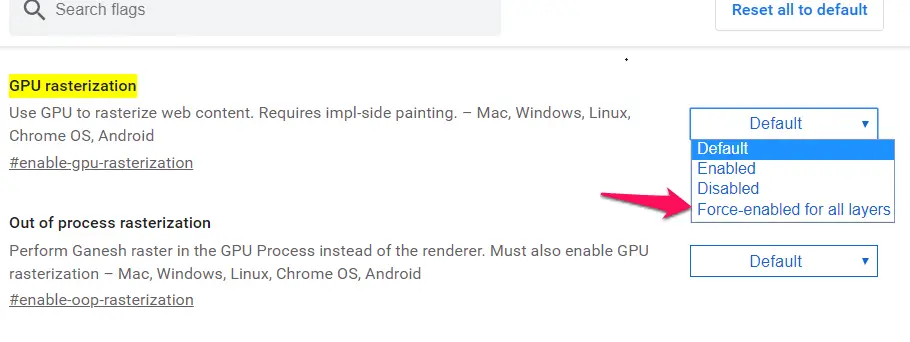
To activate this flag enter into the search bar “chrome://flags/#enable-gpu-rasterization.
In addition check, the “force enabled for all layers” option to force rendering on all application components. This is another developer-focused flag. It is however available for anyone who wants to use it.
23. Accelerated 2D canvas
This flag improves the processing of graphics in 2D such as plain text with animations and images in general which are processed via software. When enabled the processing work is delegated to the device’s hardware.
This has the effect of improving performance and speed. To activate this flag enter into the address bar chrome://flags/#disable-accelerated-2d-canvas.
24. Link disambiguation pop-up
The need for this flag is highlighted when using Chrome on mobile devices. Sometimes links are so close to each other making it impossible to click on only one of them.
Enabling the flag makes a zoomed bubble appear whenever the user is attempting to click on two links at the same time. This flag is especially useful for developers who are making websites or web apps for touchscreens.
25. Zero-Copy Rasterization
Rasterization is the process through which Chrome organizes website data in pixels and tangible information that you see on your screen.
It does this by organizing each page into slices called “tiles”. Zero-Copy Rasterization makes sure every tile is not uploaded to your device’s GPU but rather to the device memory. This is useful for devices with low-end GPU. Also, it has the effect of reducing battery consumption.
Use this flag by following the shortcut #enable-zero-copy. The Zero Copy Rasterization flag is available for users on Mac, Windows, Linux, Chrome OS, and Android.
26. Sync Clipboard Service
Copy and paste are about the most used processes on the computer. Copying on a device and pasting on a totally different device, however, takes it a step further.
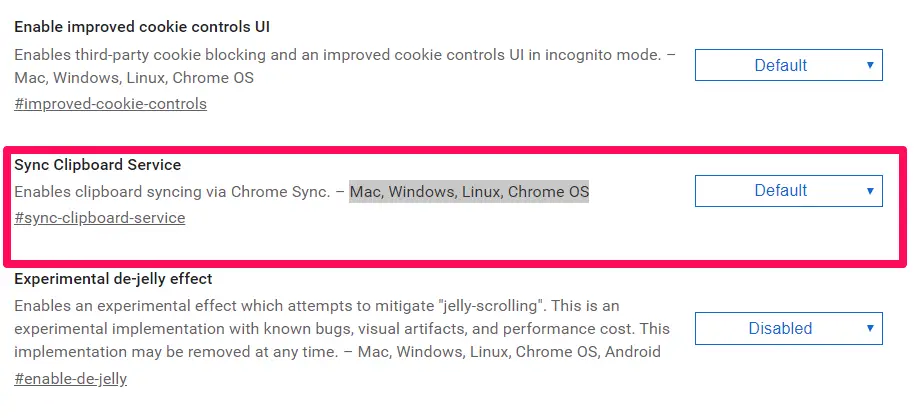
Using Chrome Sync, this flag enables clipboard syncing. Enable it using the shortcut #sync-clipboard-service. This flag works for users on Mac, Windows, Linux, and Chrome OS.
Many users have had issues with privacy. Cookies on browsers and webpages are often used to monitor browser behavior and usage. One noticeable consequence of tracked cookies are adverts on webpages you visit.
In incognito mode, there is less tracking and with this flag, you have more control over how third-party cookies are placed on your browser.
You can enable this by using the shortcut #improved-cookie-controls. This flag is available for users on Mac, Windows, Linux, and Chrome OS.
28. Quieter notification permission prompts
Notifications from browsers are characteristically very noisy and distracting. They interfere a lot with your screen view and can be a menace when you are screen sharing or performing a presentation on your screen.
This flag makes notifications a bit quieter than they normally will be. It replaces the normal modal dialog from site notifications with a quieter version.
To enable this flag use the shortcut #quiet-notification-prompts and be sure you are a user on Mac, Windows, Linux, Chrome OS, or Android
29. Secure DNS lookups
Chrome seems to have a lot of security inclined flags and here is yet another security inlined flag.
This flag when used will enable DNS over HTTPS. This implies that your browser will try to use a secure HTTPS connection to look up the addresses of web resources. Chrome users on Mac, Windows, Chrome OS, and Android can benefit from this flag.
It can be enabled with the shortcut #dns-over-https.
At the time of our research on “Best Chrome Flags To Enable”, we found a video about “8 Chrome Settings You Should Change Right Now!” which is worth watching. 👓
30. Turn off caching of streaming media to disk
This is a power-saving flag. Media are always saved on the catch during streaming. This can be beneficial in many instances but would be a disadvantage if power is to be saved.
With this flag enabled, disk activity is going to be significantly reduced during playback. Using the shortcut #turn-off-streaming-media-caching, this flag will be enabled and will be beneficial for users on Mac, Windows, Linux, Chrome OS, and Android.
31. Global Media Controls
Media is one of the biggest parts of computer usage today. Having all the controls accessible is a huge plus.
Just like the name implies the Global Media Controls UI becomes part of the toolbar when this flag is enabled. This means that right from your browser, you have total control of media functionality. This flag is restricted to users on Mac, Windows, and Linux operating systems.
To enable this tag, use the shortcut #global-media-controls
32. Periodic Background Sync
Syncs are essential in computer use. They keep you up to date on multiple devices and platforms. This flag makes sure periodically you have quiet sync in the background. This flag is available for Mac, Windows, Linux, Chrome OS, and Android Chrome users
The hashtag #periodic-background-sync helps you enable this sync.
33. Autofill Prune Suggestions
Autofill has taken the stress of constantly inputting user credentials. This makes computer use more friendly but also increases the risk of privacy intrusion.
With the Autofill Prune Suggestions flag, users can limit what appears as autofill suggestions. The flag works for Chrome users on Mac, Windows, Linux, Chrome OS, and Android operating systems.
You could enable this flag using the shortcut #autofill-prune-suggestions
34. Enable Portals
This flag was created for portals that are still in an experimental state. Portals are the web platform that allows embedding and seamless transitions from one webpage to the other.
This flag is accessible by Mac, Windows, Linux, Chrome OS, and Android users.
They can be enabled using the shortcut #enable-portals.
35. Intent picker
A few websites or services have desktop applications. Users still may visit the website and perform the same functions they could have performed on the desktop app. They may not always to open the site on a web browser.
The intent picker flag when enabled makes sure that when visiting a site that has URL manageable by a PWA, the user can open the site on the app. This is for users on Mac, Windows, and Linux.
The flag is enabled using the shortcut #enable-intent-picker.
36. Enable App Management page
If you are familiar with the Chrome apps page, then you may want to enable this flag. The flag will simply make you able to view the new Chrome app management page on your browser.
The flag is limited to users on Mac, Windows, Linux, and Chrome OS, and it can be visited with the shortcut: #app-management
37. Experimental WebAssembly
C++ and other languages need to be compiled in other for them to run on the web. WebAssenbly makes this compilation possible. The WebAssenbly engine will bring threads that allow real multi-threaded applications to run on the web.
This flag when enabled will permit web pages to use experimental webassembly features. It is available for Chrome users on Mac, Windows, Linux, Chrome OS, and Android.
The hashtag associated with this flag is#enable-experimental-webassembly-features.
38. Experimental JavaScript
Javascript has powered billions of webpages for a long time. It brings dynamism and functionality to webpages. There are a number of new features that increase web functionality. Some of these features are included only as experiments.
Enabling the Experimental Javascript tag will allow web pages to use experimental JavaScript features.
This feature is available for Chrome users on Mac, Windows, Linux, Chrome OS, and Android and can be accessed with the hashtag #enable-javascript-harmony.
39. Pull-to-refresh gesture
The application of this flag is best understood by smartphone users. On a web page or some mobile apps, when you make a vertical over scroll, the page refreshes.
When this flag is enabled, you will have the same functionality on all permitted devices. So for example on a laptop, all you need to do is over scroll vertically and you automatically have a refresh.
This flag is available for Windows, Linux, and Chrome OS users and can be accessed with the shortcut #pull-to-refresh.
This is a great flag to help you retrace your steps. Once enabled, all your browsing behavior will be recorded and sent to the URL you have specified.
You should be mindful that the trace will include personally identifiable information (PII) like URLs of websites visited and their titles. The flag is available for users on Mac, Windows, Linux, Chrome OS, and Android.
If You are looking for Best Chrome Flags For Android, below mentioned the video is worth watching.
Killer Google Chrome Tips and Tricks You Should Know
1. Open websites like apps
Chrome lets you launch your favorite web apps straight from the Desktop, without any of the browser’s usual tabs, address box, toolbar icons or bookmarks bar–so all you see is the site running in a window.
It works best with websites that behave like apps, so it’s perfect for Google tools such as Gmail, Keep, YouTube, Drive, and Photos. It also works well with other app-like sites, such as Microsoft To-Do and Outlook.com.
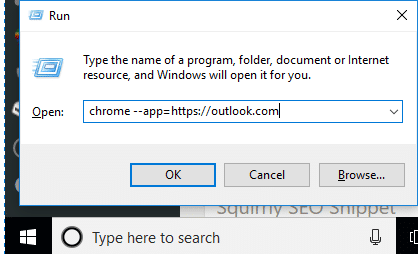
To open a website in this way, press Windows+R and type Chrome –app= followed by the URL.
Here are some examples:-
chrome –app=https://mail.google.com
chrome –app=https://keep.google.com
chrome –app=https://youtube.com
chrome –app=https://drive.google.com
chrome –app=https://photos.google.com
chrome –app=https://to-do.microsoft.com
chrome –app=https://outlook.com
2. Create shortcuts to run websites
Typing commands into the Run box is tedious, so you could instead create Desktop icons that you click to open sites as if they were apps. Right-click on the empty area of the Desktop and select New, Shortcut. You’ll need to enter the full path to Chrome for a shortcut, so click Browse, find Chrome and select it. The following should work:
“C:Program Files (x86)GoogleChromeApplicationchrome.exe”
Place the cursor at the end, press the spacebar and type:
–app=https://photos.google.com
Click Next and give the shortcut a name. You now have a Desktop icon that opens Google Photos like a Desktop app. Try it with other URLs such as Gmail, Drive and Outlook.
Note:- I have written a post for people looking for Best Bookmark Manager Tools To Manage Your Bookmarks?, do read it If you are interested.
3. Try advanced Chrome commands
Dozens of commands can be used when starting Chrome. Most are aimed at developers, but some are useful for all users.
For example, if Chrome blocks old plugins, press Windows+R and type
chrome –allow-outdated-plugins
If a web page won’t display because it has mixed secure and insecure content, use
chrome –allow-runninginsecure-content
To run a series of diagnostic tests to see if Chrome is okay, type chrome –diagnostics
Type chrome://flags in the address box to see hidden settings, some of which are experimental.
If any you’ve changed are causing problems, press Windows+R and type
chrome –no-experiments to disable them. Return to Chrome Flags and use the button at the top to reset everything back to the default.
To start Chrome full screen, type chrome –start-maximized. To make the window a specific size, use
chrome –window-size=800,600
where the numbers show the width and height in pixels. To position the Chrome window, type chrome –window-position=50,0 where the numbers are the x,y coordinates.
To finish, try combining everything we’ve learned about Chrome. For example, to start Gmail as its own app, in an 800 x 600 window, 50 pixels in and 50 down, type:
chrome –app=https://mail .google.com –windowsize=800,600 –windowposition=50,50
That’s too long to type every time so you should create a shortcut by replacing ‘chrome’ with the full path.
4. Save data by compressing online images
If a web page is taking an age to load, it’s almost certainly because it’s stuffed with large, high-resolution images, which not only test your patience but guzzle your data.
You can prevent this from happening by installing a new Chrome extension called Bandwidth Hero, which compresses all pictures on web pages to save you both time and data.
It works automatically, downloading images to a proxy server, converting them to smaller files and returning them to your browser (this happens much more quickly than it sounds).
By default, the add-on reduces the file size by around 50%, but you can reduce the compression level in its settings and stop it making images black and white.
Bandwidth Hero can be disabled on specific sites to leave their pictures intact, and usefully keeps a record of all the images it’s compressed and data it’s saved. It’s also available for Firefox.
5. Manage your tabs by wrapping them
When you have lots of tabs open in Chrome, important pages can get lost among the more trivial ones, forcing you to click to and fro to find the one you need. Wrapper makes life easier by showing you at a glance the contents of all your tabs and letting you organize them into tidy groups called ‘wrappers’.
You can give each wrapper a title and description, colour-code it for easy reference and even share it with other people via email.
Click a wrapper to view all the tabs within it and either open them individually or all at once. Wrappers are saved when you close your browser, to give you instant access
to the wrapped pages next time you need them. Annoyingly, you need to
register with Wrapper to use the add-on, but this allows other people
to share their wrappers with you.
6. Install offline apps
Chrome doesn’t just display websites, it also runs apps, and these often have as many tools and options as paid-for Windows programs.
While most apps are for online use, it’s worth remembering that some of them also work offline, so you can install them in Chrome and use them even when you aren’t connected to the internet.
To find offline apps, go to chrome://apps and click Web Store. Select either Apps or Games on the left and look further down the menu. Under Features, tick the box for Runs Offline. Your results will be filtered to show all the items that can be run offline.
You can also check whether an app will run offline from its description. Click an app and, in its information column on the right, look for the lightning bolt and the words Run Offline.
Clicking this will take you back to all the other apps that run offline. When you’ve found an app you want to use, click ‘Add to Chrome’ to install it. You’ll find your apps
in chrome://apps, where you can also run them.
7. Check the popularity of any website
Anyone who works for a website will know how important (and addictive) it is to keep track not only of the number of visitors to your site but also how many your competitors attract.
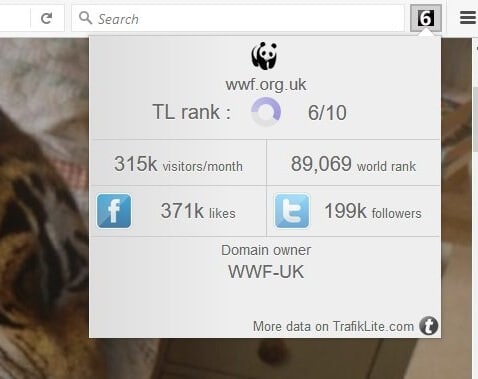
TrafikLite (www.trafiklite.com) is an extension for Chrome, Firefox and Opera that puts this information at your fingertips, so you can check the popularity of any
site instantly.
Just click the toolbar button to see the current site’s monthly visitor numbers, Twitter
followers and ‘likes’ on Facebook, as well as its global ranking. You can also view TrafikLite’s own ‘reputation’ rank for the site as a score out of 10.
8. Mute every page on a website in one go
The stable version of Chrome 62 is now available, and among its otherwise fairly unexciting list of new features is a useful tool for controlling the sound on noisy websites.
Instead of right-clicking a specific tab and choosing ‘Mute tab’, you can turn off the sound across every page on a site.
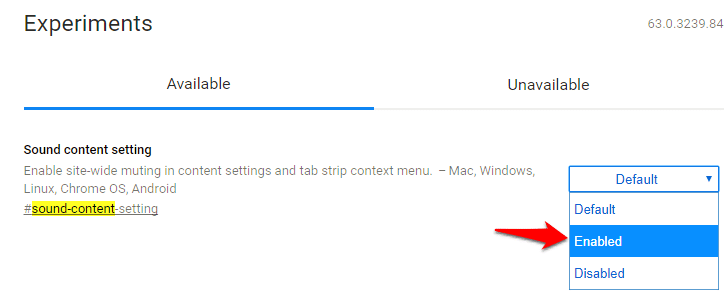
To activate the feature, go to chrome:flags and search for the entry ‘Sound content setting’.
Select Enabled from the drop-down menu and restart the browser. Now, when you want to silence every page on a website, simply right-click any of its tabs and choose ‘Mute site’ to turn off the audio across the board. When you want to restore the sound, right-click a tab and select ‘Unmute site’.
9. Feel lucky from the address bar
When you search the web by typing a term into Chrome’s address bar, you don’t get the option to click Google’s ‘I’m Feeling Lucky’ button, but there’s a workaround that adds
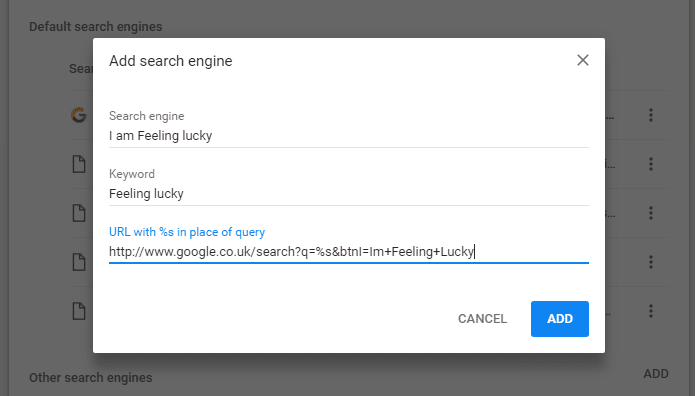
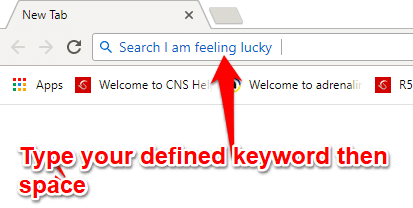
this time-saving feature. Go to Settings, ‘Manage search engines’ and click Add, then enter a name and keyword for the option – for example ‘I’m Feeling Lucky’ and ‘lucky’.
In the URL line, type:https://www.google.co.uk/search?q=%s&btnI=Im+Feeling+Lucky and click Save.
Now, when you want to use the I’m Feeling Lucky feature, just type the keyword
into your address bar, press the spacebar and enter your query.
Press Enter and you’ll be taken to (hopefully) the most relevant result.
10. Stop HTML5 videos playing automatically
Autoplaying videos–particularly noisy adverts–are becoming an increasing annoyance, but because most are in the HTML5 format, Chrome doesn’t offer a ‘click-to-play’ setting as it does for Flash content.
Until now, that is, because of the latest version of the browser (61)
adds an option that stops HTML5 video playing automatically and allows you to click to play it if you want.
To access and activate this secret setting, type chrome:flags into the address bar, press Enter and search (using Ctrl+F) for ‘Autoplay policy’. Click the drop-down menu for the entry, select ‘User gesture is required for cross-origin iFrames’ and restart Chrome.
Note that this trick won’t work for all HTML5 content, but it should make at least
some web pages less annoying.
11. Manage your tabs or your Tabagotchi dies
The more tabs you have open in Chrome, the more memory it uses and the more distracted you become, but it’s easy to ignore the risk until it’s too late and your browser
crashes.
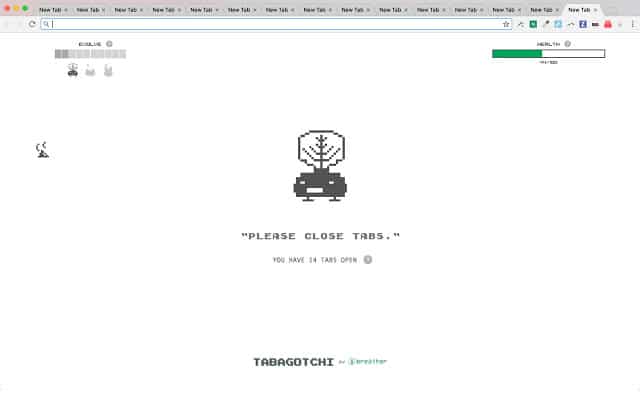
A new extension called Tabagotchi gives you the incentive to manage your tabs more sensibly by making your actions a matter of life or death.
Inspired by the Tamagotchi digital-pet craze of the Nineties, the idea is that you maintain your creature’s health and happiness by keeping open tabs to a minimum.
For each hour you spend browsing with five tabs or fewer, you get one step closer to evolving your Tabagotchi to a higher form. Conversely, when you open too many tabs, your pet grows angry and ill, and ultimately dies because of your negligence. You monster!
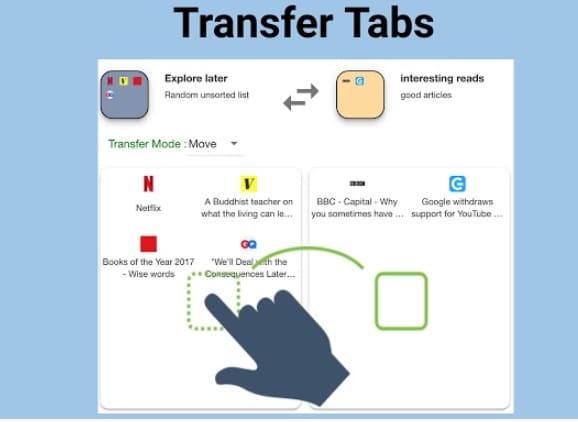
12. Unload unused tabs to view later
The more tabs you have open in Chrome, the more memory it uses, but you might be reluctant to close pages you want to view later. Rather than adding multiple bookmarks, you can use Dog Ear to temporarily ‘unload’ unused tabs, and save them in a list to reopen later.
Just click the toolbar button to unload tabs individually, or right-click it and choose ‘Dog Ear all tabs’; the list of unloaded tabs then appears on your New Tab page so you can easily restore them.
Dog Ear works in a similar way to the popular add-on OneTab (www.one-tab.com), but it’s even more efficient.
13. Reveal the passwords behind asterisks
Hiding passwords behind asterisks stops nosy parkers seeing what you’re typing, but it can also prove frustrating when you mistype a character and you’re told you’ve entered an incorrect login. If you make too many mistakes, you may even be locked out of your account.
You can avoid this problem by installing Unmask Password, which removes the asterisks from password fields so you can see exactly what you’re typing. Just click the eye symbol to reveal the characters, then click it again to hide them.
Obviously, you shouldn’t use it if there are people around you who can’t be trusted,
but it makes logging in a little easier.
14. Search Google Maps from the address bar
Chrome provides access to a host of custom search engines, and you can search many popular sites directly from the browser’s address bar by typing in their keywords followed by your search query.
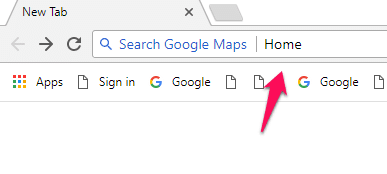
One of the most useful options is to look up any location instantly by typing maps.google.co.uk followed by the place name or postcode. You can make this even easier by shortening the search engine’s keyword to map.
Click the three-dot button in the top-right corner of the browser and select Settings, then scroll down to the ‘Search engine’ section and click ‘Manage search engines’.
Find the Google Maps entry in the ‘Other search engines’ list, click the three-dot button next to it and choose Edit. Enter map as the keyword and click Save.
While you’re there, you can add a shortcut for directions from your home address, for example, to anywhere else.
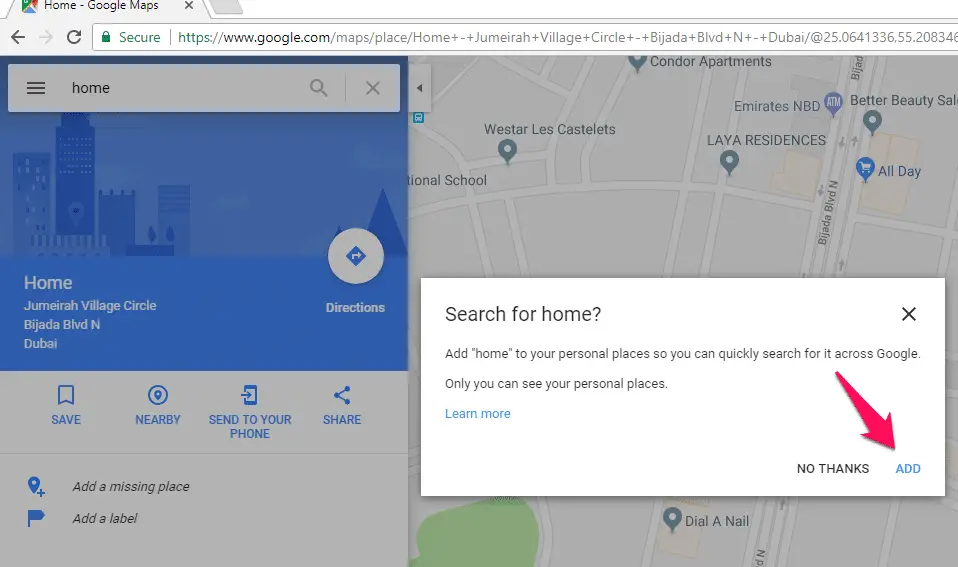
Click the Add button, then type a name for the shortcut, such as Directions, and a keyword to trigger it. In the URL field, paste the web address of your home – you can get this by clicking the Share button when viewing your home in Google Maps and copying the URL.
Click Save, and when you next enter the directions keyword, Google Maps will open with your home selected so you can quickly get the information you need.
15. Easily control the volume of your tabs
Chrome’s volume controls are disappointingly basic – it shows you which tabs are currently playing audio and lets you silence them by right-clicking and choosing ‘Mute tab’.
Thankfully, there’s now a much better option for web users who like to listen
as they browse in the form of a new extension called Volume Master.
This simple but useful tool lets you control the sound emanating from multiple open tabs via a single panel.
You can use the slider to boost the volume of the current tab by up to
600% or take it down to silence; and click the title of another tab to increase
or decrease its noise level instantly. It’s an effective way to deal with sudden loud adverts and videos that make you jump out of your skin.
16.Discover the technology behind any website
You don’t have to be a professional web designer to be interested in the type of software a developer has used to create a particular site, the service that hosts it and which advertising tools it uses to make money. Now you can discover all this information and more by installing a clever new Chrome extension called Whatruns .
This handy browser tool uses special algorithms to detect the technology behind any
the website you’re viewing.
Simply click its toolbar button to view a wealth of details about how the site was built,
including its content management system (CMS), programming language, frameworks, widgets, fonts, analytics tools, web servers and miscellaneous elements.
You can click the Know More button next to an entry to see other websites that use the same software, and ‘follow’ the current site to receive a notification when it starts using different technology.
It’s geeky but interesting stuff.
17. Turn offensive online comments into emoji
It’s a sad fact that many social-media sites serve as a magnet for idiotic and obnoxious
comments, which can spoil your enjoyment of otherwise interesting posts and videos.
Rather than avoiding comments sections altogether, why not turn those unpleasant
‘opinions’ into harmless emoji?
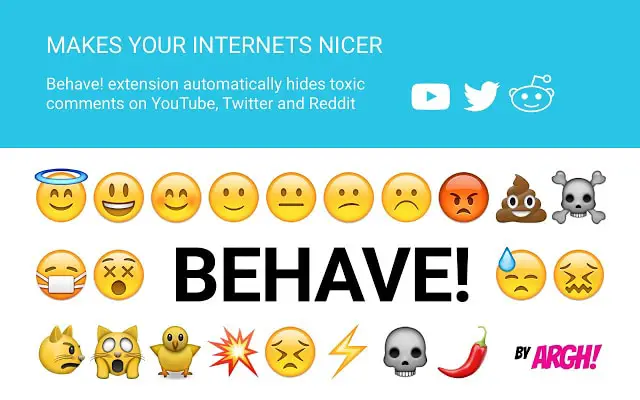
That’s the idea behind Behave , which automatically hides “toxic comments” on YouTube, Twitter and Reddit and replaces them with cute faces and objects, including the ever-popular ‘poop’.
The add-on lets you specify the toxicity level you’re willing to tolerate, from ‘I’m too
young to die’ to ‘Doomed’.
You can click comments to reveal them if you dare,
and help Behave choose the right emoji for any future comments it filters by clicking
‘Improve score’ and selecting an icon. It’s a fun way to make the web a nicer place.
18. Use DuckDuckGo ‘bangs’ in Google and Bing
Aside from keeping your searches private, one of DuckDuckGo’s best features is its support for ‘bangs’ – quick commands that let you search thousands of sites by typing, for
example, !w for Wikipedia, !twit for Twitter or !azuk for Amazon .co.uk, followed by a search term.
A new extension called !Bang Quick Search adds this functionality to Chrome so you can use bangs with Google and Bing, whichever is your default search
engine.
Type your bang into the address bar, followed by your search term (or the other way around), press Enter and you’ll be redirected to the relevant site to view matching
results.
Alternatively, type the bang to open the website’s homepage.
!Bang Quick Search works with all DuckDuckGo’s bangs – to see the full list, visit duckduckgo.com/bang.
19. Use Chrome for notes
If you want to copy content from one or more websites to use later, you don’t need to open another application such as Notepad or Word – you can just use Chrome.
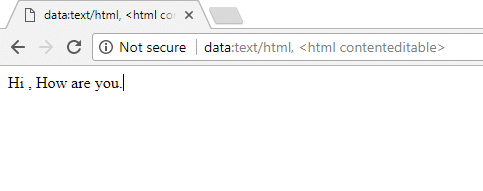
Type data:text/html, <html contenteditable> into the address bar and hit Enter. You can now type and paste whatever you like in that tab.
To save the contents, press Ctrl+S. In the Save dialogue box, replace the file’s ‘.html’ extension with ‘.txt’. This trick also works in Firefox.
20. Restart Chrome with a single click
When Chrome goes wrong, restarting it often fixes the problem, but there’s no easy way to do this other than closing the browser and reopening it.
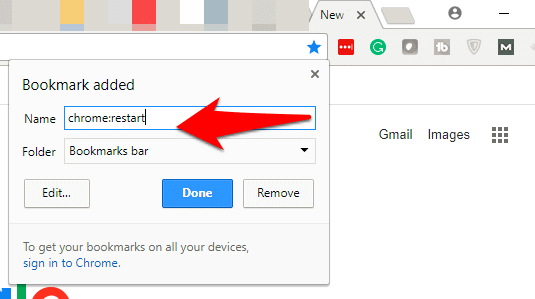
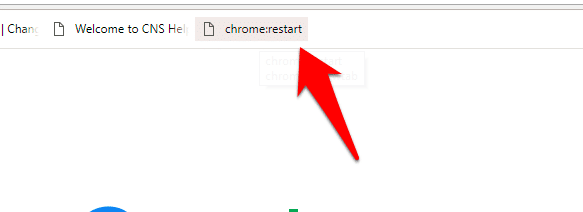
One way around this problem is to create a button that restarts Chrome instantly with one click. You can do this by making a bookmarklet for Chrome’s ‘chrome:restart’ page.
On any web page, click the bookmark (star) button in your address bar or click Ctrl+D
to add a bookmark, then click Edit. Change the name of the bookmark to Restart Chrome (or similar) and enter chrome:restart in the URL field.
Select the ‘Bookmarks bar’ in the list below, click Save and drag the new bookmark to your Bookmarks bar to create a bookmarklet.
You can now click this whenever you need to restart Chrome, with no messing around.
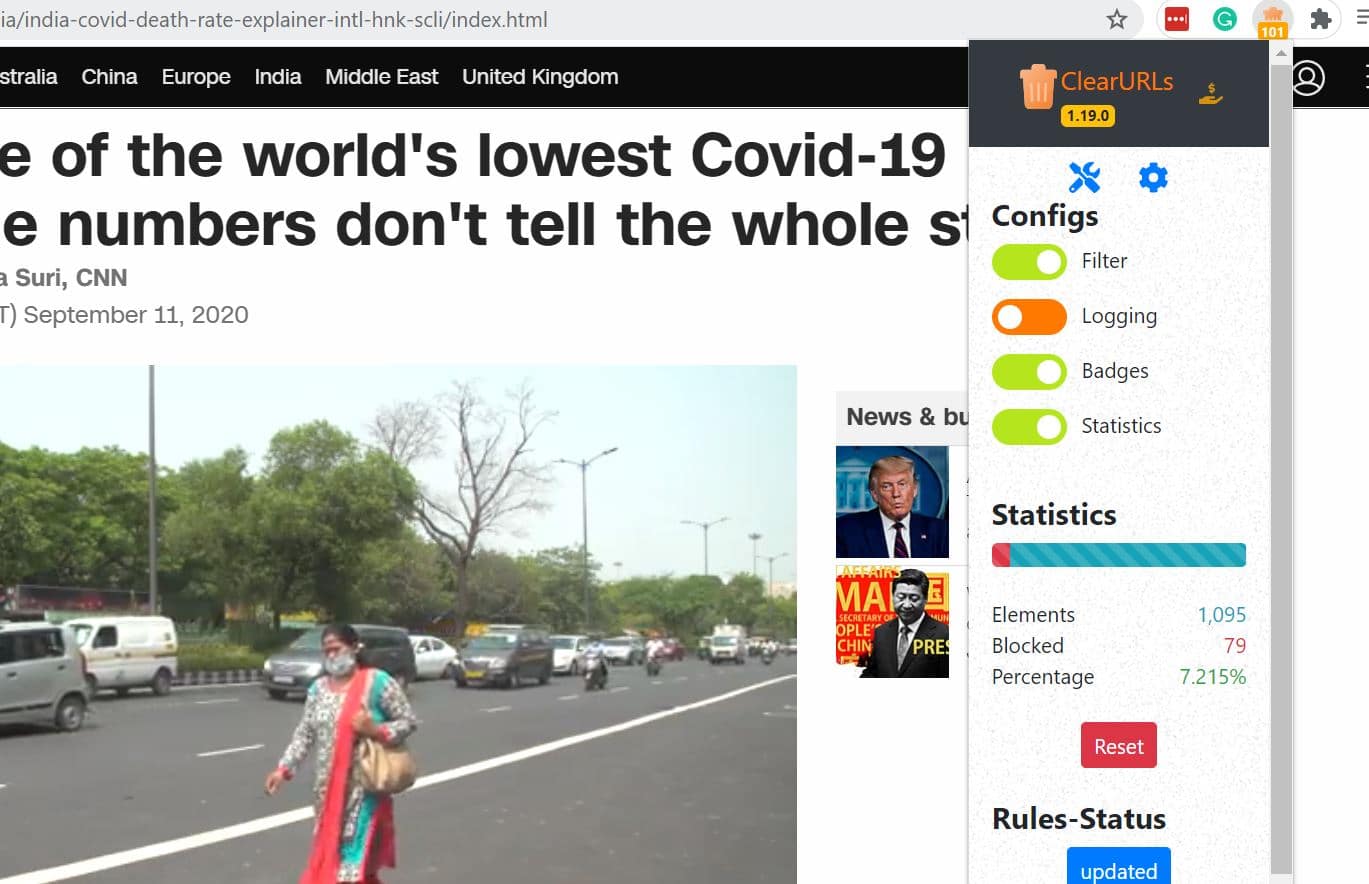
Have you ever come across a dirty URL? These are web addresses that contain data telling the site how you found its link. Companies use them all the time in online ads, emails, and sponsored posts to track your browsing activity and monitor the effectiveness of their campaigns.
CleanURL (Download Here) takes those filthy links and scrubs away the tracking code so companies can’t see if their sneaky advertising campaigns are working.
You can also scrub URLs manually by going into the Tools section – click the spanner icon – and pasting as many links as you want into the box.
CleanURL will spit them out the other side, clean as a whistle. The tool is still a work in progress and may not work on every link, but the developers behind the extension are beavering away to make it even better.
22. Highlight anything on the web
One of Microsoft Edge’s best features is the ability to ‘write’ on any web page using your mouse or device pen.
You can then share your brightly colored notes or save them for later, which is useful for students, professionals, or anyone who wants to highlight something of interest on a website.
Liner (Download Here) brings a similar feature to Chrome. Select some text using the left mouse button, and a highlighter pen icon appears beneath, along with a selection of colors.
https://youtu.be/TxbGA2AGaDg
Choose the color you want, then click the pen icon to highlight your text so it stands out on the web page or PDF document. Click the text again to change its colors, add a comment, or delete the highlighting.
If you want to save your highlights so they reappear when you next visit the site, you need to sign in at getliner.com/login.
23. Hide your browser with a mouse flick
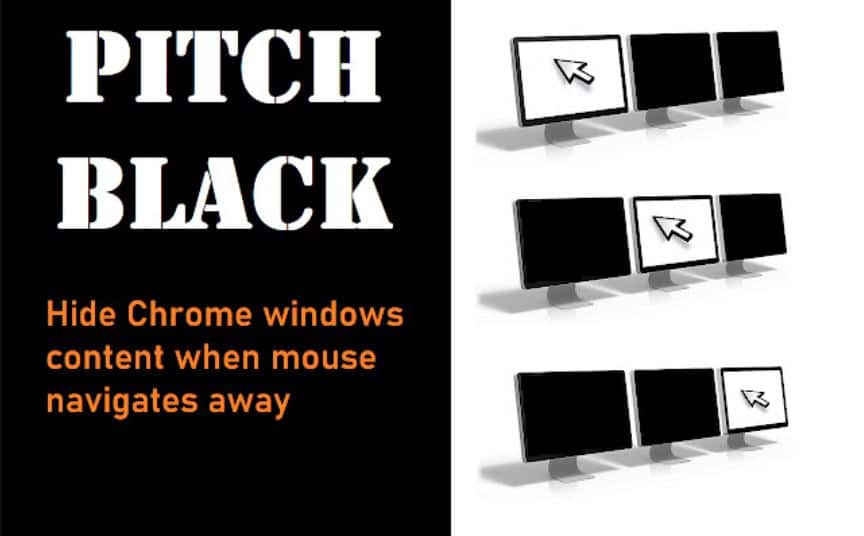
Pitch Black (Download Here) is the ideal browser tool if you’re worried that your privacy is being compromised by people sneaking a peek at your screen. Whether you’re shopping for a surprise gift or working on a top-secret project, Pitch Black lets you hide your screen’s display in a flash.
With your cursor positioned over the Chrome window, everything remains in view, but as soon as you move the mouse up to the tabs or hover over the address bar, the screen immediately turns black.
It stays this way, even if you navigate away from Chrome to a different program or across to a second monitor. Move your mouse back over the Chrome window and everything becomes visible again.
To activate the extension, switch on the option Hide Browser Content. You can adjust the brightness with the slider – if a completely black screen seems a little too ominous, fade the window to a subtler grey.
24. Copy content quickly from the web
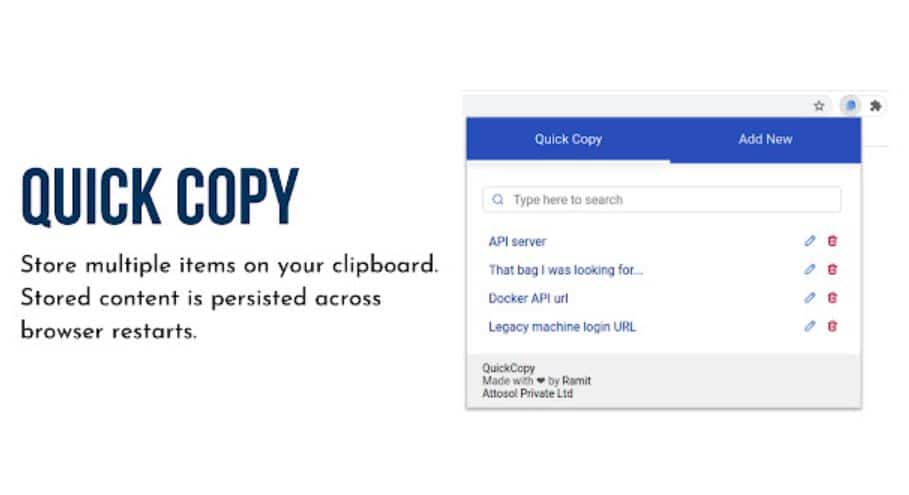
Quick Copy (Download Here) is a brilliantly simple searchable, browser-based clipboard. Copy what you need from the web, then click the extension’s toolbar button for two options: Add New and Quick Copy (this will be empty the first time you use the tool).
The content you add to your clipboard is displayed in the Description box, where you can add a description and click Save to add it to the Quick Copy tab.
Click the description to copy it or use the icons beside it to edit or delete it from your clipboard. Once you begin building your board, the tool adds a handy search bar to the top of the Quick Copy tab.
25. Conceal your precise location
If you want to view local content without letting a website know exactly where you are, you can disguise your current position using the brilliant free browser tool Location Guard (Download Here)
Available for Chrome and other Chromium browsers, such as Edge, Firefox and Opera, this extension works in the background, applying ‘noise’ to your location data to make detection less accurate.
There are three levels of noise, and you can switch between them on a site-by-site basis, depending on how hidden you want to be.
Unlike Tor Browser or a VPN, Location Guard won’t make you appear to be in another country – your spoofed location is up to 7,116m away (about 4.5 miles), so you’ll still receive relevant local information.
The add-on refreshes your fake position regularly unless you choose a fixed fake location – which, by default, is the tiny Manra Island in the Pacific Ocean.
Keyring (joinkeyring.com) is a new tool that lets you securely grant other people access to your online accounts without needing to hand over your password. Setup is very straightforward.
Sign in with your Google account – you’ll need to give the extension (encrypted, read-only) access to your contact list – then choose which services to share. These include Netflix, Spotify, Apple Music and Prime Video.
You can then invite friends and family to join your Keyring via email – they’ll also need to install the Keyring extension to access your services on their own computer.
It’s worth bearing in mind that most of these services have device limits, so not everyone will be able to use them at the same time.
The free version of Keyring lets you share six services with three people, which should be enough for most users. Unlimited monthly plans start at $5 (£4).
27. Discover what data you’re leaking online
The moment you open your browser, you’re leaking data, which means companies such as Google have access to all kinds of information including your location, the device you’re using and your IP address.
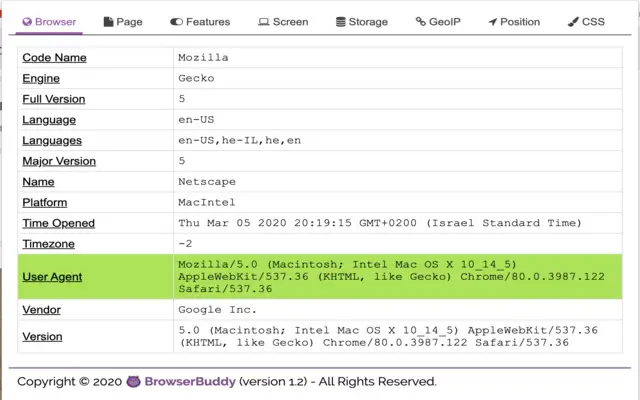
Naturally, there’s not much you can do about this without applying stringent security measures, but you can at least see exactly what information is being drip-fed through your browser by using Browser Buddy (Download Here).
This extension requires absolutely no setup and, with one click, you can instantly check “all the data available about you when you browse a page”.
Click Browser Buddy’s toolbar button to view the basic data, such as languages and times, then click each of the other seven tabs for details of other leaked information, including browser features, your device’s screen resolution and much more.
Some of the data leans more towards the technical, but Browser Buddy gives a clear overview of your information (and shows how plentiful data leakage is).
28. Check if articles were written by robots
We live in an age increasingly dominated by artificial intelligence. But while ‘deepfake’ videos and photoshopped images get a lot of attention in the media, the proliferation of Al-generated articles doesn’t.
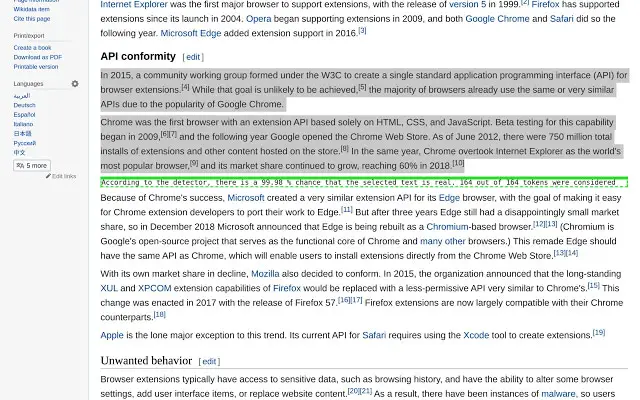
The new Chrome extension GPTrue or False (Download Here) helps you find out whether what you’re reading was created by a bot – or not.
If you’re suspicious or curious about whether a human wrote what you’re reading, highlight at least 50 words of the article, activate the extension and click Evaluate.
After a brief moment, results are displayed at the foot of your selected text detailing the percentage chance that the copy was created by a human or AI. You’ll also see how many factors (or ‘tokens’) were taken into consideration when assessing the article.
It’s a handy tool to have at a time when bot-farms are churning out fake news designed to confuse, confound and conspire.
29. Convert words in images to editable text
Copying text is usually a simple case of cutting and pasting, but what if the words you want are in an image, protected PDF or another type of file that you can’t normally copy from?
Copyfish is a Chrome add-on (Download Now ) that lets you grab text that normally can’t be selected from your browser and other software.
If the item containing the text you want to convert is already on the web, find it and open it. Or, if you’re converting a file from your hard drive, try opening it in Chrome.
You can drag and drop web-friendly images (JPG, GIF, PNG etc) and PDFs straight into a Chrome window.
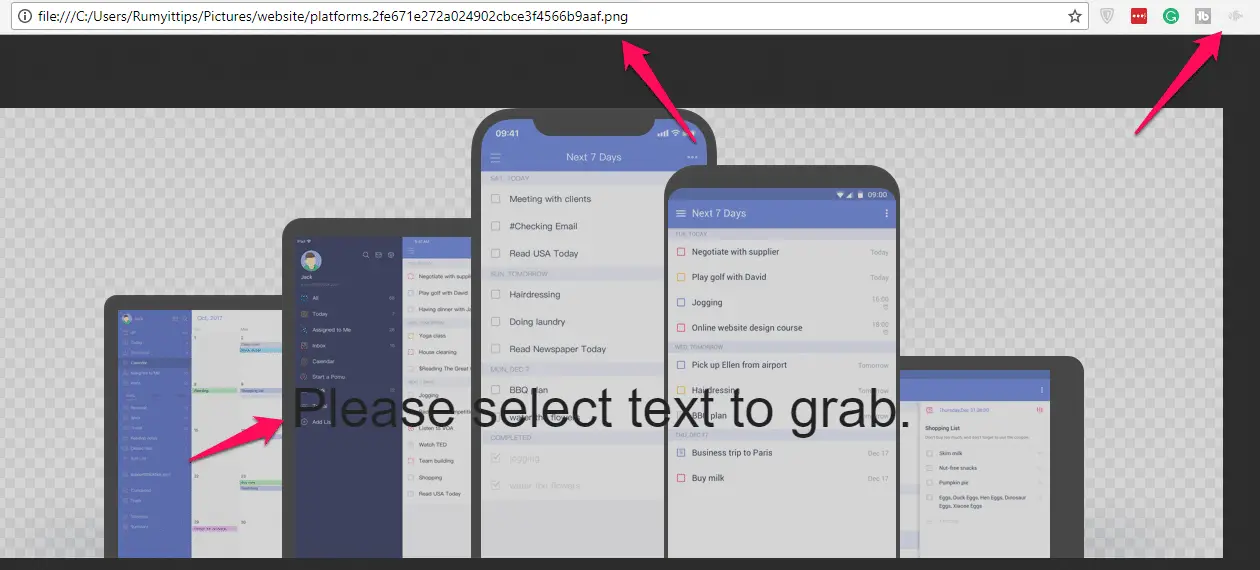
If you can, zoom in on the text you want to convert. If the text is unclear, try doing it in multiple parts so you can zoom in further. Click the Copyfish button.
The words “Please select the text to grab” appear. Click and drag the crosshair to draw a rectangle around the text.
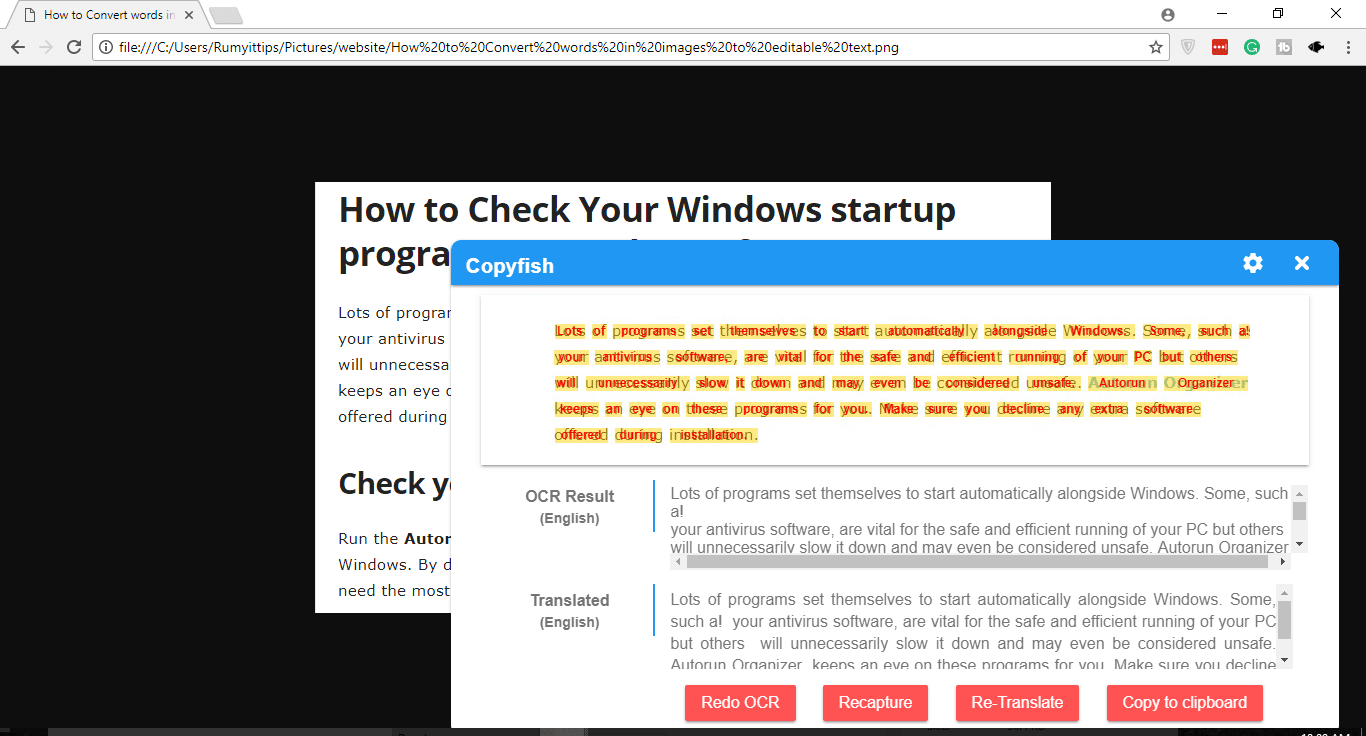
Copyfish looks for text in the image, highlights it and prints it below.
It can also translate the text if you’ve configured the settings. Recapture lets you draw around the text again, while ‘Copy to clipboard’ lets you paste the text elsewhere.
If you’re scanning a high-resolution image, try uploading it to a photo-sharing or storage service before scanning it.
Sites such as Google Photos provide better zoom controls than the standard image viewer in Chrome, which can help the software recognize words.
You can capture words from other Windows programs, though it’s a bit hit and miss. It works well with Explorer, though, which is useful for grabbing lists of files in a folder.
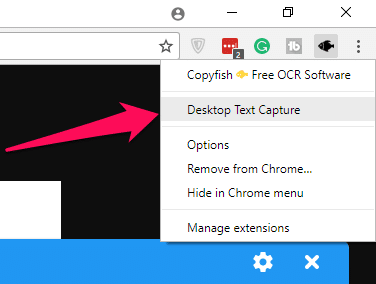
Right-click the icon, choose Desktop Text Capture, select the window you want,
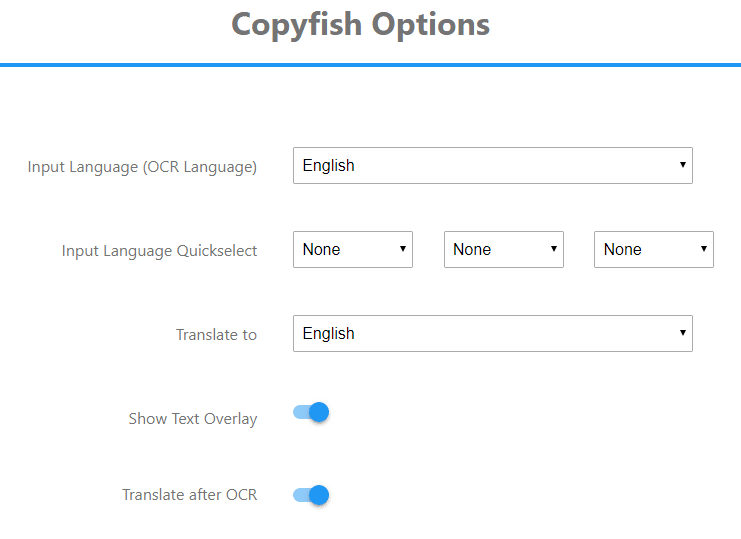
To change the settings, click the cog icon or select Options from the right-click menu. You can change the input or translation language, and use ‘quickselect’ settings to switch between several languages.
You can also choose whether to overlay text and what size it will be.
📗FAQ’s on Google Chrome Flags
Below are the couple of queries that everyone is expecting to answer and I did include the same for my readers.
How do I get Chrome flags?
In Your Google chrome Browser address bar, just enter the “chrome://flags” without quote and hit enter. That’s it. 😎
How do I open Chrome flags on my phone?
Open Google Chrome on your Android or Ios smartphone and enter “chrome://flags” without quotes in your address bar.
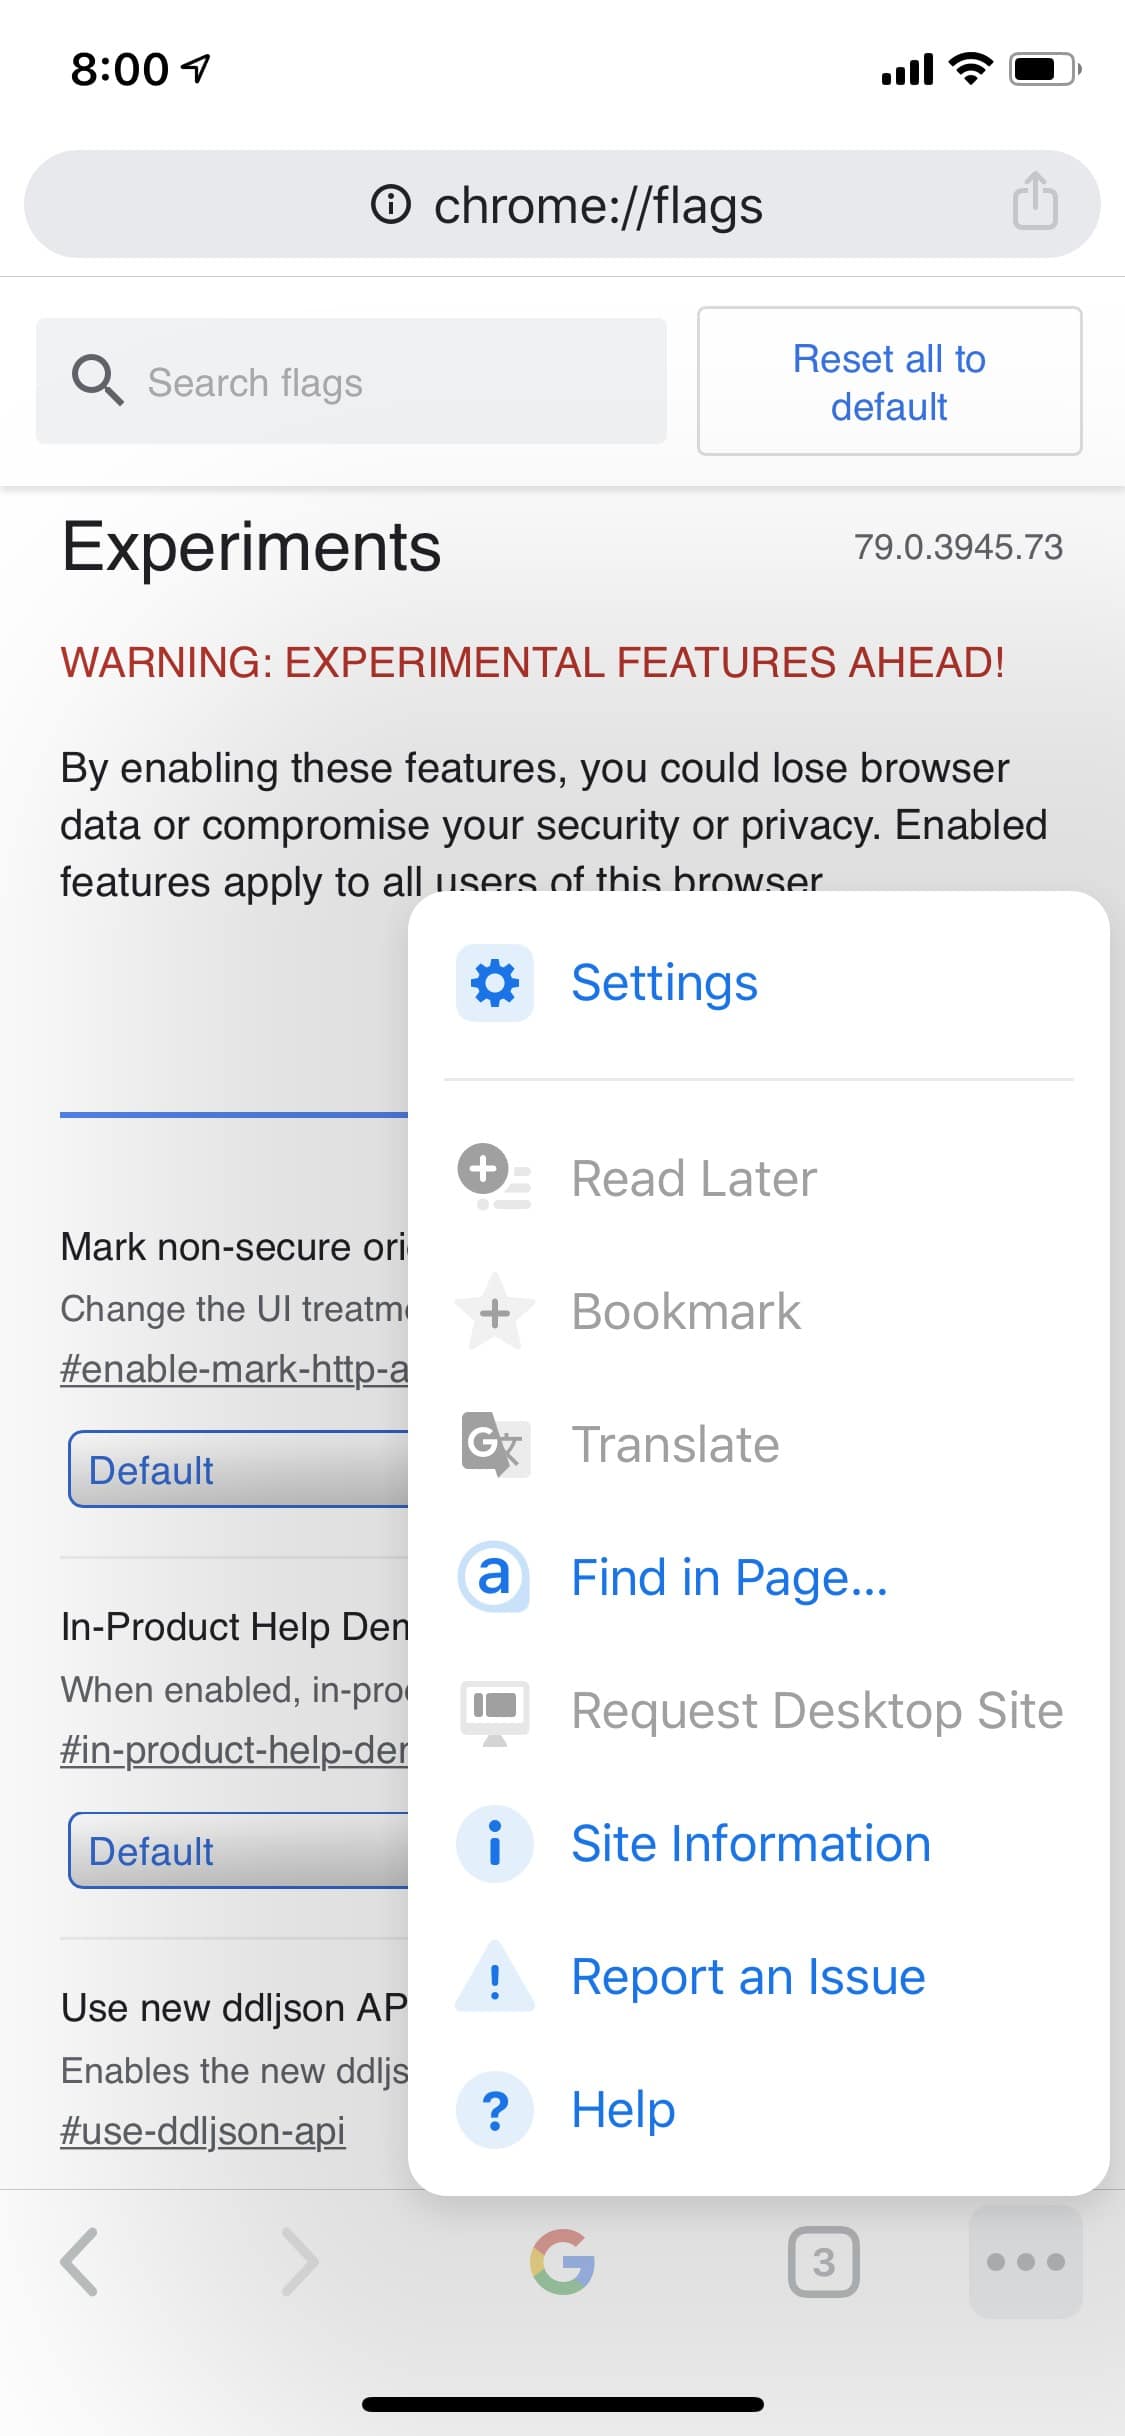
When the Flags page appears, tap on the Menu button and Tap Find in a Page option if you want to find out any above-mentioned flags. that’s it.
How do I get Chrome Beta?
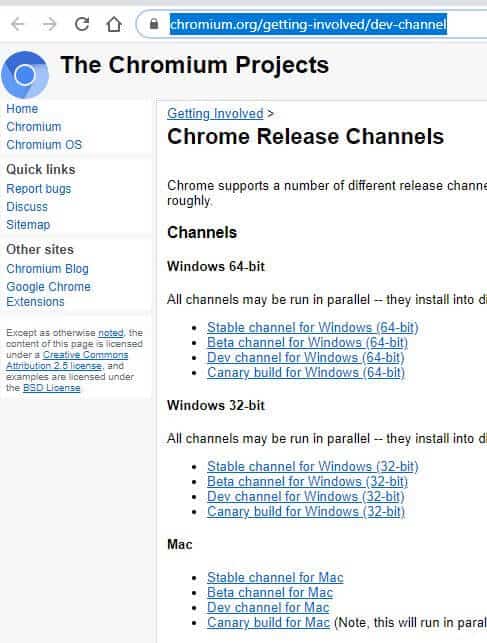
Navigate to https://www.chromium.org/getting-involved/dev-channel and download the Google Chrome beta version based on the Operating system that you are using.
How do I restart the Chrome browser?
The best way to restart the Google Chrome browser is to point the address bar to chrome://restart then press Enter.
How do you stop Google Chrome from spying on you?
Does Google spy on us?
Yes, Google is Spying on you to collect your data especially your browsing behavior for showing the advertisement which is google main core business.
What browser we are using to avoid google Spy? We are using the Brave browser ( Download Here) to avoid Google Tracking.
I will recommend you to read our Guide Brave Vs Chrome: An In-Depth Comparison Guide For You
Conclusion
Chrome flags are features still at the experimental stage. As such they are subject to change. Some of these flags will constantly improve until they are ready to be rolled out as default settings in the main browser, some of the flags will change in fundamental ways.
Some flags will be discarded because they do not work well for a large number of users. Therefore it is important to do some research before enabling a flag. We have discussed virtually everything you need to know about Chrome flags.
The flags discussed here, while not constituting an exhaustive list of flags has most of the flags you’ll need to boost the performance of your browser and have a more enjoyable experience on Chrome. Some of them will become part of Chrome by default, while some may disappear at any time.
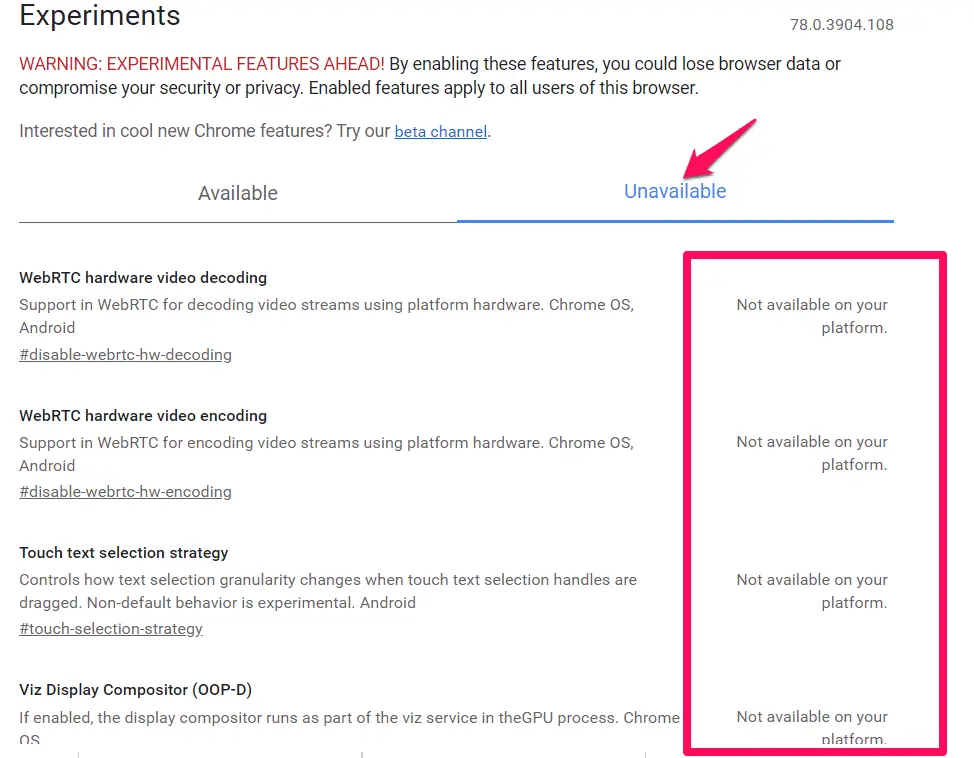
Please note that not all flags will always be available on your computer. When you visit the flags settings page – chrome://flags/ – Flags are divided into available and unavailable. All the unavailable flags do not have the option for enabling as shown in the image below.
On a final note, some of the flags discussed in this article may no more be available at the time you read. They may have been replaced or altogether removed.
One last point to note:- All the flags tested here where first use on a virtual machine. When you seek to try out flags, it is advised you do the same, because just as stated earlier, the effects may not always be pleasant and may they lead to malfunction of key computer processes.


