In this article, we will explain what WMI Provider Host (WMIPrvSE) means and what its function is in your system. We will also explain ways we can lower the WMI’s demands on your CPU and we will give our verdict on whether or not you should disable the WMIPrvSE.
What Is A WMI Provider Host And What Does It Do?
Let’s break down the acronym “WMI”. It stands for Windows Management Instrumentation. The WMI provider host is a much needed standard feature for Windows OS to function properly.

It runs in the background of your system allowing other applications on your system access to information about your system.
The WMIPrvSE Provides a standardized way for software and administrative scripts to ask for data on your Windows Operating system, the process usually does not use a lot of CPU resources but sometimes when there are errors with other system processes it can affect the WMIPrvSE process and cause it to draw a lot of CPU resources.
Processes That WMI Provider Host Carry Out
One prime example of what the WMI provider host process is in enterprises that centrally manage PCs. With the help of the WMIPrvSE, information can easily be requested through scripts and administrative PCs can access them easily.
The WMIPrvSE process isn’t dormant in home PCs. It still helps installed software gain access to much-needed operating system data.
Can The WMIPrvSE Be Disabled? 🤔
Yes, it can be but It is highly discouraging. Do not disable your WMIPrvSE because that will cause a lot of disruptions to many of the Windows-based software installed on your system.
The process is vital to your Windows Operating System working well and any tampering will disable your system.
When you notice that the WMIPrvSE process is using up a lot of your CPU’s resources, there are ways of stopping the process that’s making the WMI provider host eat up a lot of resources.
These processes can be easily stopped and they won’t mess up the integrity of your system as opposed to what disabling the WMIPrvSE process will do to it.
What To Do When Your WMIPrvSE Process Is Using Up A Lot Of CPU Resources
The WMIPrvSE is a background app so it usually just runs its processes with minimal CPU resources usage.
You may experience a temporary spike in CPU resources usage if the software is requesting data on the operating system through the WMIPrvSE but it should only be temporary.
If the process continues to demand high CPU resources, then the process disturbing the WMIPrvSE and making it use up your CPU resources must be stopped.
Here are some ways to find these processes and stop them.
1. Restart The WMI Service
Press and hold the Windows key and then click on the R key. A run dialog will appear.
In the run dialog, type services.msc This will open the services console. Navigate to WMI in the services console.
A shortcut option to finding the WMI service is to click on any of the services and press the W button. This will immediately take you to services starting from W, which will make navigating to WMI much easier.
Right-click when you’ve found the WMI service and choose Restart or Start from the popup menu that appears.
Tip – Here’s where you can also stop the process even though we discouraged that before.
2. Restart Other Associated Services
This is a continuation of the first step after you’ve restarted the WMI service.
Navigate below to the left corner of your screen and locate the Start button. Right-click on it and a pop-up menu will appear.
Scroll down and click on Command Prompt (Admin). Make sure it is the (Admin) version you click on.
A command prompt window should open.
Enter the following commands and make sure you press the Enter key after every single command typed.
net stop iphlpsvc
net stop wscsvc
net stop Winmgmt
net stop Winmgmt
net stop wscsvc
net stop iphlpsvc
Reboot your system once you’re done with entering the commands.
Check if the WMIPrvSE process is still using a lot of your CPU. The process should have made the WMIPrvSE process’s CPU usage drop to minimal but if it does not, there are still quite a few ways we can try.
3. Identify Faulty Applications Using A Clean Boot
The likely option is that a faulty application is at the root of WMIPrvSE using a lot of CPU. One of the best ways to tackle this problem is to perform a clean boot.
This is a very thorough process so it should weed out the faulty process if done properly.
Clean boots require that all non-essential services stop running and only vital services remain This helps in determining which app is faulty.
Here’s how to do a Clean Boot: –
- We’re assuming that you’re already logged into your system as an Administrator.
- Press these buttons at the same time (Windows + R). This will open the RUN prompt.
- When the RUN prompt window appears, input this text msconfig and follow the process.
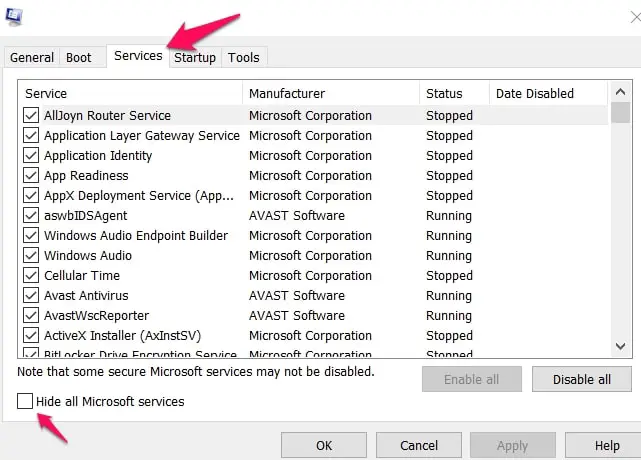
In the System Configuration menu that shows, click on Services. There will be a Hide All Microsoft Services checkbox just at the bottom left-hand side of the menu.
Uncheck this box to reveal all the Microsoft services.
On the bottom right-hand side of the screen, navigate to Disable All and click on it.
Follow that action by clicking on OK to confirm it.
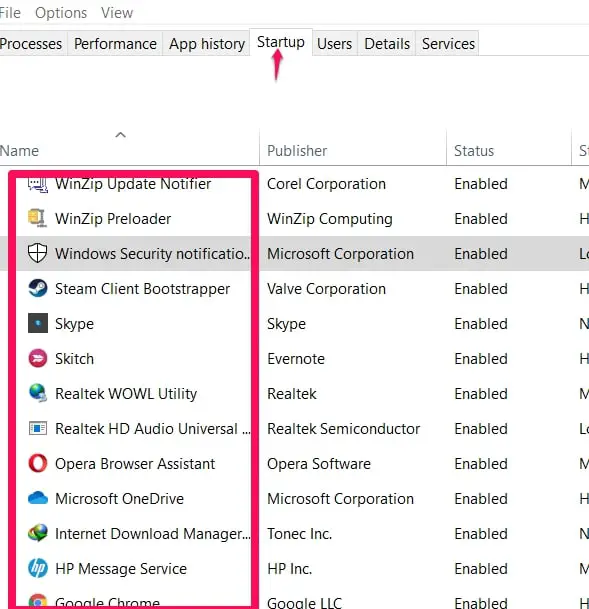
At the top of your screen, there should be some tabs. Click on Startup and then click on Open Task Manager in the menu that follows.
In the task manager menu, navigate to the Startup menu which is also found at a similar spot to the previous one. It is found in a row of menus at the top center part of your screen.
Click on Startup. A list of applications will appear. The idea is to disable all of these applications by selecting them one by one and clicking on the Disable option.
This is a process that might take a bit of time but it usually works. Once you’re done with disabling all of the applications, restart your system.
4. Enable Apps One By One
The issue about the WMIPrvSE process using a lot of CPU resources should be eradicated by disabling all the applications if indeed it is a faulty application that’s causing the problem.
This is essentially what it means to carry out a clean boot. We are not done yet though because we cannot just disable all of the apps.
To find the exact faulty application, enable the services one at a time.
Check CPU usage as you enable the services. Immediately you discover a spike, chances are you’ve discovered the faulty application.
You could reinstall the application and see if it still spikes your CPU usage. If it still does, it will be better to leave it uninstalled until you can find a fault-free version of the application.
5. Using Event Viewer To Find The Process
What this method will help you figure out is the process that is causing high CPU usage. All you have to do to stop the spike in CPU usage is to uninstall the application that corresponds with the process.
There are two ways to access the Event Viewer.
- Windows 7 and below, just search for it in the Start Menu.
- For Windows 8 and above users, this shortcut combination (Windows + X) will open up a list of options, search for and click on Event Viewer.
At the top of the Event Planner window, search for View in the toolbar and click on it. Enable this option Show Analytic And Debugs Option.
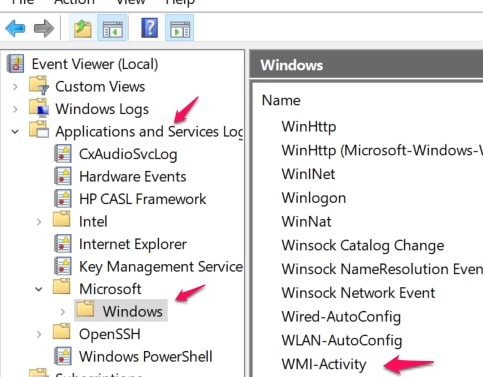
After you’re done, look downward left and locate and open Applications And Services Logs. Search for and click on Microsoft and follow up on this process by searching for Windows in the next menu that appears.
Open the Windows menu, search for, and double click on WMI-Activity. This will open up the contents of the file.
Find and click on Operational. This is where you’ll have access to the WMI provider host operational logs.
Search for errors. If there are none, this is likely not the solution to your problem.
However, if you do find an error, get more details about it by clicking on it. The details will appear at the bottom of the window.
In the details shown, find the General tab and locate a specific text
“ClientProcessld”
Write down the number that immediately follows this specific text.
Close the Event Viewer and start up the task manager.
You can open a RUN dialog using the shortcut explained earlier and input task mgr to access it quicker.
In the task manager, select Services and search through the services shown looking for which one of the numbers matches the set you wrote down. The numbers will be under the PID column.
Once you find a match, disable that process and then uninstall the application that the process is for. This should return your WMIPrvSE process to minimize CPU usage.
6. Use the Windows Repair Tool to Repair WMI Provider Host
Windows repair tool (Download Here) is a third party from tweaking.com that comes in both free and paid versions. The free version comes with a feature of repair Repair WMI Provider Host.
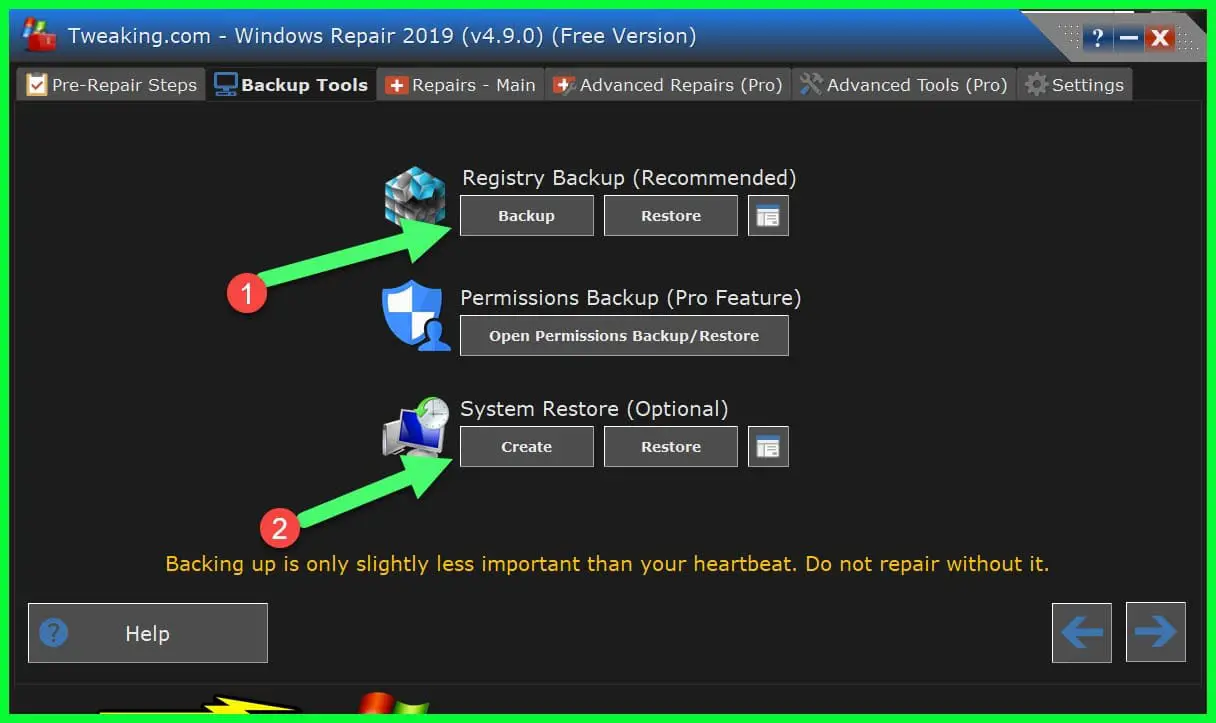
After downloading the tool, install it and open it with a tool with run as administrator. navigate to the Backup Tool tab and click on the registry backup to take the backup of the windows registry and also click on the System restore option to create a system restore.
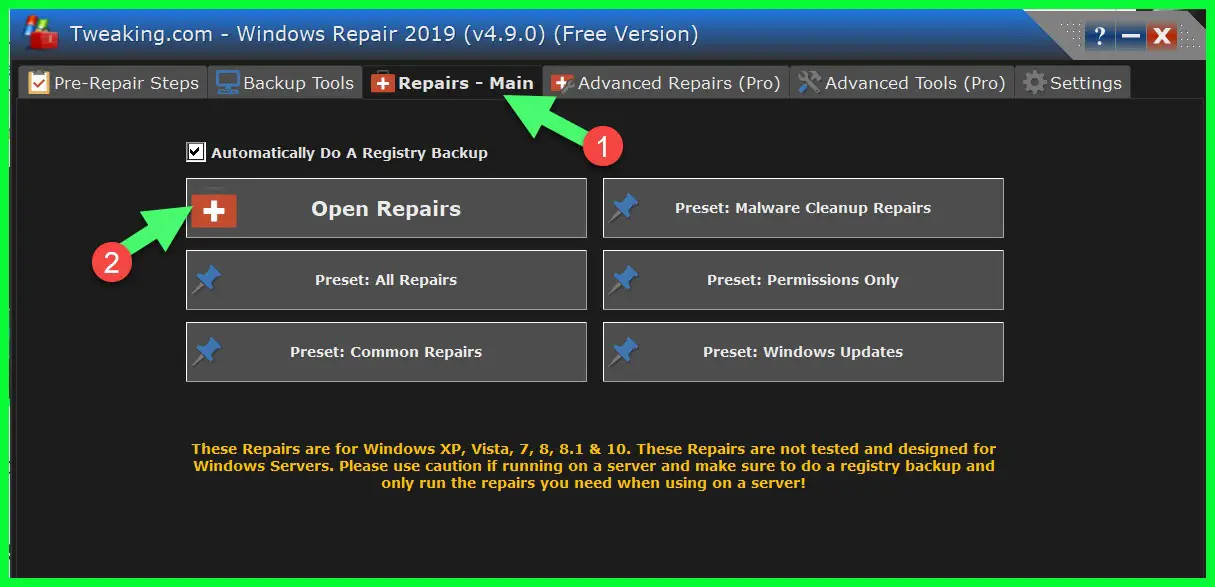
Now click on the Repairs tab, here you have 6 options to repair like malware cleanup repairs, permission repairs, Windows update repairs.
But in our case, we will click on the “Open Repairs” option.
It will give you warning to run this application to run in safe mode for more effective result and it’s also recommended to run this application in the safe mode.
if you don’t want to run in the safe mode, just click on the “I understand the risk and close the warning” tab.
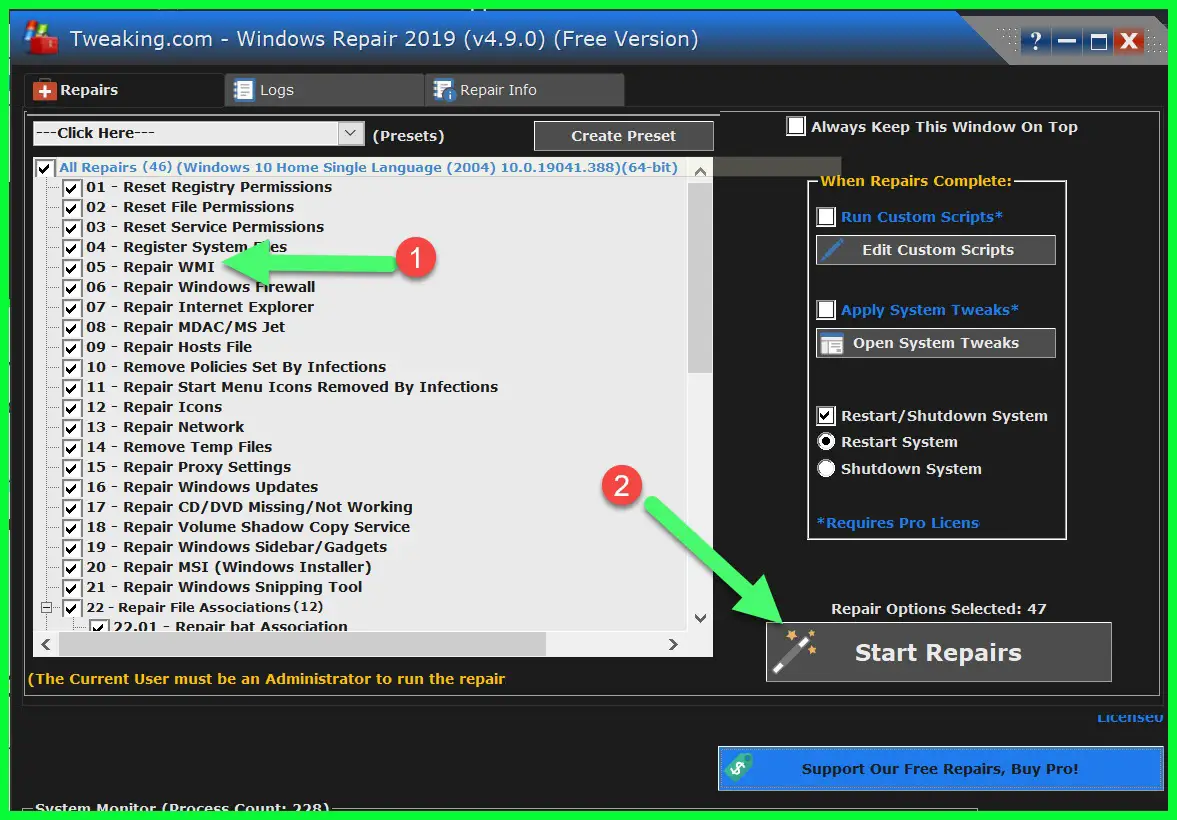
Under All Repairs, you will find “Repair WMI (WMI Provider Host) which is select by default.
I would recommend running the full repair but if you only want to repair WMI provider host then uncheck other options and click on the “Start Repairs” option to start the repair.
it will take around 5 to 10 minutes times to repair the file and permissions, depend upon your PC configuration.
Most of the time this tool is able to fix all the issues related to wmi provider host high memory usage.
7. Use 3rd Party App To Repair Corrupt Files
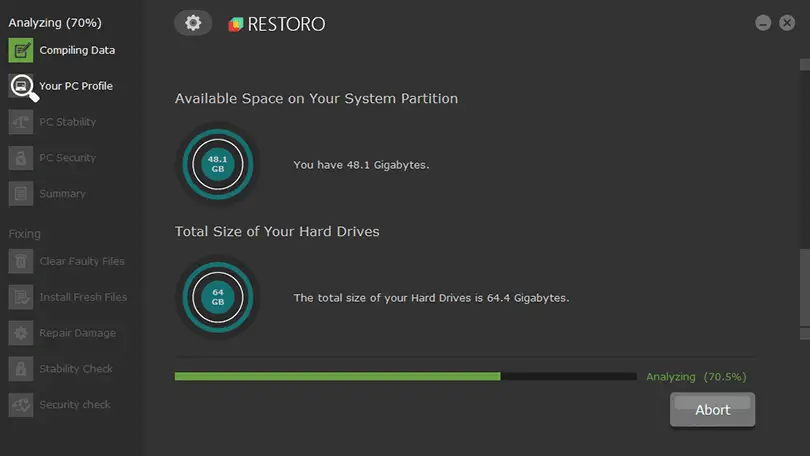
This method works by users downloading an app that scans, restores, and repairs files. Use apps like Restoro. Download the app and run it. Use it to fix any damaged or corrupt files.
Check to see if the WMIPrvSE process is still using up a lot of CPU resources.
Conclusion
WMI provider host is a quite important feature of the Windows OS. It usually does not use high CPU resources but some faulty apps may cause it to do so.
Use the methods above to figure out the faulty apps and disable them so that the WMI provider host process does not slow down your system.
Have you ever had this issue? How did you solve it? We would really like to know. Share your experiences in the comment box.


