


Are you ready to embark on an exciting Minecraft multiplayer adventure with your friends?💁 Look no further!
In this comprehensive guide, we’ll walk you through the step-by-step process of setting up your Minecraft server using Hamachi.
Whether you’re a seasoned player or a curious beginner, this article will provide all the information you need to create a seamless gaming experience for you and your fellow Minecraft enthusiasts.
Picture this: a world where you and your friends can collaborate, compete, and explore in Minecraft’s vast and immersive realm.
With a dedicated server, you can transform your gaming sessions into epic adventures, customizing every aspect of your gameplay and inviting others to join your virtual community.
And with Hamachi, a powerful virtual private network (VPN) tool, you can effortlessly connect with your friends, no matter where they are, to create a secure and private gaming environment.
In the following sections, we’ll dive into setting up a Minecraft server with Hamachi, covering everything from downloading and installing the necessary software to configuring your server settings.
You’ll also discover valuable tips and tricks to optimize your server’s performance and ensure a lag-free experience for all players.
So, let’s get started and unleash the full potential of Minecraft multiplayer gaming with the help of Hamachi!
How To Prepare to Create the Server
First, you should note that creating servers on Minecraft only works for the Java version of the game on the desktop. The preparation stage consists of downloading and installing hamachi and the Minecraft server file.
Here are the steps to follow:
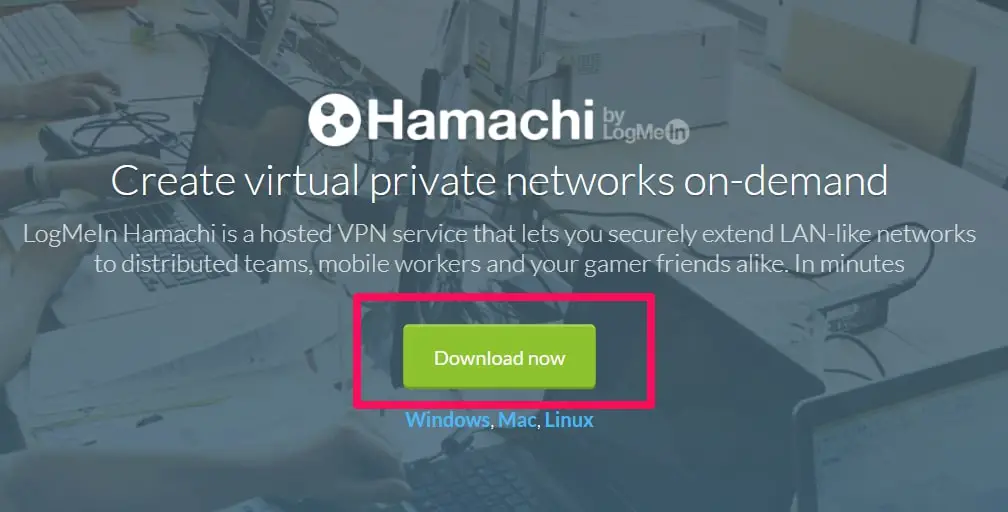
Download hamachi. On your web browser load the page https://www.VPN.net/ and click the green Download button at the center of the page. Doing this downloads the hamachi setup file to your computer.
Install Hamachi. On Windows, double click the setup file, select language, click Next, check the “I have read” box, then click Next and then Install. When prompted click Yes and then Finish.
For Mac users, open the zip folder, double click the hamachi setup file, click Open, then check the “I have read” box. Next click install and enter your password if prompted and finally click Finish when prompted.
Next, download the Minecraft server file by opening https://minecraft.net/en-us/download/server/ in your browser. Then click the Minecraft_server.1.16.3.jar link to download the Minecraft java edition.
Create a new folder on your computer desktop. You can name the folder “Minecraft server”.
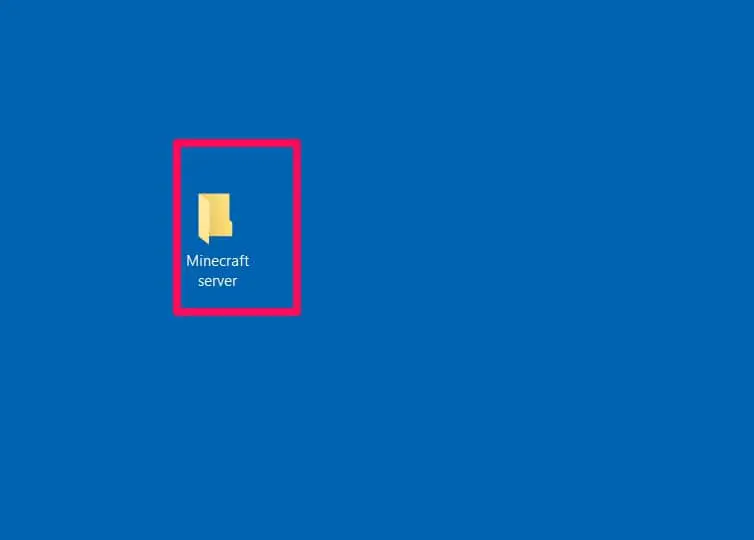
Place the downloaded Minecraft server file in the folder. You can either click and drag the Minecraft server to the folder or copy and paste it into the folder.
After these preparation steps, you can proceed to create the server on your Windows or Mac computer.
Creating Server On Windows
These are the steps to create the hamachi server on Windows:
Download the latest versions of Minecraft and Java. Double click the Minecraft launched and wait for it to update itself if it needs updating. To update java visit https://java.com/en/download/installed.jsp and check the Agree box and continue.
It is suggested that you use internet explorer because many browsers don’t support java.
Open the Minecraft server folder and double click the server file. This will make the server file begin unpacking in the folder.

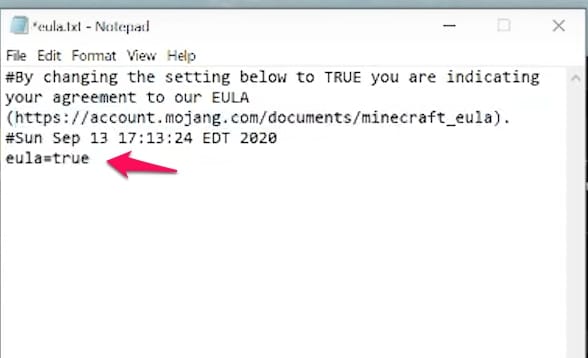
Agree to the Minecraft server terms of use. Once the “eula” file appears, open it on notepad and change the false in the “eula=false” line to true. Save your changes using Ctrl+S, then exit the notepad.
Double click the server file to allow the server files to continue unpacking.
When you see “Done” in the text at the bottom of the window, you can close the window.
You may like to read our guide on 17 Of The Best Minecraft Servers To Join in.
Creating Server On Mac
The steps for creating a server on Mac are almost identical to those involved for Windows.
Ensure you have the latest version of Minecraft and Windows. Minecraft updates itself when you double click the Minecraft launcher. To download java go to https://java.com/en/download and click the free Java download button.
Double click the Minecraft server file to make it begin unpacking in the folder.
Agree to the Minecraft server terms of service. To do this, wait till the “eula” file appears, open it in TextEdit, and change the false in the “eula=false” line to true. Save the changes using ⌘command+S. Finally, exit text edit.
Continue unpacking the Minecraft server file. Do this by double-clicking the Minecraft server file.
Close the window when the entire procedure is done.
How To Configure Hamachi
Another important step in learning how to setup a Minecraft server with hamachi is to know how to configure hamachi. The steps given below show you how.
Open hamachi. You can use the search feature to search for hamachi or LogMeIn Hamachi, then double click to open.
Turn on hamachi by clicking the power icon at the top of the hamachi window. This will prompt a login window to appear.
Sign up for hamachi. Enter your email, a password, and reenter the password in the spaces provided.
Click the Network tab at the top for the hamachi window. This will prompt a drop-down menu to appear.
Click “create a new network” and in the pop-up window type the name you want to give the server in the “Network ID” text box.
Enter a password for your server and click create.
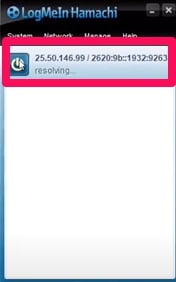
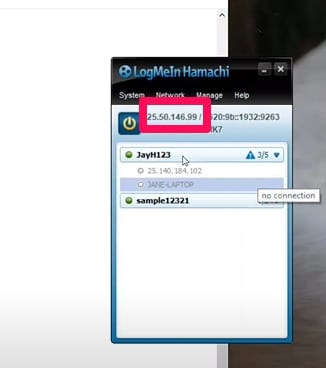
Copy IP address. Right-click the IP address at the top of the Hamachi window and copy the ipv4 address.
Paste the IP address into the server folder. First, rename “server.properties” text file in the Minecraft server to “serveproperties” file, then open the text edit app and paste the copied IP address at the right side of the “server-ip=” line.
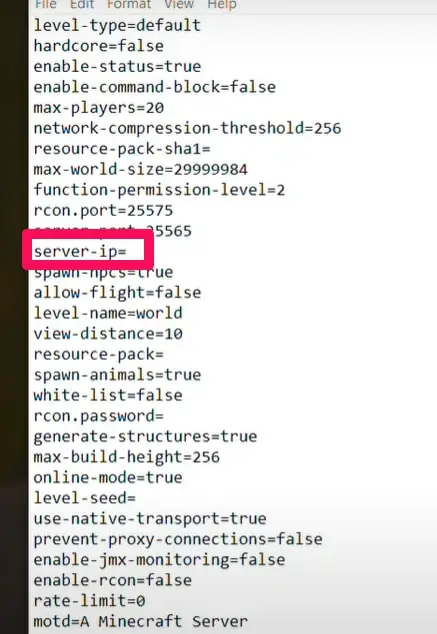
Save the file and exit the text editor.
Right-click server name, then click “go online” from the menu. If you see “go offline”, it means you are already online.
Connect To Your Server
These are the steps to connect to your server. Ensure the hamachi server is already running before you connect.
Run the server file. Double click the java server file in the Minecraft server file to open the file’s command window.
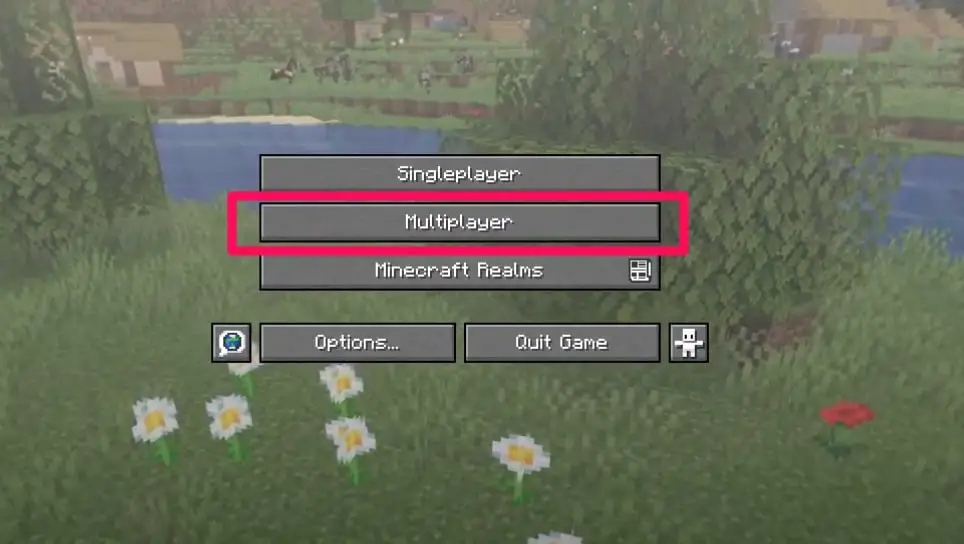
Open Minecraft, then click play, then click multiplayer.
Click “add server”.

Enter the server name in the text box provided, then enter the server IP address in the space provided and click “Done”.
Once the server appears in the search result, select server, and click ” join server”. Wait for the server to load, and when prompted enter the password.
Once all these steps are completed, you can enjoy playing Minecraft as a multiplayer game. Don’t forget to invite your friends so they can play too.
📗FAQ
Can Hamachi be used for Minecraft server?
Yes, Hamachi can be used for hosting a Minecraft server. It is a popular choice for players who want to create a private server that only their friends can access.
Hamachi is a virtual private network (VPN) service that allows you to connect to other devices over the internet. Using Hamachi, you can create a secure network between yourself and your friends and play Minecraft together.
What is Hamachi for Minecraft?
Hamachi is a VPN service that allows you to create a virtual private network between multiple devices. It is often used for hosting Minecraft servers, allowing players to connect over the internet as if they were on the same local network.
Hamachi creates a secure connection between devices, meaning players can connect without worrying about security risks or other issues.
Is Hamachi no longer free?
Hamachi still offers a free version of its software, but it is limited to a maximum of five connected devices.
You must purchase a paid subscription if you need to connect more devices. The paid version of Hamachi also offers additional features, such as better network performance and the ability to create larger networks.
Why can’t I play Minecraft on Hamachi?
There could be several reasons you cannot play Minecraft on Hamachi. Some possible issues include incorrect network settings, problems with your firewall or antivirus software, or issues with your internet connection.
If you are having trouble connecting to a Hamachi server, you may need to troubleshoot your network settings or consult other players who have successfully used Hamachi for Minecraft.
What IP address do I need for Hamachi?
When using Hamachi for Minecraft, you must use the IP address assigned to your Hamachi network adapter. This address will typically start with “5.” or “25.” and can be found in the Hamachi interface under the “Network” tab.
You must also provide this IP address to any other players who want to connect to your Minecraft server.
How to create MC server with Hamachi?
To create a Minecraft server with Hamachi, you must download and install the Hamachi software on your computer.
Next, you must create a new Hamachi network and share the network ID and password with your friends. Once everyone is connected to the network, you can start the Minecraft server and provide your friends with the Hamachi IP address so they can join your game.
What is the risk of using Hamachi?
Using Hamachi for Minecraft can be safe if you take appropriate security precautions. However, there is always some risk involved when using any networking software.
Some potential risks of using Hamachi include security vulnerabilities, privacy concerns, and performance issues. Using a strong password and only sharing your Hamachi network ID and password with trusted friends is important.
Is Hamachi just a VPN?
Yes, Hamachi is a virtual private network (VPN) service that allows you to create a secure connection between multiple devices over the internet. It can be used for various purposes, including hosting Minecraft servers, remote desktop access, and file sharing.
Can I trust Hamachi?
Hamachi is generally considered a trustworthy service, as a reputable company develops it and has been around for many years.
However, as with any software, there is always some risk involved in using Hamachi. It is important to take appropriate security precautions, such as using strong passwords and limiting access to your network.
Is Hamachi Wild caught?
Hamachi is a type of fish commonly found in the Pacific Ocean, particularly off the coast of Japan. It is often served in sushi restaurants and is considered a popular seafood dish.
However, it is important to note that Hamachi, the VPN service, is completely unrelated to the fish of the same name.
Is anything better than Hamachi?
Other VPN services hosting Minecraft servers, such as ZeroTier and LogMeIn Hamachi, can be used. Each service has strengths and weaknesses, so it is important to research and choose the one that best meets your needs.
Why do people use Hamachi?
People use Hamachi for Minecraft because it allows them to create a private server that only their friends can access.
It is a secure way to play Minecraft together, even if the players are in different parts of the world. Hamachi is also easy to set up and use, making it a popular choice for gamers.
How do I host a Minecraft server with Hamachi for free?
To host a Minecraft server with Hamachi for free, you must download and install the Hamachi software on your computer.
Next, you must create a new Hamachi network and share the network ID and password with your friends. Once everyone is connected to the network, you can start the Minecraft server and provide your friends with the Hamachi IP address so they can join your game.
Why can’t my friend join my Minecraft world with Hamachi?
There could be several reasons why your friend cannot join your Minecraft world with Hamachi. Some possible issues include incorrect network settings, problems with firewalls or antivirus software, or issues with the Minecraft server itself.
If you are having trouble connecting, you may need to troubleshoot your network settings or consult with other players who have successfully used Hamachi for Minecraft.
How do I host a Minecraft server without Hamachi?
To host a Minecraft server without Hamachi, you can use a dedicated server hosting service or set up your server on a separate computer.
Dedicated hosting services can be expensive but offer better performance and reliability than a home-based server. Setting up your server can be more affordable, but it requires more technical knowledge and may not be as reliable.
Does Hamachi use real IP?
Hamachi uses a virtual IP address assigned to your Hamachi network adapter. This IP address allows your computer to communicate with other devices on the Hamachi network, even if they are located in different parts of the world.
However, Hamachi does not use your real IP address, which helps to protect your privacy and security.
Does Hamachi mask your IP?
Hamachi does not mask your IP address but creates a secure connection between your computer and other devices on the Hamachi network.
This helps to protect your privacy and security, as it prevents unauthorized access to your computer or network.
Can people see my IP in Hamachi?
No, people cannot see your IP address when you use Hamachi. Hamachi creates a secure connection between your computer and other devices on the Hamachi network, meaning your real IP address is hidden.
How do I join MC through LAN?
To join Minecraft through LAN, you must ensure you are on the same local network as the person hosting the game.
Next, you must launch Minecraft and select the “Multiplayer” option. From there, you should see the LAN game on the list of available servers. Simply select the game and click “Join Server” to connect.
How do you join a LAN world in Minecraft?
To join a LAN world in Minecraft, you must ensure you are on the same local network as the person hosting the game. Next, you must launch Minecraft and select the “Multiplayer” option. From there, you should see the LAN game on the list of available servers.
Simply select the game and click “Join Server” to connect. If the game does not appear on the list, you may need to troubleshoot your network settings or consult with the person hosting the game.
Does my friend need Hamachi to join my server?
Yes, your friend will need to download and install Hamachi to join your Minecraft server. Hamachi creates a virtual private network (VPN) that allows your friend to connect to your computer as if they were on the same local network.
Without Hamachi, your friend cannot connect to your Minecraft server.
Did Hamachi get hacked?
There have been no reports of Hamachi being hacked or compromised. However, as with any software, there is always some risk involved in using Hamachi.
It is important to take appropriate security precautions, such as using strong passwords and limiting access to your network.
Does Hamachi need the firewall off?
No, Hamachi does not need your firewall to be turned off to function. However, you may need to adjust your firewall settings to allow Hamachi traffic to pass through. Consult your firewall documentation for instructions on how to do this.
How do Hamachi servers work?
Hamachi servers work by creating a virtual private network (VPN) between multiple devices. Once the network is set up, users can connect as if they were on the same local network.
This allows for secure communication and data transfer between devices, even if they are located in different parts of the world.
How much does Hamachi server cost?
The cost of Hamachi depends on the number of connected devices and the length of the subscription period. Hamachi offers a free version of its software that allows for up to five connected devices. Paid subscriptions start at $29 per year for up to 32 connected devices.
What is Hamachi virus?
There is no such thing as a “Hamachi virus.” Hamachi is a legitimate software program developed by LogMeIn, a reputable company.
However, as with any software, there is always some risk involved in using Hamachi. It is important to download Hamachi from a trusted source and to take appropriate security precautions.
What happens if I delete Hamachi?
If you delete Hamachi from your computer, the program and all associated files will be removed. This means you will no longer be able to use Hamachi to create virtual private networks or connect to other devices over the internet.
Does hamachi have parasites?
No, Hamachi does not have parasites. Hamachi is a virtual private network (VPN) service that allows you to create secure connections between multiple devices over the internet. It is not a living organism and cannot have parasites.
Why has Hamachi service stopped?
If the Hamachi service has stopped working, there could be several reasons. Some possible causes include problems with your internet connection, issues with the Hamachi software, or network configuration problems.
If you are having trouble with the Hamachi service, you may need to troubleshoot your network settings or consult with other users who have experienced similar issues.
Is Hamachi Legal in Germany?
Yes, Hamachi is legal in Germany. No laws or regulations prohibit the use of VPN services like Hamachi in Germany. However, as with any software, it is important to use Hamachi responsibly and to respect the privacy and security of others.
How to play Minecraft with friends without paying for a server?
To play Minecraft with friends without paying for a server, you can use Hamachi or a similar VPN service to create a private network between devices.
Once the network is set up, you can start a Minecraft server on one of the devices and provide your friends with the network ID and password so they can join the game.
Another option is to use Minecraft Realms, a subscription-based service that allows you to create private Minecraft servers that invited players can access.
Can you host a Minecraft server 24 7 free?
It is possible to host a Minecraft server 24/7 for free, but it requires a lot of technical knowledge and a dedicated computer that can run 24/7 without interruption.
You must also configure your network settings to allow incoming traffic to your server. A more practical option for most users is a dedicated server hosting service, which offers reliable uptime and better performance.
What is the best free server platform for Minecraft?
There are several free server platforms for Minecraft, including Spigot, Bukkit, and Vanilla. Each platform has its features and strengths, so it is important to research and choose the one that best meets your needs.
How do I join someone’s network on Hamachi?
To join someone’s network on Hamachi, you must know the network ID and password. Once you have this information, you can launch the Hamachi software and select “Join an existing network.” You will be prompted to enter the network ID and password from there.
Why can’t people join my Minecraft LAN world?
There could be several reasons why people cannot join your Minecraft LAN world. Some possible issues include incorrect network settings, problems with firewalls or antivirus software, or issues with the Minecraft server itself.
If you are having trouble connecting, you may need to troubleshoot your network settings or consult with other players who have successfully joined your LAN world.
Why can my friend join my Minecraft world but I can’t join theirs?
You cannot join your friend’s Minecraft world for several reasons. Some possible issues include incorrect network settings, problems with firewalls or antivirus software, or issues with the Minecraft server itself.
If you are having trouble connecting, you may need to troubleshoot your network settings or consult your friend to see if they can assist.
Can you self host a Minecraft server?
Yes, you can self-host a Minecraft server on your computer or on a separate computer that is dedicated to running the server.
However, self-hosting a Minecraft server requires technical knowledge and the ability to configure your network settings to allow incoming traffic to your server.
Do I need a VPN to host Minecraft server?
No, you do not need a VPN to host a Minecraft server. However, using a VPN such as Hamachi can provide additional security and privacy when hosting a server over the internet.
How do I host Minecraft locally?
To host Minecraft locally, you must set up a Minecraft server on your computer. Once the server is set up, you can launch the game and select “Multiplayer.” You can select “Add Server” from there and enter your local IP address and server name. Other players on your local network can join your server by entering your local IP address in the server list.
Overall, Hamachi can be useful for hosting Minecraft servers and playing with friends online. However, it is important to use it responsibly and take appropriate security precautions to protect your privacy and security.
It is also important to remember that Hamachi, the VPN service, is completely unrelated to the Hamachi fish, a popular seafood dish in Japan.
Conclusion
Setting up a Minecraft server with Hamachi can be a rewarding experience for gamers and Enthusiasts.
By following the simple steps outlined in this article, you can create a multiplayer environment where you and your friends can embark on epic adventures, build magnificent structures, and explore a virtually limitless world together.
With Hamachi’s ease of use and compatibility with Minecraft, you can bypass the complexities of port forwarding and seamlessly connect with your friends across different networks.
Whether you’re hosting a private server for a small group or creating a bustling community, Hamachi provides a reliable solution for establishing a secure and stable Minecraft server.
Remember to consider the system requirements of your server, allocate sufficient resources, and regularly update your Hamachi software to ensure optimal performance.
Additionally, familiarize yourself with Hamachi’s features and settings, such as network management and security options, to customize your server according to your preferences.
By harnessing the power of Hamachi, you can transform your Minecraft experience into a collaborative and immersive journey.
So, gather your friends, unleash your creativity, and dive into the boundless possibilities that await in your very own Minecraft server.
Get ready to build, explore, and share unforgettable moments!

