


In this article, we’ll discuss How to Install the Java Development Kit (JDK) on a Raspberry Pi. I just bought a new Rasberry pi recently, so I just want to install the Java Development Kit, because java is very necessary to make things happen. It has become easier. So let’s get started.
What is a JDK?
The Java Development Kit (JDK) is a software development environment for developing Java applications and applets. It includes the Java Runtime Environment (JRE), the interpreter/loader (java), the compiler (javac), the archiver (jar), the document generator (javadoc), and other tools needed for Java development.
People who are not familiar with Java may be confused about using JRE or JDK. To run Java applications and applets, just download the JRE. However, to develop Java applications and applets and to run them, you need to use the JDK.
Why Developers need JDK?
Java developers initially provided two JDK tools, java and javac. Both run from a command prompt. A Java source file is a simple text file saved with a .java extension. After writing and saving the Java source code, the javac compiler will be called to create the .class file. After creating the .class file, you can use the ‘java’ command to run the java program.
For developers who want to work in an integrated development environment (IDE), the JDK bundled with Netbeans can be downloaded from the Oracle website. This type of IDE speeds up the development process by introducing click and drag and drop capabilities for creating applications.
Various platforms have different JDKs. Supported platforms include Windows, Linux and Solaris. Mac users need a different software development kit that includes modifications to some of the tools in the JDK.
Log in to the computer, activate the web browser, and navigate to the [|Oracle Java SE Download] download page. [Midori browser cannot connect to this page. This page has been successfully processed using the Iceweasel browser. ] Click on the JDK download link. Read and accept the Oracle binary code license agreement for Java SE. Download the current file for “Linux ARM v6 / v7 Soft Float ABI” and save it where you have write access. Your home directory will be assumed as described below.
The following instructions assume that you are installing version 7u10 of the JDK. If you download and are installing a different version, adjust the file name accordingly.
Activate the terminal window by double-clicking the “LXTerminal” or “Root Terminal” icon or the menu “Accessories -> LXTerminal” or “Accessories -> Root Terminal“. Type the following command in the terminal to create an installation directory and extract the downloaded files:
You can install the oracle-java8-jdk package from the official Raspbian repository, but it only provides the old version of Java (8u65). If you want to use the latest version, you need to download the JDK directly from the Oracle website. Since the Raspberry Pi is powered by an ARM processor and Raspbian is a 32-bit operating system, choose the Linux ARM 32 Hard Float ABI version.
When downloading the correct package, unzip it into the /usr/java directory:
Log in to the Raspberry Pi and type the command to extract jdk-8-linux-arm-vfp-hflt.tar.gz to the /opt directory.
Follow the steps below
$ sudo tar zxvf jdk-8-linux-arm-vfp-hflt.tar.gz -C / opt
Set the default java and javac to the newly installed jdk8.
$ sudo update-alternatives -install / usr / bin / javac javac /opt/jdk1.8.0/bin/javac 1
$ sudo update-alternatives -install / usr / bin / java java /opt/jdk1.8.0/bin/java 1
$ sudo update-alternatives -config javac
$ sudo update-alternatives -config java
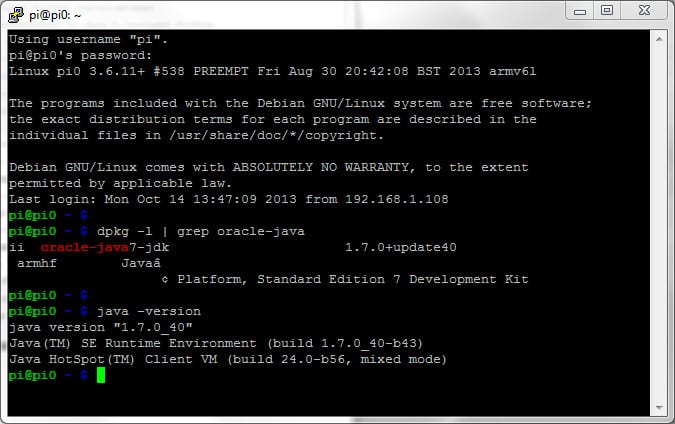
After all, use the command with the -verion option to verify.
$ java -version
$ javac -version


