


Using Raspberry Pi as a Samba file server is easy, where you can store backups and share files from all other computers on the network.
Samba is a standard Linux implementation of SMB/CIFS file sharing used by Windows PCs and Apple computers and is widely supported by media streaming, game consoles and mobile apps.
This tutorial assumes that you will use a keyboard, mouse, and monitor to set up the file server, but you can also enable SSH and remotely connect to the file server from another computer on your local network. We also assume that you are using a 32GB (or smaller) micro SD card that provides reasonable storage and can be accessed without any additional steps. However, if you need extra storage, you can easily install a large external USB drive and create a Samba entry for it.
How to SSH to the Raspberry Pi
Or, if you want to stay compact, you can install Raspbian on a micro SD card up to 256GB, although we recommend checking the online (non-working SD card) before buying to make sure you get a skin that is fully compatible with Raspberry.
Once setup is complete, you can install the home file server on all other computers on the network and use it as a convenient place to store music files that you want to share with roommates, important documents to back up and save games. The files you want to share between computers.
We recommend using a wired Ethernet connection to ensure stability and fast transfer speed. If you connect Pi via WiFi, the project will still work, but performance will be affected, especially when copying large files.
Steps to Turn Your Raspberry Pi into a File Server
File Server: Setting up Samba
Download the latest version of NOOBS and copy it to a blank micro SD card in the format fat32. Insert the micro SD card into the Pi, launch and choose to install Raspbian using the PIXEL desktop.
$Install Samba
Samba is available in Raspbian’s standard software repository. We will update our repository index to ensure that our operating system is fully updated and install Samba using apt-get. Open the terminal and type:
$Sudo apt-get update
$ Sudo apt-get upgrade
$ Sudo apt-get install samba samba-common-bin
We will create a dedicated shared directory on Pi’s micro SD hard drive. You can put it anywhere, but we will be at the top of the root file system.
$Sudo mkdir -m 1777 / share
This command sets the sticky bit (1) to help prevent accidental deletion of the directory and provides read/write/execute (777) permissions for everyone.
$Sudo s leafpad /etc/samba/smb.conf
In our example, you need to add the following entry:
[share it]
Comment = Pi shared folder
Path = / share
Browsable = yes
Writable = yes
Only guests = no
Create mask = 0777
Directory mask = 0777
Public = yes
Guest = yes
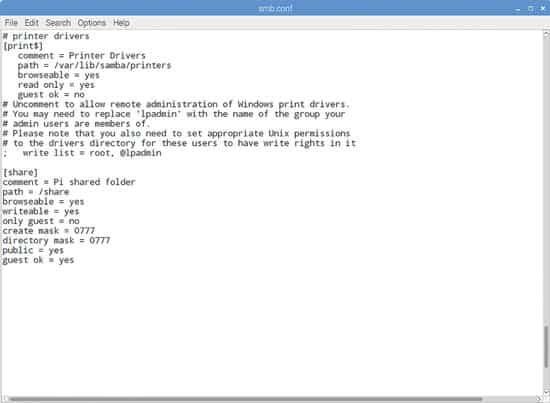
This means that anyone can read, write, and execute files in a share by logging in as a Samba user (which we will set below) or as a guest. If you do not want to allow guest users, omit the guest ok = yes line.
You can also use the Samba share user’s home directory so they can access it from other locations on the network, or share a larger external hard drive at a fixed installation point. Just create an smb.conf entry for any path you want to share, and it will be available on your network when you restart Samba.
Create a user and start Samba
Before we start the server, you need to set a Samba password – this is different from your standard default password (raspberry), but if you prefer, it is not harmful if you reuse it, because this is a low security, local network project.
$Sudo smbpasswd -a pi
Then follow the prompts to set a password. Finally, let’s restart Samba:
$Sudo /etc/init.d/samba restart
From now on, whenever you open the Pi, Samba will start automatically. Once you’ve determined that you can find the shared folder on the network, you can safely disconnect the mouse, monitor, and keyboard from the Pi and run it as a headless file server.
Find your Pi on the web
You can now find your Raspberry Pi file server (default name is RASPBERRYPI) from any device on your local network. If you leave the default settings for smb.conf, it will appear in the Windows Network Workgroup named WORKGROUP.
Map as a Network Drive
Open the “Computer” window or “This PC” and click the “Map Network Drive” button on the toolbar.


