























Have you ever found yourself scratching your head, wondering about the intricate details of your computer’s hardware?💁
If you’ve been pondering the question, “What motherboard do I have?” – you’re in the right place.
Whether you’re a tech enthusiast, a casual computer user, or someone who wants to upgrade their system, identifying the motherboard in your computer is an essential first step.
Understanding your motherboard is like uncovering the DNA of your computer.
It is key to determining compatibility with various components, maximizing performance, and troubleshooting technical issues. Yet, for many, this crucial piece of information remains elusive.
In this article, we will guide you through uncovering the mystery behind your computer’s motherboard.
We’ll provide you with easy-to-follow steps, helpful tips, and insightful explanations to empower you with the knowledge you need.
By the end, you’ll be equipped with the confidence to identify your motherboard and unlock a deeper understanding of your computer’s core.
So, if you’ve ever wondered about the motherboard lurking beneath the surface of your computer, let’s dive in together and demystify the question, “What motherboard do I have?”
Prepare to embark on an exciting journey of discovery and gain a newfound appreciation for the heart of your machine.
Let’s get started!
How to Check What Motherboard do I have in windows
It is an easy task to check which motherboard do you have in windows 10. In this subsection, we are going to talk about two such ways.
Command Prompt:-
To check the motherboard specification with the help of Command Prompt just be obedient to the following steps:-
Step 1: Launch the command prompt by either searching out from the start menu or by launching RUN( Windows + R ) and typing cmd there.
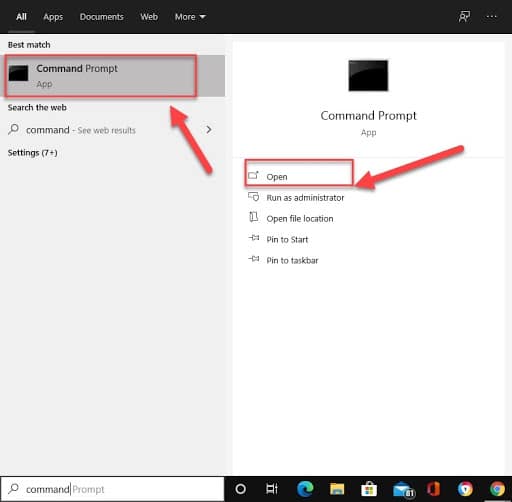
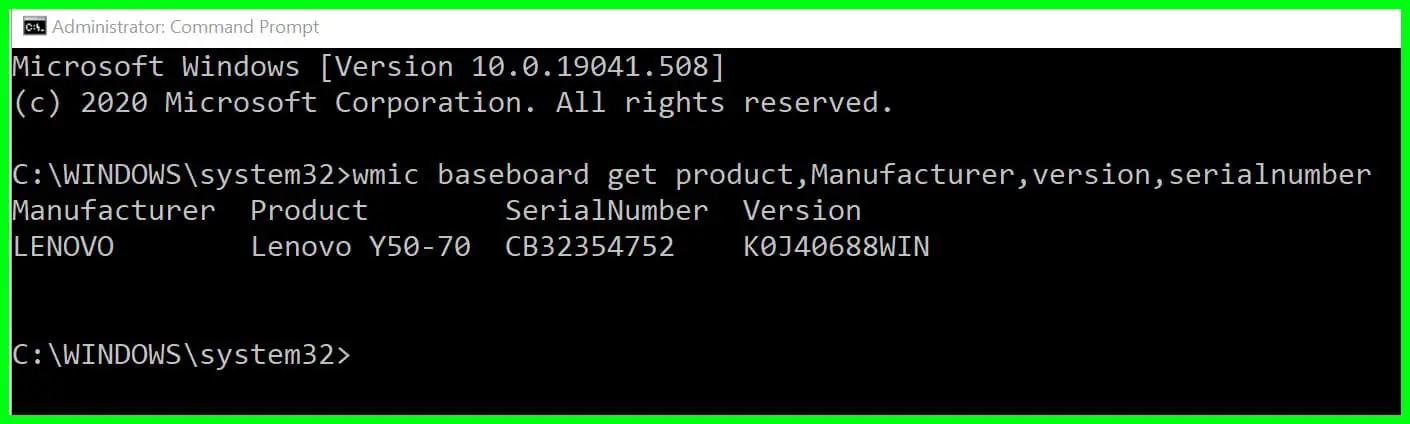
Step 2: To get your motherboard details type
“ wmic baseboard get product,Manufacturer,version,serialnumber “
System Information:-
In windows 10 you have a build-in application that will help you in extracting knowledge of your motherboard that is “system information”.
With the help of system information, one can see the detailed specification of his computer which includes its motherboard information, BIOS information, etc.
Just be obedient to the prescribed steps and you are good to go.
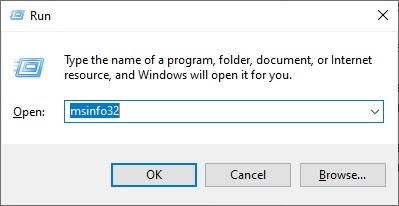
Step 1: Launch the “system information” application by searching it from the taskbar or by launching RUN(Windows + R) and type “msinfo32”.
Step 2: scroll down from the right side of your screen and search for “Motherboard manufacturer or Baseboard manufacturer”.
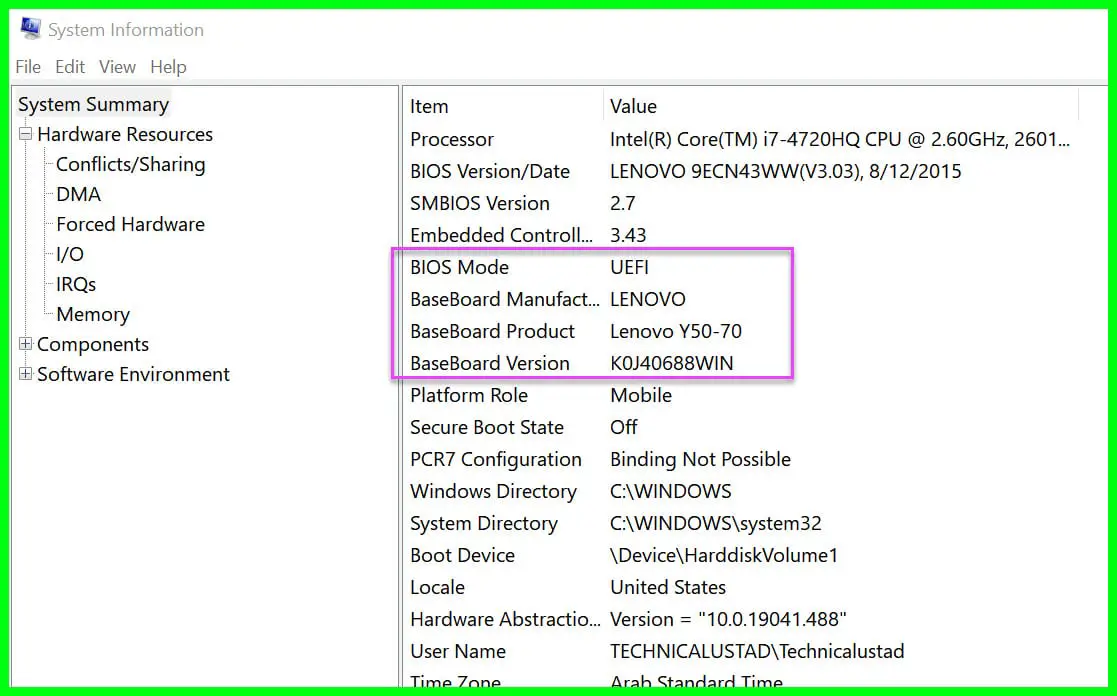
These were the two easy methods by which you can check which motherboard you are using.
How to check what motherboard do I have in Ubuntu Linux?
Checking your motherboard’s specification is an easy task in this open-source operating system, Ubuntu Linux. You just need to be obedient to the prescribed steps to do that.
Step 1: Launch the terminal app in ubuntu Linux by either searching it out from the app drawer or by clicking Alt + Ctrl + T.
Step 2: In the command line type “dmidecode -t 2” and hit enter.
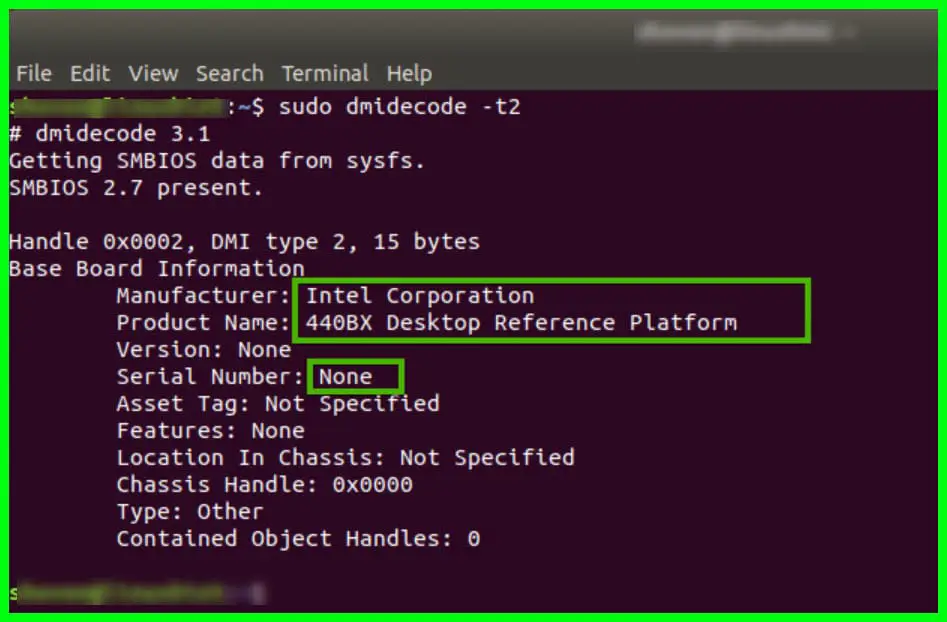
Here you can see the manufacturer details, product name, version, and serial number.
How to check what motherboard do I have in MacOs:-
Apple is very possessive about its hardware and stuff. They will never disclose their exact specification to maintain the uncanny image of the brand.
All this collectively makes it difficult to determine your MAC’s motherboard. But I got you covered. In this subsection, we are going to unravel the mystery.
We are going to find out your motherboard’s specifications with the help of the iMAC serial number. To do that just be obedient to the following steps:-
Step 1: Click on the apple icon menu located at the top corner of your screen.
Step 2: Click on “about this MAC” option.
Step 3: open it to get your serial number.
Step 4: After getting your serial number, enter that number in this website. To extract your motherboard information.
Here’s how you can get details about your motherboard in the MAC operating system. It was easy, wasn’t it?
How to check what motherboard do I have via a third party software:-
There are dozens of third-party applications in the market that will help you in extracting detailed information about your system, which includes your motherboard’s name and serial number as well.
There are third party applications for every platform. Like CPU-Z and Speecy was built to serve windows. On the other hand, we have CPU-G and Neofetch for Unix-based operating systems(macOS and Linux).
In this example, we are going to use the CPU-Z application as it is easy to use and free, unlike its counterpart Speecy.
One of the other benefits you will get by using CPU-Z over other default app is that you will know a lot about your computer rather than just knowing a few basic things such as Motherboard name and serial number.
To check your motherboard’s details via CPU-Z obey the following steps:-
Step 1: Download the CPU-Z application from the provided link.
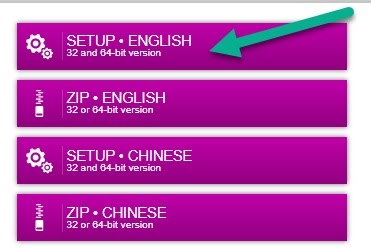
Step 2: Launch the application and click the “Mainboard” tab. Under that tab, you will see your motherboard’s details.
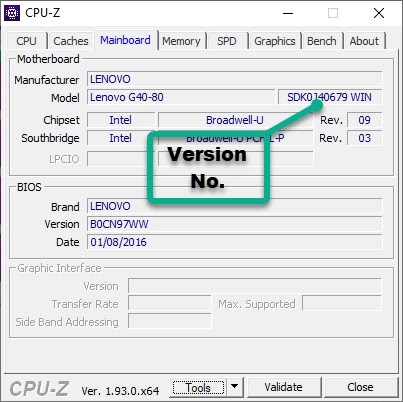
If you have Unix based applications such as macOS or Linux you can do the same with the help of the CPU-G application.
How to check what motherboard do I have physically?
If you don’t want to go the easy route and want to experience your motherboard physically, we got you covered in this section.
We don’t recommend you do that on a laptop as it is very compressed but if you have a desktop then be my guest.
Before doing anything make sure that the power supply to your computer is off. Open your CPU by twisting its screws with the help of a screwdriver. You will see your motherboard’s serial number and name printer on the motherboard itself.
Every manufacturer places its motherboard differently so to be sure just check the board you are considering as a motherboard. If it has RAM slots, CPU slots embedded in it then that board is a Motherboard.
In case you are not able to find the motherboard’s name printed then look for its model number. Then search the name on the internet via model number.
I am sure these pieces of information will help you in knowing your Motherboard.
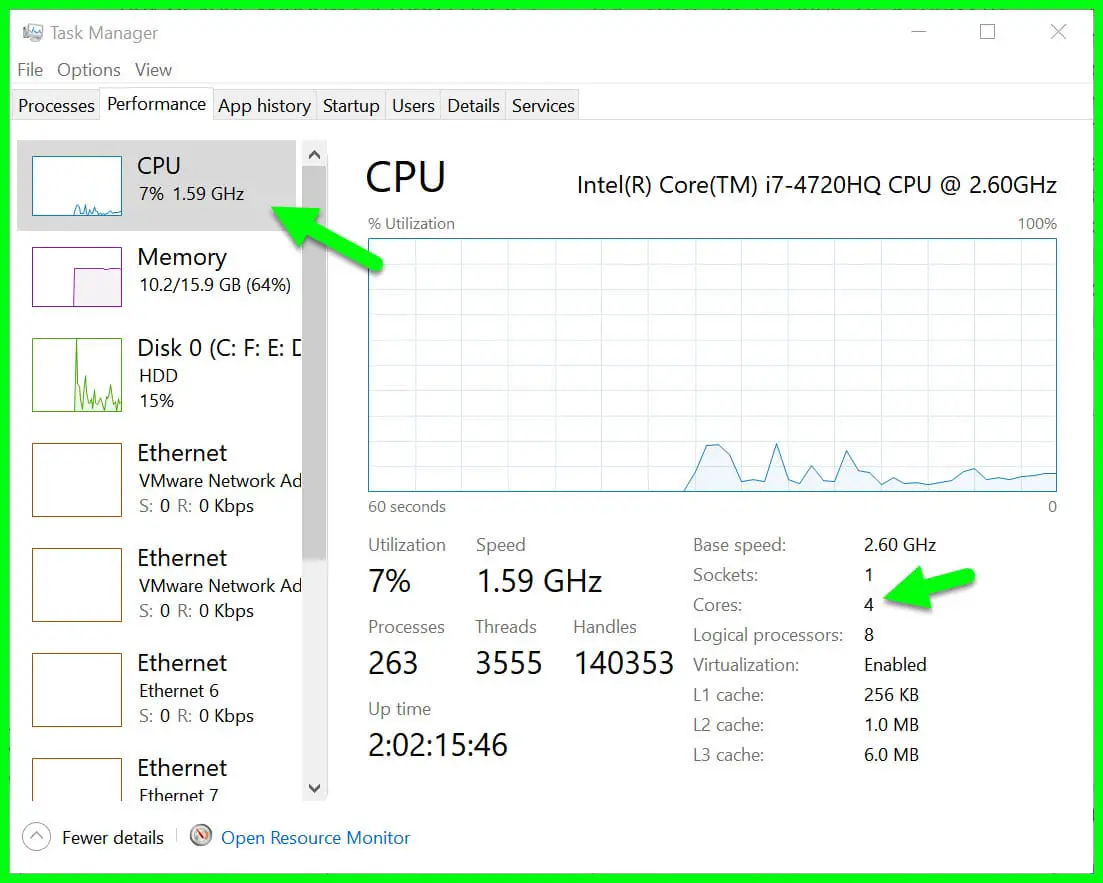
How To Count processor cores
Have you ever wanted to know how many cores there are in your PC’s processor? You can easily find out by right-clicking the taskbar, then clicking Task Manager.
Go to the Performance tab and select CPU. The information listed below the chart shows the number of cores. It also displays the number of logical processors, because one CPU core can simulate two, which makes it look like your PC has more cores than it really does.
How to Find Out What Motherboard You Have Without Turning It On
When it comes to determining what motherboard you have without turning it on, there are a few nifty methods you can employ.
This article aims to guide you through the process, ensuring you can unveil the mysterious identity of your motherboard even when your computer remains dormant.
One approach is to inspect the physical markings on the motherboard itself. Carefully open your computer case and search for a series of alphanumeric characters printed on the board.
Look for labels such as “Model,” “Part Number,” or “Serial Number” etched onto the surface. Armed with this information, you can embark on further research to identify the specific make and model of your motherboard.
Another useful method involves examining the documentation that accompanied your computer or motherboard when you purchased it.
Check any manuals, guides, or specifications sheets for details on the motherboard model. Look for sections specifically related to the motherboard or system specifications, as these often contain vital information that can assist in identification.
If the previous methods yield no results, fear not! There are software utilities available that can unveil the secrets of your motherboard.
Programs like CPU-Z or Speccy can provide an in-depth hardware analysis of your computer, including motherboard details.
By running these utilities, you gain access to a wealth of information, ranging from the manufacturer and model to the BIOS version and even sensor readings.
In conclusion, discovering what motherboard you have without turning it on is indeed possible. Through a combination of inspecting physical markings, consulting documentation, or utilizing software utilities, you can unearth the identity of your motherboard with ease.
Armed with this knowledge, you can make informed decisions regarding upgrades, compatibility, and troubleshooting.
So, embrace these methods, and let the secrets of your motherboard be revealed!
How to Check Motherboard Model Physically
Checking the motherboard model physically can provide valuable insights into your computer’s hardware configuration.
This guide will walk you through the process, enabling you to identify the motherboard model without relying on software or turning on your computer.
1. Power off your computer and unplug it from the power source. This ensures your safety and prevents any potential damage to the components.
2. Open your computer case by removing the side panel or cover. Take precautions to avoid static electricity discharge by grounding yourself or using an antistatic wrist strap.
3. Locate the motherboard inside the case. It is the primary circuit board where various components connect and interact.
4. Examine the motherboard carefully. Look for identifying labels or markings etched onto the surface. Common locations include the center, edges, or corners of the board.
5. Search for model numbers, part numbers, or serial numbers printed on the motherboard. These alphanumeric codes provide crucial information for identifying the motherboard model.
6. Once you have located the relevant information, note it down for further reference. Take clear pictures if needed, to ensure accuracy.
By following these steps, you can check the motherboard model physically and obtain the necessary details for upgrading, troubleshooting, or compatibility purposes. Remember to handle the components with care and reassemble your computer correctly after the inspection.
📗FAQ’s
How do I find out what my motherboard is?
One way to find out what your motherboard is is to open up your computer and look for the model number printed on the motherboard itself. Alternatively, you can use a system information tool like CPU-Z or Speccy to find the make and model of your motherboard.
How do I find out what motherboard I have Windows 10?
You can use the System Information tool to find out what motherboard you have on Windows 10. Open the Start menu and type “System Information” in the search bar, then select the option that appears.
Look for the “BaseBoard Manufacturer” and “BaseBoard Model” entries in the System Summary section to find the make and model of your motherboard.
What motherboard do I have from BIOS?
You can find out what motherboard you have from the BIOS by restarting your computer and entering the BIOS setup program.
Look for an option labeled “System Information,” “Mainboard,” or something similar. The make and model of your motherboard should be listed in this section.
How do I find out what motherboard I have Windows 11?
Finding out what motherboard you have on Windows 11 is similar to the process on Windows 10. Use the System Information tool to find the “BaseBoard Manufacturer” and “BaseBoard Model” entries in the System Summary section to determine the make and model of your motherboard.
How do I find my motherboard serial number and model?
To find your motherboard’s serial number and model, you can typically find this information printed on the motherboard itself. Alternatively, you can use a system information tool like CPU-Z or Speccy to find this information.
How do I find my motherboard model and drivers?
To find your motherboard model and drivers, you can visit the website of your motherboard’s manufacturer and search for your motherboard’s model number. From there, you can download the latest drivers and software for your motherboard.
Do motherboards come with Windows 10 installed?
No, motherboards do not come with Windows 10 installed. Windows 10 is an operating system that needs to be installed separately on a computer.
Does Windows recognize motherboard?
Yes, Windows recognizes the motherboard in a computer and provides information about it in the System Information tool.
Is BIOS the motherboard?
No, the BIOS (Basic Input/Output System) is not the motherboard itself, but rather a program stored on a chip on the motherboard. The BIOS provides a way for the computer’s hardware and software to interact with each other.
Does BIOS identify hardware?
Yes, the BIOS identifies the hardware installed on a computer, including the motherboard, CPU, memory, and storage devices. The BIOS also provides a way to configure and control the computer’s hardware.
Is BIOS on the motherboard or CPU?
The BIOS is typically stored on a chip on the motherboard, not on the CPU itself. However, some CPUs do have their own firmware that can be updated and configured separately from the motherboard BIOS.
Can I install Windows 11 on an old motherboard?
Whether or not you can install Windows 11 on an old motherboard depends on the specific motherboard and its compatibility with Windows 11.
Microsoft has published minimum system requirements for Windows 11, so you should check to see if your motherboard meets those requirements before installing Windows 11.
Wrap-up
In conclusion, discovering the answer to the question “What motherboard do I have?” is crucial for various reasons.
By identifying the exact model and specifications of your motherboard, you gain valuable knowledge that can help you in several ways.
Firstly, it enables you to make informed decisions when upgrading or troubleshooting your computer system.
Whether you’re considering adding more RAM, upgrading your processor, or installing a new graphics card, knowing your motherboard details ensures compatibility and optimal performance.
Additionally, understanding your motherboard’s capabilities allows you to harness its full potential. You can take advantage of specific features, such as USB 3.0 ports, M.2 slots, or overclocking capabilities, to enhance your computing experience.
This knowledge empowers you to tailor your system to your specific needs, whether you’re a gamer, content creator, or professional working with resource-intensive applications.
Moreover, knowing your motherboard information can assist you in obtaining accurate technical support.
When encountering issues or seeking assistance, providing your motherboard details to technicians or online forums enables them to offer targeted advice and solutions, saving you time and frustration.
Fortunately, determining your motherboard model is a relatively straightforward process. You can explore several methods, including checking your computer’s documentation, inspecting the physical motherboard, or utilizing software utilities.
These approaches will help you uncover the necessary information and put you on the path to better understanding and optimizing your computer system.
Remember, a solid understanding of your motherboard not only empowers you to make informed decisions about upgrades and troubleshooting but also unlocks the full potential of your computer system.
So, take the time to identify your motherboard model and specifications, and embark on a journey of enhanced performance, compatibility, and technical support.