Windows OS is known to have different errors and “Windows can’t communicate with the device or resources” is one of them. Even though it is not a very famous error but it requires a separate set of solutions. In this article, we are going to fix the “Windows can’t communicate with device or resource” error.
Why “Windows can’t communicate with the device or resources” error occurs?
The chances of your receiving “Windows can’t communicate with the device or resources” error increases when you launch the Network Diagnostic process because of an unstable internet.
This happens because of the error in the connection between the DNS server and your computer which acts as a client.
There are two DNS in your computer, primary and secondary. The primary one is provided by your Internet Service Provider and the secondary one is there as a backup server. But sometimes, because of some wrongful setting twitches or other causes (which we will mention in this article), this problem occurs.
Windows can’t communicate with the device or resources: Possible Fixes
The following are the tips to resolve the “Windows can’t communicate with the device or resources” error.
1. Make sure that DNS and DHCP clients are running
Even though they are enabled by default but sometimes in the rarest of the condition your DNS and DHCP may not work. Therefore, in this section, we will check that.
To do that, you need to follow the prescribed steps:-
Step 1: Launch the Services application by searching it out from the start menu or by RUN(Win + R), type “services.msc”, and hit enter.
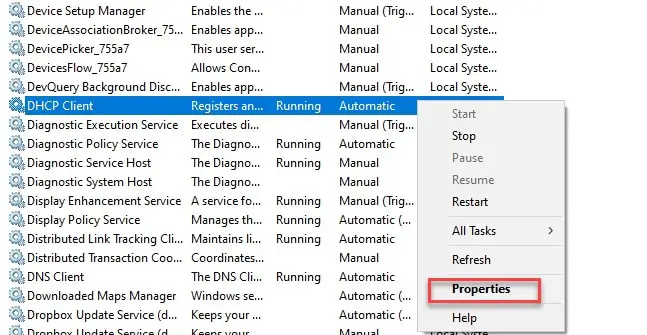
Step 2: Scroll down a bit to reach “DHCP Client”, right-click on it, select “properties”, from the appeared list.
Step 3: From the appeared Properties, make sure that you are on General Tab and change the Startup file to Automatic.
You need to do the same with DNS clients. If the Startup file is file is disabled and because of that, you were facing this problem. Then this after performing this step you won’t face this issue.
2. Alter your network driver
One of the most common reasons behind the “Windows can’t communicate with the device or resources” error is the malfunctioning of the network. There are two fixes, one is is subtle and another one is a little extreme. In this section, we are going to cover both of them.
a) Update your Network driver-Manually
Most of the time, your network driver is updated by default either separately or along with the windows updates. But there are instances recorded by the users when their driver isn’t updated and because of that, they are receiving “Windows can’t communicate with the device or resources” error.
To update your Network driver manually, you need to follow the prescribed steps:-
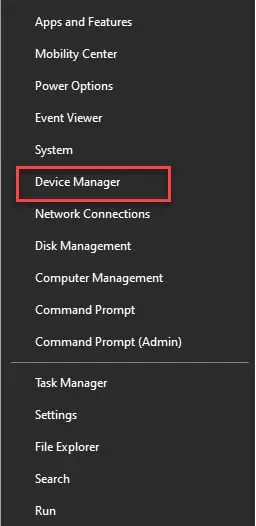
Step 1: Launch the device manager by either searching it out from the start menu by right-clicking on the start menu and select “Device Manager” from the appeared list.
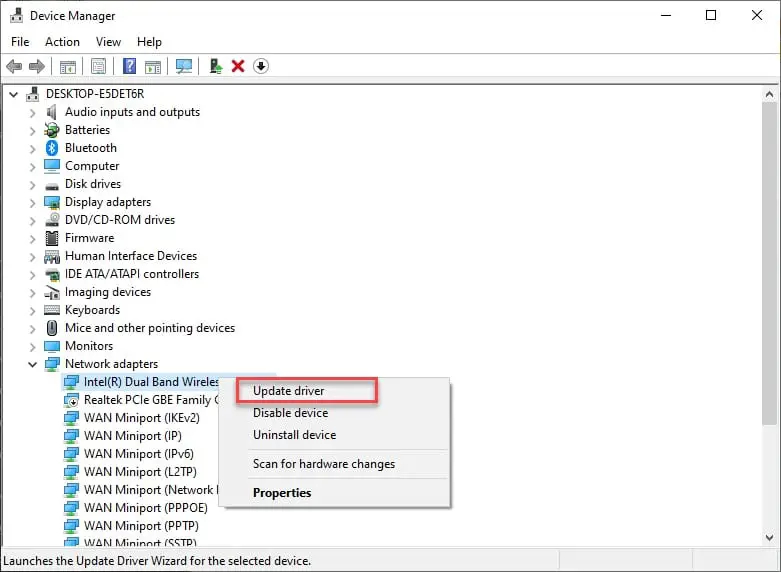
Step 2: From the appeared Device Manager window, expand the Network Adapter option, right-click on your network device, and then click Update driver from the appeared list.
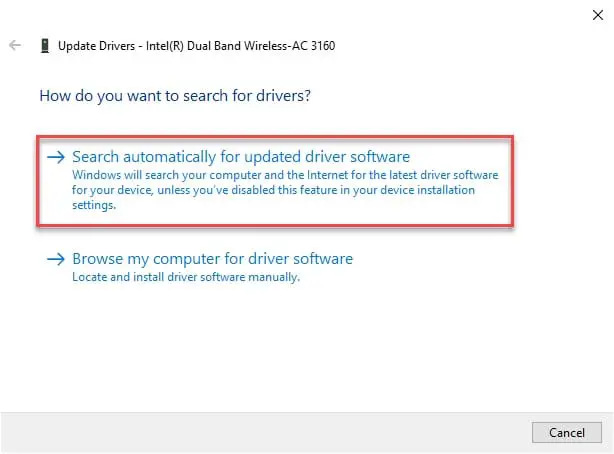
Step 3: An update driver window will appear, presenting two options, either Search Automatically or Browse Online, you can select either of two but in my opinion, you should select the “Search Automatically…” option.
After the completion of the update process, you need to restart your computer and hopefully, the “Windows can’t communicate with the device or resources” error will be eliminated.
b) Reinstall your Network Driver
This is the extreme step. This should be attempted after the failure of the former one as when your Network Driver has malfunctioned an update can solve the problem. Therefore, in this section, we are going to uninstall the driver and then re-install it.
To reinstall your Network Driver, you need to follow the prescribed steps:-
Step 1: Launch the device manager by either searching it out from the start menu by right-clicking on the start menu and select “Device Manager” from the appeared list.
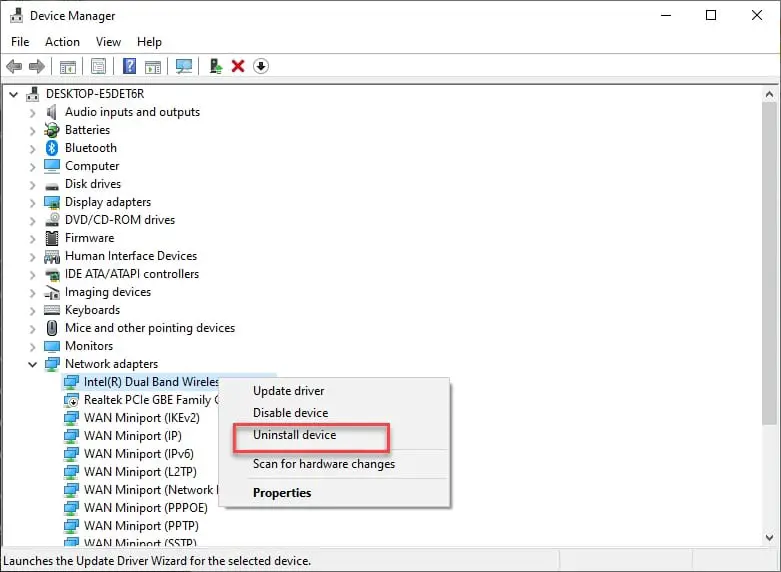
Step 2: From the appeared Device Manager window, expand the Network Adapter option, right-click on your network device, and then click Uninstall Driver from the appeared list.
This will remove the Network Driver. Now, you need to re-install it.
Step 3: Right-click on the Network Adapter and then select Scan for hardware changes.
This will find your Network Device, install it, and make it ready for work.
After the completion of the reinstallation process, you need to restart your computer and hopefully, the “Windows can’t communicate with the device or resources” error will be eliminated.
3. Empty your DNS cache
The “Windows can’t communicate with the device or resources” error is a DNS related error. Therefore, a corrupt DNS file can also cause this problem. That is why, in this section, we are going to flush out all the cache from the DNS.
To do that we are going to use the OG command-line interpreter, the command prompt. To empty DNS Cache in windows by Command Prompt, you need to use the prescribed steps:-
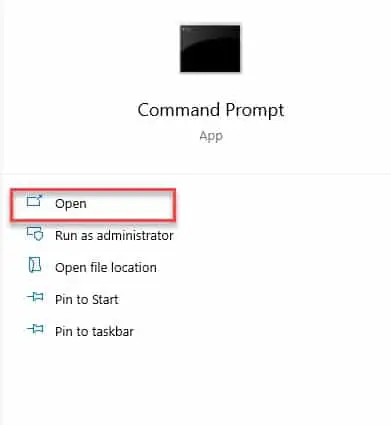
Step 1: Launch the Command Prompt as an admin either searching it out from the start menu or by RUN(Win + R), type “cmd” and hit Ctrl + Shift + Enter.
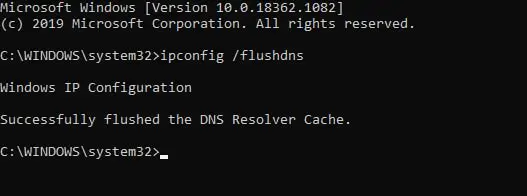
Step 2: Type the following commands, one by one.
ipconfig /flushdns
ipconfig /registerdns
ipconfig /release
ipconfig /renew
Note: Hit enter after every command.
These commands will clear your DNS’s cache that will eventually fix the “Windows can’t communicate with the device or resources” error.
4. Check your Adapter Settings
Since DNS is related to the Networking Sector of your PC, the adapter can be a reason behind it showing “Windows can’t communicate with the device or resources” error.
To do that, you need to follow the given steps:-
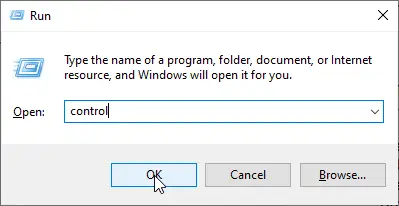
Step 1: Launch the Control Panel by either searching it out from the start menu or from RUN(Win + R), type “control” and hit enter.
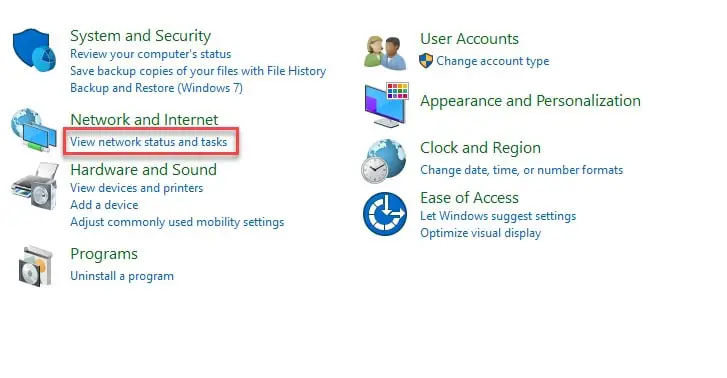
Step 2: From the appeared control panel window, click on View network status and tasks option placed under Network and Settings.
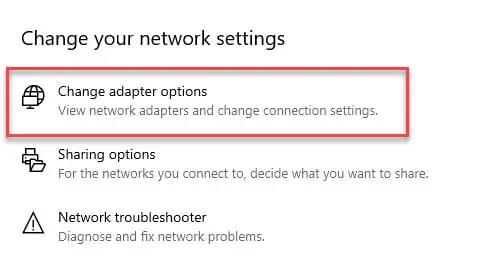
Step 3: On the appeared screen, you need to select the Change adapter settings option from the list placed on the left side of the screen.
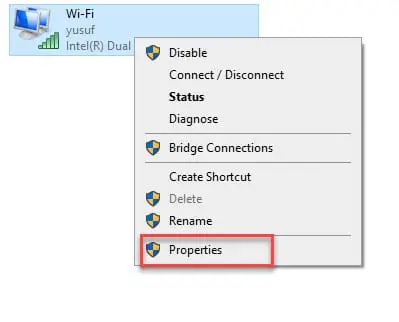
Step 4: You will be redirected to the Network Connection windows, there you need to right-click on the connected network and select Properties from the appeared list.
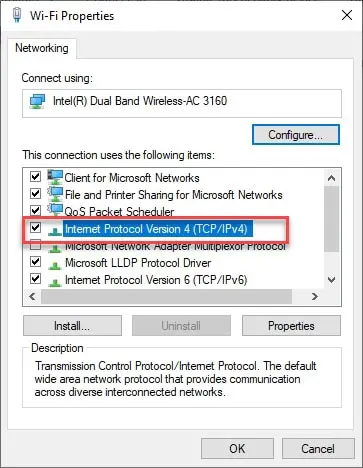
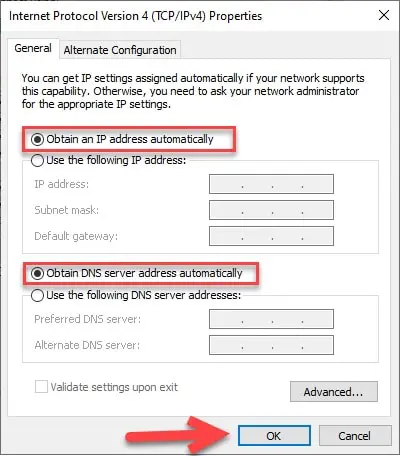
Step 5: From the appeared Wifi Properties window, make sure that the “Internet Protocol Version 4(TCP/ IP)” selected and then double-click on it.
Step 6: Now, you need to make sure that, both “Obtain an IP address automatically” and “Obtain DNS Server address automatically” is enabled, if they are not then check both of them and then click OK.
Afterward, you need to do the same for Internet Protocol Version 6(TCP/IPv4) and you are good to go.
If any of the two were disabled and you are enabled them with these steps then you should restart your computer in order to get things back on track. Hopefully, this will resolve the “Windows can’t communicate with the device or resources” error.
5. Make your DNS public
As mentioned earlier, the “Windows can’t communicate with the device or resources” error also occur due to wrongful setting twitches. You can solve that problem with the help of the above-mentioned tips. But if they don’t work then you should try and make your DNS public.
To make your DNS public in Windows 10, you need to follow the following steps:-
Step 1: Launch Settings by either searching it out of the start menu or by right-clicking on the start menu and then select “Settings” from the appeared list.
Step 2: Click on Network and Internet from the appeared list.
Step 3: Now, under the Change your adapter option, click on the Change your adapter button.
Step 4: You will be redirected to the Network Connection windows, there you need to right-click on the connected network and select Properties from the appeared list.
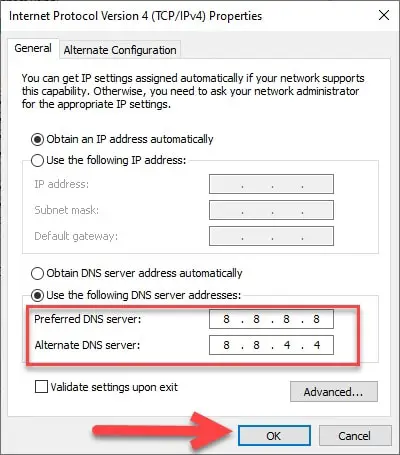
Step 5: From the appeared Wifi Properties window, double-click on the “Internet Protocol Version 4(TCP/ IPv4)” option.
Step 6: Finally, check the “Use the following DNS server address” and then change the Preferred DNS server: 8.8.8.8 and Alternative DNS server: 8.8.4.4 and then click OK.
You need to restart your computer and hopefully, the “Windows can’t communicate with the device or resources” error will be eliminated.
6. Scan for virus and malware
Not just “Windows can’t communicate with the device or resources” error, any error in any OS can be due to viruses and Malware. Therefore, in this section, we are going to delete all the viruses and malware.
We are going to do two things, first, we are going to allow Windows Defender to scan your system periodically, and then we will download an anti-virus and anti-malware.
To enable Windows Defender you need to follow the prescribed steps:-
Step 1: Launch Settings by either searching it out of the start menu or by right-clicking on the start menu and then select “Settings” from the appeared list.
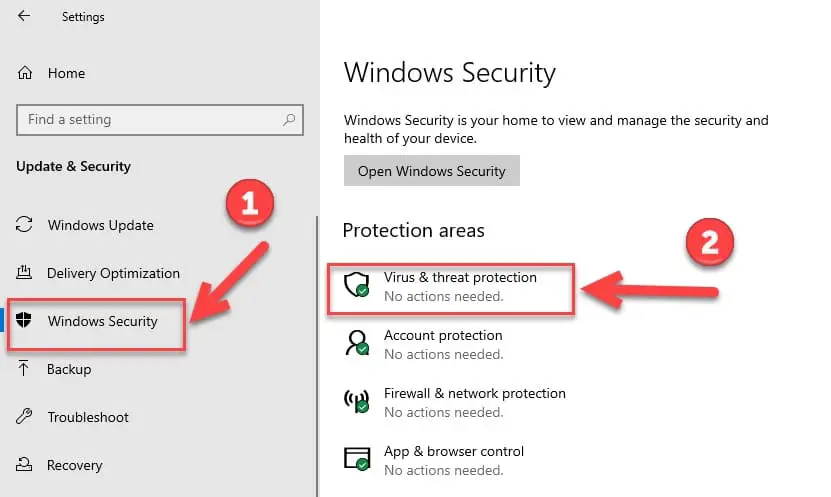
Step 2: Click on Update and Security” from the appeared screen.
Step 3: First go to the Windows Security tab and then click on Virus & threat protection.
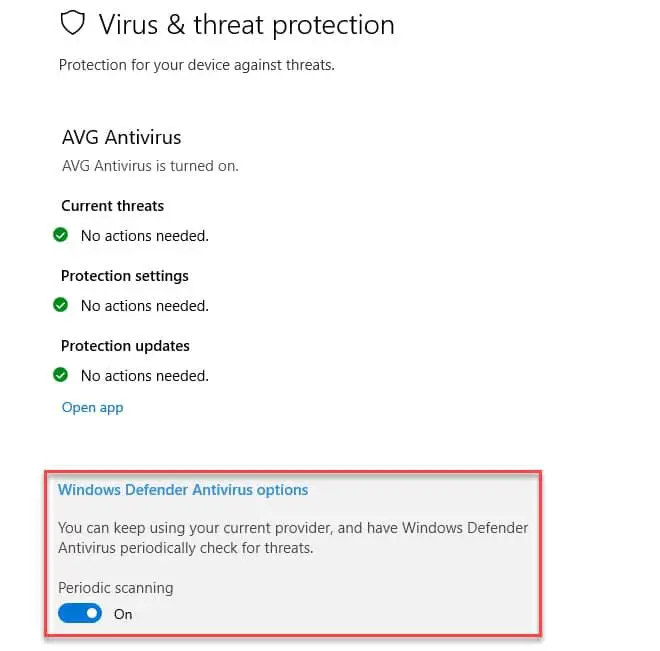
Step 4: Click on the Windows Defender Antivirus option and then use the toggle to enable the Periodic scan.
Afterward, you need to download an anti-virus and anti-malware. We would recommend you going for Avast as your anti-virus and Malwarebytes as your anti-malware.
Summary
The “Windows can’t communicate with the device or resources” error is a very unique error and it depends on your DNS and DHCP server.
In this article, we have talked about six different fixes which will hopefully solve your problem.


