


Have you ever needed to create a second Wi-Fi network in addition to your primary network? If you (or someone close to you) have a business (coffee, restaurant, hairdresser or doctor, in short, a place where people are likely to wait), it is likely that you have already had to provide internet access to your Customers, without wanting to give the password of your box.
In the same way, you may have already wanted to create an internal network that is cut off from the Internet, for example, to exchange files within a small company, and so on.
For all these situations, the simplest solution is to create what is called a hotspot, that is to say a kind of box that you can control and to which your users can connect to access the internet.
In this tutorial, let’s see how we can use a raspberry pi to create our own homemade hotspot, in less than 10 minutes!
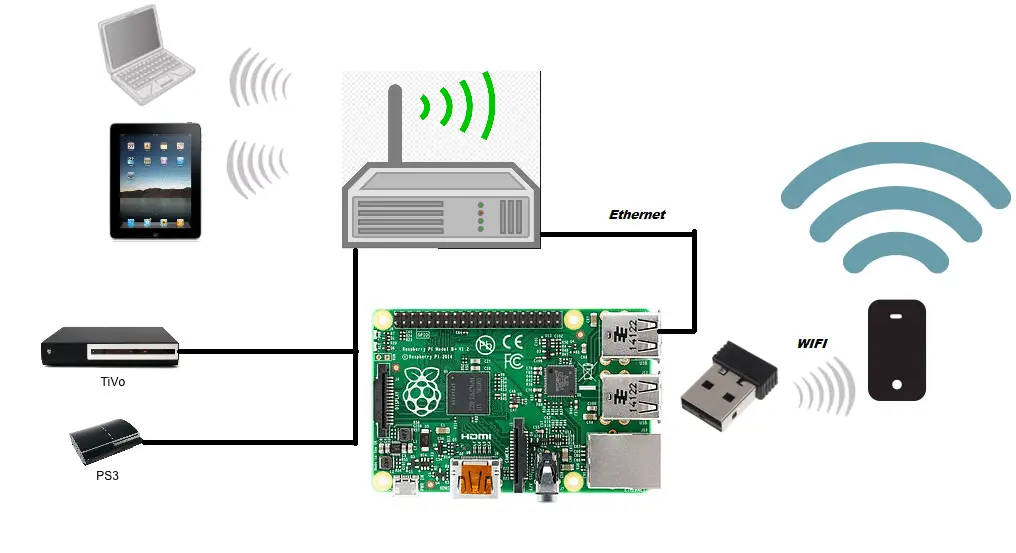
The Raspberry Pi can be used as a wireless access point to run a separate network.
This can be done using the built-in wireless capabilities of the Raspberry Pi 3 or Raspberry Pi Zero W, or using a suitable USB wireless dongle that supports access points.
Please note that this document has been tested on the Raspberry Pi 3 and some USB dongle may need to slightly change its settings. If you have problems using a USB wireless dongle, check the forums.
To work as an access point, the Raspberry Pi will need to install access point software and DHCP server software to provide network addresses for connected devices. Make sure your Raspberry Pi is using the latest version of Raspbian (date 2017 or later).
Let’s Get Started
Collect the Hardware
- Raspberry Pi 3 View on Amazon
- microSD Card Loaded with Raspbain View on Amazon
- Some input devices keyboard, mouse and HDMI Display.
Use the following to update your Raspbian installation:
sudo apt-get update
sudo apt-get upgrade

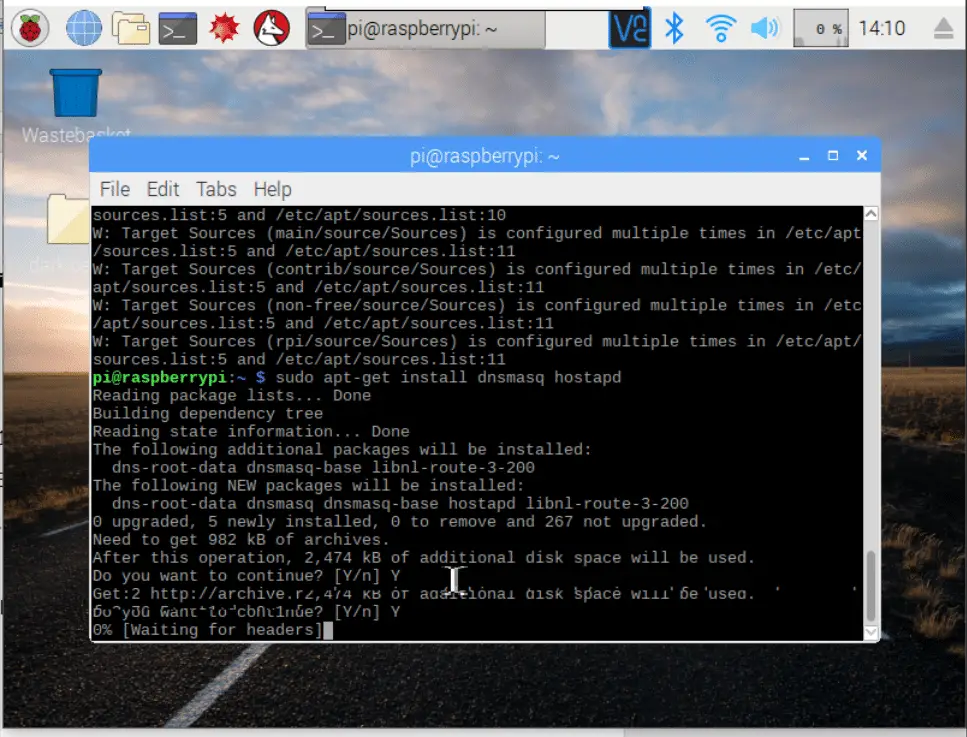
Install all the required software in one go with this command:
sudo apt-get install dnsmasq hostapd
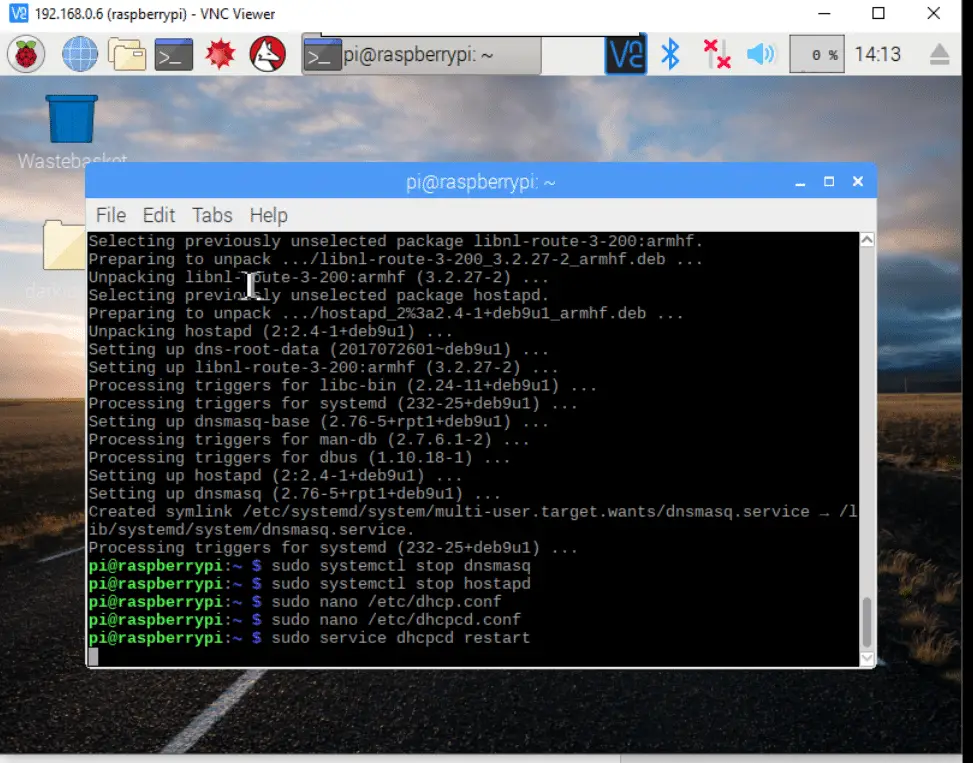
Since the configuration files are not ready yet, turn the new software off as follows:
sudo systemctl stop dnsmasq
sudo systemctl stop hostapd
Configure static IP
We are configuring a separate network as a server, so the Raspberry Pi needs to assign a static IP address to the wireless port. This document assumes that we use the standard 192.168.x.x IP address for our wireless network, so we will assign the server an IP address of 192.168.4.1. Also assume that the wireless device being used is wlan0.
To configure a static IP address, use the following command to edit the dhcpcd configuration file:
sudo nano /etc/dhcpcd.conf
Go to the end of the file and edit it so that it looks like the following:
“interface wlan0
static ip_address=192.168.4.1/24”
Do not add (“”)
Now restart the dhcpcd daemon and set up the new wlan0 configuration:
sudo service dhcpcd restart
Configuring the DHCP server (dnsmasq)
The DHCP service is provided by dnsmasq. By default, the configuration file contains a lot of information that is not needed, and it is easier to start from scratch. Rename this configuration file, and edit a new one:
sudo mv /etc/dnsmasq.conf /etc/dnsmasq.conf.orig
sudo nano /etc/dnsmasq.conf
Type or copy the following information into the dnsmasq configuration file and save it:
interface=wlan0 # Use the require wireless interface – usually wlan0
dhcp-range=192.168.4.2,192.168.4.20,255.255.255.0,24h
So for wlan0, we are going to provide IP addresses between 192.168.4.2 and 192.168.4.20, with a lease time of 24 hours. If you are providing DHCP services for other network devices (e.g. eth0), you could add more sections with the appropriate interface header, with the range of addresses you intend to provide to that interface.
There are many more options for dnsmasq; see the dnsmasq documentation for more details.
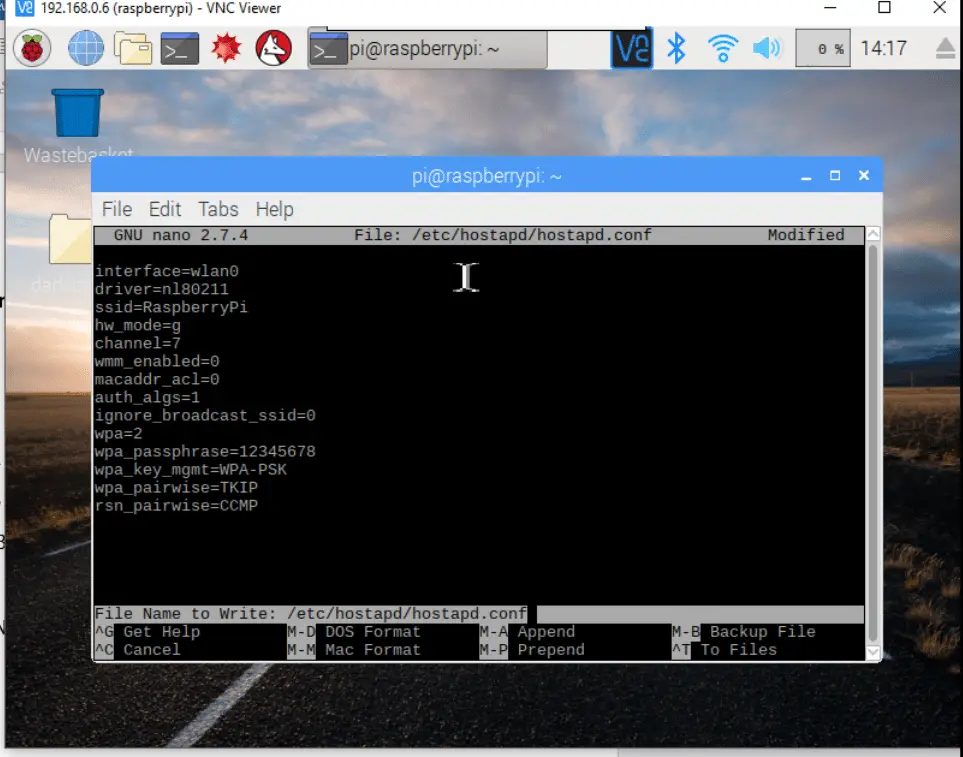
Configuring the access point host software (hostapd)
You need to edit the hostapd configuration file, located at /etc/hostapd/hostapd.conf, to add the various parameters for your wireless network. After initial install, this will be a new/empty file.
sudo nano /etc/hostapd/hostapd.conf
Add the information below to the configuration file. This configuration assumes we are using channel 7, with a network name of NameOfNetwork, and a password AardvarkBadgerHedgehog. Note that the name and password should not have quotes around them. The passphrase should be between 8 and 64 characters in length.
interface=wlan0
driver=nl80211
ssid=AnyName
hw_mode=g
channel=7
wmm_enabled=0
macaddr_acl=0
auth_algs=1
ignore_broadcast_ssid=0
wpa=2
wpa_passphrase=Password
wpa_key_mgmt=WPA-PSK
wpa_pairwise=TKIP
rsn_pairwise=CCMP
We now need to tell the system where to find this configuration file.
sudo nano /etc/default/hostapd
Find the line with #DAEMON_CONF, and replace it with this:
DAEMON_CONF=”/etc/hostapd/hostapd.conf”
Start it up
Now start up the remaining services:
sudo systemctl start hostapd
sudo systemctl start dnsmasq
ADD ROUTING AND MASQUERADE
Edit /etc/sysctl.conf and uncomment this line:
sudo nano /etc/sysctl.conf
net.ipv4.ip_forward=1
Add a masquerade for outbound traffic on eth0:
sudo iptables -t nat -A POSTROUTING -o eth0 -j MASQUERADE
hit Enter and Save the iptables rule.
sudo sh -c “iptables-save > /etc/iptables.ipv4.nat”
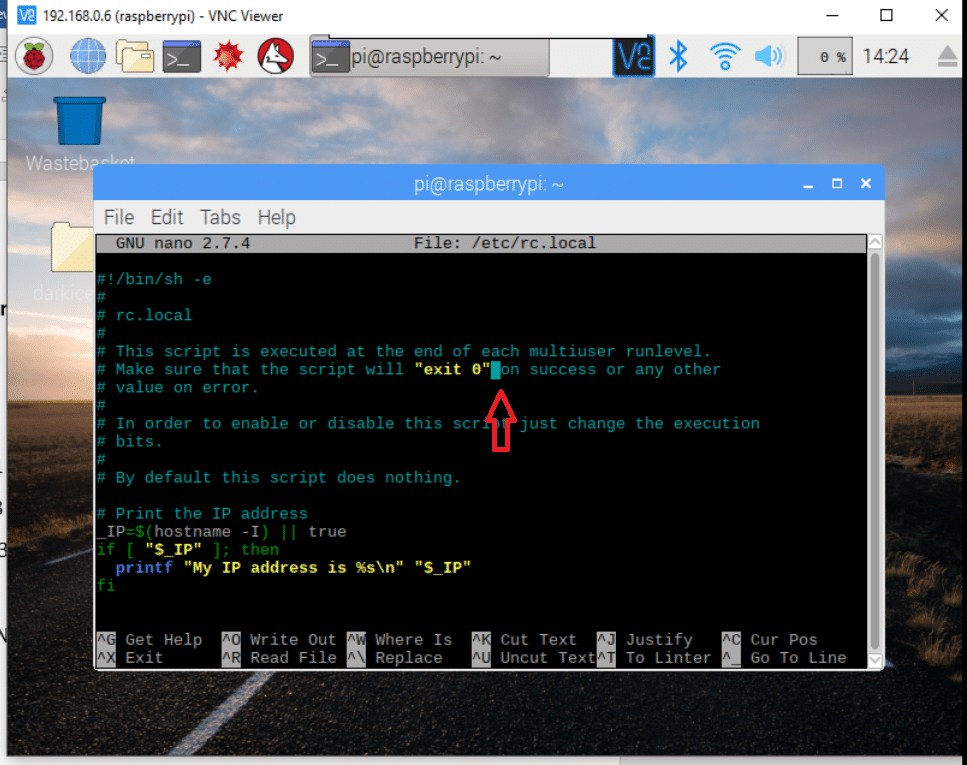
Edit /etc/rc.local and add this just above “exit 0” to install these rules on boot.
sudo nano /etc/rc.local
iptables-restore < /etc/iptables.ipv4.nat
Reboot
sudo nano reboot
Using a wireless device, search for networks. The network SSID you specified in the hostapd configuration should now be present, and it should be accessible with the specified password.
Note:- I have written a post for people looking for the Best Wireless Access Point to buy?, do read it If you are interested.
If SSH is enabled on the Raspberry Pi access point, it should be possible to connect to it from another Linux box (or a system with SSH connectivity present) as follows, assuming the pi account is present:
ssh pi@192.168.4.1
By this point, the Raspberry Pi is acting as an access point, and other devices can associate with it. Associated devices can access the Raspberry Pi access point via its IP address for operations such as rsync, scp, or ssh.
You may also like to read some other awesome projects
How to Build Pi Planter with Raspberry pi zero: a basic plant automation project
How to connect RFID module with Arduino Uno and OLED Display


