


In this article, we are building a very useful project where we can control our LED lights using our voice over smartphones. In this project, we will use the Bluetooth module to send smartphone voice commands to the Raspberry Pi, which will receive the transmitted signal wirelessly and will perform the appropriate tasks via hardware. We can replace relays with LEDs for AC appliances and build a home-automation project for voice control.
Collect Hardware
- Raspberry Pi 3 (any model can be used) (Buy Now)
- Bluetooth module HC-06 (Buy Now)
- Breadboard (Buy Now)
- 100 Ohm Resistance (3) (Buy Now)
- LED (blue, red, green) (Buy Now)
- 5Volt Power supply (Buy Now)
- Android phone
Bluetooth module:-
Bluetooth module consists of two parts, one is the Bluetooth serial interface module and a Bluetooth adapter. Bluetooth serial module is used to convert the serial port to Bluetooth.
How Bluetooth Module will work
Now open the AMR Voice application, go to the Options menu and connect it to the Bluetooth module by clicking “Connect Robot”:
You can use the Bluetooth module directly after purchasing it from the market because there is no need to change any setting of the Bluetooth module. The default baud rate for the new Bluetooth module is 9600 bps. You simply connect rx and tx to the controller or serial converter and provide the module with a 5 V DC regulated power supply.
Bluetooth module has two modes, one is the main mode, the other is from the mode. Users can set any mode by using some AT commands. Even the user can use the AT command to set the module’s settings. Here are some commands to use:
First, the user needs to enter AT mode at a baud rate of 38400 bps by pressing the EN button of the Bluetooth module or by providing a high level on the EN pin. Note: All commands should end with \ r \ n (0x0d and 0x0a) or ENTER KEY on your keyboard.
Later, if you send the AT to the module, the module will respond with OK
ATà technicalustad.command
AT + ROLE = 0 → Slave mode selection
AT + ROLE = 1 → main mode selection
AT + NAME = xyzà Set the Bluetooth name
AT + PSWD = xyz → set the password
AT + UART = <value1>, <value2>, <value3> à Set the baud rate
E.g. AT + UART = 9600,0,0
HC-06 Bluetooth module pin description:
- Status à open
- Rxà serial receive pin
- Txà serial transfer pin
- GND is grounded
- Vccà + 5volt dc
- KEYà entered in AT mode
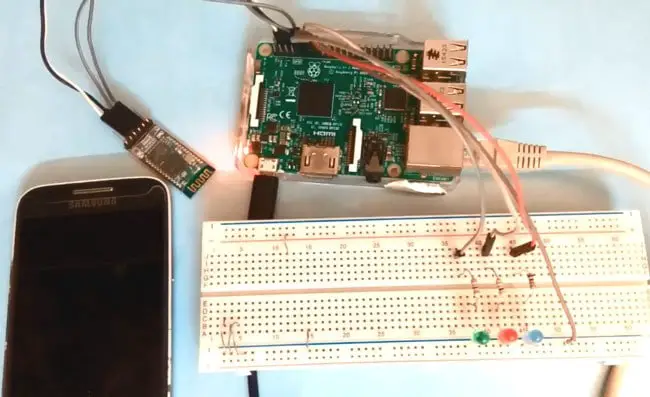
Project Description:
The job of this Voice Controlled LEDs project is very simple. In this project, we used three different color LEDs (blue, red and green). HC-06 Bluetooth module is used to receive voice command output in string format. The Raspberry Pi receives the input string from the Bluetooth module and compares it with the predefined string and performs the corresponding task.
In this project, we used the AMR Voice app (Android Meet Robot: Speech Recognition) on Android phones in order to provide voice commands to our Raspberry Pi from our smartphone.
AMR Voice App Installation and Configuration:
AMR Voice App can be downloaded and installed from Google Play Store. You also need to have the Google Voice App installed for this project. The AMR Voice application takes the sound as input and transforms it into a text string using the Android phone’s internal Voice Google (Google Voice App), then sends the converted text over Bluetooth.


Now user can tap over the Mic symbol on mobile screen and speak predefined Voice commands to operate the LEDs:


- “blue light on” (only blue LED turned on)
- “blue light off” (only blue LED turned off)
- “red light on” (only red LED turned on)
- “red light off” (only red LED turned off)
- “green light on” (only green LED turned on)
- “green light off” (only green LED turned off)
- “all lights on” (blue, red and green LEDs turned on)
- “all lights off” (blue, red and green LEDs turned off)
- “blink” (all LEDs start blinking with a 100 millisecond time period)
voice-controlled-LEDs-AMR-voice-app-demonstration
Then AMR voice app records this voice and sends it to Google Voice app to convert it into the text string format. Now this converted string is sent to Raspberry Pi via Bluetooth module and Raspberry Pi reads this string from UART port and store in a string in the code. And then compare it with predefined strings, if any match occurs then Raspberry Pi takes a respective action or performs a task.
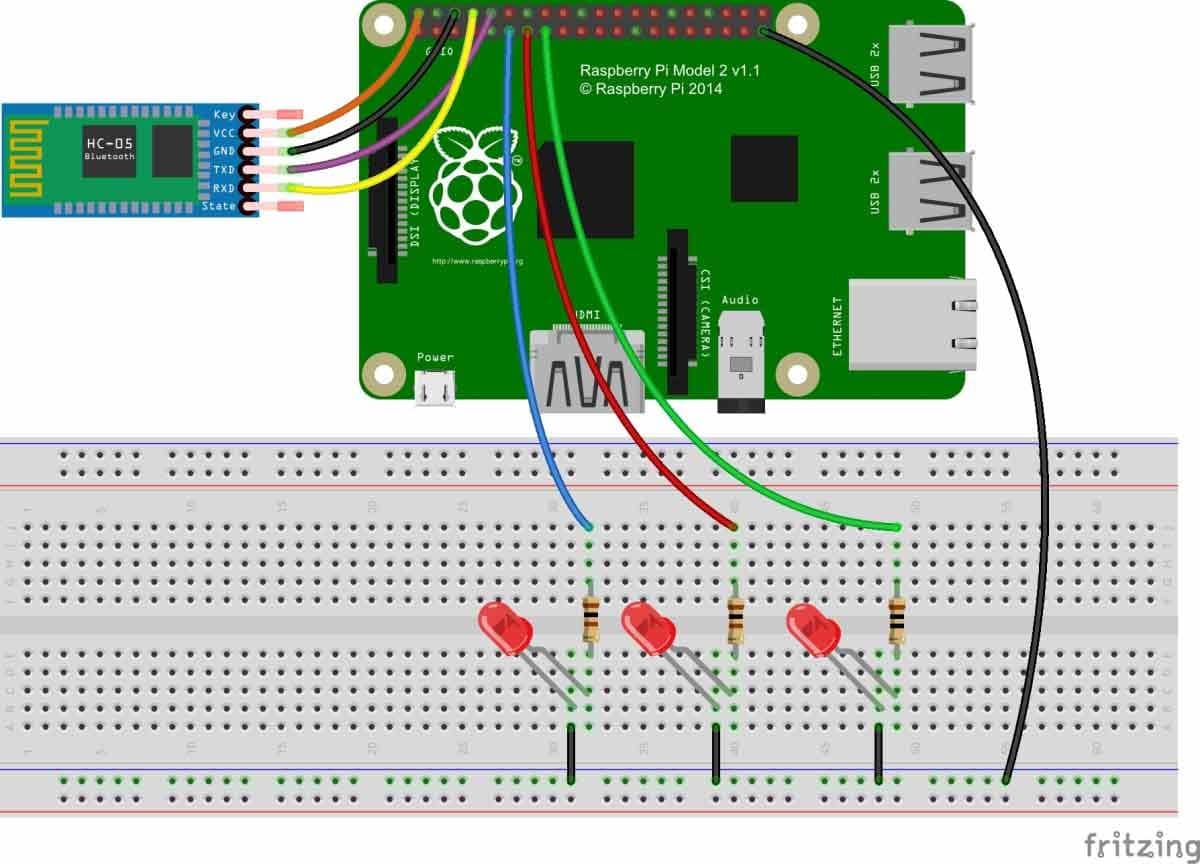
Wiring of a module :
Circuit of this project is very simple, which contains Raspberry Pi 3 Board, LEDs and Bluetooth Module (HC-06). Raspberry Pi reads the Bluetooth Module and control the LEDs accordingly. LEDs Blue, Red and Green are connected at GPIO 17, 27 and 22. Rx and Tx of Bluetooth Module are directly connected to Tx and Rx pins of Raspberry Pi. Remaining connections are shown in circuit diagram.
Raspberry Pi Configuration and Python Program:
We are using Python language here for the Program. Before coding, user needs to configure Raspberry Pi. You can check our previous tutorials for Getting Started with Raspberry Pi and Installing & Configuring Raspbian Jessie OS in Pi.
If you are Beginner in Raspberry pi then I will suggest you to follow the Noob Tutorial Link Here
After that you need to run following commands to run latest updates on Raspbian Jessie:
sudo apt-get update
sudo apt-get upgrade
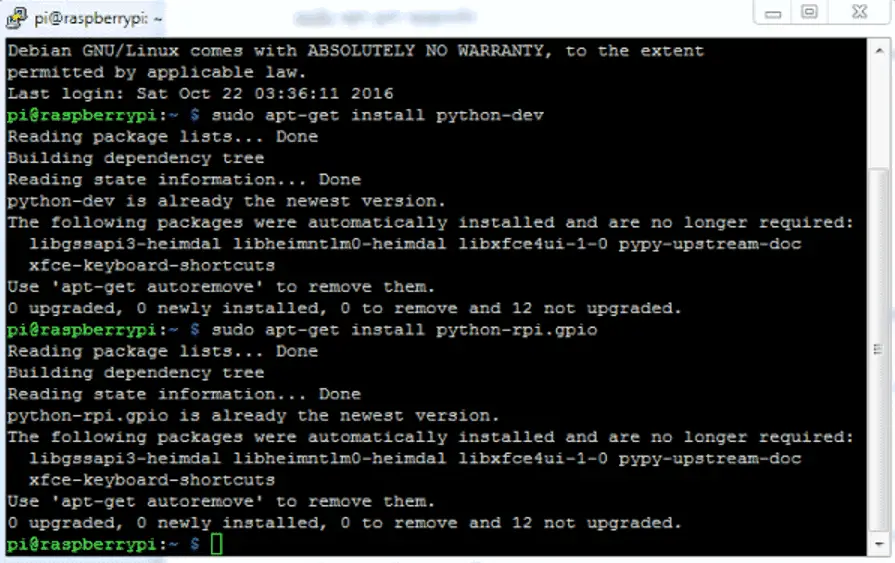
After it we need to install Raspberry Pi GPIO development tool, it can be installed by following commands:
sudo apt-get install python-dev
sudo apt-get install python-rpi.gpio
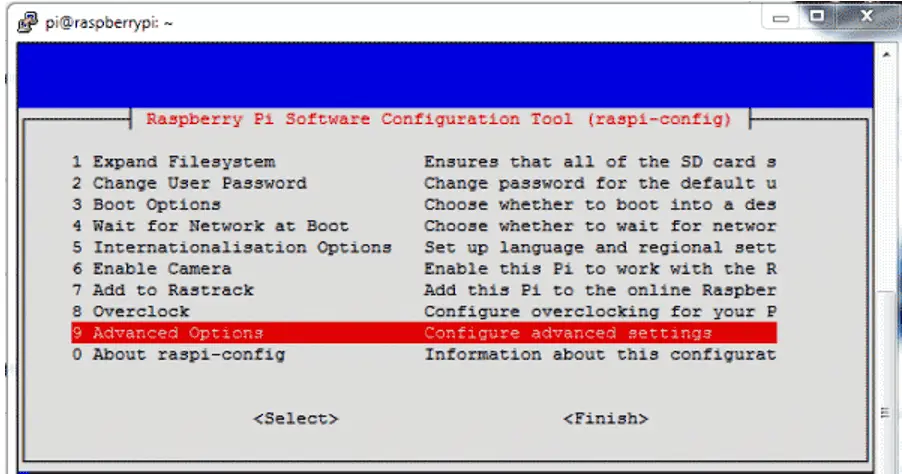
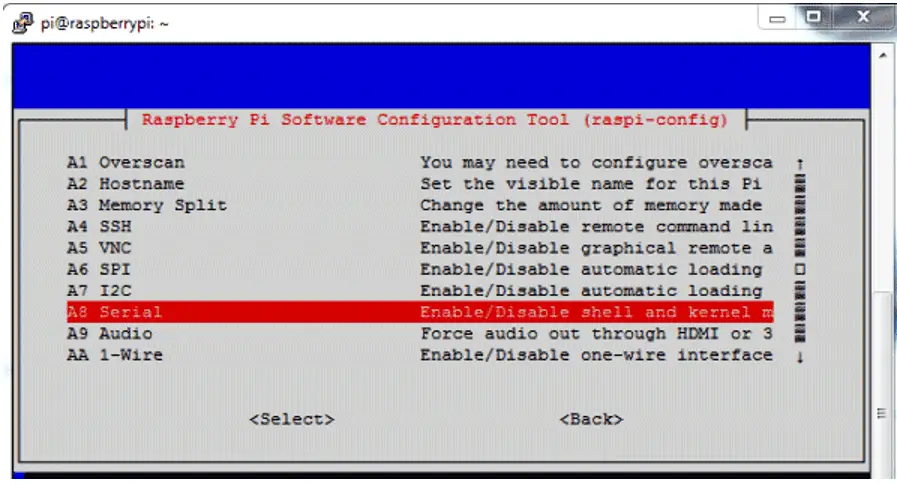
Then user needs to configure serial port of Raspberry Pi. Here we have used Raspberry Pi 3 for this project. So user needs to configure serial port according to their Raspberry Pi version. For Raspberry Pi 3, first user needs to disable console login via serial port, through RPi Software Configuration Tool. Open it by using below command:
sudo raspi-config
Then go to ‘Advance Options’, select ‘Serial’ and ‘Disable’ it.
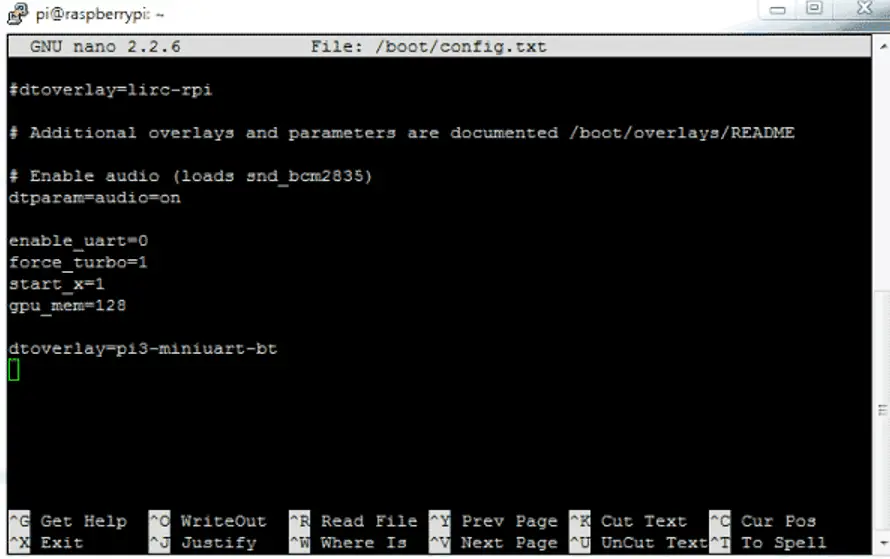
After this we need to disable inbuilt Bluetooth of Raspberry Pi 3 by adding dtoverlay=pi3-miniuart-bt at the end of /boot/config.txt file:
sudo nano /boot/config.txt
After adding the line reboot Raspberry Pi by issuing sudo reboot command.
Finally login in Raspberry Pi again and configure /boot/comline.txt file:
sudo nano /boot/comline.txt
And edit the file as below:
dwc_otg.lpm_enable=0 console=tty1 console=serial0,115200 root=/dev/mmcblk0p2 rootfstype=ext4 elevator=deadline fsck.repair=yes rootwait

Now you can run the Python program given below in Raspberry Pi and you are done! Program is easy and can be easily understandable.
So here we have completed building our Voice Controlled Devices using Raspberry Pi. You can further enhance it and modify it for controlling AC home appliances by adding relays.
Python Code:
import serial
import RPi.GPIO as GPIO
import os, time
led1=17
led2=27
led3=22
GPIO.setwarnings(False)
GPIO.setmode(GPIO.BCM)
GPIO.setup(led1, GPIO.OUT)
GPIO.setup(led2, GPIO.OUT)
GPIO.setup(led3, GPIO.OUT)
GPIO.output(led1 , 0)
GPIO.output(led2 , 0)
GPIO.output(led3 , 0)
Serial = serial.Serial(“/dev/ttyS0″, baudrate=9600, timeout=2)
data1=””
data=”
while 1:
while data != ‘#’:
data = Serial.read(1)
data1+=data
print data1
if data1.find(“blue light on”)>0:
GPIO.output(led1 , 1)
print “Blue Light on”
if data1.find(“blue light off”)>0:
GPIO.output(led1 , 0)
print “Blue Light Off”
if data1.find(“red light on”)>0:
GPIO.output(led2 , 1)
print “Red Light on”
if data1.find(“red light off”)>0:
GPIO.output(led2 , 0)
print “red Light Off”
if data1.find(“green light on”)>0:
GPIO.output(led3 , 1)
print “Green Light on”
if data1.find(“green light off”)>0:
GPIO.output(led3 , 0)
print “Green Light Off”
if data1.find(“all lights on”)>0:
GPIO.output(led1 , 1)
GPIO.output(led2 , 1)
GPIO.output(led3 , 1)
print “All Lights on”
if data1.find(“all lights off”)>0:
GPIO.output(led1 , 0)
GPIO.output(led2 , 0)
GPIO.output(led3 , 0)
print “All Light Off”
if data1.find(“blink”)>0:
for k in range (100):
GPIO.output(led1 , 1)
GPIO.output(led2 , 1)
GPIO.output(led3 , 1)
time.sleep(0.1)
GPIO.output(led1 , 0)
GPIO.output(led2 , 0)
GPIO.output(led3 , 0)
time.sleep(0.1)
Serial.flush();
data=””;
data1=””;


