In Windows 10, the Action center is responsible for giving you notifications and allowing you to access settings quickly with the help of “quick settings”.
But if you are getting the notification but aren’t able to access it then you know that your Action center is not working. In this article, we are going to discuss the cause of the Windows 10 Action center won’t open issues and fixes of this problem.
Along with these fixes, I will show you the advanced way to manage your action center.
Why is Windows 10 Action center won’t open
There are a few reasons why the action center won’t open in Windows 10:-
You might have disabled Action Center, even though, action-center is enabled in Windows 10 but because of some unintentional setting twitches, you might have disabled the Action Center.
Corrupt User Profile, this is a big thing and the action center won’t open is a symptom of it, therefore, you should take a backup of your files.
Corrupt system files, sometimes because of incomplete download or viruses and malware your system files got corrupt, therefore, your action center won’t open.
You should not take this for granted as the weirdness of the action center can cause big trouble in the long run. Therefore, we are going to discuss methods and techniques by which you will solve this problem.
Windows 10 Action Center Won’t Open: 11 Fixes
As mentioned earlier, the weirdness of the action center can cause big trouble, therefore, in this section, we will be discussing the fixes.
First of all before concluding anything, press Win + A. If this doesn’t open the Action Center then you know that you are dealing with a problem.
1. Fix Action Center by restarting Windows Explorer
Sometimes, Windows Explorer can be the reason behind the weirdness of Action Center. Therefore, we should try to restart Windows Explorer.
To restart the Windows Explorer you just need to be obedient to the following steps:-
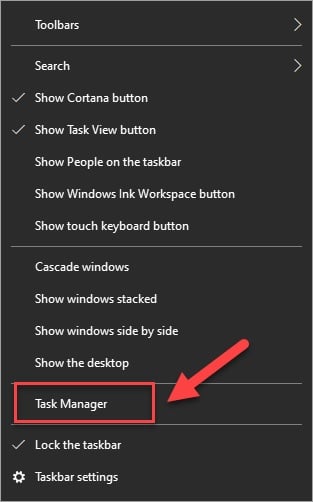
Step 1: Launch the Task Manager by right-clicking on the taskbar and then click on Task Manager from the appeared list.
Step 2: Now, under the process tab, right-click on the Windows Explorer option and then from the appeared list click on “End Task”.
Now, you have ended the task.
To restart the task use the following steps.
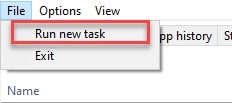
Step 3: Click on the “File” option top-left corner of the window and then from the appeared list click on “Run new task”.
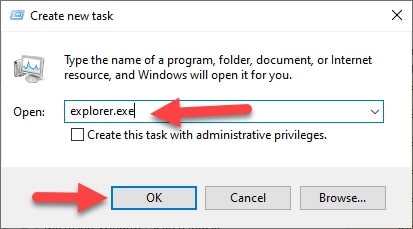
Step 4: Click will redirect you to the “Create new task” window, type “explorer.exe”, and then click OK.
Retry launching the Action Center by pressing Win + A. Hopefully, you will be able to launch Action Center.
2. Fix Windows 10 Action center won’t open by enabling/restarting
Sometimes the problem can be as pathetic as a disabled Action Center. As mentioned earlier, you might have unintentionally disabled the Action Center, if that’s the case then you can enable it using the following steps.
If that’s not the case then you can even restart the Action Center with the help of the following case.
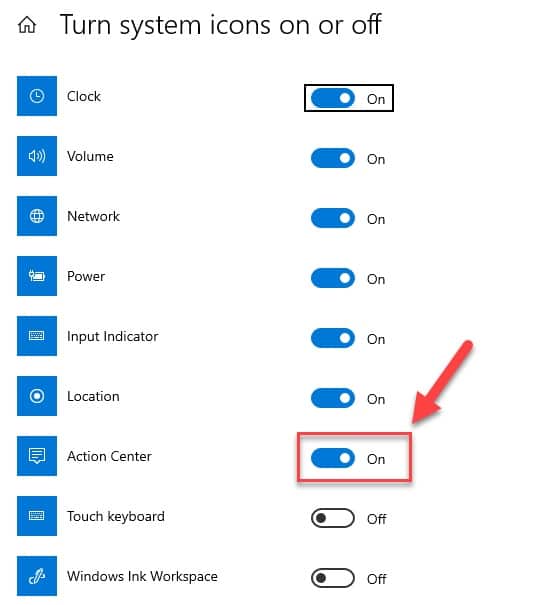
Step 1: Launch Systems Icon Settings by searching “Turn system icons on or off” from the start menu.
Step 2: On the appeared screen you will see different processes with a switch toggle in front of them, among them you need to search Action Center and then use the toggle to enable it.
If your Action Center is already enabled then you need to disable it, wait for a few minutes, and then enable it.
Now restart the device and press Win + A. Hopefully, your Action Center will start working.
3. Fix Action Center by re-registering to it
There were instances when the user’s action center file got corrupted. If you are dealing with the same problem then there is an easy fix for you, just re-register to the Action Center.
To re-register to the action center you need to follow the prescribed steps:-
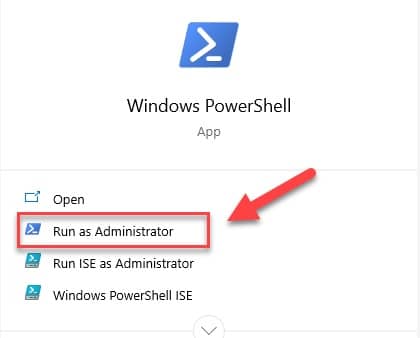
Step 1: Launch PowerShell in Elevated/Admin mode by either searching it from the start menu or by right-clicking the start menu and selecting “Windows PowerShell(Admin)” from the appeared list.
Step 2: Now, type “Get-AppxPackage | % { Add-AppxPackage -DisableDevelopmentMode -Register “$($_.InstallLocation)\AppxManifest.xml” -verbose }” and hit enter.
Now the PowerShell will automatically re-register the action center.
4. Fix Action Center by renaming the UsrClass files
Your desktop’s ShellBag information is stored in the UsrClass file with the extension .DAT. The folder’s information such as its size, the icon, the location, the extension, etc is stored in that ShellBag.
Not only that, but the UsrClass files also contain information about the ZIP and the virtual folders of Windows 10. Therefore, you know that it is something important.
Their importance can be certified from the fact that your Windows search button, the volume rocker, the start-menu won’t work if these files are absent.
But, you shouldn’t panic as we have an easy fix to this problem. We are going to rename the UsrClass file in order to fix the action center won’t open the problem.
To do that, you need to be obedient to the following steps:-
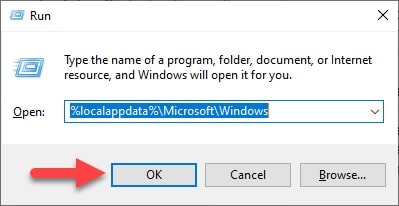
Step 1: First of all, launch RUN(Win + R), and then write “%localappdata%\Microsoft\Windows” and hit enter.
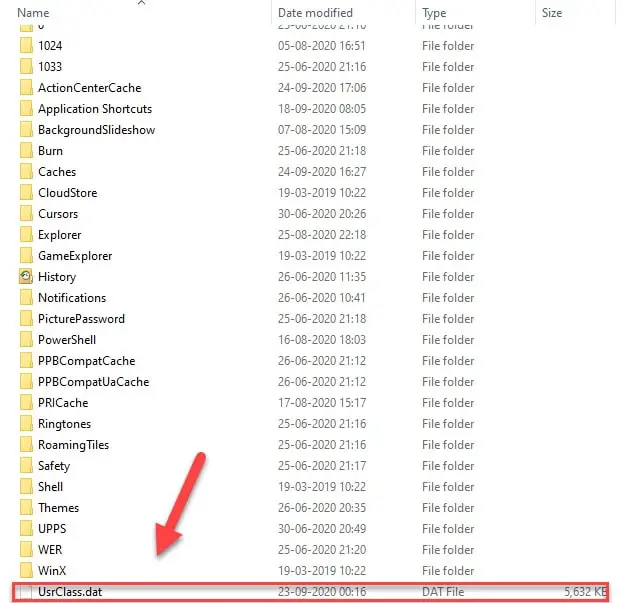
Step 2: You will be redirected to Windows Explorer, there you need to search for the “usrclass.dat” file and rename it with “usrclass.old.dat”.
Finally, restart your computer and hopefully, your action center is in action now.
5. Fix Action Center by updating your Windows
Sometimes, the problem can be because of your laziness as in this case. Microsoft tends to release updates that contain security patches and bug fixes.
If your action center is not opening after the installation of an update, chances are that Microsoft has already rectified the error with the help of an update. Therefore, it is recommended to check for updates regularly.
To check updates in Microsoft Windows one needs to follow the prescribed steps:-
Step 1: Launch setting by clicking on the start menu and then the settings icon placed at the bottom-left side of the menu.
Step 2: From the appeared window click on the Update and Security option.
Step 3: From the list titled “Update & Security” select “Windows Update” and then “Check for updates”.
The update will take time, therefore, wait for a few minutes and allow your PC to reboot. After the completion of the update, press Win + A, hopefully, your action center will work now.
6. Fix Action Center by cleaning the disk
Sometimes, because of the disk being overfilled your operation becomes sluggish, therefore, it stops you from performing certain tasks such as launching the Action Center.
Therefore, in this section, we will be going to perform disk cleanup and see whether it rectifies your problem or not.
To perform disk clean-up you need to be obedient to the prescribed steps:-
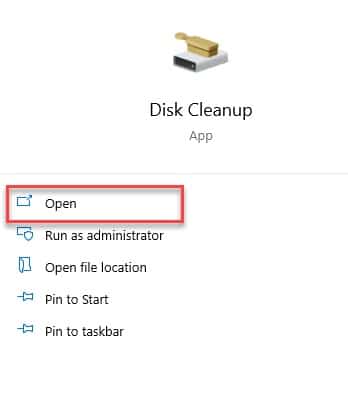
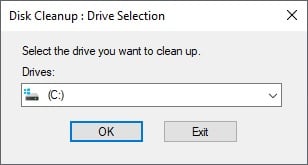
Step 1: Launch the disk cleanup application by searching it out from the start menu.
Step 2: From the appeared disk cleanup window, under the section titled “Select the disk you want to clean” select the types of files you want to delete and then press OK.
Note: At first, just clean the D drive first, and then if the things don’t get back to normal then you can select different files.
Finally, restart your computer and hit Win + A and you are good to go.
7. Fix Action Center by Creating a new user account
As mentioned earlier in the article, one of the most prominent reasons why your action center is not working is the malfunction of the user account.
Therefore, if after all the effort you are not able your action center is not opening then you should try to create a new user account.
To do that, you need to follow these steps:-
Step 1: Launch setting by clicking on the start menu and then the settings icon placed at the bottom-left side of the menu.
Step 2: From the appeared window click on Accounts.
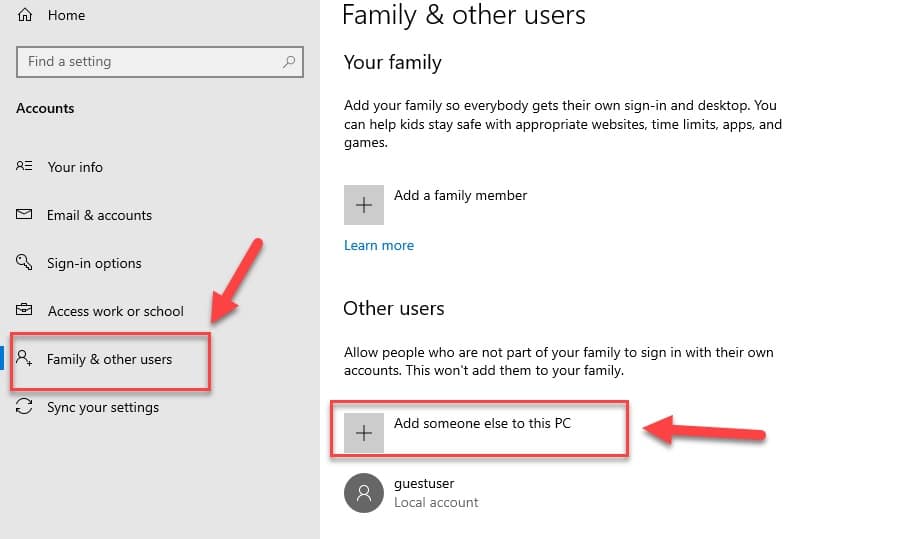
Step 3: From the list placed on the left side of the screen select Family and other users.
Step 4: Now, under the “other users” section, click on “Add someone else to this PC” to add an account.
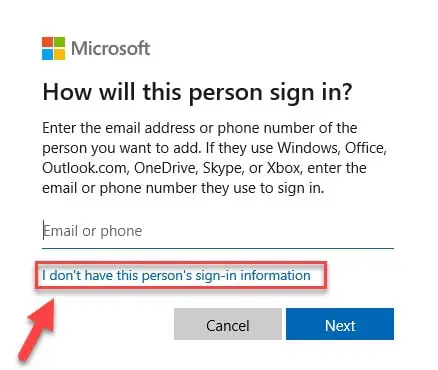
Step 5: click will redirect you to Microsoft login panel, since you need a user, therefore, click on the “I don’t have this person’s sign-in information” option.
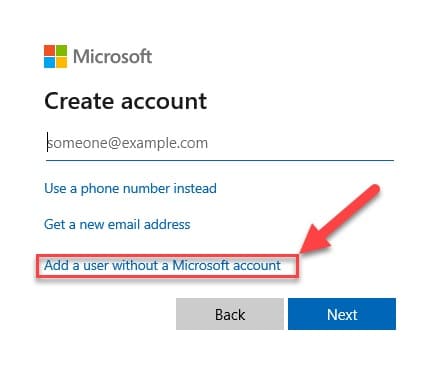
Step 6: Now, Microsoft will ask you to create an account, there you need to click on “Add a user without a Microsoft account” option.
Step 7: Finally, you need to enter the required data and create an account.
After the completion of the account creation process, you need to restart your computer log in to that account and you are good to go. Your action center will start working again.
8. Fix Action Center by Performing a System Restore
Windows often release bug fixers in the updates but sometimes they are a bit late in doing that therefore, the best option for you would be to perform a system restore as it will eradicate any problem caused by the updates.
To do that you need to follow the prescribed steps;-
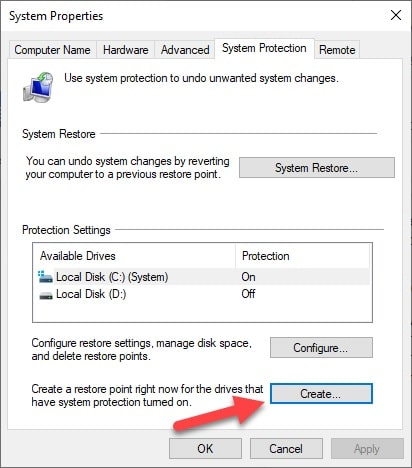
Step 1: Search out the Restoring application from the Start menu by typing “Create a restore point”.
Step 2: from the appeared window click on the “Create” button under the System Protection tab.
Step 3: A box will appear where you need to name the task for example “restore”.
Step 4: Now, click on the “system restore” button and then next.
Step 5: You will be redirected to a window where you need to click on “Show more restore points”. This will allow you to see the task that you have created. Click on Next.
Step 6: Finally, finish the task by clicking on finish>OK.
Now, restart the device and you are good to go.
9. Fix Action Center by cleaning the Hard Drive
This is a very radical step but sometimes it is better to do that. A lot of times our operating system acts weird because of the corrupted files and the formation of junks. Therefore, sometimes the only solution to this problem is performing a complete cleanup.
To clean your hard drive one needs to follow the prescribed steps:-
Step 1: Launch Command Prompt as an administrator by either searching it out from the start menu or by the RUN(Win + R), type “cmd” and then hit Ctrl + Shift + Enter.
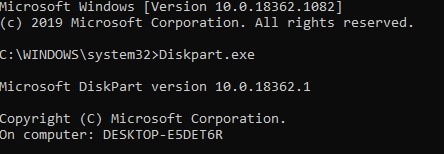
Step 2: type “diskpart” to enter the diskpart portal.
Step 3: Now, in the diskpart prompt you need to type “list disk” to see the number of disks you have.
Step 4: To select a disk you need to type “Select disk <the disk you want to select>” and hit enter.
Step 5: Finally, enter “clean” and job done.
Control Windows notifications using Focus assist
Notifications that pop up on your screen when you’re working or playing games are distracting,
especially when they have to be clicked to be dismissed. To avoid these interruptions, you can use ‘Focus assist’ in Windows 10 to limit notifications or stop them altogether.
Open the Settings app (Windows+i) and click System, then ‘Focus assist’. There are three options: the default Off setting, which shows all notifications; ‘Priority only’,
which hides unimportant notifications and only shows those that need your attention; and ‘Alarms only’, which hides all notifications except for alarms that you’ve set for yourself.
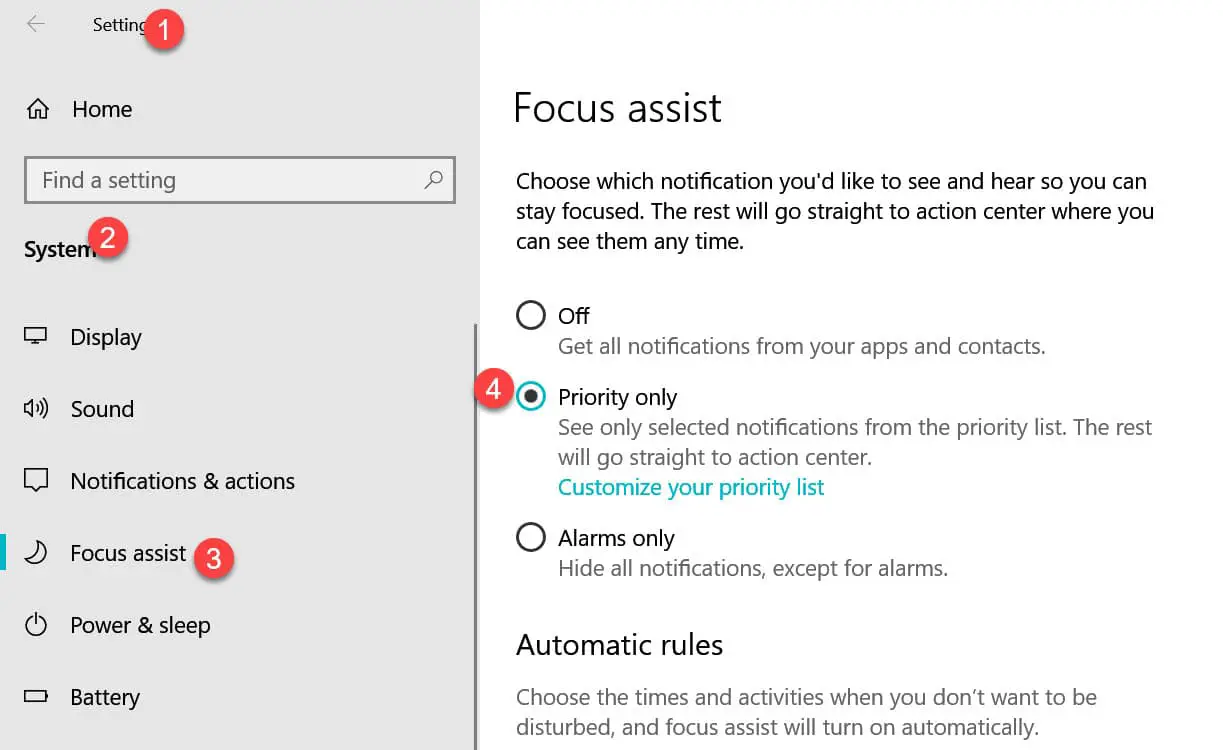
Click the icon at the right-hand end of the taskbar’s notification area to open the Action Centre, then click the Focus-assist button to cycle through the three notification settings.
Set global notification settings
Notifications can pop up in a variety of locations – in the bottom-right corner of your screen, within the Action Centre, and on the lock screen. Sometimes they’re accompanied by a sound.
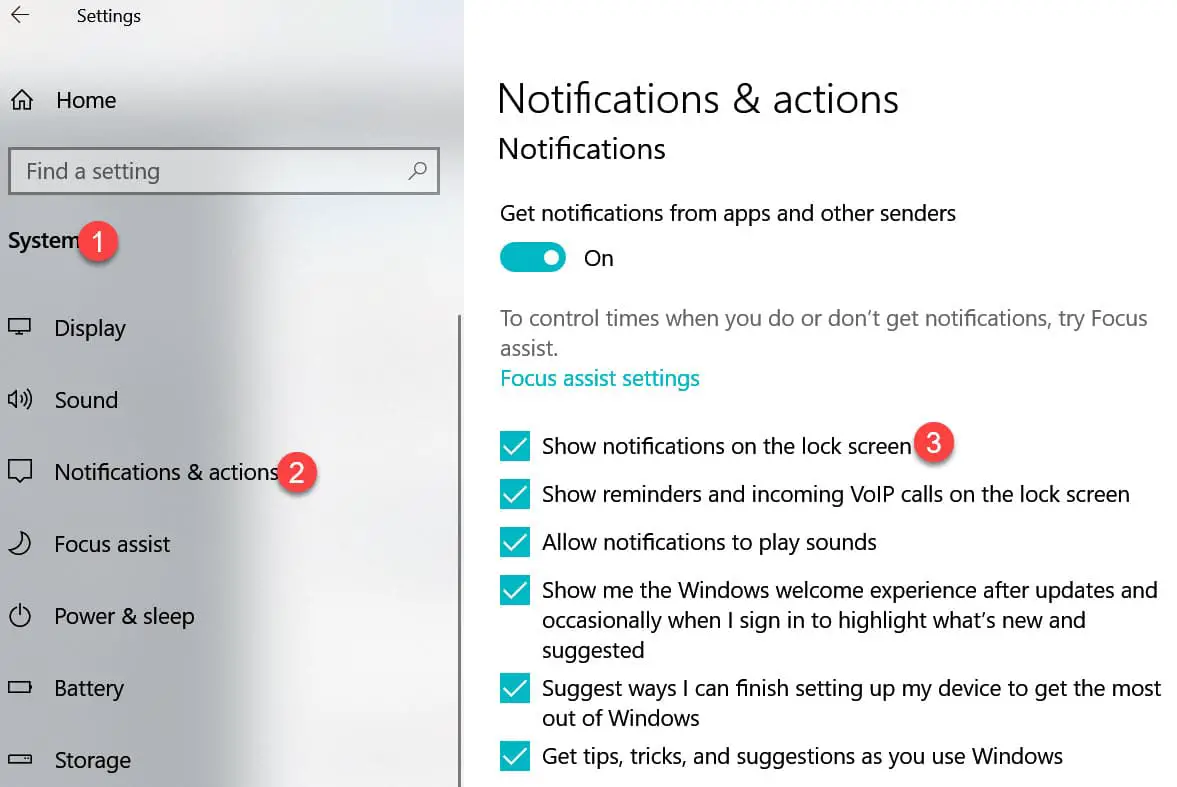
To configure these notifications, go to Settings, System, ‘Notifications & actions’ and look for the Notifications section. Tick or clear ‘Show notifications on the lock screen’ to suit your preference.
This is a global setting, so it applies to everything. You can also set the global ‘Allow notifications to play sounds’ box, as you prefer.
Enable or disable app notifications
Most notifications come from apps bundled with Windows or downloaded from the Microsoft Store, but it’s also possible for other programs to display them.
To see which apps are able to pop up these distractions, open Settings, System, ‘Notifications & actions’, then scroll down to the list of apps.
Here, you can use the switches to choose whether or not you want to see notifications from each app.
If you can’t find a program on the list,it may be because it can’t display notifications in the official Windows 10 way.
However, it may still show its own notification when the app is running. Some apps have their own settings that let you configure notifications from within the app.
For example, open Microsoft News from the Start menu and click the cog icon in the bottom-left corner to open its settings. Under the General tab, there is a Notifications section with three switches for ‘Breaking news’, Top stories’ and ‘Daily brief’. Turn them on or off as you prefer.
Open the Windows 10 Mail app and click the cog icon at the bottom. Select Notifications in the settings.
If you have more than one email account, you can configure each one separately. For example, if you have both Outlook and Gmail, you can set one to show notifications while the other one doesn’t, and one to play a sound while the other is set to silent.
Not all apps have notification options, but it’s worth looking for them in their settings.
Customize notifications in the Action Centre
Some notifications are sent straight to the Action Centre, rather than popping up in the bottom-right corner of your screen.
You might also miss notifications if you take a break because some are on a short timer and may disappear before you get a chance to see them.
To see missed notifications, click the icon on the right-hand side of the taskbar to open the Action Centre. Move the cursor over a notification to see its controls. You can click the up and down buttons to expand or shrink the notification.
Expanding a notification may display more information or provide buttons to interact with it. Click the X to remove the notification and click the cog icon to display a menu with additional options.
Configure the Priority list
You can use the ‘Priority only’ setting to exclusively show important alerts (see main tip, left), but who decides what’s important and what isn’t? You do.
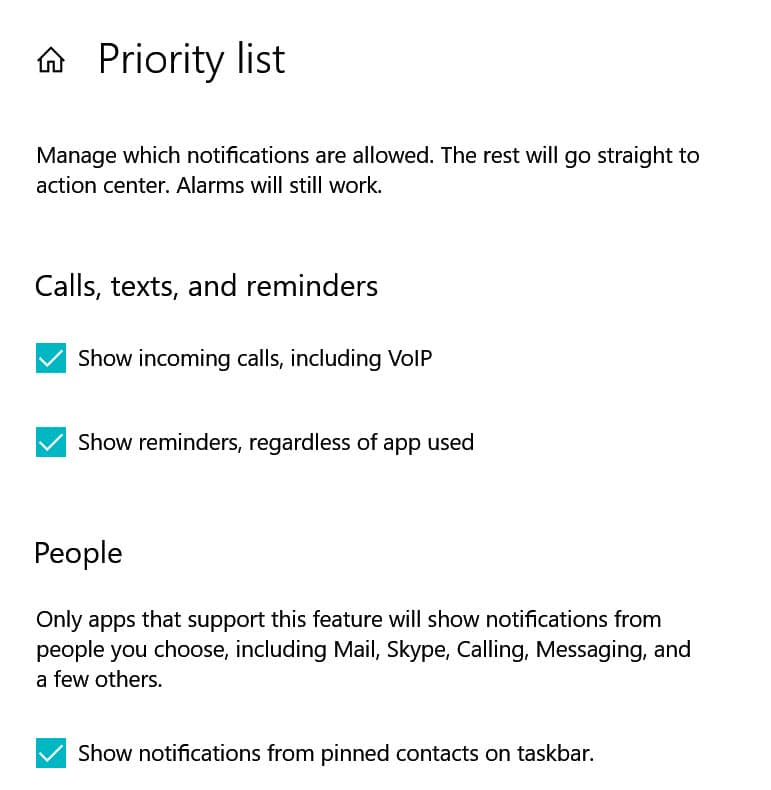
Go to Settings, System, ‘Focus assist’ and click the ‘Customise your priority list’ under the ‘Priority only’ setting.
The ‘Calls, texts, and reminders’ section lets you choose whether to show incoming calls, such as Skype or another video- or voice-calling app. Reminders can be shown regardless of the app.
In the People section, you can choose to always show notifications from contacts pinned to the taskbar. Use the plus button to add individuals.
At the bottom, in the Apps section, is a list of apps that you always want to see notifications from. You can add more apps to this list by clicking the plus button.
Set rules for notifications
As well as letting you choose which apps show notifications, focus assist lets you control when they appear. So you could, for example, set quiet times during work hours when only limited notifications are allowed.
Open the Settings app and click System, then ‘Focus assist’ and scroll down to the ‘Automatic rules’ section. If you play games, turn on the switch next to ‘When I’m playing a game’ so you won’t be interrupted.
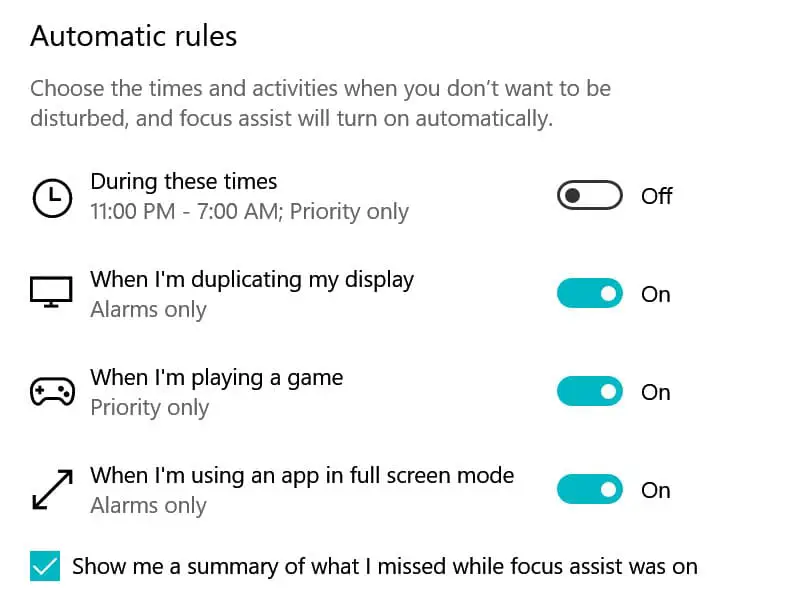
If you watch videos on your PC, turn on ‘When I’m using an app in full-screen mode’. Clicking the option after enabling this lets you choose whether to show only alarms or alarms and priority messages.
The ‘During these times’ option is particularly useful. Turn on the switch, then click the option. Set the start and end times for when you normally work, play games or watch videos. You can set the repeat to Daily, Weekends or Weekdays, and choose ‘Alarms only’ or ‘Focus only’ for the ‘Focus level’.
Tweak advanced app notification options
Every app that displays notifications can be individually configured. Go to Settings, System, ‘Notifications & actions’ and click one of the apps in the list.
There are separate tick boxes to choose whether notification banners display in the corner of the screen or in the Action Centre.
You can set the number of notifications you want to be displayed in the Action Centre, from 1 to 20 – set a low number if you want to avoid overactive apps filling it up.
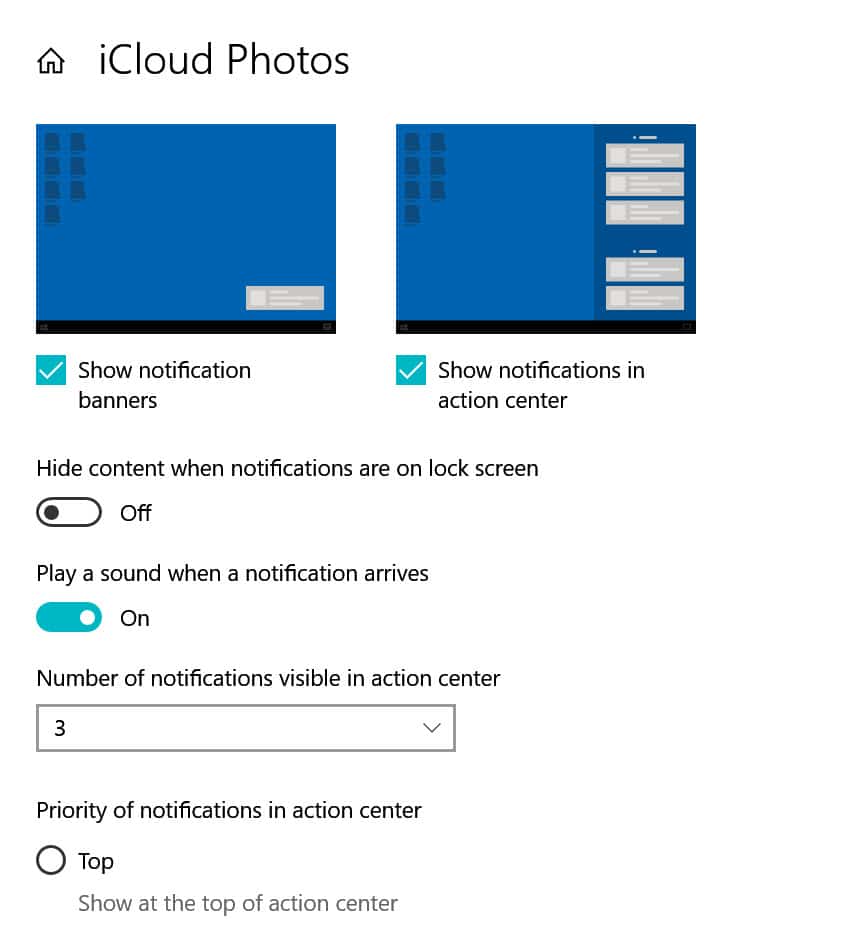
To ensure important notifications don’t get pushed out of the Action Centre by less important alerts, scroll to the bottom of the section and select either Top or High for the priority, rather than Normal.
Control website notifications
As well as Windows and apps, websites and services can display notifications on your desktop. However, you need to be selective or you’ll be inundated, so think carefully before clicking OK if a notification pops up when you’re visiting a website asking to send notifications.
If you are seeing too many website notifications, open the menu in Chrome, click Settings, and find the ‘Privacy and security’ section. Click Site settings, then Notifications.
In Edge, go to Settings, ‘Site permissions’, then Notifications. There is a simple switch in both browsers.
If you don’t want to see any notifications from websites, turn it off.
Both Chrome and Edge have a quiet switch. If notifications are allowed, turning this on shows a less intrusive style of notification.
A normal pop-up stops you browsing the web until it’s dismissed, but quieter notifications can be ignored. In fact, if Google detects that people often block a site, quiet notifications are automatically applied.
With notifications turned on, when you visit a site and are asked whether to allow the site to send them, your response is added to the Block or Allow list. Use the controls to add or remove sites from these lists.
Wrap-up:-
In this article, we have seen 9 fixes of Action Center won’t open problem, let’s quickly just go through them:-
- Action center is responsible for giving you notifications and allowing you to access settings quickly with the help of “quick settings”.
- There are different reasons why your action center isn’t opening such as a corrupted profile or file and disabled action center.
- You can fix action by restarting the windows explorer, by just right-clicking on Windows Explorer from the task manager and then click “End Task” from the list to disable it. Then file>Run new task, type “explorer.exe” and click OK.
- If your action center is disabled it then to enable it, launch Systems Icon Settings, and then use switch toggles to enable it.
- To fix your action center by re-registering to it, launch PowerShell as an admin and type “Get-AppxPackage | % { Add-AppxPackage -DisableDevelopmentMode -Register “$($_.InstallLocation)\AppxManifest.xml” -verbose }”
- To fix your action center by updating the window, you can go to the control panel and then click Update and Security>Windows update>check for update.
- To fix the action center by creating a new account, launch settings then click on accounts>Family and other users>I don’t have this person’s sign-in information>Add a user without a Microsoft account enter your information and you are good to go.
- To fix the action center by renaming UsrClass files, launch run and then type “%localappdata%\Microsoft\Windows” and then rename usrclass.dat” to “usrclass.old.dat”.
- To fix the action center by performing a system restore, go to restore portal, click on create>name the task>system restore>next>finish>OK.
- To fix the action center by cleaning the hard disk, launch the command prompt as an admin, type “diskpart”, then to know the different disks you have, type “list disk”, select the disk as “Select disk <the disk you want to select>”, finally type “clean”


