


Windows OS gives you an option to add two different types of users on a single system, the administrator and the standard user. They both have different privileges.
The administrator privilege is obviously more than the privilege of a standard user. The administrator privilege includes a complete grab over all the computer’s settings, an option to install or remove software, run the command prompt as an administrator, and the PowerShell in elevated mode, etc.
On the other hand, a standard user is forbidden from all the mentioned privileges. Even though they can alter the settings, or install an application but the changes will only be applicable for that particular account.
But the best part about this feature is that you can any time change the account type with the help of few twitches.
Check if your account has administrator privilege
There are few very easy ways to check whether your account has administrator privilege or not. All of the methods to check administrator privilege is listed below:-
1. Use settings to check if your account has administrator privilege
To check, whether your account has administrator privilege or not with the help of settings application, you need to follow the following steps:-
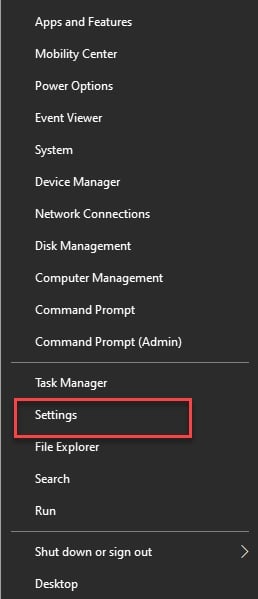
Step 1: Launch the Settings application either by searching it out from the start menu or right-click on the start menu and then choose “Settings” from the appeared list.
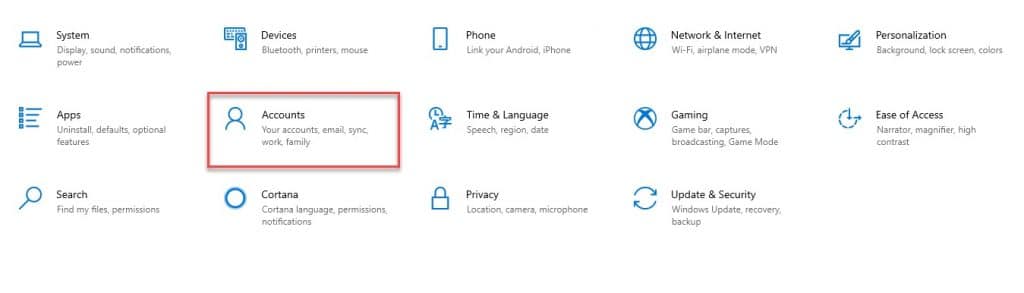
Step 2: From the appeared screen click on Account.
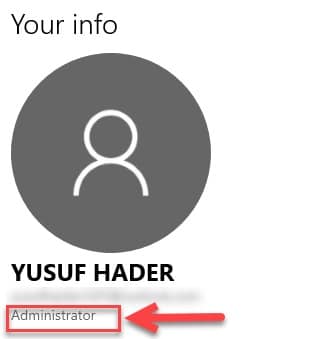
Step 3: Make sure that you are on the “Your Info” tab, then under your profile picture and your email ID, if you see “Administrator” then you know that your current account has administrator privilege.
2. Use Local Users and Groups to check if your account has administrator privilege
To check, whether your account has administrator privilege or not with the help of “Local Users and Groups” application, you need to follow the following steps:-
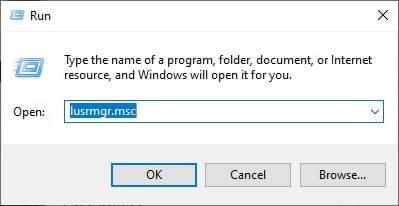
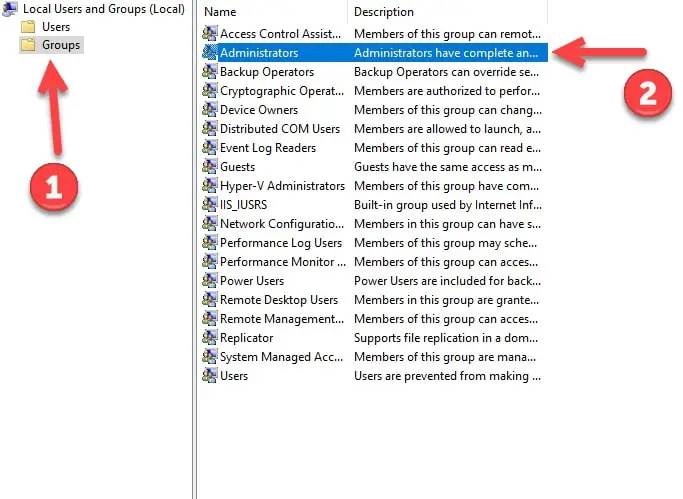
Step 1: The Local Users and Groups application by RUN(Win + R), type “lusmgr.msc”, and hit enter.
Step 2: From the left side of the screen, under Local User and Groups(Local) you will a folder named groups, click on that, and then from the appeared list of groups, double-click on Administrator.
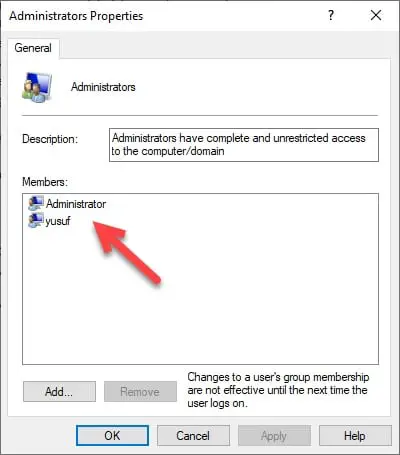
Step 3: Then click will redirect you to administrator properties, there under the members’ option, you will see all the name of the account having administrator privileges.
3. Use the Command Prompt to check if your account has administrator privilege
To check, whether your account has administrator privilege or not with the help of one of the most useful applications in Window OS that is the Command Prompt, you need to follow the following steps:-
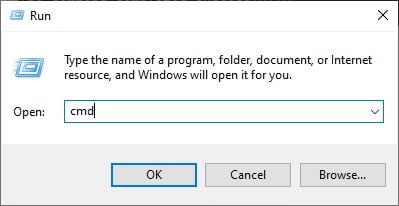
Step 1: Launch the command prompt either by searching it out from the start menu or by RUN(Win + R), type “cmd” and hit enter.
Step 2: Type net user <name of the account>, for example, here my account name is “yusuf”, therefore, the command would be net user yusuf.
Step 3: From the appeared information, the Local Group Member section, if you see an administrator and User then you know that your current account has administrator privilege.
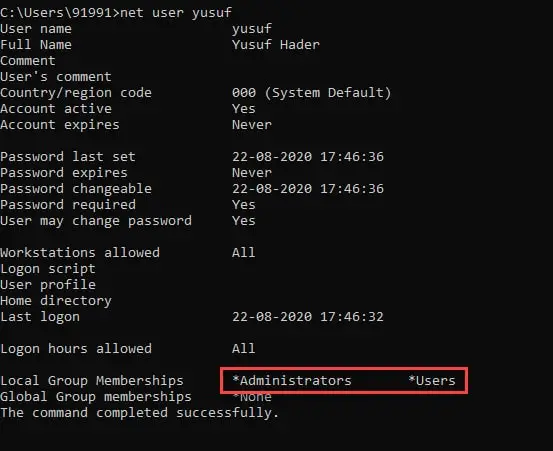
On the other hand, if there is just “User” written in front of Local Group Member then you know that your account is forbidden from the administrator privilege.
4. Use the computer management to check if your account has administrator privilege
To check, whether your account has administrator privilege or not with the help of the Computer Management application, you need to follow the following steps:-
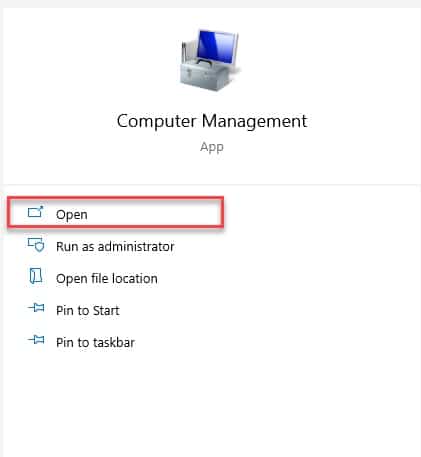
Step 1: Launch the computer management application by searching it out from the start menu.
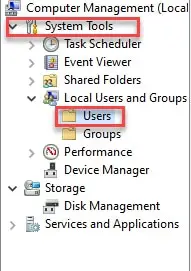
Step 2: Now, from the left side of the appeared window, you need to expand the System tools first and then Local Users and group. Then from the appeared list of folders, select Users.
Step 3: From the right side of the window, right-click on the user whose privilege you want to check, and select Properties from the appeared list.
Step 4: Now, under the “Members of” tab, if you see both administrator and the user then you know that the selected account has administrator privilege.
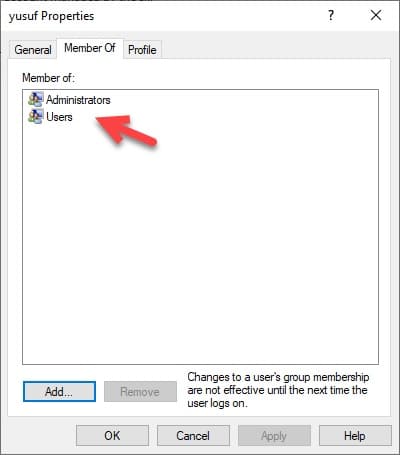
If there is a User and not an administrator then this implies that the selected account is forbidden from the administrator privilege.
5. Use the PowerShell to check if your account has administrator privilege
The PowerShell is an alternative for the command prompt. Microsoft is pushing it in new updates. Therefore, if you aren’t able to find the command prompt, look for another command-line interpreter, the PowerShell.
To check, whether your account has administrator privilege or not with the help of the PowerShell application, you need to follow the following steps:-
Step 1: Launch PowerShell by searching it out of the start menu or launch RUN(Win + R), type “powershell”, and hit enter.
Step 2: Type the following command one by one:-
Note: You need to hit enter after every entry.
Whoami
Get-LocalUser -Name <account name> | Select PrincipalSource
You can see the order in the Screenshot below

Now, as you can see below the principal source it’s Microsoft Account, which means that your current account has administrator privilege. On the other hand, if you see Local written there then you know that the selected account is forbidden from the administrator privilege.
6. Use the Control Panel to check if your account has administrator privilege
To check, whether your account has administrator privilege or not with the help of the Control Panel application, you need to follow the following steps:-
Step 1: Launch the Control Panel by either searching it out from the start menu or from RUN(Win + R), type “control” and hit enter.
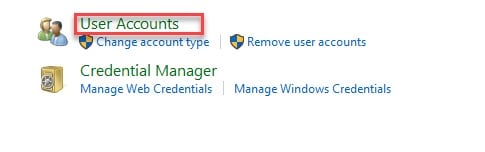
Step 2: From the appeared screen, click on User Account.
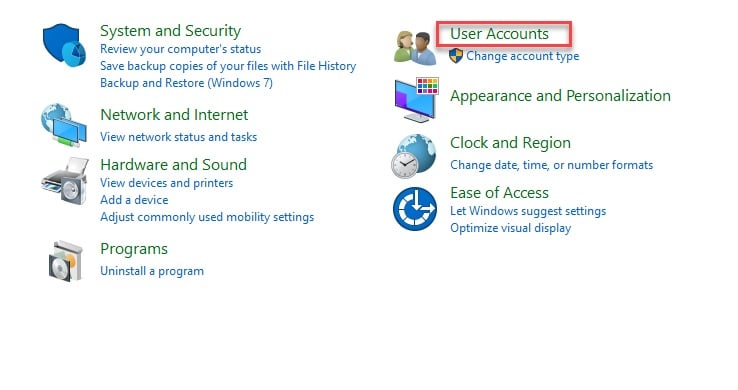
Step 3: On the appeared screen, you need to click on User Account.
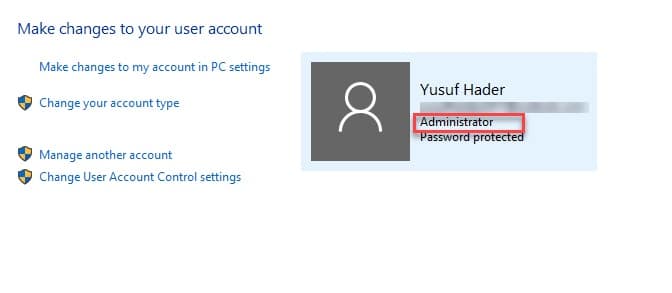
Step 4: This will redirect you to a panel where you can change the user account settings, from on the left side, under your profile and email address if you see administrator, then this implies that your account is an administrator account.
Change your account privilege to the administrator
Now, after knowing your account type it’s time to change it to the administrator. We have different methods to do it. All of them are listed below:-
1. Make your account administrator by Settings
The following are the prescribed steps you need to take in order to change the user account privilege.
Step 1: Launch the Settings application either by searching it out from the start menu or right-click on the start menu and then choose “Settings” from the appeared list.
Step 2: From the appeared screen click on Account.
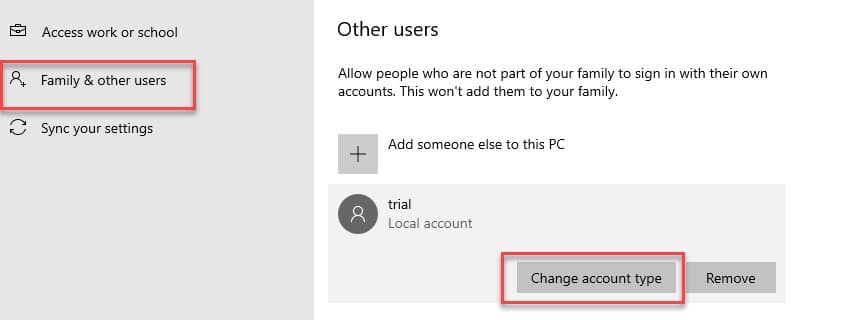
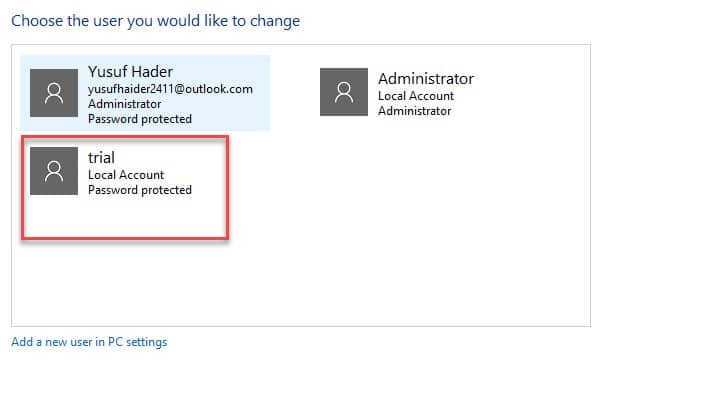
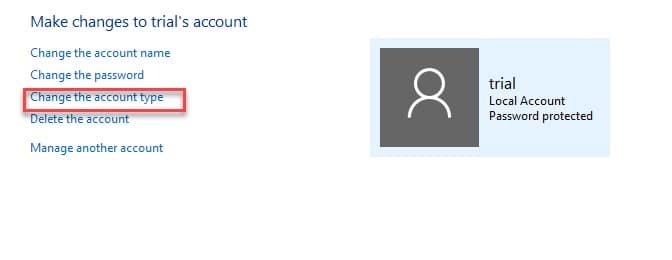
Step 3: Now, you need to go to the Family & Other users tab, select the user account, and then click on the appeared Change account type button.
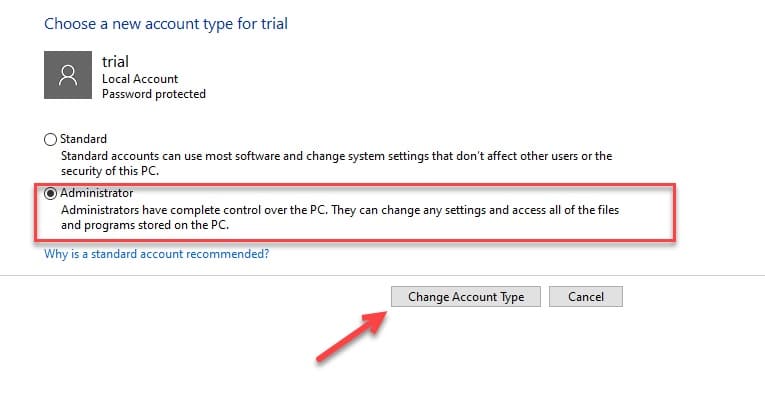
Step 4: From the appeared “Change account type” window, select Administrator and click OK.
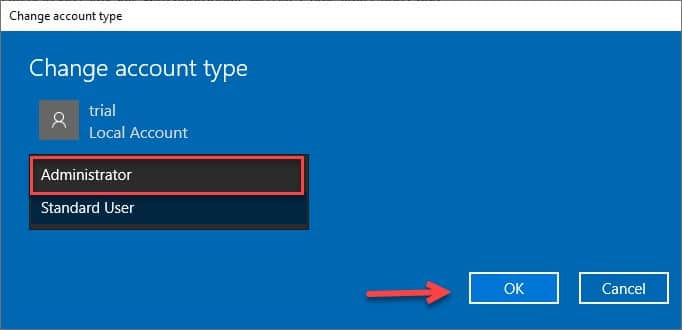
After the completion of the process, you need to restart your computer and you are good to go.
2. Make your account administrator by User Accounts
The following are the prescribed steps you need to take in order to change the user account privilege with the help of the User Accounts application.
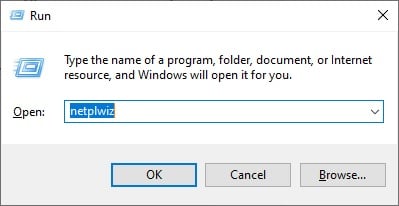
Step 1: Launch the User Account application by RUN(Win + R), type “netplwiz”, and hit enter.
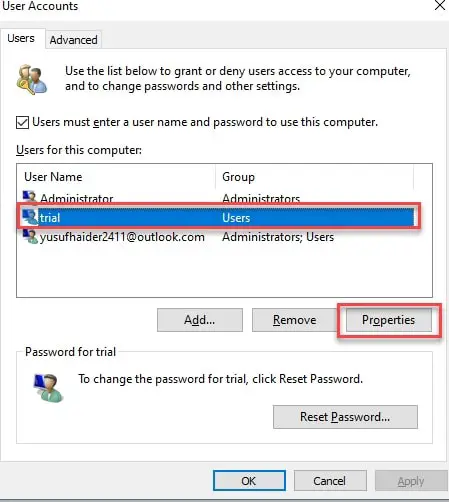
Step 2: From the appeared User Account window, you need to select a user account that you want to change the privilege of, then click on Properties.
Step 3: On the redirected window, go to the Group Member tab, there you need to select the Administrator and then OK.
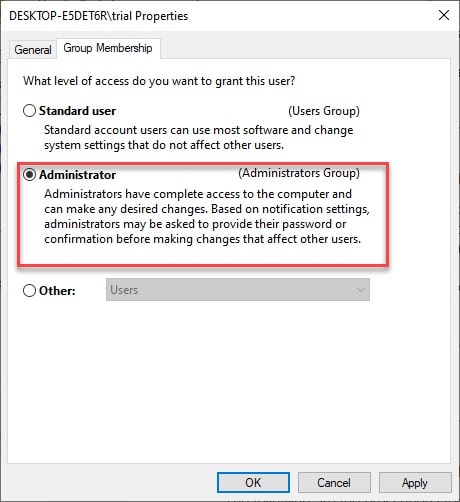
Step 4: Click Apply> Ok.
Step 5: From the appeared window, again click Apply> OK.
After the completion of the process, you need to restart your computer and you are good to go.
3. Make your account administrator by Control Panel
The following are the prescribed steps you need to take in order to change the user account privilege with the help of the Control Panel application.
Step 1: Launch the Control Panel by either searching it out from the start menu or from RUN(Win + R), type “control” and hit enter.
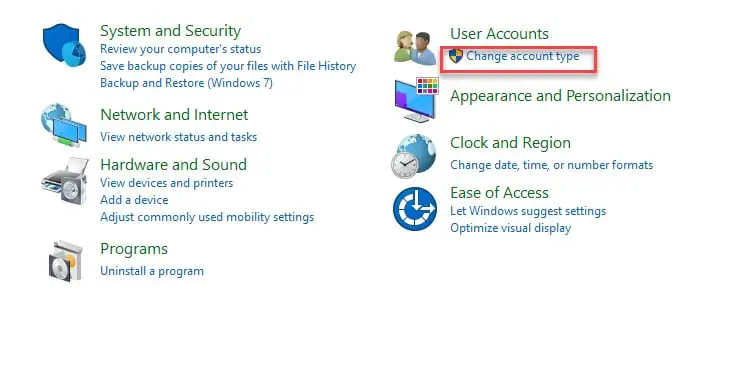
Step 2: From the appeared screen, click on Change Account type placed under the User Account.
Step 3: Now, choose the user account who is to be given the administrator privilege.
Step 4: Then click will redirect you to the change and account window, there you need to click on Change the account type.
Step 5: Now, change the account type to the administrator and then click on Change Account type.
After the completion of the process, you need to restart your computer and you are good to go.
4. Make your account administrator by the Command Prompt
The following are the prescribed steps you need to take in order to change the user account privilege with the help of the Command Prompt application.
Step 1: Launch the command prompt as an admin either by searching it out from the start menu or by RUN(Win + R), type “cmd” and hit ctrl + Shift + enter.
Step 2: Type the following command and hit enter.
net localgroup administrators <name of the account> /add

Your account will be added to the administrator group and it can enjoy the administrator privilege.
After completing the process, you need to restart your computer and you are good to go.
5. Make your account administrator by the PowerShell
The following are the prescribed steps you need to take in order to change the user account privilege with the help of the PowerShell application.
Step 1: Launch the PowerShell as an admin either by searching it out from the start menu or by RUN(Win + R), type “powershell” and hit ctrl + Shift + enter.
Step 2: Type the following command and hit enter.
Add-LocalGroupMember -Group “Administrator” -Member “<name of the accout>”

Your account will be added to the administrator group and it can enjoy the administrator privilege.
After completing the process, you need to restart your computer and you are good to go.
Wrap-up
In this article, we have discussed the administrator privilege in Windows user accounts. This article was divided into two halves, in one half we saw the methods to check for administrator privilege, whereas, in the second half we gave local accounts administrator privilege.


